Product Sales Report Pro
Plugin Requirements
- Self-Hosted WordPress Installation
- WooCommerce 3.4.2 or newer
- PHP ZIP extension installed for XLSX export functionality
- PHP version 7 or greater
- memory_limit 128M
- post_max_size 160M
- max_execution_time 180
- upload_max_filesize 160M
- max_input_time 180
- max_input_vars 5000
- MySQL version 5.6 or greater OR MariaDB version 10.0 or greater.
- HTTPS support
- Nginx or Apache with mod_rewrite module
Introduction
The Product Sales Report Pro plugin generates reports on the quantity and gross sales of individual WooCommerce products sold over a specified date range. Reports can be downloaded in CSV (Comma-Separated Values), XLSX, or XLS format for further analysis in your spreadsheet software, or for import into other software that supports data files in those formats. Visit the Product Sales Report Pro Plugin Page Here
Description
The Product Sales Report Pro plugin helps WooCommerce managers gain deep insights into the performance of their WooCommerce stores. With Product Sales Report Pro, webmasters can quickly and easily generate reports on the quantity and amount of sales of individual WooCommerce products sold over a specified date range. The exported data will offer an overview of the sales performance of individual WooCommerce products, helping brands refine their online sales strategies. Product Sales Report Pro can export data into a range of formats (XLSX, XLS, HTML, or CSV) for further analysis of compatible software.
Major features
- Use a date range preset, or specify the custom start and end dates.
- Report on all products in your store, or limit the report to only include products within certain categories or only specific product IDs.
- Report on all products in your store, or limit the report to only include products within certain categories or only specific product IDs.
- Customize the report sorting order (sort by Product ID, Quantity Sold, or Gross Sales).
- Integrates with the Scheduled Email Reports for WooCommerce plugin to automatically send reports as email attachments on a recurring basis.
- Compatible with the Frontend Reports for WooCommerce plugin to enable access to preset reports from the frontend via a shortcode or widget.
- Report on product variations individually.
- Optionally include products with no sales.
- Report on shipping methods used (Product ID, Product Name, Quantity Sold, and Gross Sales fields only).
- Limit the report to orders with a matching custom meta field (e.g. delivery date).
- Change the names of fields in the report.
- Change the order of the fields/columns in the report.
- Include custom fields defined by WooCommerce or another plugin on a product or product variation.
- Save multiple reports presets to save time when generating different reports.
- Export in Excel (XLSX or XLS) format.
- Send the report as an email attachment.
This guide explains how to use the Product Sales Report Pro plugin features to generate sales metrics for your WooCommerce store making for better planning and smart decision making.
Use the Index on the left to quickly locate usage guidance on specific features. If you haven’t installed Product Sales Report Pro yet, then you should visit the Product Sales Report page where you can explore the plugin’s many features.Good reporting is important for monitoring product sales performance, planning effective sales strategies, better sales forecasting, accurate accounting, inventory management, and maintaining or reducing your sales cycle.
Differences Between Product Sales Report Pro and Export Order Items Pro
Product Sales Report Pro and Export Order Items Pro are very powerful reports plugins for WooCommerce websites. Both of these plugins work together to help create advanced, comprehensive reports for your WooCommerce store. But what are differences between those two?
To learn the differences between the plugins read our blog article that includes a great visual reference — a comparison table.
Initial Setup
To use the premium version of Product Sales Report Pro for WooCommerce, install and activate the plugin on your WordPress and WooCommerce enabled website. If you are new to WordPress, here is a helpful guide on how to install WordPress plugins.
Overview & Activation
Product Sales Report Pro integrates seamlessly with WordPress. After installing and activating the plugin, a new Product Sales Report item is added to the WooCommerce menu. If you are using the Pro version of the Product Sales Report plugin, the first time you visit the settings page you will be required to add your license key in the License tab. The license key can be found in the email sent to you after successfully purchasing our product and displayed after the checkout process. Members can find their license key in the members area. On WP Zone click My Account > Membership Details and click the View Full Details button to reveal your license key.
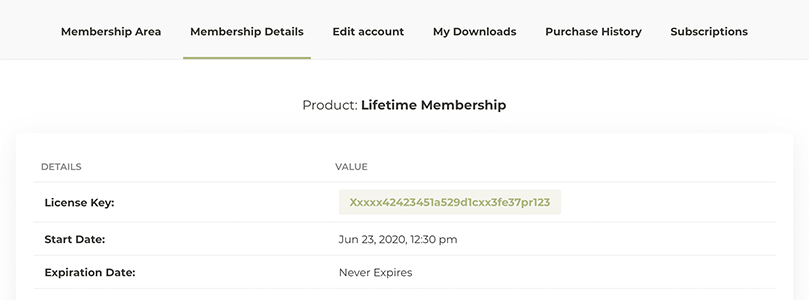
Add it in your WordPress dashboard and Click Activate License. Annual and Lifetime Members are able to use this key across all our plugins, themes and other premium products. If you have an issue with your license key please contact a member of our support team for assistance.
Report Settings Overview
The Reports Settings dashboard is where you configure your reports, save them as presets for reuse, and download or email your reports with a click. In the Pro version of Product Sales Report you will see an option to create a preset. We will cover the process of creating and working with presets in the Working With Presets section of our usage document. This option is available through the entire creation process above each of the settings tabs. Adding a name for your report and clicking save will save the current settings of your report as a preset that can be opened and used again at anytime.
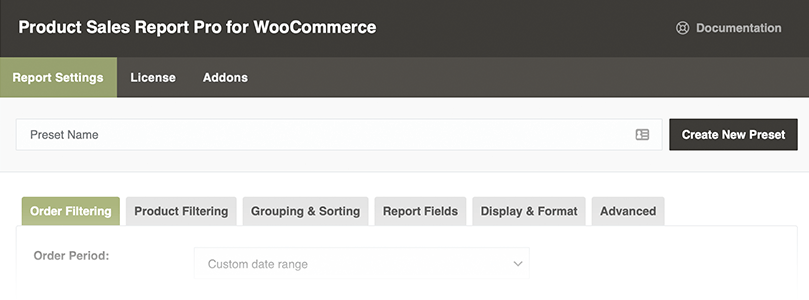
Settings Tabs
In this section we will cover each of the configuration tabs and the options available for creating, sorting, styling, sharing, and formatting your ecommerce sales reports.
Configuration & Settings Tabs:
- Presets (Only visible after creating a preset) - Download, edit, or delete your saved sales report settings
- Order Filtering - Include or exclude specific items from your report with conditional logic, date range, and customer information
- Product Filtering - Advanced sorting based on product type, category, tags, ID, fields, and status
- Grouping & Sorting - Further subdivide the report in addition to Products and Product Variations (if applicable) and results ordering
- Report Fields - Choose which fields to include in a report
- Display & Format - Number of products to included, file format, and spreadsheet structure settings
- Advanced - Buffering, timeout configuration, plugin conflict resolution, debugging, and CSS styling options

At the bottom of the Report Settings is a Download Report button, a field for entering an email address, and an Email Report button.

Order Filtering
The Order Filtering tab provides options and conditional logic for configuring what orders should be included in your report. In this section we will cover each of the configuration options for including and excluding orders.
Order Period
This is the orders you want included in your sales report based on one of the preset date ranges or a custom rage that you choose.
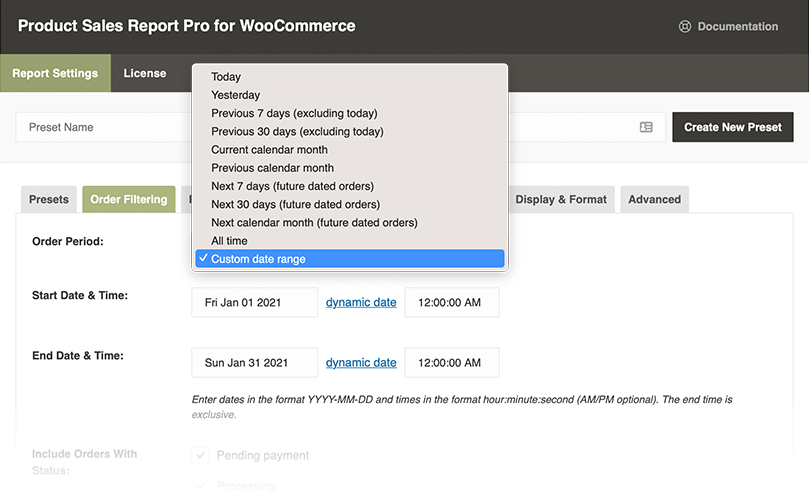
Time period sorting options include:
- Today
- Yesterday
- Previous 7 days (excluding today)
- Previous 30 days (excluding today)
- Current calendar month
- Previous calendar month
- Next 7 days (future dated orders)
- Next 30 days (future dated orders)
- Next calendar month (future dated orders)
- All time
- Custom date range
Choosing any of the presets will generate a report for items purchased in that time period.
Fixed Times Times must be entered in the format HH:MM:SS (with optional AM/PM), and the end time is exclusive (i.e. only orders placed before the specified end time are included). Do not specify the midnight hour as "00"; it should be specified as 12 AM.
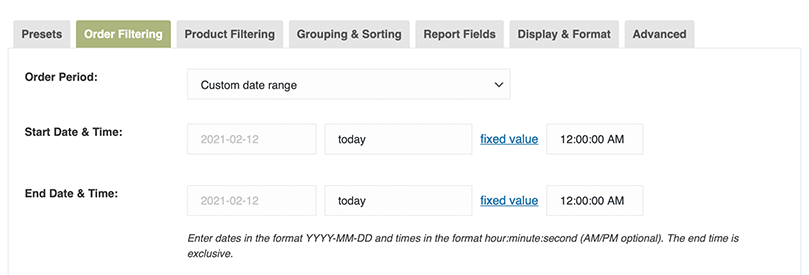
Dynamic Date The Dynamic Date feature allows you to specify an expression which will be used to automatically calculate the report date relative to the date on which the report is run. Read more about date range logic and available expressions in the Understanding Fields, Conditions, and Dynamic Ranges section of this document. To switch back to the fixed value date feature, click the "fixed date" link.
Custom date range and setting the correct end date/time
Understanding Date/Time Specification Errors
When a custom date/time range is utilized and not applied as intended, as indicated by debug outputs showing the date "1970-01-01" instead of the specified date, it is often indicative of incorrect date/time specification. This issue frequently arises from a mix-up between the 24-hour format (e.g., "00:00:00" or "23:00:00") and the 12-hour AM/PM format, leading to invalid entries such as "00:00:00 AM" or "23:59:59 PM". Such entries are invalid due to the use of a 24-hour format alongside AM/PM indicators. To ensure proper application, time should be specified either in the 24-hour format without AM/PM (e.g., "00:00:00" or "23:59:59") or in the 12-hour format with AM/PM (e.g., "12:00:00 AM" or "11:59:59 PM").
Exclusive End Date/Time in Reporting
In the reporting plugin, the end date/time for generating a report is treated as exclusive, meaning that the specified end time is not included in the report's coverage. Documentation may highlight this feature, yet there is a common observation where the end time is set to "11:59:59 PM" for intending to encompass an entire day's data. For accurate reporting that includes all orders up to the end of a specified day, the recommended practice is to set the end time to midnight of the following day. For instance, to accurately report on all orders for the year 2023 starting from January 1st, 2023, the end time should be set to January 1st, 2024, at 12:00:00 AM. This approach ensures inclusion of orders placed right before midnight on the last day of the reporting period. While excluding the final second of the last day might seem inconsequential, it can lead to inaccuracies, such as missing orders placed at 11:59:59 PM on December 31st, 2023, thereby rendering the report incomplete.
Include Orders With Status
WooCommerce marks your orders with a status that is adjusted as the order is being processed. With Product Sales Report Pro you can include or exclude specific orders based on the order status.
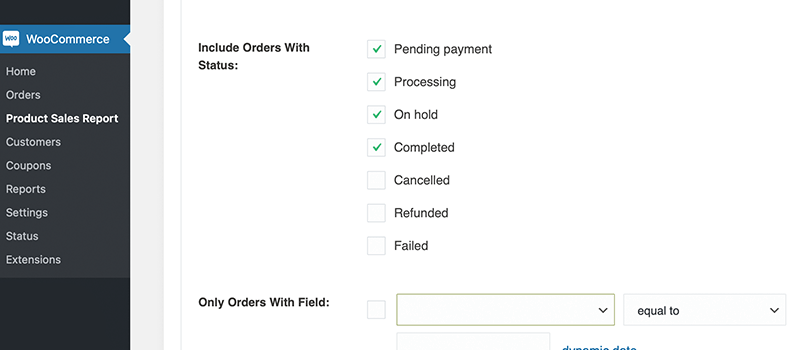
These include:
- Pending payment
- Processing
- On hold
- Completed
- Cancelled
- Refunded
- Failed
A status marked with a check next to it will be included in the report.
Only Orders With Field
The Only Orders With Field option allows you to select one of your order meta fields, set a condition, and only orders matching the specified condition will be counted in the report. Conditional field values include:
- equal to - any order that matches
- not equal to - any order that does not match
- less than - any order that is less than the time period specified
- less than or equal to - any order that matches or less than the time period specified
- greater than - any order that is greater than the time period specified
- greater than or equal to - any order greater than or equal to the time period specified
- Between - any order between the time period specified
- does not exist - report only on orders that do not have the selected meta field
If you use a plugin that records delivery dates associated with orders, you can report on orders having a certain delivery date by choosing the delivery date field, selecting "equal to" as the condition, and entering the date.
Order Item Field Caching
Since version 2.2.48, plugin improves the report settings page by caching order item field names, reducing loading times. To force a field refresh, click the "Refresh Fields" button.
Scheduled Task: The plugin also sets up a daily task to update the field names cache.
Cache Population: If no cached field names are found, it scans the most recent 1,000 order items instead of the entire database.
Include Orders by Customer Role
Filter orders by the purchasers user role. This is the assigned role a customer is logged in as when placing the order. Available options include both WordPress and WooCommerce user types:
- (All Customers)
- (Guest Customers)
- Administrator
- Editor
- Author
- Contributor
- Subscriber
- Customer
- Shop manager
Only Orders from Customers With Field
This option allows you to filter orders by specific customer fields giving you further control over what orders appear in your report based on specific user information.
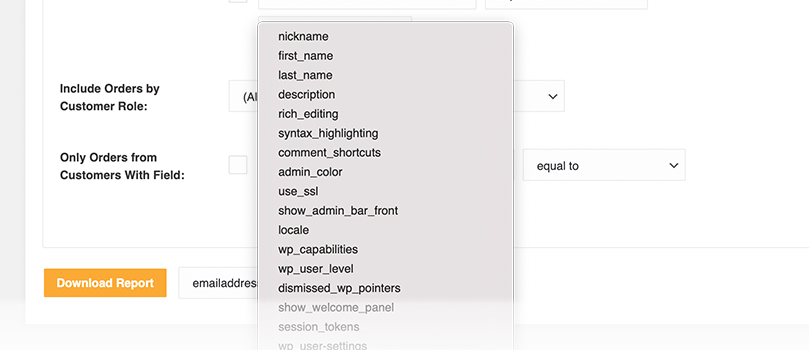
Here is a list of the available fields (this may vary based on your active plugins):
- Nickname
- First_name
- Last_name
- Description
- Rich_editing
- Syntax_highlighting
- Comment_shortcuts
- Admin_color
- Use_ssl
- Show_admin_bar_front
- Locale
- Wp_capabilities
- Wp_user_level
- Dismissed_wp_pointers
- Show_welcome_panel
- Session_tokens
- Wp_user-settings
- Wp_user-settings-time
- Wp_dashboard_quick_press_last_post_id
- Community-events-location
- Ags_welcome_panel
- _pum_dismissed_alerts
- Wc_last_active
- Last_update
- Billing_first_name
- Billing_last_name
- Billing_address_1
- Billing_city
- Billing_state
- Billing_postcode
- Billing_country
- Billing_email
- Billing_phone
- Shipping_method
- Paying_customer
- _order_count
- _last_order
- _woocommerce_tracks_anon_id
- Wp_media_library_mode
- closedpostboxes_post
Selecting one of the fields and assigning a dynamic value will create a report that follows the specific rule you select. Dynamic rules for the Only Orders from Customers With Field option include:
- equal to - any order that matches
- not equal to - any order that does not match
- less than - any order that is less than a specified range
- less than or equal to - any order that matches or less than a specified range
- greater than - any order that is greater than a specified range
- greater than or equal to - any order greater than or equal to a specified range
- Between - any order between a specified range
- does not exist - report only on orders that do not have the selected meta field
Learn more about conditions and fields in the Understanding Fields, Conditions, and Dynamic Ranges section of this document.
Output Rounding
In some cases output may be affected by the limited precision of PHP's floating point numbers (see the warning in the PHP manual: https://www.php.net/manual/en/language.types.float.php). This may occur retrieving values from the database, when the plugin does calculations after retrieving values from the database, such as when a report field consists of two database fields added together, or when calculating the totals row. When this occurs, a tiny fractional error may be introduced each time a calculation is performed, typically less than 0.000000000000001 per calculation or retrieval. This is not likely to affect the accuracy of the output in normal usage where only a few decimal places are used, even if a value has been derived from many calculations such as the totals row in a very long report. However, if output rounding is not in effect, you may see unexpected additional decimal places in some fields in your output. In this case we recommend rounding the output values as needed.
Product Filtering Tab
Where the Order Filtering tab focuses on sorting by order and user specific information, the Product Filtering tab provides report filtering based on features.
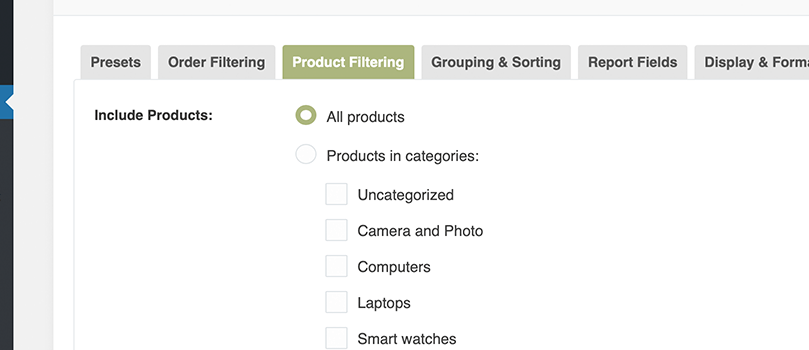
Your sales report can include all the products in your ecommerce store or be sorted by:
- Category
- Product ID
- Tags
- Fields
- Variation (Grouped and Ungrouped)
- Only include products with sales
- Exclude free products
- Include shipping
- And refunded items
To include all products in your store, select the box next to All products and you can move on to the next tab. If you want more target reports the section includes a breakdown of available sorting options.
Products in categories
If the Product in categories radio selector is on, only products in specific categories you have selected will be reported on. Click the box next to the product categories you want included in your report.
Product ID
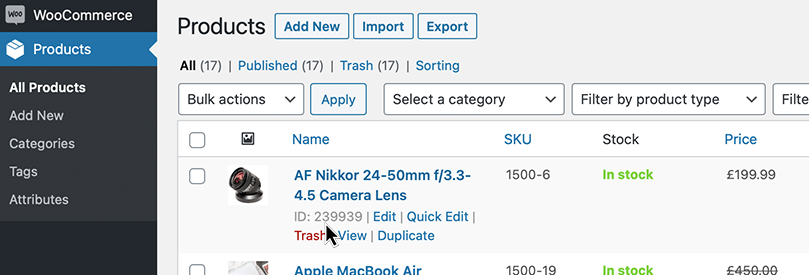
Using product ID is a great way to create a report for specific products. To only include one or more individual product(s), select " Product ID(s)" and enter the ID number(s) of the product(s), separated with commas. To determine the ID of a product, click "Products" in the left sidebar menu and hover over the product's title; the ID will be displayed below the title.
Only Products Tagged
Enabling the Only Products Tagged option allows you to specify one or more product tag names (separated by commas), only products with at least one of the specified tags will be included in the report. You can add tags to the field directly or by using the drop-down below the field.
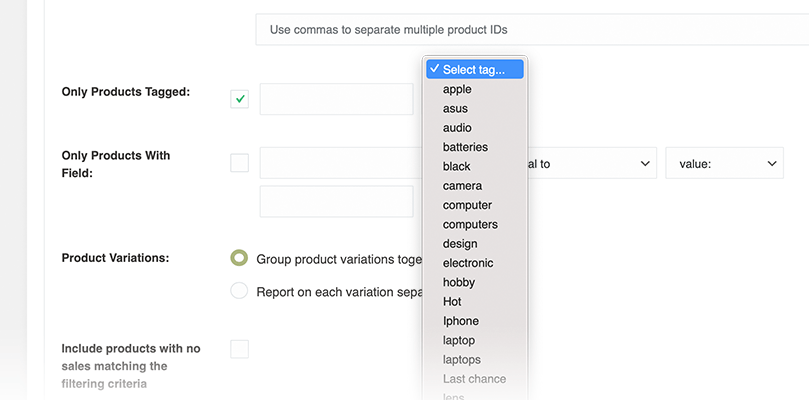
Only Products With Field
If you enable this option and specify a product meta field and condition, only products matching the specified condition will be counted in the report. For variable products, only the parent product is filtered (not individual variations). Learn more about using conditional logic and refining your search with fields in the Understanding Fields, Conditions, and Dynamic Ranges section of this document.

Product Variations
You can treat combine the data for a product or products with a variation or choose to report on each variation separately. Reporting on variations separately can help when determining what size, color, etc. is performing best
- To report all data as grouped, select "Group product variations together".
- To treat each variation as a separate product, select "Report on each variation separately".
Include products with no sales matching the filtering criteria
Check this option if you want the report to list all products matching the product filtering criteria, including those with no sales matching the order filtering criteria during the reporting period. If product variations are reported on separately, all product variations with no sales matching the order filtering criteria will be listed as well. Depending on how many SKUs are in your shop, this report could be very large.
Include unpublished products
Check this option to include products with any post status.
Exclude free products
Check this option if you want to exclude orders with a total amount of zero (after discounts).
Include shipping
Check this option if you would like to include shipping methods as products. For each shipping method used on at least one order that matches the specified date range and other filters, the report will include a row with the shipping method ID as the Product ID, the shipping method title as the Product Name, the number of times that the shipping method was used as the Quantity Sold, and the total shipping cost as the Gross Sales. Other fields will not be included.
Include line-item refunds
If selected, sales amounts and quantities will include deductions for refunds entered during the report date range (regardless of the original order date). If unchecked, line-item refunds will not be reflected in the report (except in specifically refund-related fields such as "Quantity Refunded").
Grouping & Sorting Tab
Grouping gives you the opportunity to further subdivide your report and sorting let’s you set the order your results will be displayed in. In this section we look at how to use the Group By and Sort By features.
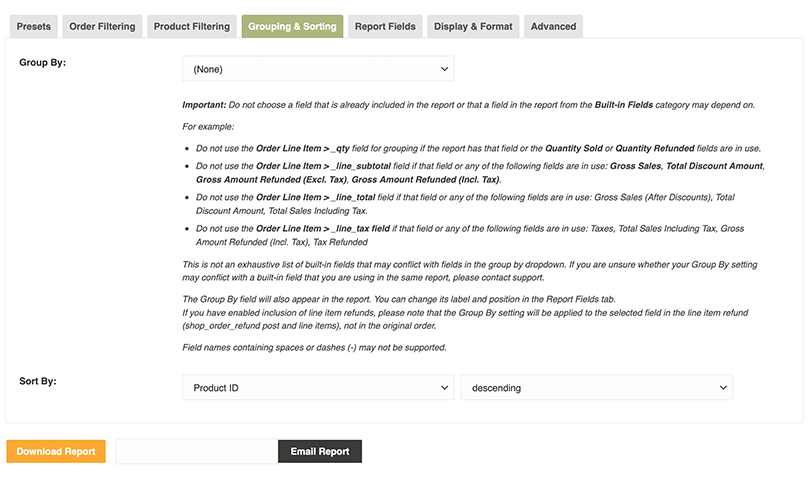
Group By
The Group By dropdown lets you choose an order field or order line item field for further subdividing the report.
For example, choose the "_billing_email" order field to include a separate row in the report for each combination of Product/Variation and billing email.
You can change its name and position of the custom group field in the Report Fields tab. Important: Do not choose a field that is already included in the report. The field you select will also appear in the report.
- Do not use the Order Line Item > _qty field for grouping if the report has that field or the Quantity Sold or Quantity Refunded fields are in use.
- Do not use the Order Line Item > _line_subtotal field if that field or any of the following fields are in use: Gross Sales, Total Discount Amount, Gross Amount Refunded (Excl. Tax), Gross Amount Refunded (Incl. Tax).
- Do not use the Order Line Item > _line_total field if that field or any of the following fields are in use: Gross Sales (After Discounts), Total Discount Amount, Total Sales Including Tax.
- Do not use the Order Line Item > _line_tax field if that field or any of the following fields are in use: Taxes, Total Sales Including Tax, Gross Amount Refunded (Incl. Tax), Tax Refunded
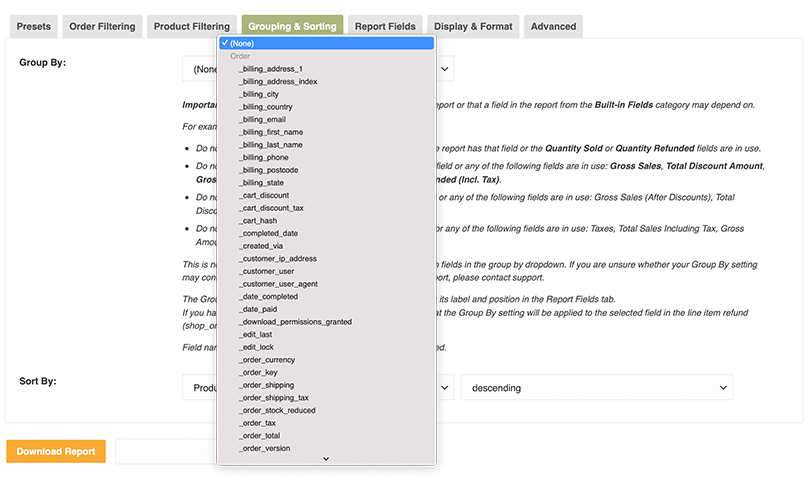
This is not an exhaustive list of built-in fields that may conflict with fields in the group by dropdown. If you are unsure whether your Group By setting may conflict with a built-in field that you are using in the same report, please contact support. The Group By field will also appear in the report. You can change its label and position in the Report Fields tab. If you have enabled inclusion of line item refunds, please note that the Group By setting will be applied to the selected field in the line item refund (shop_order_refund post and line items), not in the original order. Field names containing spaces or dashes (-) may not be supported.
Product Grouping

This option is currently experimental (i.e. any settings besides the default "Group by products or variations (based on ID)"). Please be sure to check the output to ensure it is what you expect!
If the "Group by products or variations (based on SKU)" option is selected, a single row may represent more than one product. In that case:
- For most built-in product fields, if the products have the same value for a given field, the identical values are not repeated (only unique values are shown).
- If a cell displays more than one value, the totals option for that column will be disabled.
- For the "Current Stock Quantity" field, stock of multiple products in the same row is added together and the total is reported. The "Group by products or variations (based on SKU)" option should not affect shipping rows or rows representing products with no sales (these should still be based on individual products/variations by ID).
If one of the "Group by products or variations..." options is not selected, the following options will be of no effect or disabled:
- Product Variations (Group product variations together / Report on each variation separately)
- Include products with no sales matching the filtering criteria
- Include line-item refunds
Also, product related fields will not be accessible and any product related fields already in your report will be removed.
Shipping, if shipping reporting is enabled, will always be reported on separate row(s) from regular products.
Note that if the "Group by product category" option is selected and a product has more than one category, the sale(s) of that product could be included in the report more than once, which could cause totals to be higher than the actual total of the sales in the report. Sales of products with no categories (except shipping, if shipping reporting is enabled) will not be reflected in the report.
Sort By
Choose the order in which results are displayed in the report. You can choose to sort the order by Product ID, Product Name, Quantity Sold, or Gross Sales.

You can either set them to display in:
- Ascending order
- Descending order
Reports Field Tab
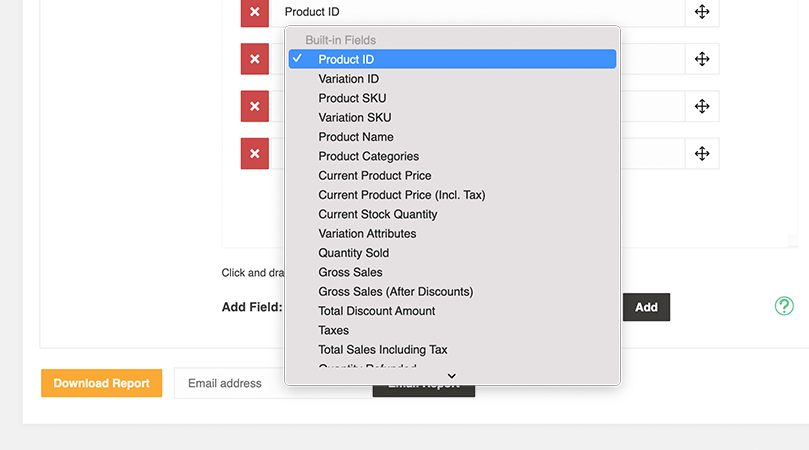
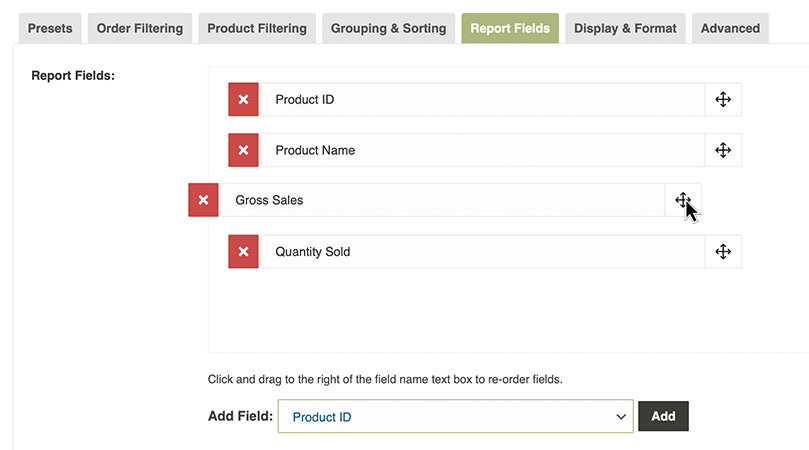
Customize what information is included in your report. Add, reposition or remove fields from your report with the drag and drop field selector.
Add field
To add a field to a report, select the field in the Add Field dropdown and click the Add button.
Remove field
Click the X icon box next to a field name to remove a field from the report. The field will be removed when you save the preset, or (if not editing a preset) when you run the report and reload the report settings page.
if you are using the Group By feature in the Grouping & Sorting tab, the Group By field will be added to the Report Fields list and cannot be removed.
Changing the order of fields
Drag-and-drop the fields to change their order by using the arrows icon to the right of the field.
Editing field name
Edit a field name to change how it is displayed in the report header, if applicable. To edit the field name, in the report field drag and drop editor, click on the field name you want to edit and a cursor will appear. Type or paste in your new field name title.
Display & Format Settings Tab
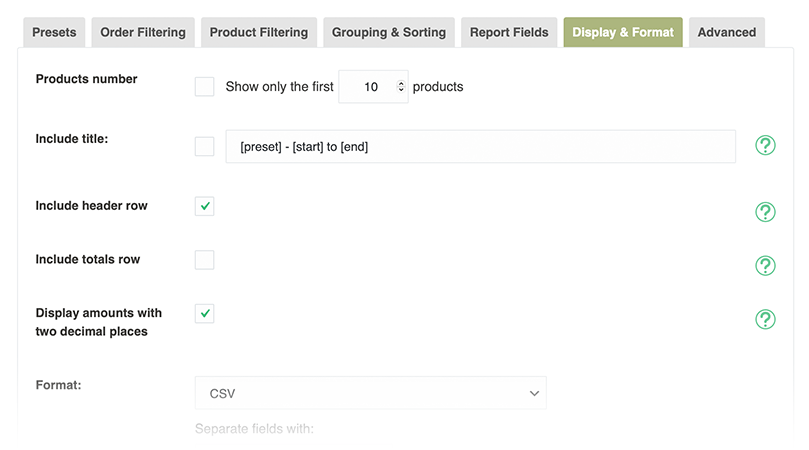
The Display & Format settings options allow you to change how many items are included in the report and other formatting options including:
- A title with dynamic title shortcodes
- The option to include or exclude the title
- Add a totals row
- Display amounts with 2 decimal places
- Choose the export format including CSV configuration options
- The name the file will be saved as on download or when emailed
In this section we will cover each of the settings.
Product number
By default all product sales will be included based on your report configuration. Checking the product number box allows you to limit the number to a specified amount based on the most recent products. Next to "Show only the first" set the number of products that should be included in the report and when the report is generated it will stop with that number of products from your store. If you only want the first results, selecting this option will speed up the report generation and use less resources.
Include Title
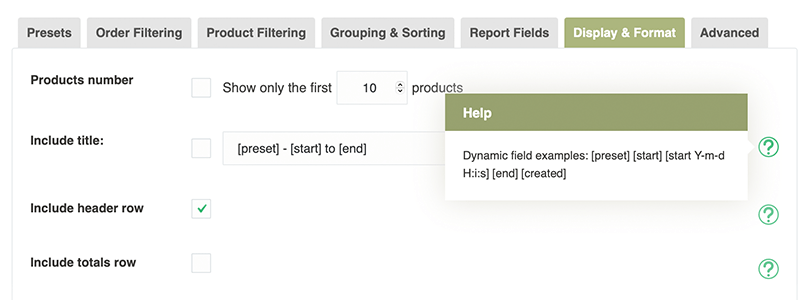
Check this option to include a title as the first row of your report. The title can include a few dynamic fields:
- [preset] - The name of the report preset
- [start] - The start date of the order period
- [end] - The end date of the order period
- [created] - The creation date of the report (i.e. the date on which the report was run)
The date-based fields can optionally be followed by a parameter that specifies the date format; for example: [start Y-m-d]. This can also be used to display the time; for example [start Y-m-d H:i:s] or just [start H:i:s]. For more information on the date format specifier, see the "Parameters > format" section of this page in the PHP manual.
Include header row
Uncheck this option if you do not want the field names included as the first row of the report.
Include totals row
Check this option to include a row with totals of certain numeric fields at the end of the report.
Display amounts with two decimal places
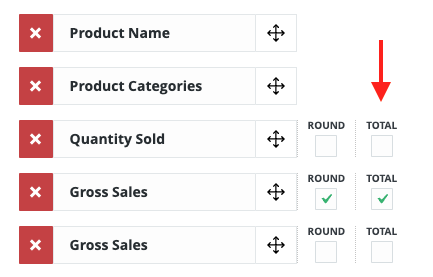
Calculations are done based on the amounts stored in the WooCommerce database without intermediate rounding (except when the intermediate rounding option is enabled and applicable), so selecting this option may introduce small rounding variances. The totals row is based on the rounded values if this option is enabled. This option only applies to the fields with Round checked in the Report Fields tab.
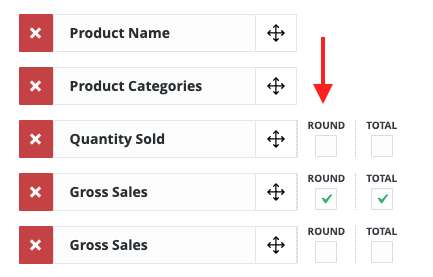
Intermediate rounding
Enabling this option will round certain order line item amounts to two decimal places before they are added to the total amount on any given row. This only applies to the following built-in fields: Gross Sales, Gross Sales (After Discounts), Total Discount Amount, Taxes, Taxes - [tax name], Total Sales Including Tax, Gross Amount Refunded (Excl. Tax), Gross Amount Refunded (Incl. Tax), Tax Refunded. Some of these fields are derived from other fields by addition or subtraction; for those fields, the rounding occurs before addition or subtraction.
Format
Select the file format of the downloaded or emailed report. Product Sales Report Pro has 5 formats to choose from and options for adjusting the structure of the CSV format.
Formats available include:
- CSV
- XLSX
- XLS
- HTML
- HTML (Enhanced)
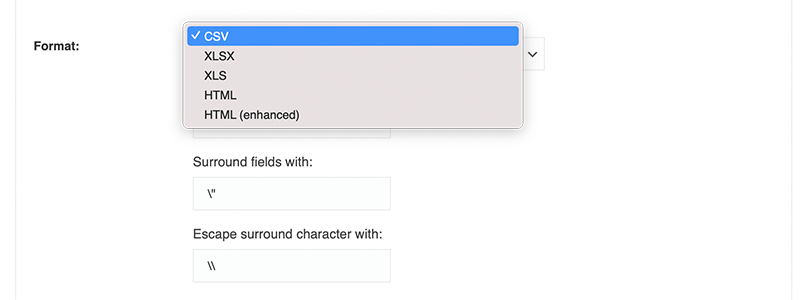
CSV formatting options
If the CSV file format is selected you will be given various options for adjusting the how results are exported.
- Choose how Items in the field are separated - by default items are separated by commas.
- What surrounds your field - by default it is quotation marks
- Escape surround character - by default it is a forward slash
Filename
Enter the name of the report file, without an extension. The filename can include a few dynamic fields. See the documentation for the "Include title" option (above) for more details.
Advanced Tab
The Product Sales Report Pro advanced options give you control of performance when generating reports, troubleshooting, 3rd party compatibility, and styling. In this section we cover the available configuration tools located in this tab.
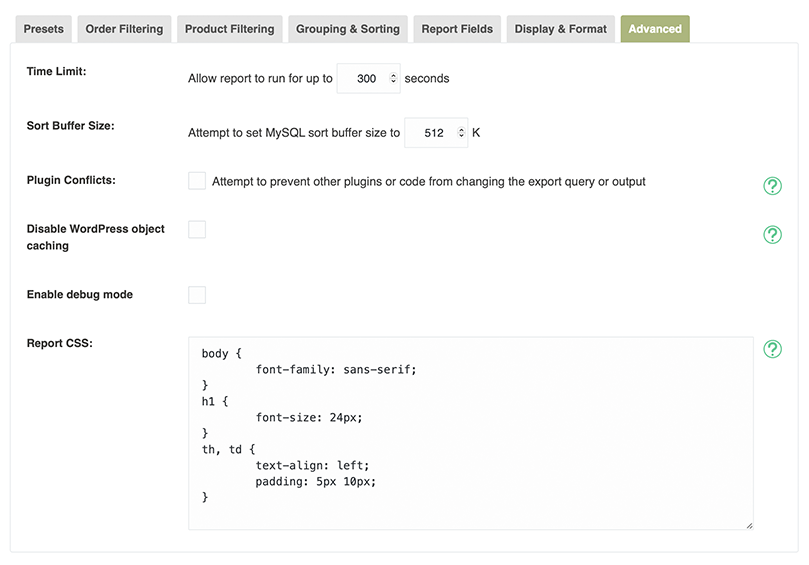
Time Limit
This allows you to modify the PHP execution time limit when the report body does not generate. The default is set to 300 seconds. Try increasing this value if you are getting PHP timeout errors. If you continue receiving a timeout error message when generating reports and this tool does not work with your server, reach out to your hosting provider for additional options.
Disable WordPress object caching
Disable object caching if you are encountering memory limit errors. If the error persists please reachout to our support team.
Enable debug mode
Enable this option to display certain debugging information, such as the main SQL queries used to retrieve sales data.
Debug mode is only designed to work with HTML format. It may work with other formats like CSV, but it will definitely corrupt XSLX files.
Report CSS
This field allows you to add to and modify the CSS styles applied to the "HTML" and "HTML (enhanced)" report formats. For security reasons, only users with the "edit_theme_options" capability are allowed to change this setting.
Working With Presets & The Presets Tab
Sales report presets give you the ability to save your reports to be reused in the future for comparison analytics overtime. Presets can also be downloaded and with other WooCommerce stores.
Creating a Preset
Once you have set up a Product Sales Report, you can save your report settings as a preset. Enter a name for the preset in the field above the report settings tabs and click the " Create New Preset" button. If this is the first preset you have created a new Presets tab will appear. From this tab you can download, edit, or delete your saved report.
Download a Preset
Click the download Icon to the right of any preset name to generate a report based on the presets configurations.

Edit or Duplicate
Clicking the "pencil" icon for a preset will load that preset's settings. You can modify the settings as desired, generate reports with the modified settings, and save the modified settings to the original preset (via the "Save Changes" button above the report tabs) or to a new preset (via the "Create New Preset" button; you'll probably want to edit the name as well).

To rename a preset, edit the preset name in the field above the report settings tabs and click "Save Changes". To duplicate the preset with adjustments click the Create New Preset button.

Delete a Preset
You can delete a report preset by clicking the corresponding "trash" icon in the list on the Presets tab.

Downloading, Exporting, and Sharing
At the bottom of every page is a button for downloading your selected report or enter an email address and click the Email Report button Click the Download Report button to generate and download the report, or enter an email address and click the Email Report button to send it as an email attachment.

If you need would like to schedule your reports to be sent automatically install Scheduled Email Reports for WooCommerce to expand the functionality of Product Sales Report. Members get access to the Scheduled Email Reports add-on for free. Learn how to configure report scheduling on the Scheduled Email Reports documentation.
Understanding Fields, Conditions, and Dynamic Ranges
If you are not familiar with working with fields or conditional logic, opening a long list of field names can be overwhelming. In this section we will provide a basic understanding of what fields are and how to use them for filtering your reports.
Fields
Most of the data for your ecommerce store is being stored in fields in your database. WordPress and WooCommerce uses that data for managing information about your users, products, posts, pages, forms that are submitted, and so on. The field names are often descriptive of what information is being stored but include underscores or dashes between for computing purposes.
For example, the field storing the SKU of your products is titled _sku.
Product Sales Report Pro pulls most of the fields directly from the WordPress database. This means the available fields can vary depending on your configuration and the plugins you have installed. If a third-party plugin adds a meta field to a product, it should appear in the relevant field lists. Note: for performance reasons not all fields may be displayed. If you need a specific field to be included in your report the plugin may have an option to enter a field name that isn't in the list.
Conditions
Conditions can be implemented in different ways, but provide you customizable filtering options. We have tried to make the conditions as descriptive as possible and follow an If - then (If This,Then That) style logic.
If the order’s _billing_first_name equals David, then include it in my sales report.
Date Ranges and Dynamic Date
Fixed Times Times must be entered in the format HH:MM:SS (with optional AM/PM if a 12-hour time is used), and the end time is exclusive (i.e. only orders placed before the specified end time are included). Midnight should be specified as 12 AM. Dynamic Date Range The Dynamic Date feature allows you to specify an expression such as "last Monday", "-14 days", or "yesterday", which will be used to automatically calculate the report date relative to the date on which the report is run. To use this feature, click the "dynamic date" link and enter your expression in the text field that appears below the date field. If your expression is valid, the date field should automatically update to show the calculated date relative to the current date (based on the time zone set in WordPress). A complete list of available expressions that you can use with this feature are located in PHP manual on the Relative Formats page.
Uninstalling Product Sales Report Pro for WooCommerce
To uninstall Product Sales Report Pro it is crucial to follow these steps.
- Deactivate the Product Sales Report Pro plugin in the plugins list.
- Delete the Product Sales Report Pro plugin in the plugins list.
Once the plugin is uninstalled, all Product Sales Report Pro options and settings are deleted.
Frequently Asked Questions
Does that plugin support ACF fields?
All the custom fields created by you or other plugins should be available on the plugin as long as they are not CTP (custom post types).
Is it possible to get customer data (names, emails, billing, shipping, custom cart data) with reports?
If you want to export customer's data additionally, we would suggest using Export Order Items Pro instead. Export Order Items Pro and Product Sales Report Pro are primarily designed for different purposes, while there is some overlap in functionality. Product Sales Report Pro deals mostly with reports on product sales totals while Export Order Items Pro deals with inline order items. So, one will export totals while the other will export inline. With this in mind. Export Order Items allow you to include a totals row at the end of the report (so you could run multiple reports, each filtered by a different product) but it doesn't allow for a total up groupings of sales within a single report like Product Sales Report Pro does, at the same time, you could export inline items of your orders with Export Order Items Pro while you just can't do that on Product Sales Report Pro.
Is there a way to export all PDF-Invoices collected (monthly or yearly) in one list?
Unfortunately no. Our plugin export numbers and text included in most fields available in your WooComerce database. It is not designed to export individual PDFs but rather a complete report on the report fields you want to customize. It can also group by a specific field and report on variations.
Is it possible to export only orders with a specific payment method within a date range?
Yes, it should be possible to reach by using conditions.
It is possible to export by this plugin a one CSV of monthly sales data for simple and variation products?
You can do an export of single products and products with variations with our Product Sales Report Pro plugin. There is an option in our plugin that allows you to either group product variations together as a single field or report each variation on a separate field, if you enable that checkbox you will be able to select each variation field separately on the Report Fields tab and make your export.
Does your product support WordPress multisite?
Our plugin does not support multisite.
Is it possible to filter the sales (number, price...)by the client or better by a group of clients?
Yes, it's possible, by using the "group by" option and selecting the billing_first_name or _last_name field.
When running reports, it only shows X products when we have Y. Do I have to adjust server settings or plugin settings to export more products?
Product Sales Reports uses your actual WooComerce database to show information. If some product is not displayed properly it's because either the custom field is not tagging that product or because it is getting left behind because of the order status. Be sure to include all order status when doing an export.
How can I move plugin from one website to another one?
Try to update the domain address assigned to your license in My Account and then you should be able to activate the product on your new website.
Compatibility
- Self-Hosted WordPress Installation and WooCommerce.
- WordPress Single Site
Incompatible with
- WordPress Multisite
Additional Information and Support
For general WordPress information – wordpress.org. For WooCommerce plugin information WooCommerce.
Want to Buy Similar Products?
If you feel you need to give your website a completely professional finish, or you simply don’t have time to do it yourself, contact us at wpzone.co or send us an email to [email protected], to get our current rates. If you like our products and would like to purchase similar plugins, please visit wpzone.co/shop