Testify
Requirements
- Self-Hosted WordPress Installation
- PHP version 7 or greater
- memory_limit 128M
- post_max_size 64M
- max_execution_time 180
- upload_max_filesize 64M
- max_input_time 180
- max_input_vars 5000
- MySQL version 5.6 or greater OR MariaDB version 10.0 or greater.
- HTTPS support
- Nginx or Apache with mod_rewrite module
The Testify WordPress Plugin
Create an attractive and engaging testimonial section for your website with The Ultimate Testimonial Plugin for WordPress: Testify. Both easy to use and customize, setting up a beautiful and functional testimonial section to showcase positive customer feedback is a breeze. With Testify, you’ll be enticing site visitors and converting them into customers in no time. Visit the Testify Plugin Page Here
Major Features
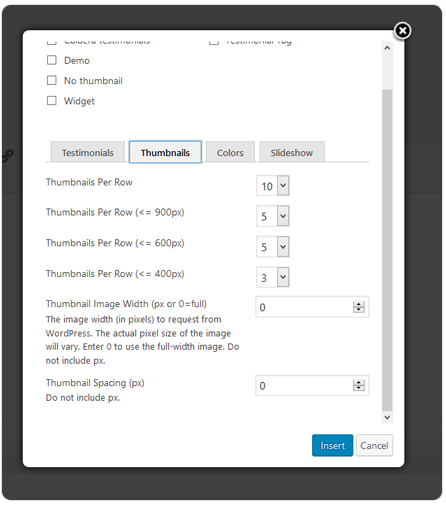
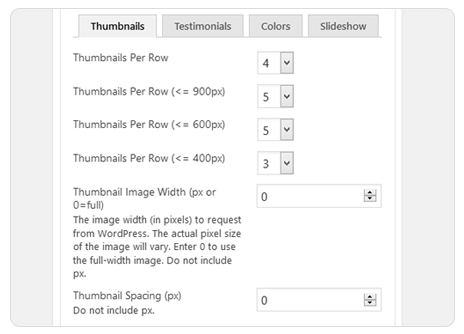
Thumbnails
- Ability to set number of thumbnails per row in different device sizes
- Ability to set thumbnail image width
- Ability to set thumbnail image spacing
Animation and Autoplay
- Ability to set autoplay duration
- Ability to set transition type
- Ability to set transition duration
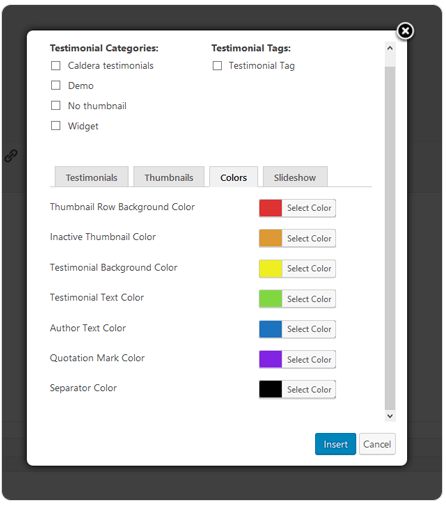
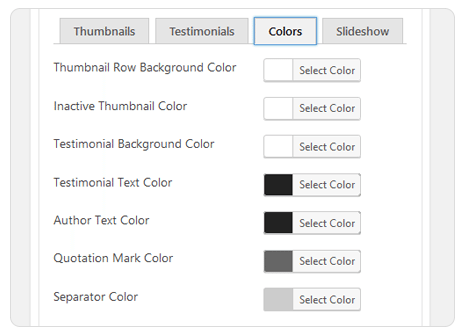
Colors
- Ability to set thumbnail row background color
- Ability to set inactive thumbnail color
- Ability to set testimonial text color
- Ability to set author text color
- Ability to set quotation mark color
- Ability to set separator color
Other Features
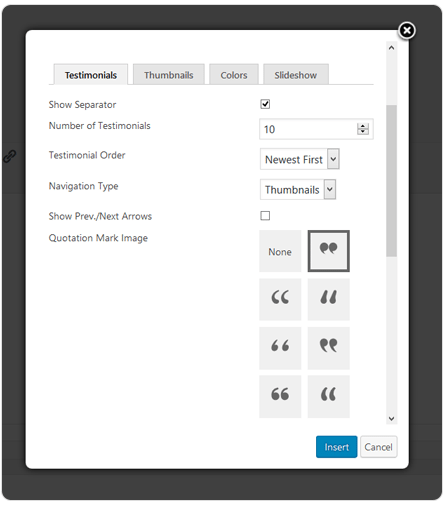
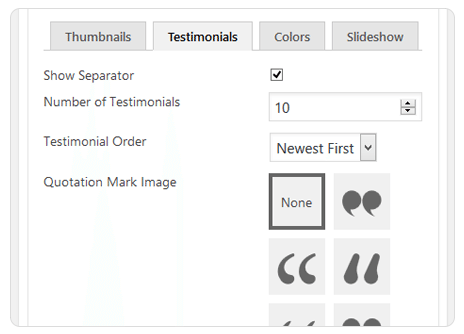
- Ability to set testimonial order (random, ascending, descending)
- Ability to choose navigation type (arrows, thumbnails, dots or none)
- Ability to set quotation mark style & size
- Ability to set testimonial font family & style
- Ability to set testimonial font weight & size
- Ability to set author font family & style
- Ability to set author font weight & size
Installation
Uploading in WordPress Dashboard
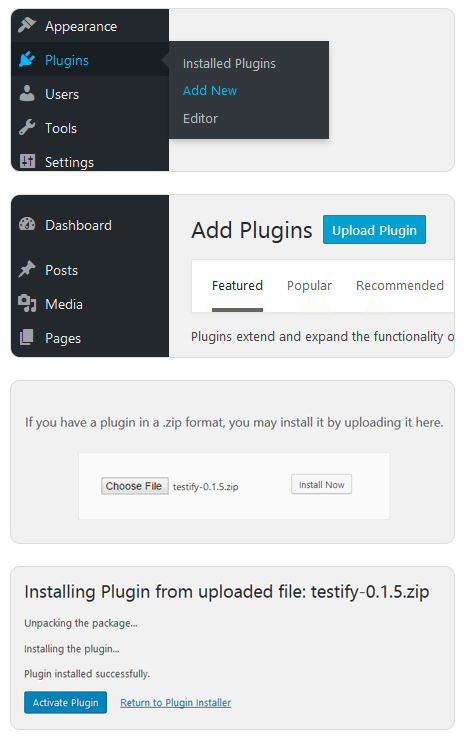
- Navigate to the**"Add New"**in the plugins dashboard
- Navigate to the**"Upload"**area
- SelectTestify.zipfrom your computer
- Click**"Install Now"**
- Activatethe plugin in the Plugin dashboard
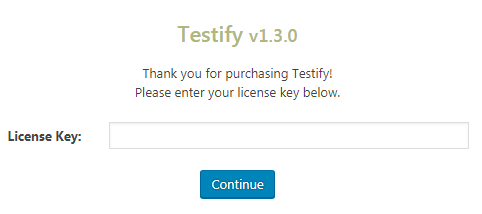
- Enter License Key
Using FTP
- Download the Testify plugin archivefrom WP Zone to your computer.
- After you download the plugin archive to your computer, if it’s in a compressed Zip file, unzip it to access the uncompressed files. If the file is zipped (compressed), use a free web application (such as WinZip) to unzip the plugin.
- Connect to your server using your preferred FTP application.
- Navigate to thewp-contentfolder within the WordPress installation for your website.
- In thewp-contentdirectory, find thepluginsdirectory; upload your Testify plugin files to this location using your FTP client. Congratulations — your Testify plugin is installed, but you still need to activate it.
- Choose Plugins→Plugins on your Dashboard. The Installing Plugin page appears and you should see Testify among the installed plugins.
- Click the Activate link that appears below the Testify plugin’s title.
- Enter License Key
Usage
Add a New Testimonial
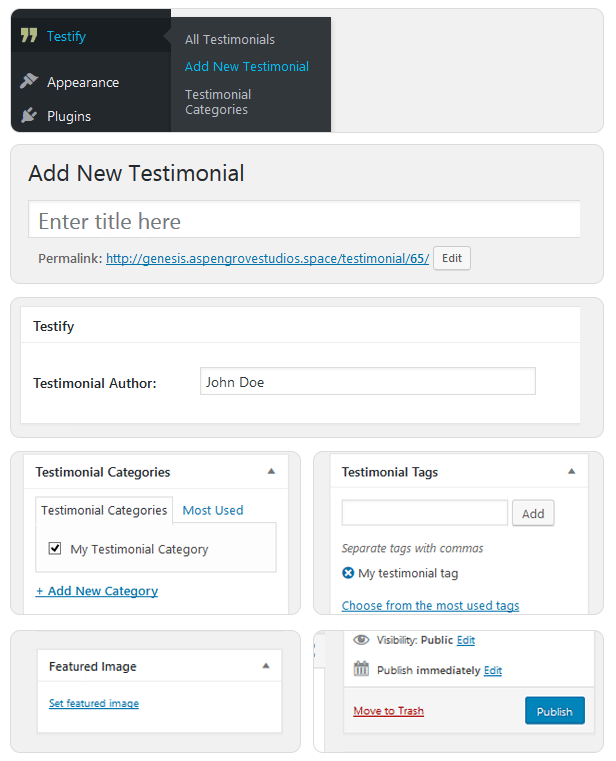
- Navigate to the**"Testify Menu Item"**in the left sidebar
- Click**"Add New Testimonial"**
- Enter a title for your testimonial
- In the WordPress editor,add the testimonial text
- In the**"Testimonial Author"**field, add the name of the person
- You can personalize the testimonial slug in the**"Slug"**field
- Add the author’s portrait in theFeatured Image Settingin the right sidebar
- You can also assign one or more categories to each testimonial
- As well as tags, you can add multiple tags if you wish
- When you’re done, click the**"Publish"**button.
Manage Categories
- Navigate to the**"Testify Menu Item"**in the left sidebar
- Click**"Testimonial Categories"**
- In the right column you will see a list of all existing categories (these are not the same as the blog categories
- In the left column you will see the fields to add new categories to your testimonials
- In the**"Name"**field, add the name of the category
- You can personalize the category slug in the**"Slug"**field
- You can set the category as a Child of an existing category
- You can also add a description to the category (Not all themes show this)
- When you’re done, click the**"Add New Category"**button.

Manage Tags
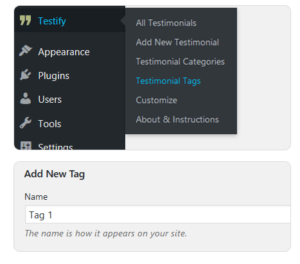
- Navigate to the**"Testify Menu Item"**in the left sidebar
- Click**"Testimonial Tags"**
- In the right column you will see a list of all existing tags (these are not the same as the blog tags)
- In the left column you will see the fields to add new tags to your testimonials
- In the**"Name"**field, add the name of the tag
- You can personalize the tag slug in the**"Slug"**field
- You can also add a description to the tag (Not all themes show this)
- When you’re done, click the**"Add New Tag"**button.
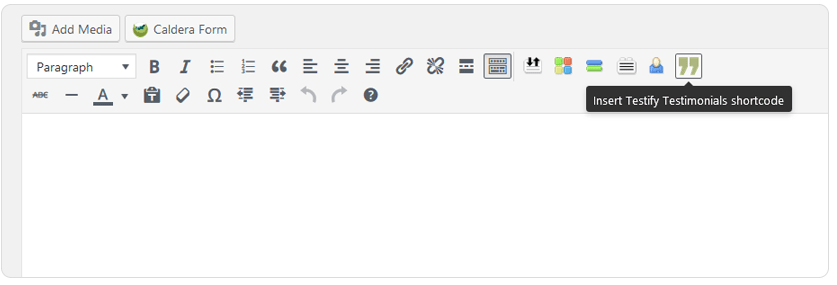
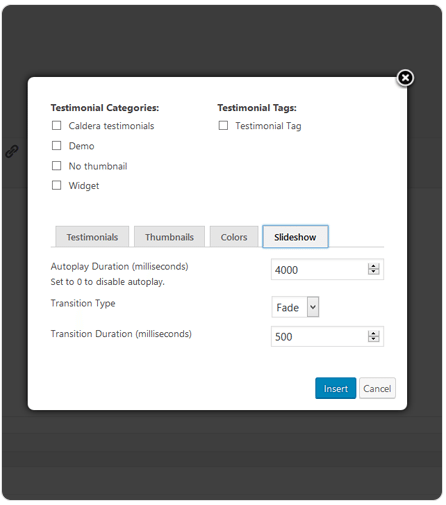
Working with the Shortcode Generator
Create shortcodes quickly and easily by using the Shortcode Generator. Open the WYSWIG editorin the pages and posts andclick on the Testify icon.
Use the shortcode generator to style and design your testimonials in just a few seconds! Display testimonials from specific categories or tags, set color, font and animation properties and customize your testimonial to suit your brand identity or website aesthetic. Once you’ve completed your design, save your testimonial and click the insert button. Testify will automatically generate a shortcode based on your design specifications that can be inserted into your WordPress website
Creating Shortcodes Manually
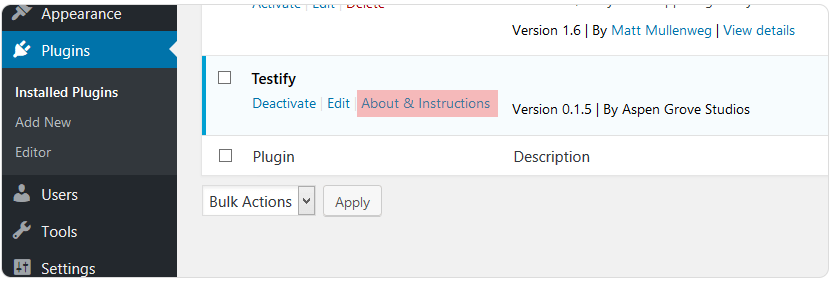
You can also add shortcodes manually. Click the **"About and Instructions"**link in the plugin description on the Plugins Page, open the page with all the instructions to operate the plugin. There you will find extensive instructions on how to manipulate the shortcodes to display your testimonials in different ways.
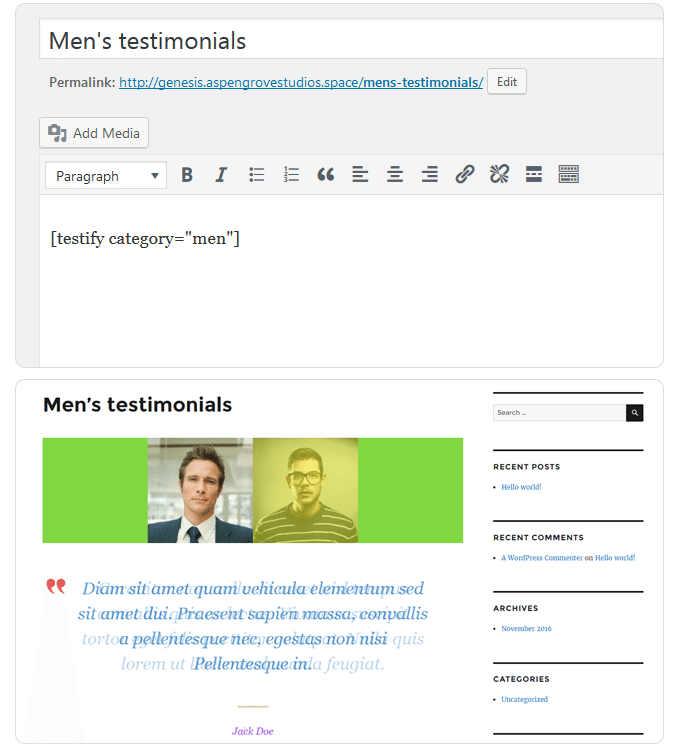
Example of Shortcode use to display Different Categories of Testimonials on different pages (or modules)
- Create a new page (or a new text module)
- Add the**"testify"**shortcode followed by the equal sign (=) and the name of your chosen category between quotation marks. In the example below
[testify category="men"] - When you’re done, click the**"Publish"**button.
The result will show only the testimonials that have that particular category.
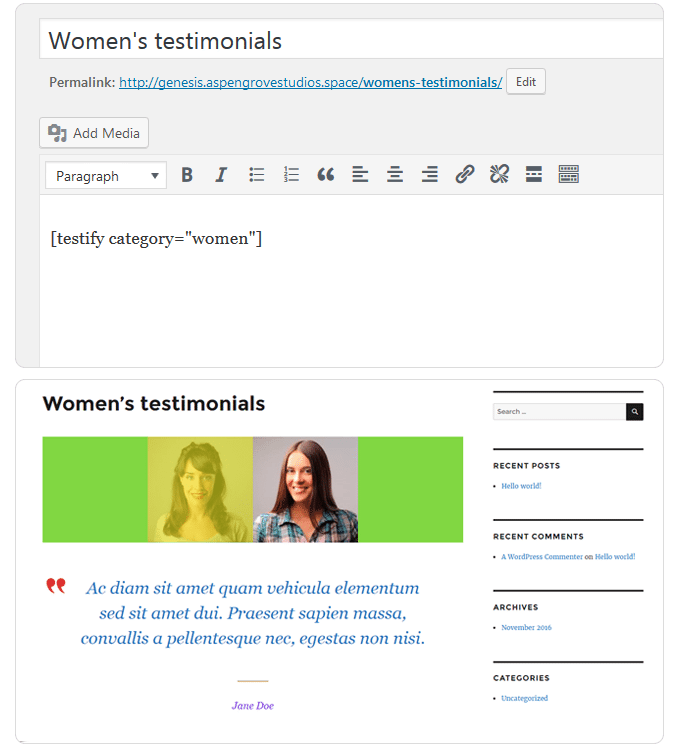
Example of Shortcode use to display Different Categories of Testimonials on different pages (or modules)
- Create a new page (or a new text module)
- Add the**"testify"**shortcode followed bthe equal sign (=) and the name of your chosen category between quotation marks. In the example below
[testify category="women"] - When you’re done, click the "Publish" button.
The result will show only the testimonials that have that particular category.
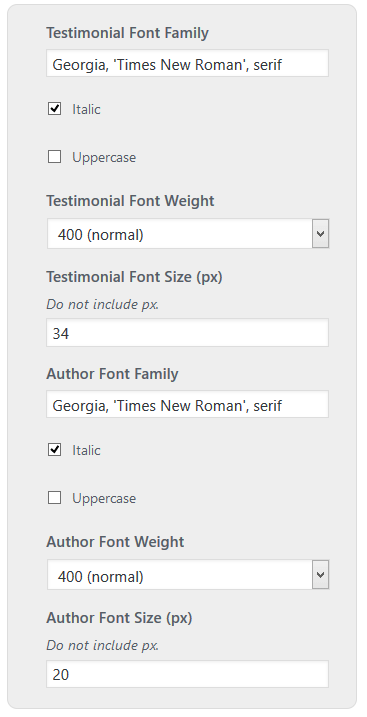
Assigning Fonts
Assigning fonts in Testify is as easy as setting the font-family property with CSS. Navigate to the Testify menu in the Theme Customizer to declare your fonts. Remember to set a number of fallback fonts to ensure desired display of fonts across browsers. Start with the font you want, and end with a generic family, to let the browser pick a similar font in the generic family, if no other fonts are available. More than one font family is specified in a comma-separated list:
'Times New Roman', Georgia, Serif
If the name of a font family is more than one word, it must be in single quotation marks, like: ‘Times New Roman’.
Steps:
- Navigate to the Theme Customizer
- Select Testify -> Testimonials
- Enter Chosen Font Families
- Save & Exit
If you wish to use custom fonts or fonts that are not included in your theme, you must first activate them by following the instructions in these articles:
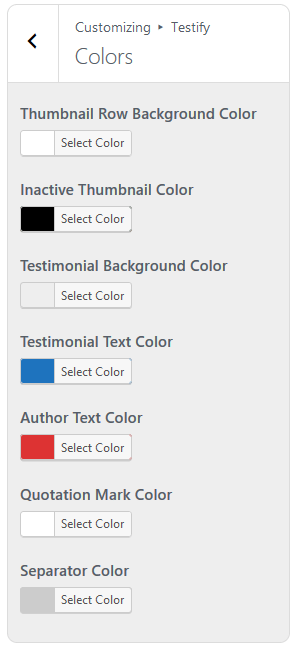
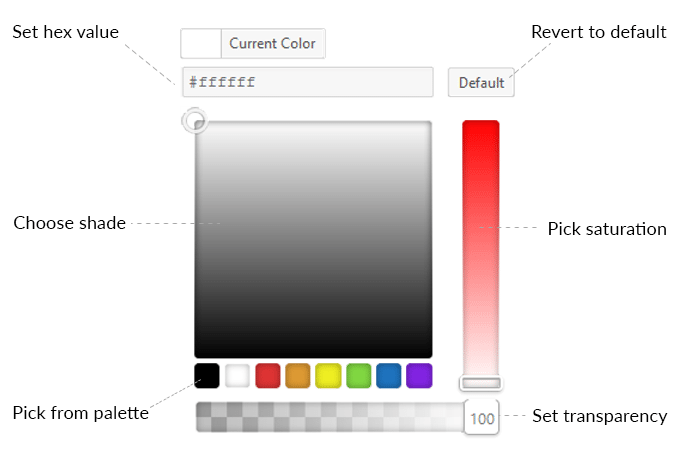
Using the Color Picker
The "Colors" tab in the Customizer has controls to set the colors for backgrounds, thumbnails, text, quotation marks and separator. Click on any of these to access the color picker. Using it is very easy, it has:
- a field to set the color hex value,
- a button to revert to the default color,
- a central shade chooser,
- a standard colors palette,
- a slider to pick the color saturation, and
- a slider to set color transparency
Using the Testify Widget
The Testify widget has the same settings as it does in the Customizer.
You can set the number of thumbnails,widthandspacing
You can choose wether to show a separator, thenumber of testimonials,quotation marks,fonts,font sizesandfont styles
You can set the colorsjust as easily as in the customizer

You can set the animations The interesting part about using the Testify widget is that you can use as many widgets as you want on a given sidebar or widget area and use different ones for every sidebar or widget area that your theme allows.
Using the Testify Divi Module
The Testify Divi Module is a little different than the Testify Widget. In the General Settings tab, you can set
- the number of testimonials ,
- category,
- order,
- alignment,
- Background color,
- Navigation type,
- Navigation Arrows,
- Quotation mark,
- Separator,
- Images & Image Sizes,
- Image shape and border,
- Transition and Animation
- and Thumbnail sizes & Colors.
You can also choose to make the module inactive by device type as with any other Divi Module. On the Advanced Settings tab, you can set the
- fonts,
- the font sizes,
- font color,
- spacing & line height for Header and Testimonial text,
- as well as for Author Name.
There even is a Custom CSS tab for further styling.
Integration with Caldera Forms
Now you can integrate our plugin with Caldera Forms!
Caldera Forms will be sunset/retired on 31 Dec 2021. Security, WordPress compatibility, and maintenance updates for Caldera Forms will continue until that time. We recommend using different form generator plugin.
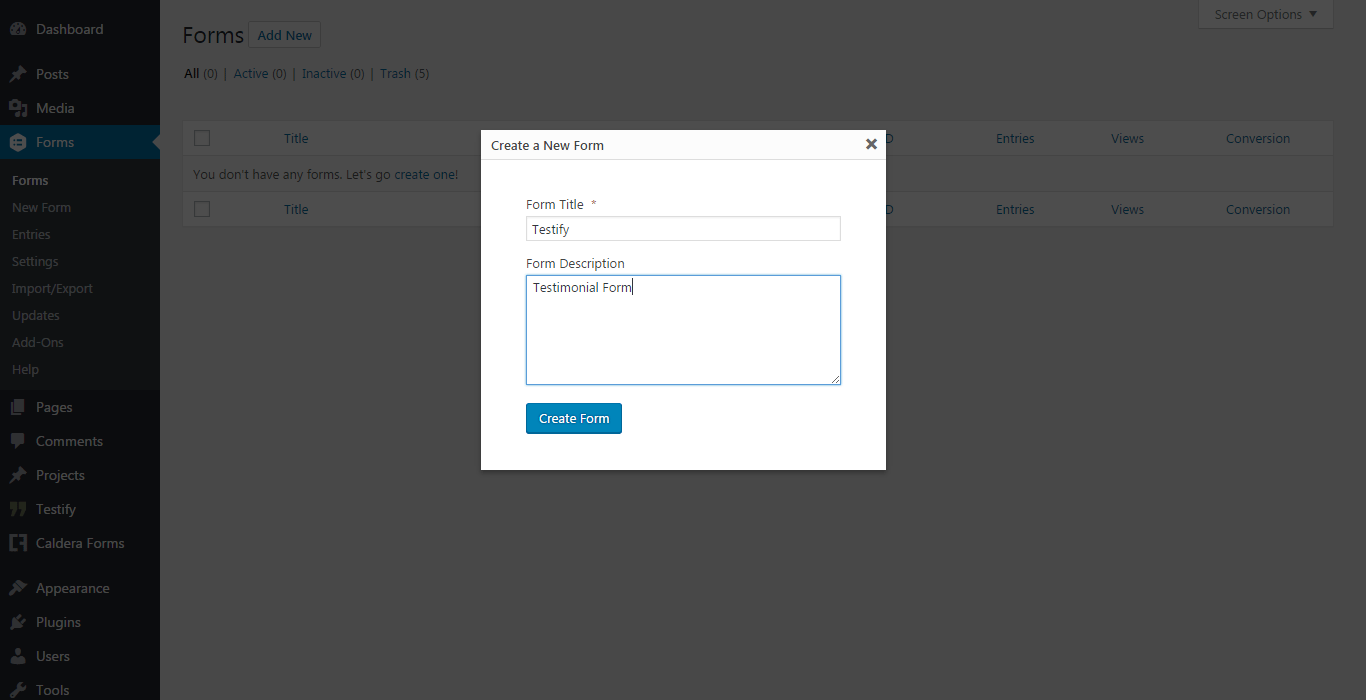
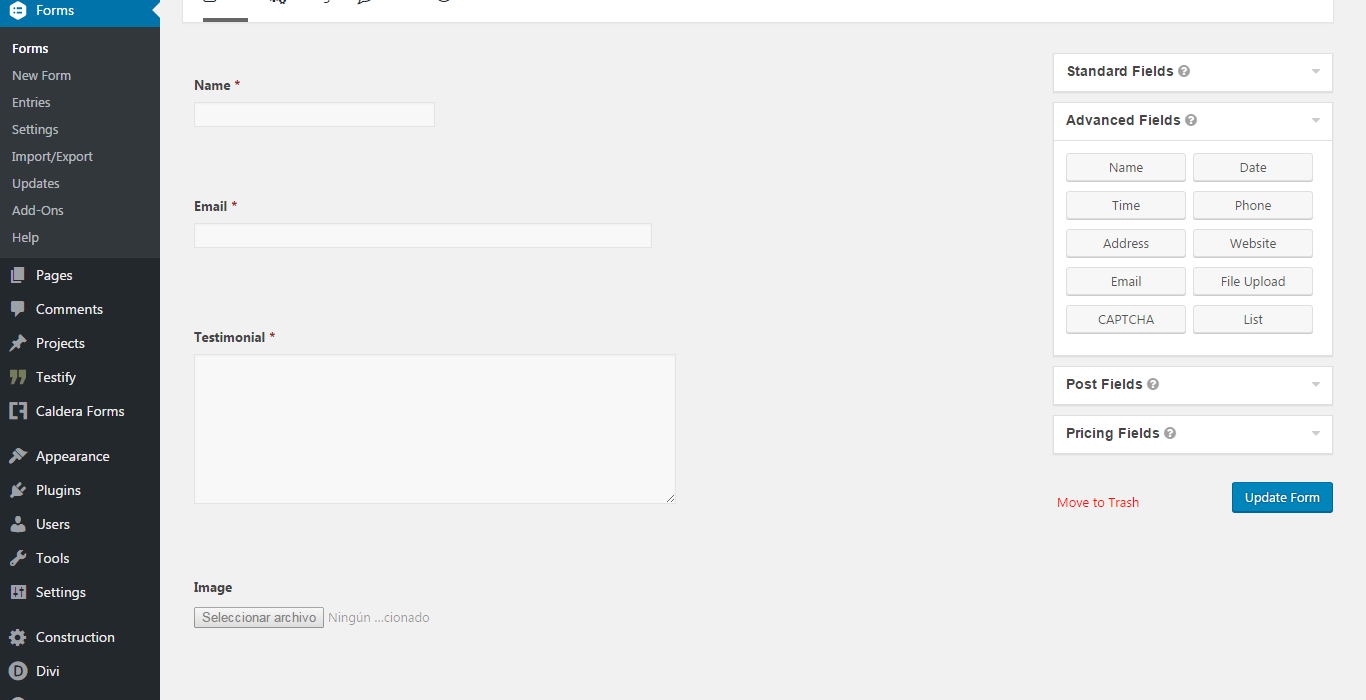
STEP ONE
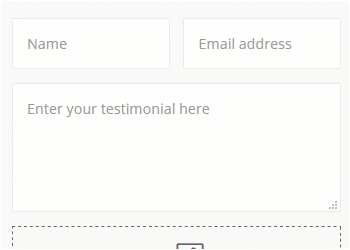
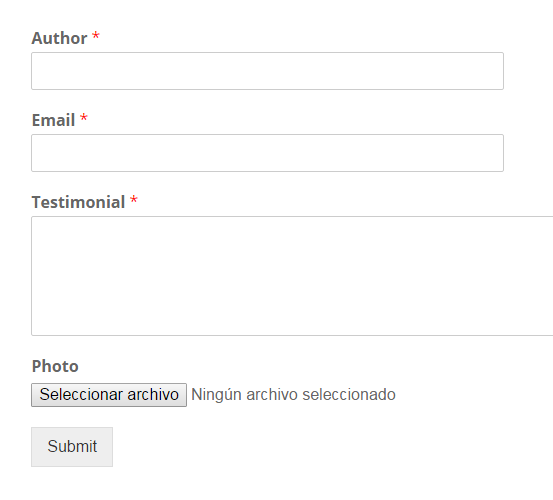
Create a new Caldera Form. Include the Name, Email Address, Textarea and Photo Upload fields.

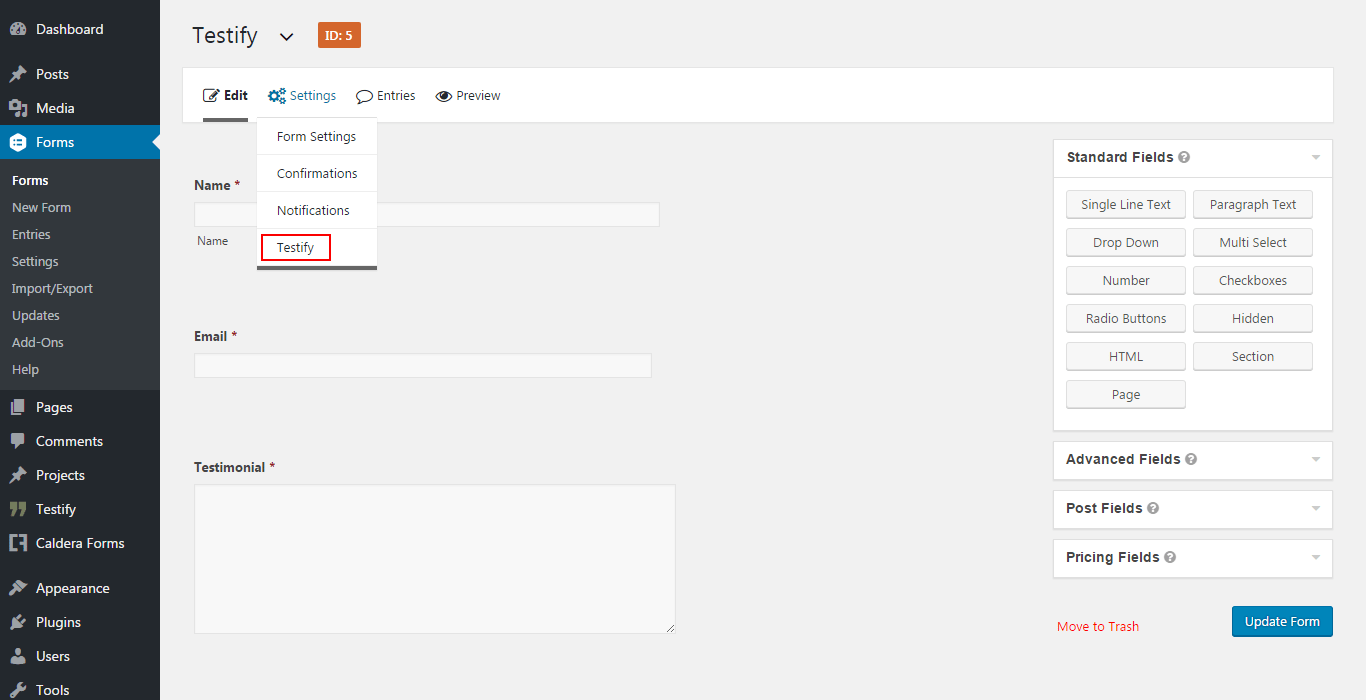
STEP TWO
Integrate Caldera Forms with Testify. Navigate to Processors, click Add Processor and click Use Processor.
STEP THREE
Generate the shortcode from the Caldera Forms plugin and insert it anywhere on your website.
STEP FOUR
Now your happy clients can submit their feedback directly to you via your website!
Integration with Gravity Forms
Now you can integrate our plugin with Gravity Forms!
STEP ONE
Create a new Gravity Form. Include the Name, Email Address, Text Area and File Upload fields.
STEP TWO
Integrate Gravity Forms with Testify. Navigate to Settings, click Testify and then choose the appropriate fields to match the form.

STEP THREE
Generate the shortcode from the Gravity Forms plugin, or use the Gravity Forms button, and insert it anywhere on your website.
STEP FOUR
Now your happy clients can submit their feedback directly to you via your website!
Integration with WP Forms (ONLY WORKS WITH PRO VERSION)
Now you can integrate our plugin with WP Forms!
STEP ONE
Create a new WP Form. by using the pre-made template button provided.
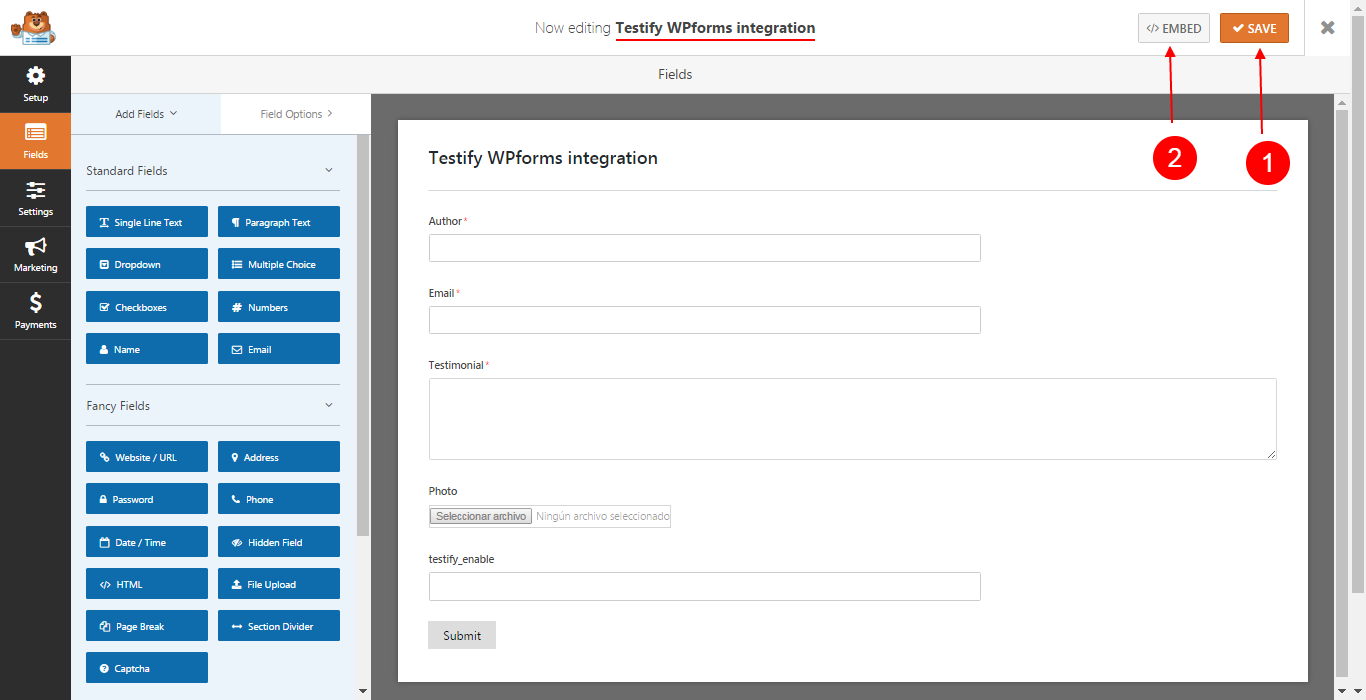
STEP TWO
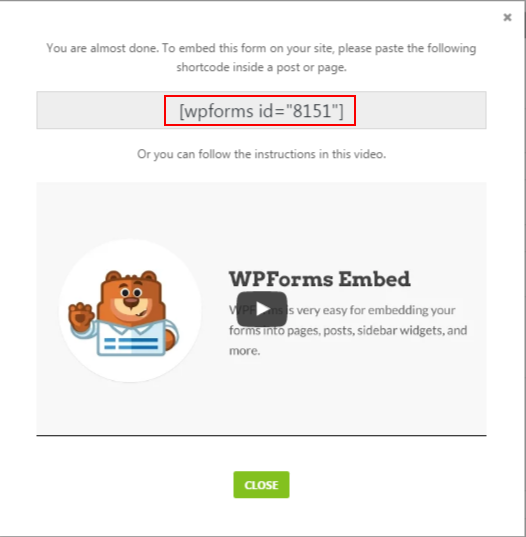
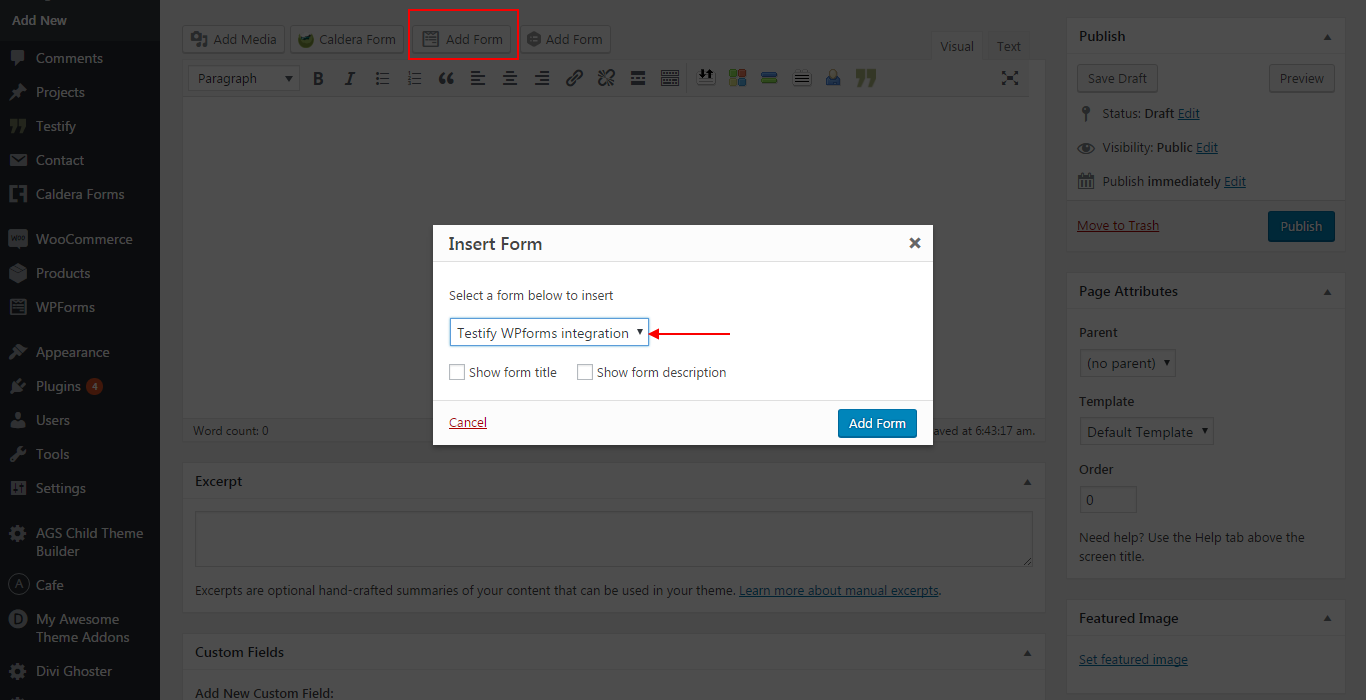
Save form and then click the "embed" button to copy the code needed to include your new Testify Form in any post or page; or, simple navigate to a new or existent post or page and click the WP Forms button located above the text editor, choose the form you just created and click the "Add Form" button.
IMPORTANT
This integration only works with the PRO version of WP Forms. If you want to enjoy integration with WP Forms for your User Submitted testimonials you need to purchase WP Forms PRO.
Now your happy clients can submit their feedback directly to you via your website!
Frequently Asked Questions
Are there any bugs with this plugin?
We have tested this plugin extensively and have found no known bugs or conflicts, but there is always the chance of unforeseen situations and potential bugs. If your website does happen to crash after installing this plugin, please follow WordPress’ procedure on manually deleting a plugin here https://codex.wordpress.org/Managing_Plugins
Will this plugin slow down my site?
This plugin is well developed and extremely lightweight. As with any plugin, this one has the potential to slow down your site, but we estimate the impact to be almost immeasurable.