Divi Ghoster
Requirements
- Self-Hosted WordPress Installation
- Divi Theme or Extra Theme by Elegant Themes
- PHP version 7.2 or greater
- memory_limit 128M
- post_max_size 64M
- max_execution_time 180
- upload_max_filesize 64M
- max_input_time 180
- max_input_vars 5000
- MySQL version 5.6 or greater OR MariaDB version 10.0 or greater.
- HTTPS support
- Nginx or Apache with mod_rewrite module
Divi Ghoster is not compatible with Multisite WordPress Installation.
Description
Divi Ghoster is a white-labeling plugin for Divi. It makes the Divi theme not recognizable on the backend, in most of the source code, and by most theme detectors. Divi Ghoster allows you to add your own branding to the Divi tab in the dashboard, the page builder, page settings, and theme options. You can change the theme name in Appearance > Themes, and hide Divi Ghoster and other Divi plugins from appearing in the plugins list. Divi Ghoster also includes a login page customizer, allowing you to customize the wp-admin page with your background, logo, colors, etc.
Before Installing Divi Ghoster
- Backup your website as you should before installing any plugin
- The Divi Theme (or Divi child theme) must be active
- Change your permalinks to something other than "Plain"
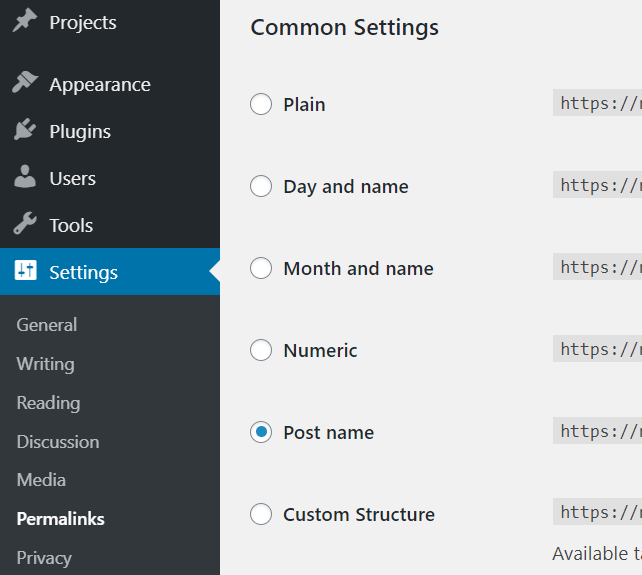
To change your permalinks, go to Settings > Permalinks in the WordPress dashboard and choose any permalink option except for Plain.
Installing Divi Ghoster
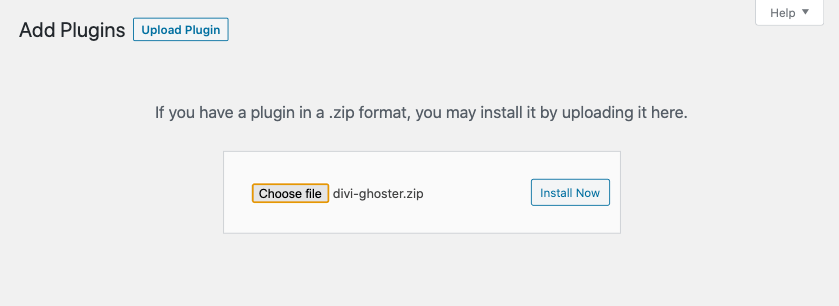
Download the plugin from WP Zone to your computer. To upload the file to your Divi website, go to Plugins in the WordPress dashboard, and select Add New. Select Upload Plugin at the top left of the screen. Select Choose File and navigate to the downloaded file and select it. Click ** Install Now**.
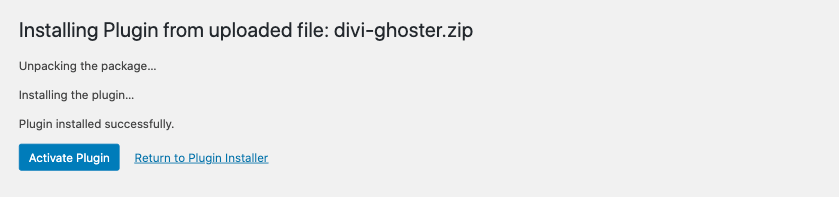
Activate Plugin, enter the license key if needed. Divi Ghoster is now ready to use.
Divi Ghoster Setup
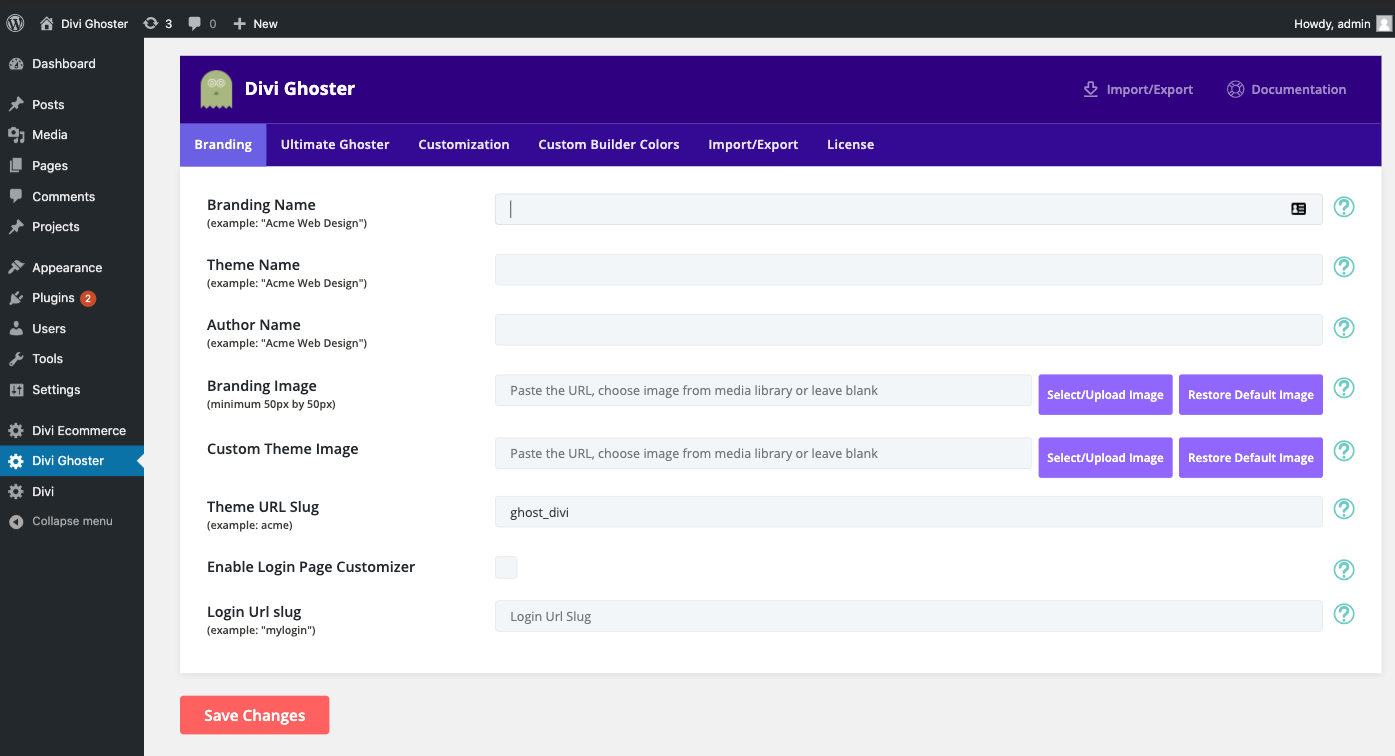
To setup Divi Ghoster, select Divi Ghoster in the WordPress dashboard menu. This opens the Divi Ghoster menu where you can make all of your selections. Go through the tabs, enter your information into the fields, and select Save Changes when you’re finished. You’ll need to refresh the page to see the changes. The fields include an example under the title. The links in the upper right corner allow you to import and export your settings and view the documentation. Click the question marks next to each setting to get a description of what the setting does.Navigate to Settings >> Permalinks and make sure your permalinks are set to something other than "Plain" Branding

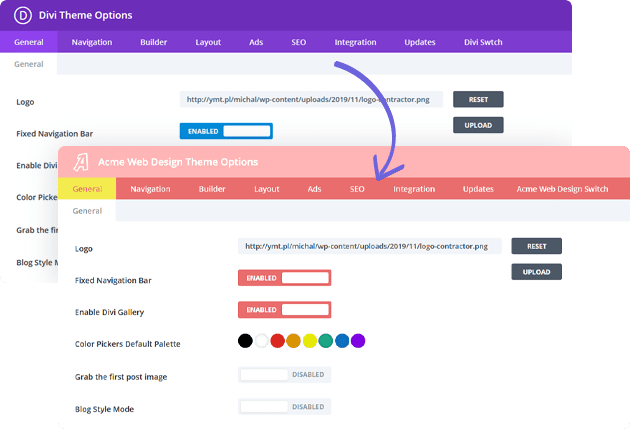
Branding allows you to change the name and associated files of Divi to match your brand.
Branding Name

This is the name of your brand. It can be a company name, product name, etc. This will replace the name "Divi" in the dashboard, page builder, etc.

Here’s the Divi Builder with a new branding name. The name has changed in the dashboard menu and the Divi Ghoster title.
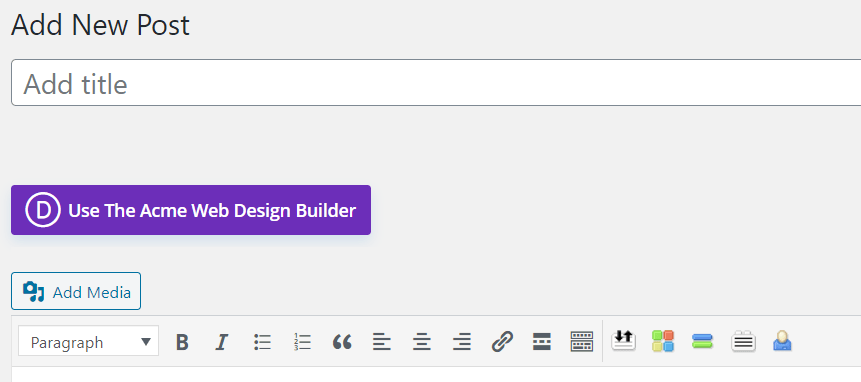
The name has also changed on the Divi Builder in both the classic and Gutenberg editors.
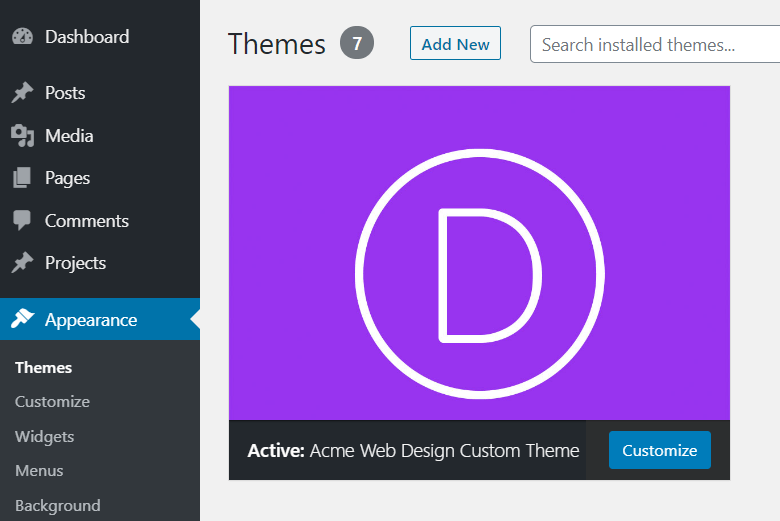
Theme Name

This replaces the theme name that’s displayed in the Appearance > Themes directory. Here’s the theme showing the new name.
Author Name

This replaces the theme author name so you can use your company’s name, your name, or any other name you want.
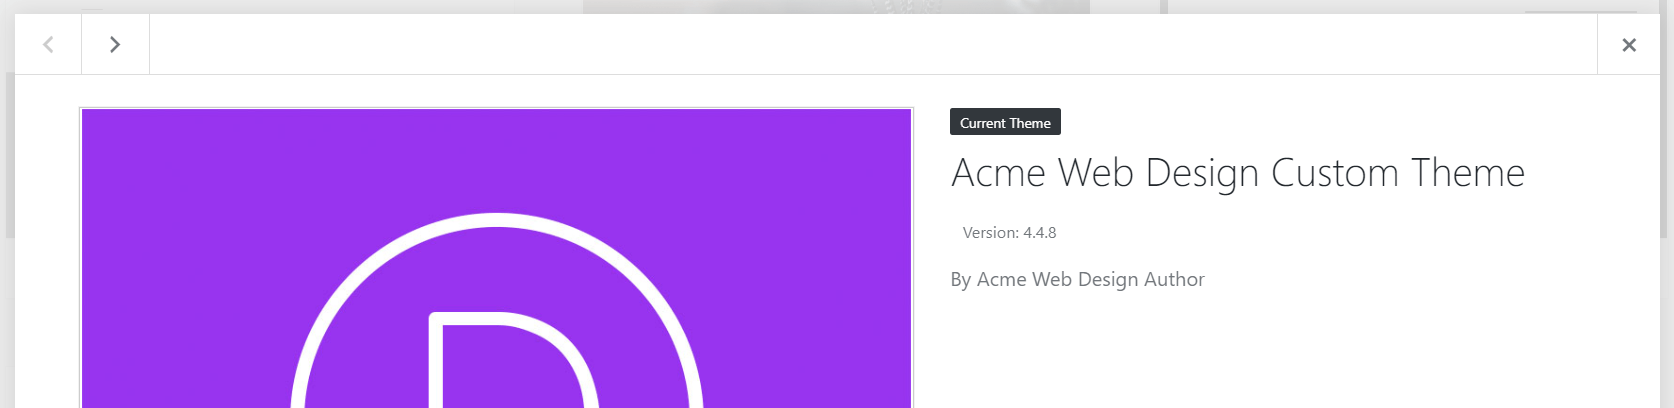
This is the name that displays in the theme details when you click on the theme in the theme directory.
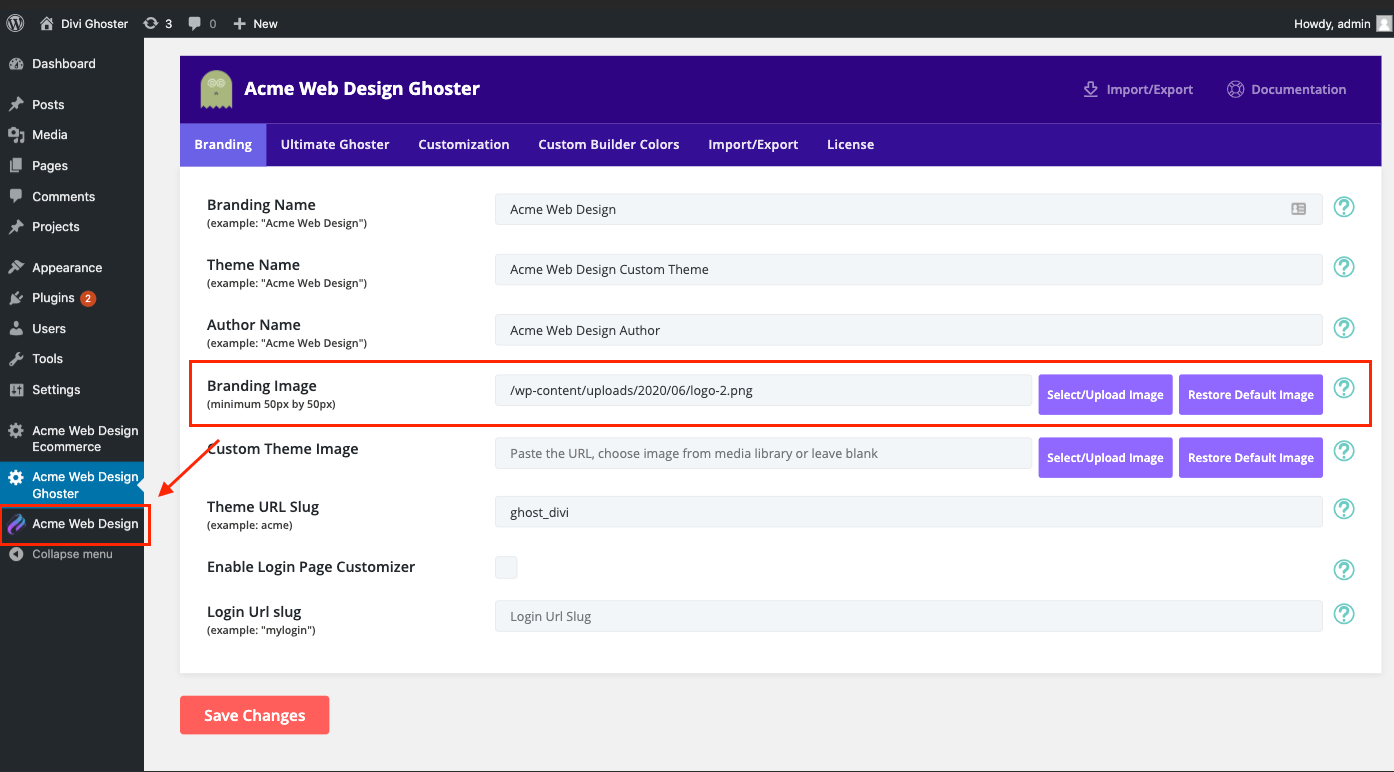
Branding Image
This is the icon that appears on the dashboard, page builder, etc. It should be no smaller than 50px x 50px. Larger files will reduce in size, so it can be larger, but we don’t recommend using a large file. Add the URL into the field or upload the image you want to use. The image displays next to this field. The default image is a gear.
This example uses a logo icon, which also displays in the dashboard menu.
Custom Theme Image

This is the image that displays in the Appearance > Themes directory. A preview is provided next to the field. Enter the URL or upload the image. You can also remove the image. Images should be 1200px x 900px and can be JPG or PNG.
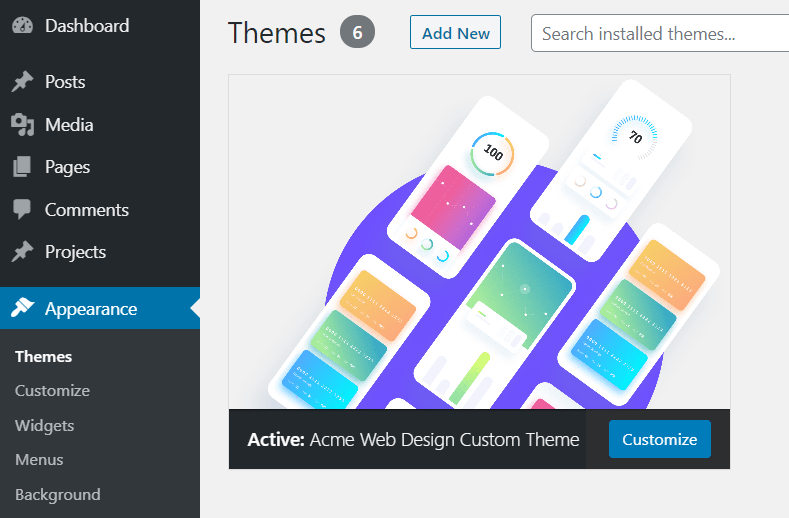
The theme now displays the image that was selected. Make sure you clear cache after saving changes.
Theme URL Slug

This lets you specify the theme slug (the default URL that appears in the theme options. For example, using the slug ghost_divi will display the URL http://yourwebsite.com/wp-admin/admin.php?page=et_ghost_divi Enable Login Page Customizer

Enabling this reveals a button that lets you customize your login page. First, enable the logon customizer and click to save changes. Then, click Login Customizer to begin customizing the page. It will redirect you to the frontend with the theme customizer active so you can add your own logo, colors, and background.
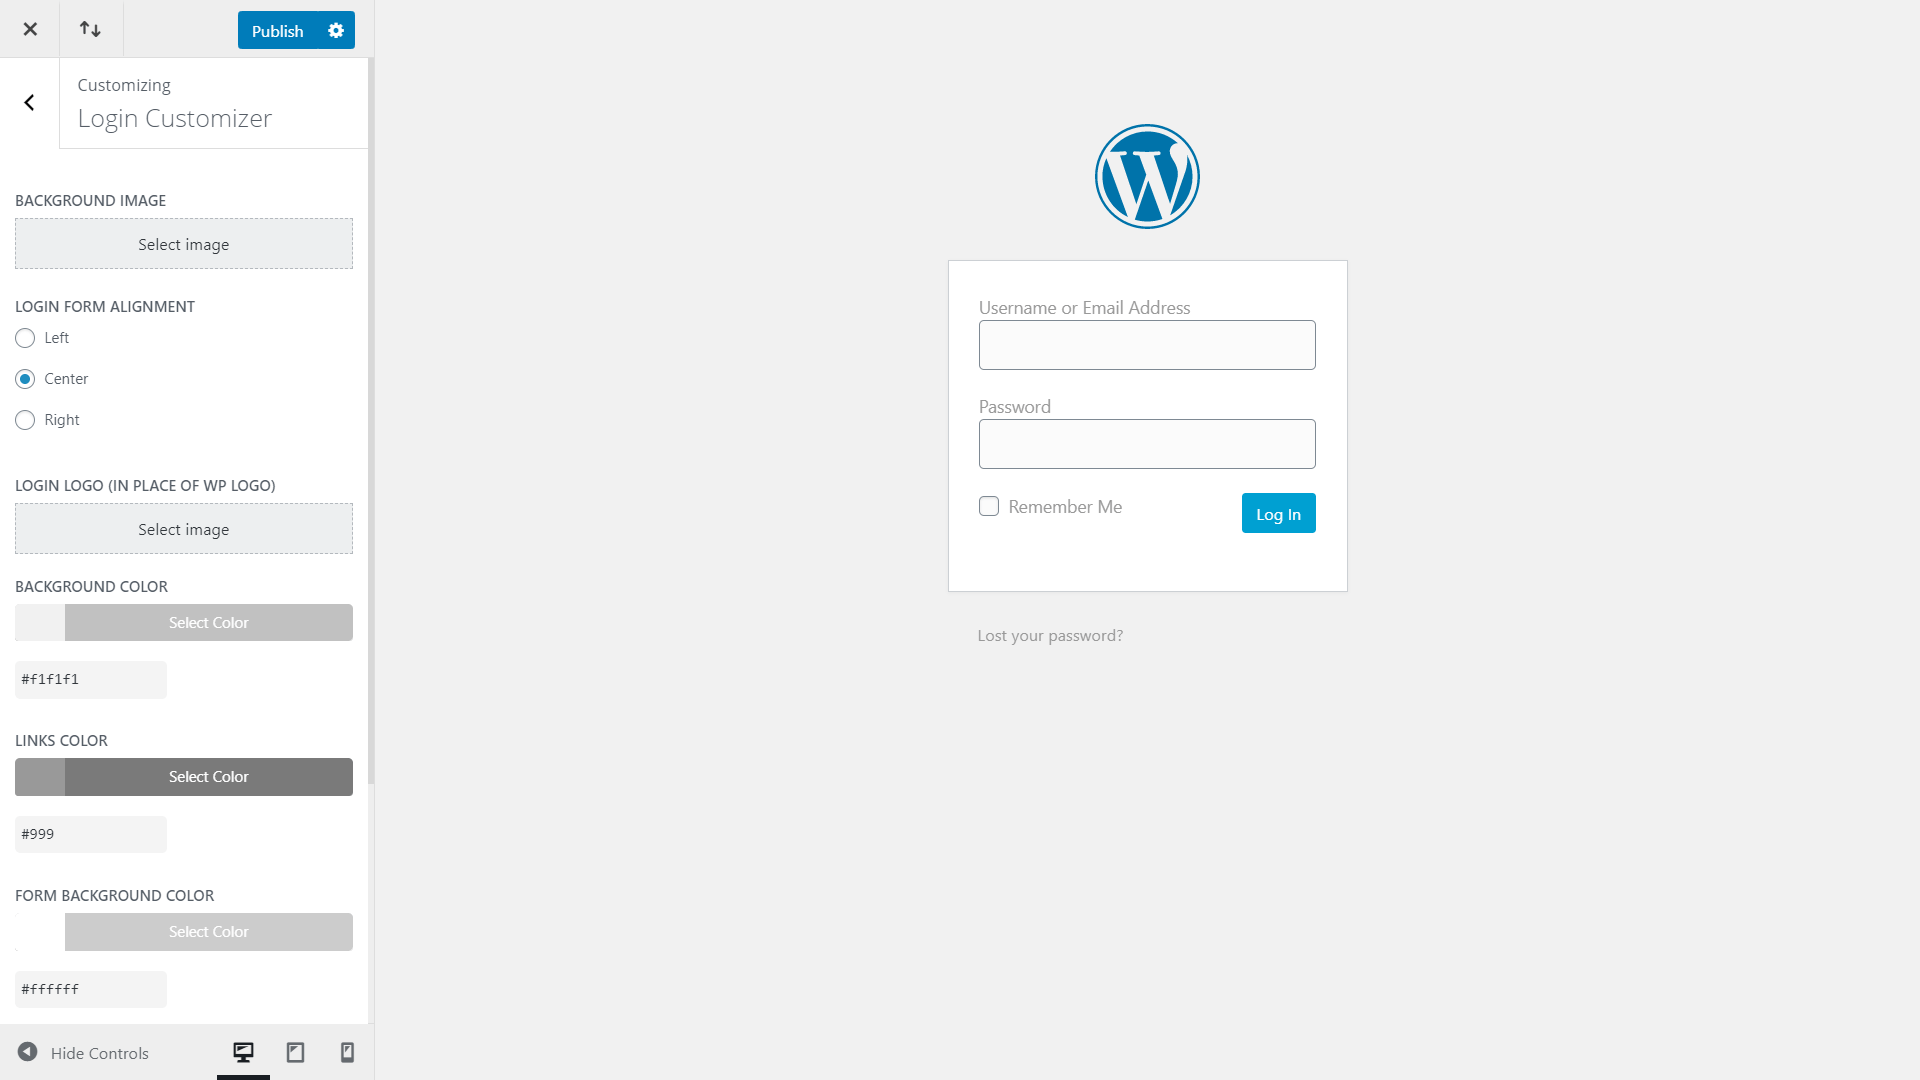
The theme customizer will open to the Login Customizer settings and the login screen will show, where you can make adjustments live.
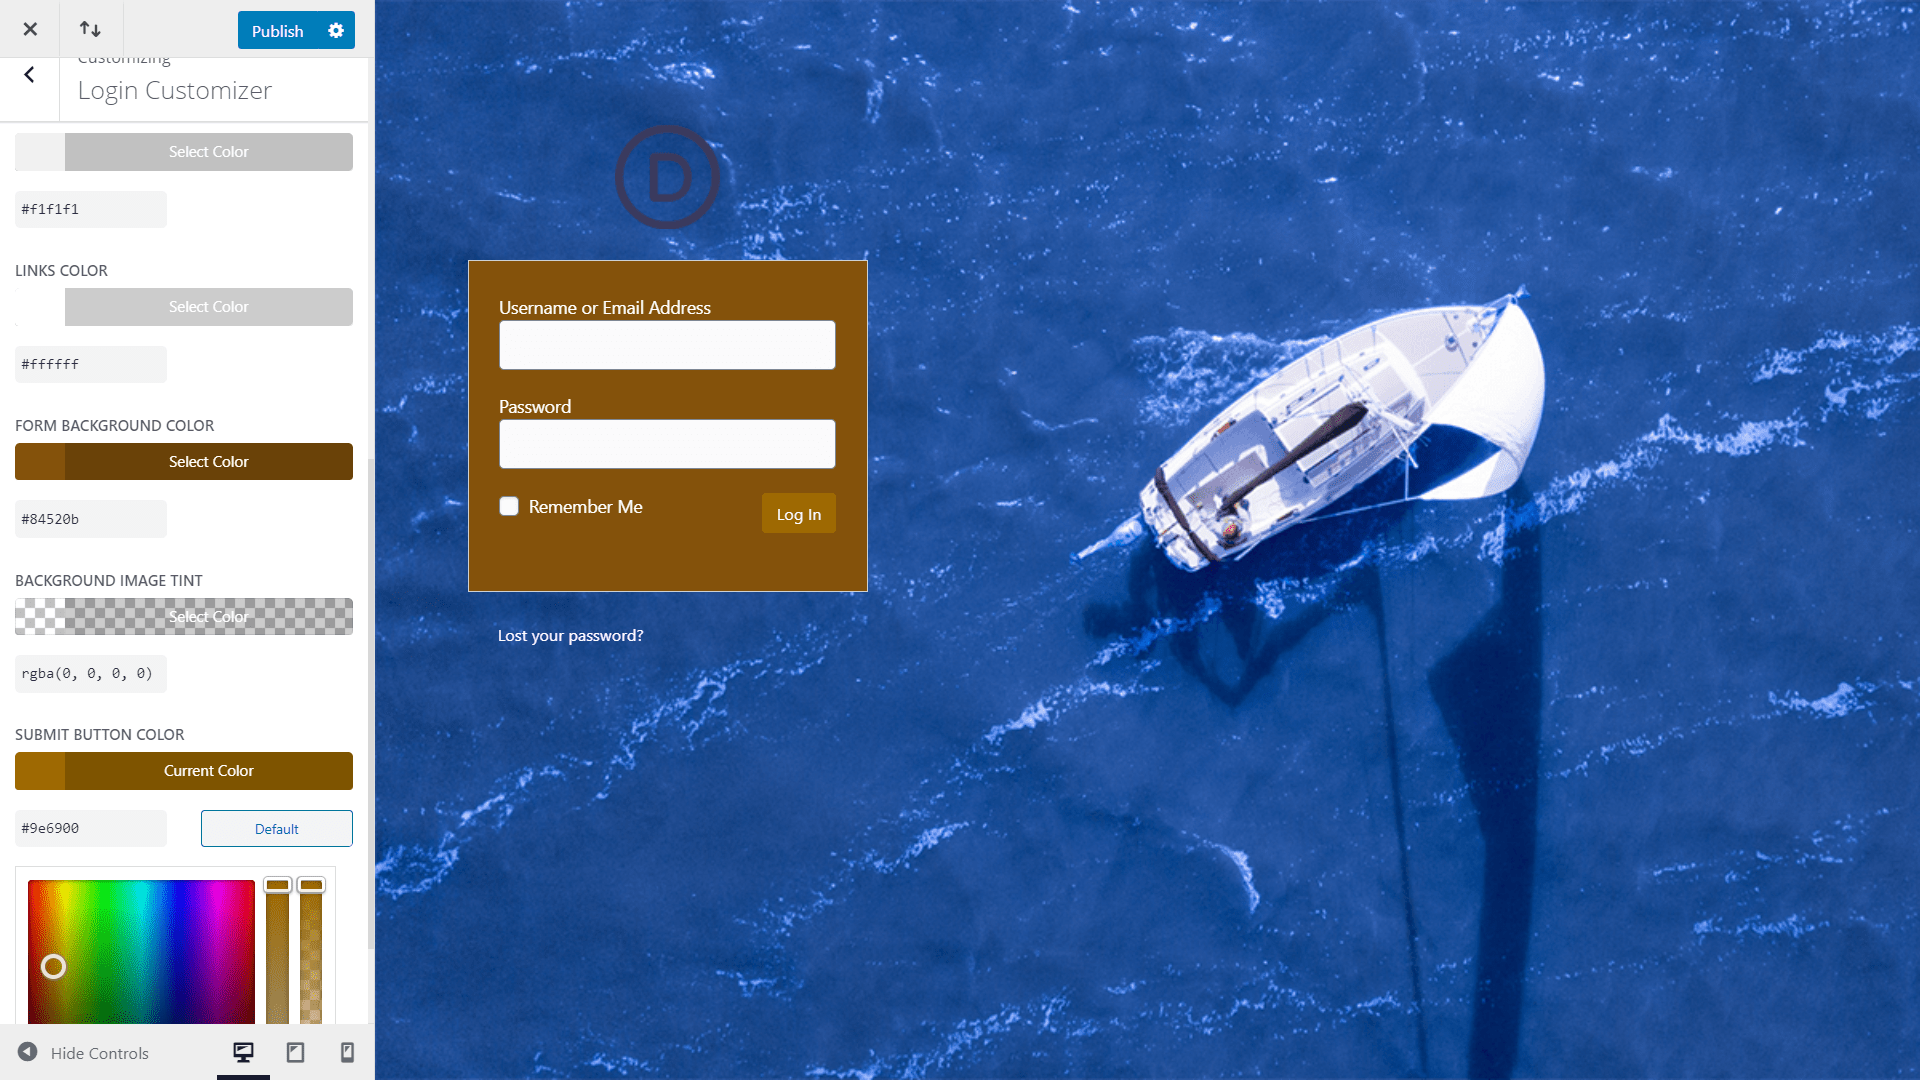
Adjustments include background image, form alignment, logo replacement, background color, links color, form background color, background image tint, and submit button color. The controls work the same as any controls in the theme customizer.
Login Url slug

This lets you change the login URL slug, giving you complete control over the login URL. For example. The default login URL is https://your-site.com/wp-login.php. By changing the slug to mylogin, the URL becomes https://your-site.com/mylogin. Our custom login URL functionality will work just fine under Apache and does not require any hosting configuration. On the other hand, if your hosting provider or webserver is running under NGINX, an extra rewrite rule is needed. Please be sure to add the following rule into your nginx .conf file related to your virtualhost configuration. We recommend you add the rule and restart nginx before you enable the custom login URL functionality on Divi Ghoster for everything to work properly.
rewrite ^(\[^.\]\*\[^/\])$ $1/ permanent;
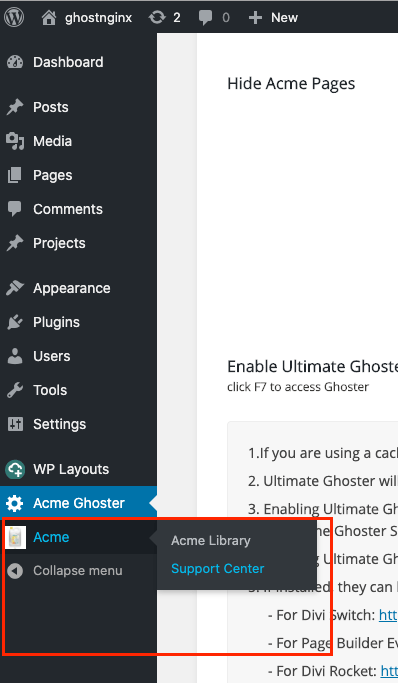
Ultimate Ghoster

Ultimate Ghoster hides everything related to Divi, including Divi Ghoster. The only way to access the settings of Divi plugins is through direct links.
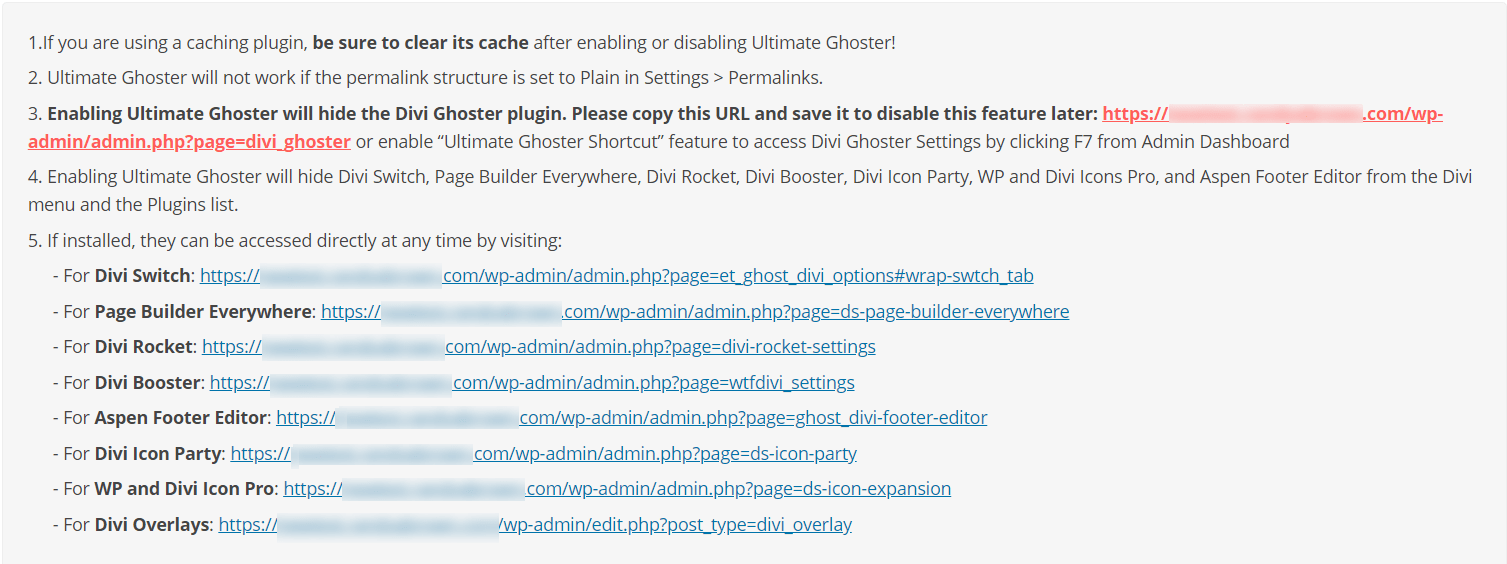
The instructions and links are provided at the bottom of the settings in the Ultimate Divi Ghoster tab. Be sure to copy these links and paste them somewhere for easy access.
Ultimate Divi Ghoster
Enabling Ultimate Divi Ghoster (or whatever you’ve called your theme) will open a new set of options. Here, you can choose exactly what to hide. For example, you can hide Divi related plugins, the Divi Ghoster plugin, all traces of Divi, premade layouts, theme update information, and the product tour. Check the boxes of what you want to hide and save your settings. Several things will happen when Ultimate Ghoster is enabled:
- The Divi Ghoster link in the dashboard will disappear.
- Divi-related plugins, including Divi Ghoster, will not be visible in the plugins dashboard.
- The Divi theme will be hidden from the source code and theme detector websites and replaced with your selected branding name.
- The Role Editor will disappear.
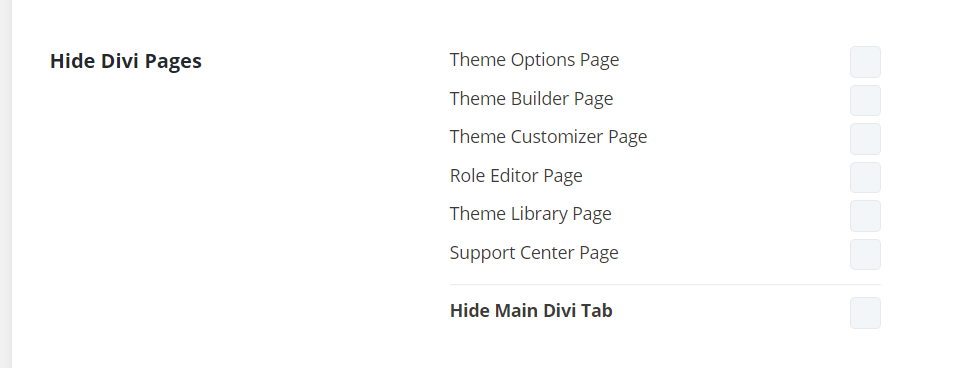
- Hide Divi Pages
- Hides Divi Ghoster from Site Health plugins list
Hide Traces of Divi Ghoster option
Enabling this option will remove various instances of "divi" from your website's source code, such as by replacing it with your chosen theme slug or by obfuscating it. In some case(s), these instances may be restored after page load using JavaScript. When this occurs, they would be visible when viewing the "live" source code of the page in your browser's developer console, but not when viewing the original source retrieved from the server, which should also help to mask the use of Divi from automated theme detection tools.
Please note that this feature is not intended to remove every possible reference to Divi from your website source code, but rather to remove most references to Divi. The primary objective is to prevent automated theme detection tools from identifying Divi, not to stop a site visitor from manually determining that Divi is being used. For example, there will still be CSS classes such as "et_pb_module" that would give away the use of the Divi builder to someone looking for it, and third-party plugins may still include references to Divi that are not ghosted.
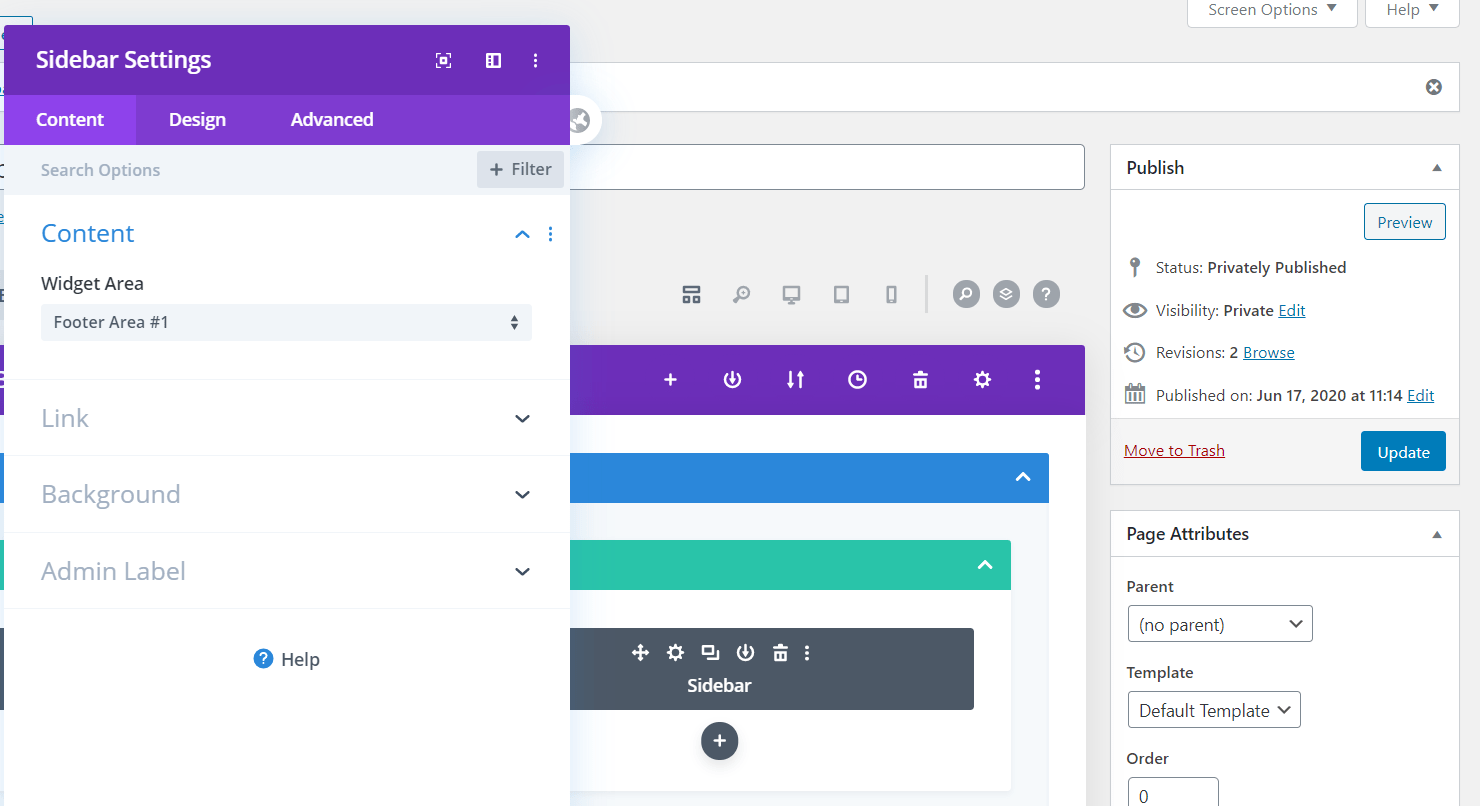
This allows you to choose which Divi pages to hide from the WordPress dashboard. Hide the Divi theme options, theme builder, library, and more. In this example I hid Theme Options Page, Theme Builder Page, Theme Customizer Page, Role Editor Page.
Here are some screenshots of the changes that take effect in your site’s backend once the Ultimate Ghoster is enabled: Enable Ultimate Ghoster Shortcut

Enable a shortcut that lets you quickly access Divi Ghoster’s settings. With this shortcut enabled, anyone can access Divi Ghoster by clicking F7 while in the admin dashboard rather than pasting in the direct URL.
Customization

Customization lets you hide certain tabs and features.
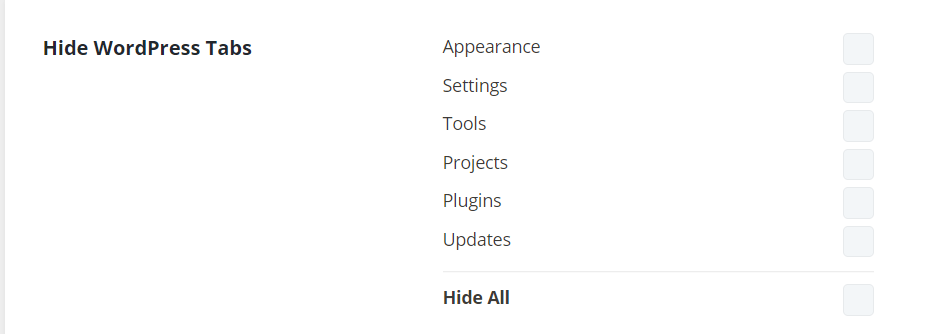
Hide WordPress Tabs
Hide several links from the WordPress dashboard including Appearance, Settings, Tools, Projects, Plugins, and Updates so users will not have access to them. A list at the bottom of the Customization screen provides links to access those pages. Be sure to copy the links so you’ll have easy access to them.
WordPress Customizations

Hide the WordPress icon, footer, and default widgets from the dashboard in order to hide that you’re using WordPress.
Hide WordPress Icon

Normally, WordPress has an icon that displays in the upper left corner.

Hiding the icon removes it and pushes the site title to the left to take its place.
Hide WordPress Footer
WordPress normally places a message in the footer with a link to the WordPress home page. This option disables that footer message.
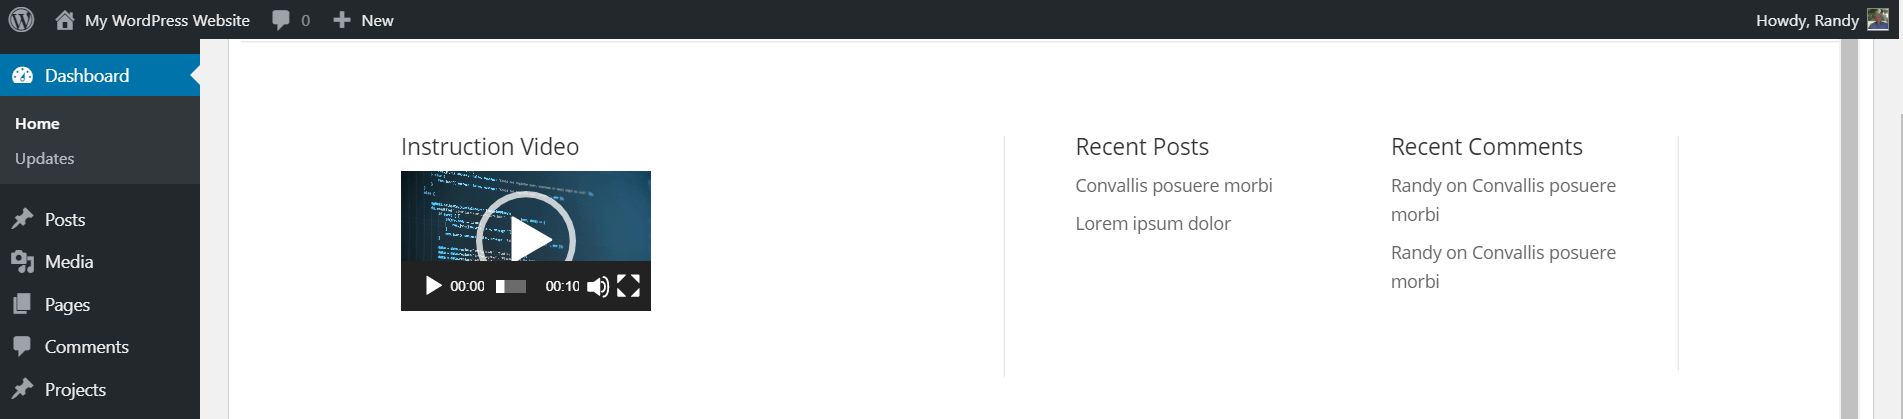
Hide WordPress Default Widgets
Normally, WordPress has a dashboard home screen with lots of widgets that welcome you to WordPress, provide links for steps and actions you can take, create a quick draft, see activity, and more. You can move things around and create your own layout.

This option hides those dashboard widgets and any references to WordPress.
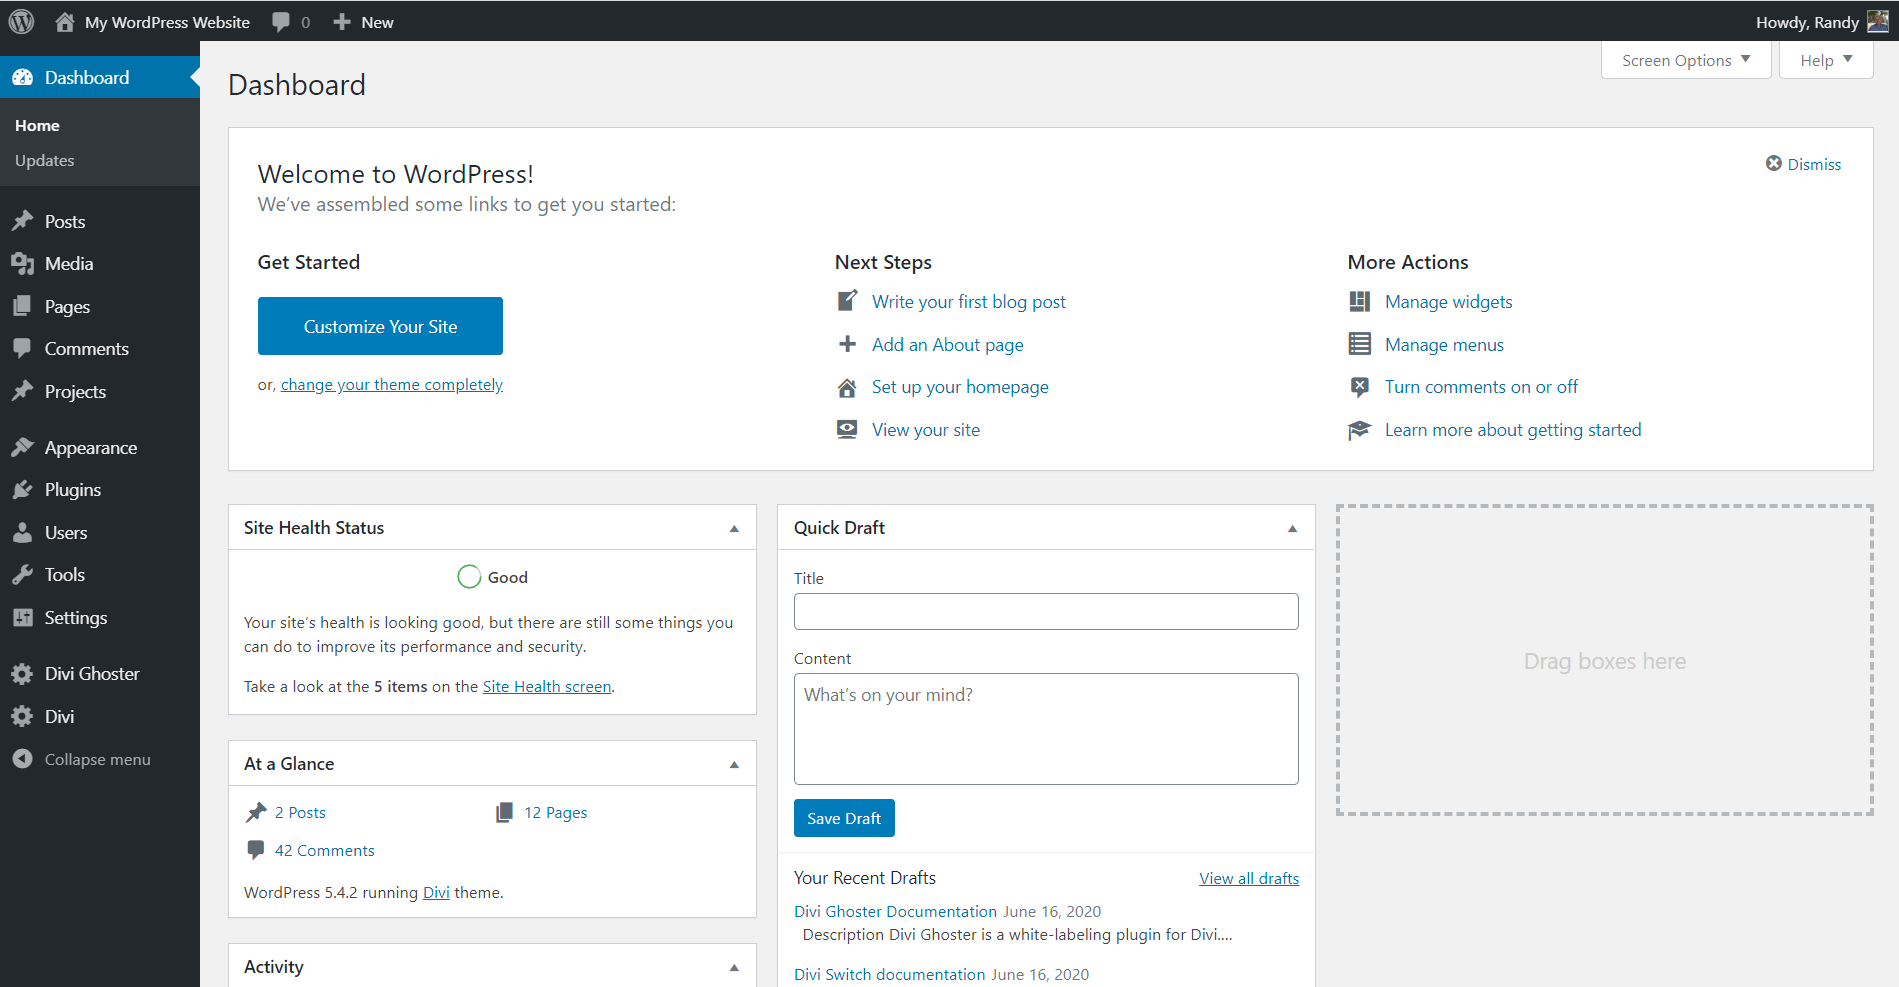
Custom Dashboard Layout

Create a custom dashboard page with or without the Divi Builder. This can work in combination with the previous settings.
 A
A
s soon as you create the page, head to the Page Attributes console and under the Templates drop-down menu, select the Blank template. It will make the site header and footer not being displayed on the page. Add any tools or information you want and publish the page privately. The page can include any content you want. This example shows a Divi layout with two sidebars in order to display footer widgets in the dashboard home page.

Choose the page from this dropdown box to replace the current WordPress welcome widget. Here’s the example dashboard home page with footer widgets.
If for some reason your layout is not displaying, click on the Screen Options tab at the top and make sure Welcome is selected.

Custom Builder Colors

This allows you to customize the colors for the backend Divi Builder and the frontend Visual Builder.
Enable Custom Colors

Enable this feature to make the color changes take effect.
Color Adjustments
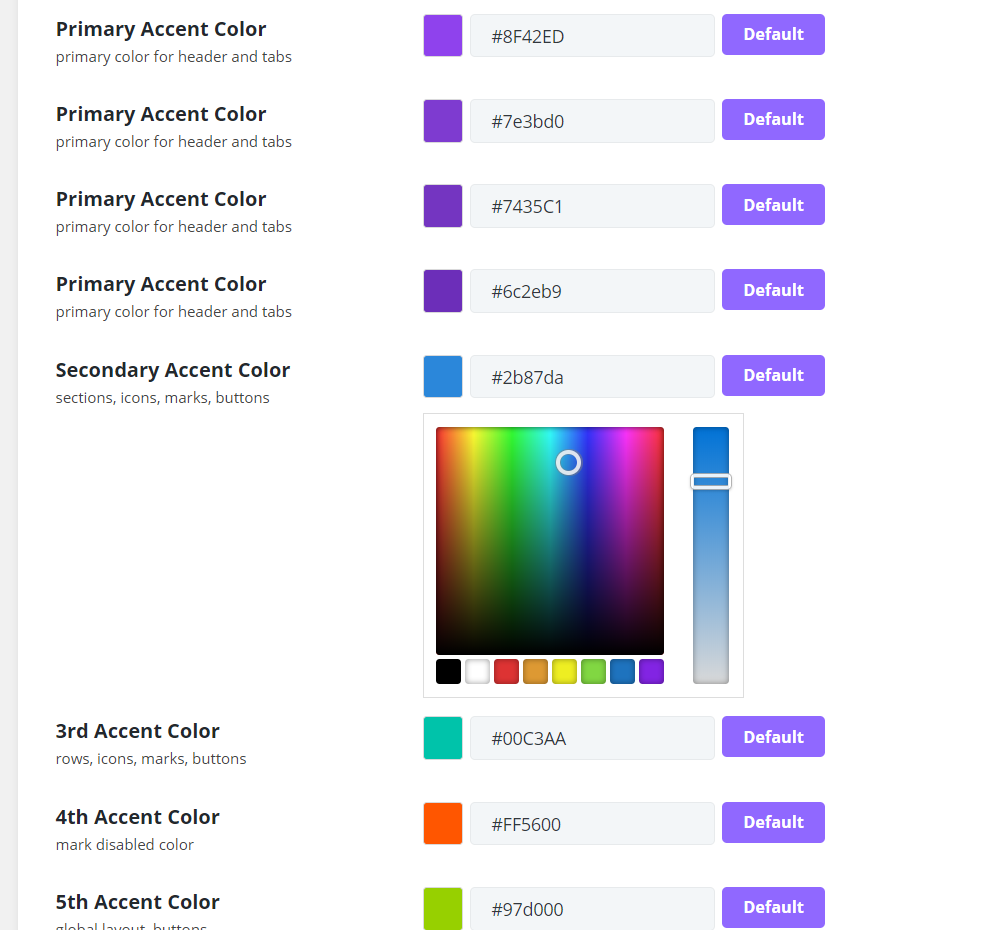 Adjust colors for the primary, secondary, 3rd, 4th, 5th, and 6th accent colors, and the text color. Choose the accent color you want to adjust by clicking the color to use the color picker or enter the hex code into the field. Click Default to return to the original color. Each of the color labels includes a description to show what the color is for. This can be used as a guide to target specific colors. For example, if you want to adjust the icons, marks, and buttons of rows, you’d select the 3rd accent color.
Here’s an example of how the Divi Theme Options could look with custom colors.
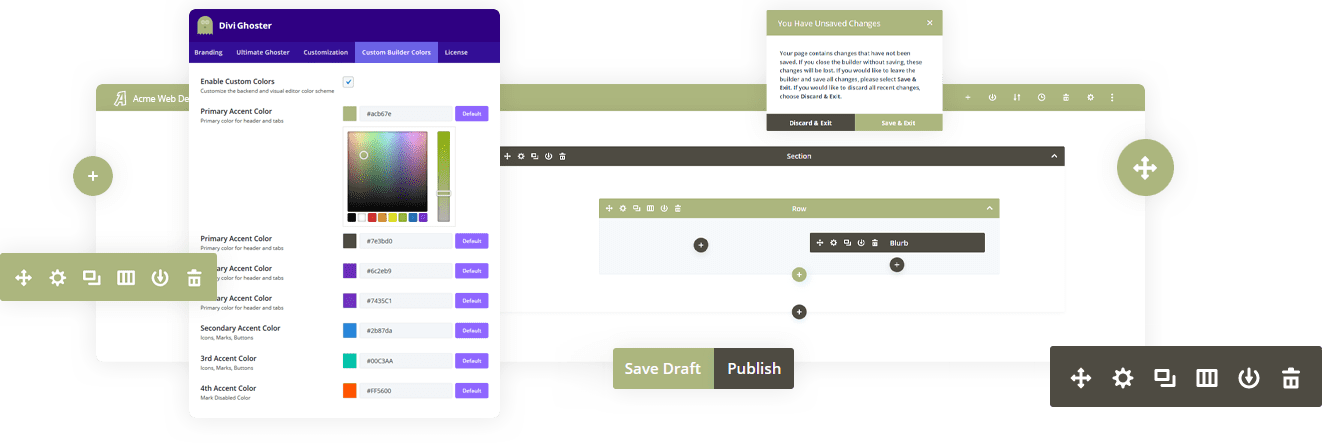
Here’s an example of how the Divi Builder could look with custom colors.
Import/Export

Import or export your Divi Ghoster settings from this tab. Select the Import/Export link in the upper right of this window also takes you to this tab.
Import

To import, click Choose File and navigate to your Divi Ghoster settings file. Click Import Settings and wait for the import to complete. Click Save Changes at the bottom of the settings page.
Export

To export your Divi Ghoster settings, simply click the Export button. This file can be imported into any installation of Divi Ghoster. It can be used to create a backup of your settings or use the same settings on another website.
License
Tab will be displayed if you purchased product from www.wpzone.co
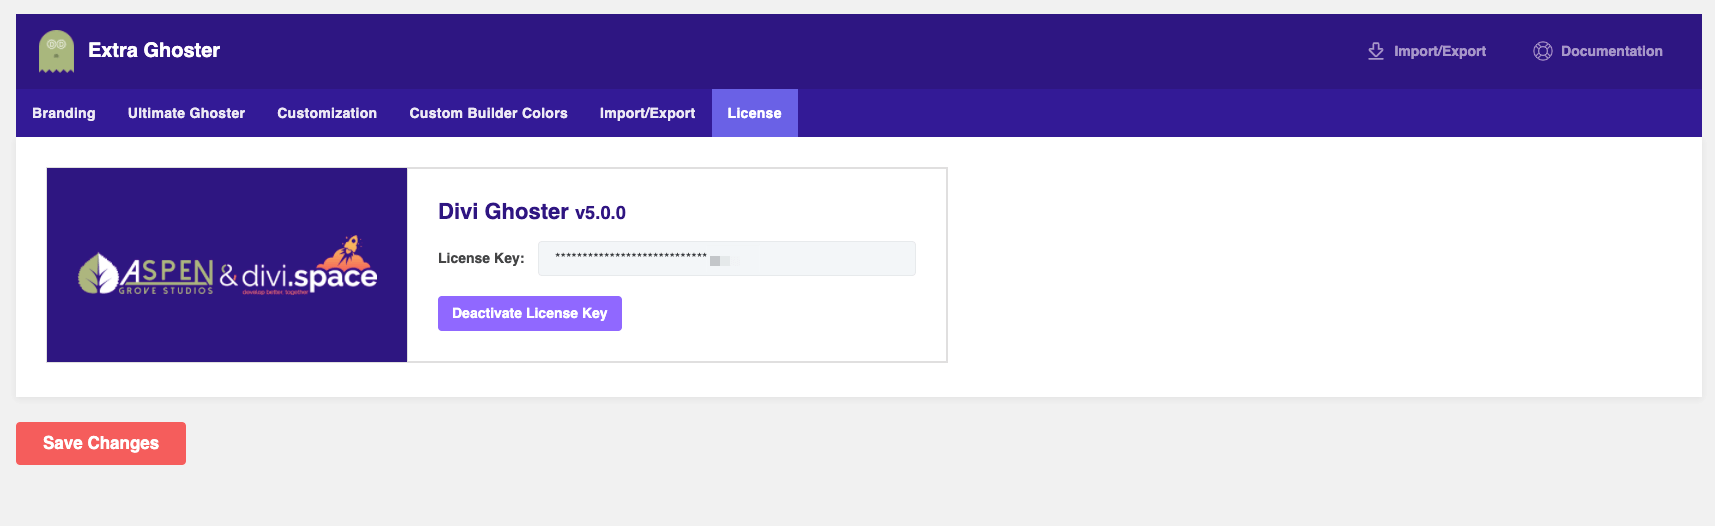
The License tab lets you deactivate your license key.
Uninstalling Divi Ghoster
To uninstall Divi Ghoster, it is crucial to follow these steps.
- Turn off Ultimate Divi Ghoster
- Save changes
- Deactivate the Divi Ghoster plugin in the plugins list
- Delete the Divi Ghoster plugin in the plugins list
Once the plugin is uninstalled, all Divi Ghoster options and settings are deleted.
Frequently Asked Questions
###I enabled ‘Ultimate Ghoster’ and can’t access the plugin dashboard
Simply follow this URL structure (replace with your domain) to access the dashboard http://yourwebsiteurl.com/wp-admin/admin.php?page=divi\_ghoster
I enabled ‘Ultimate Ghoster’ and can’t access the Divi Role Editor
Simply follow this URL structure (replace with your domain) to access the dashboard http://yourwebsiteurl.com/wp-admin/admin.php?page=et\_divi\_role\_editor
How do I update this plugin to newer versions?
When a version update is available, a notice will appear in your WordPress dashboard. Simply follow the steps to update like you would any other plugin in the repository.
Will this plugin slow down my site?
This plugin is well developed and extremely lightweight. As with any plugin, this one has the potential to slow down your site, but we estimate the impact to be almost immeasurable.
What happens if I deactivate or uninstall this plugin?
Should you ever need to uninstall or deactivate this plugin, all default ‘Divi’ branding will return. As mentioned previously, please be sure to disable "Ultimate Ghoster" BEFORE deactivating and uninstalling Divi Ghoster.
Compatibility
Divi Ghoster is compatible with any single site self-hosted WordPress. Divi Ghoster is not compatible with WordPress Multisite. Enabling the plugin by mistake on an enabled network could result in a broken dashboard. To fix this you need to manually remove the plugin directory at your WordPress plugin folder.
Additional Information and Support
For general WordPress information – WordPress.org For additional help with using Divi, Elegant Themes offers free technical support to all its members. – elegantthemes.com
Need help with customization or want to buy similar product?
If you feel you need to give your website a completely professional finish, or you simply don’t have time to do it yourself, contact us at wpzone.co or send us an email to [email protected], to get our current rates. If you like our products and would like to purchase similar plugins, please visit wpzone.co/shop