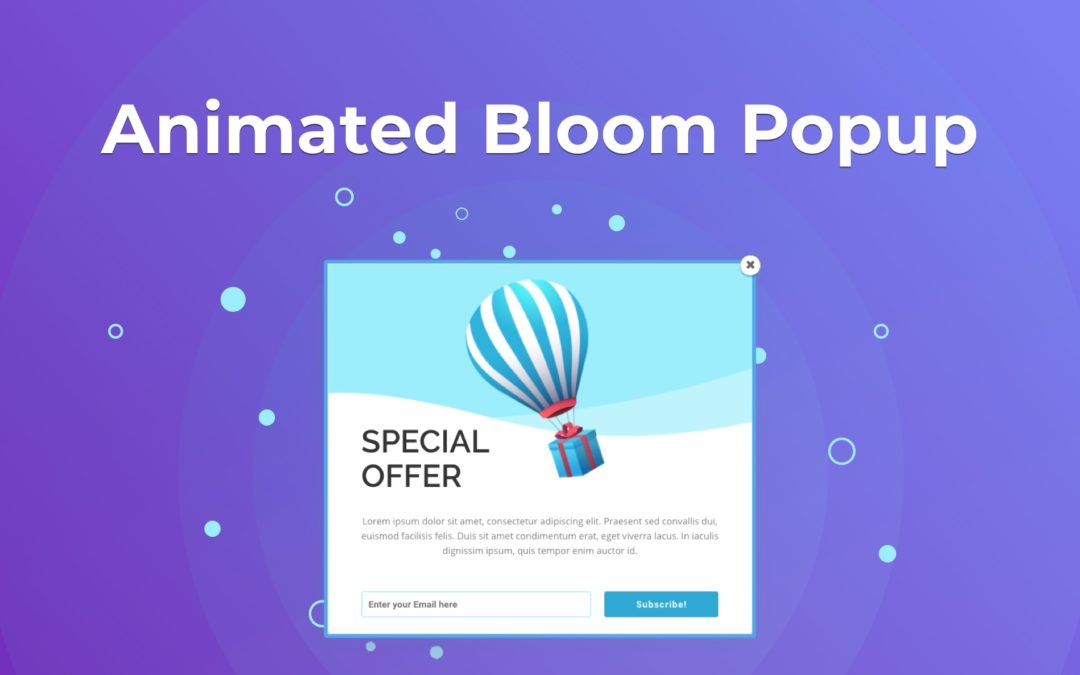
Popups are an emotive subject. Some people love them, some people REALLY do not, but the numbers speak for themselves in terms of converting casual web traffic into sales, return visits and other actions: When done well, popups work. In this tutorial we’re going to show you how you can make beautiful, engaging and (most importantly) highly converting popups using only WordPress and the Bloom Plugin by Elegant Themes.
In this tutorial, we’re focusing on creating animated popups that look great and offer something a little extra compared to the standard options available in Bloom. For those not familiar with Bloom, it’s a plugin created by Elegant Themes, the brains behind the Divi theme. Featuring six different display types, multiple triggers and animation settings, it is a powerhouse for email opt-in popups that really outclasses the competition.
1. Tutorial Set up
For this tutorial, you’ll need to have a WordPress installation set up and running, with the Bloom already installed. As always, we recommend using a development or testing environment and not working on a live site. While it is unlikely anything we’re doing here will break a live install, it is always better to be safe.
2. Add a New Account Email Marketing Software
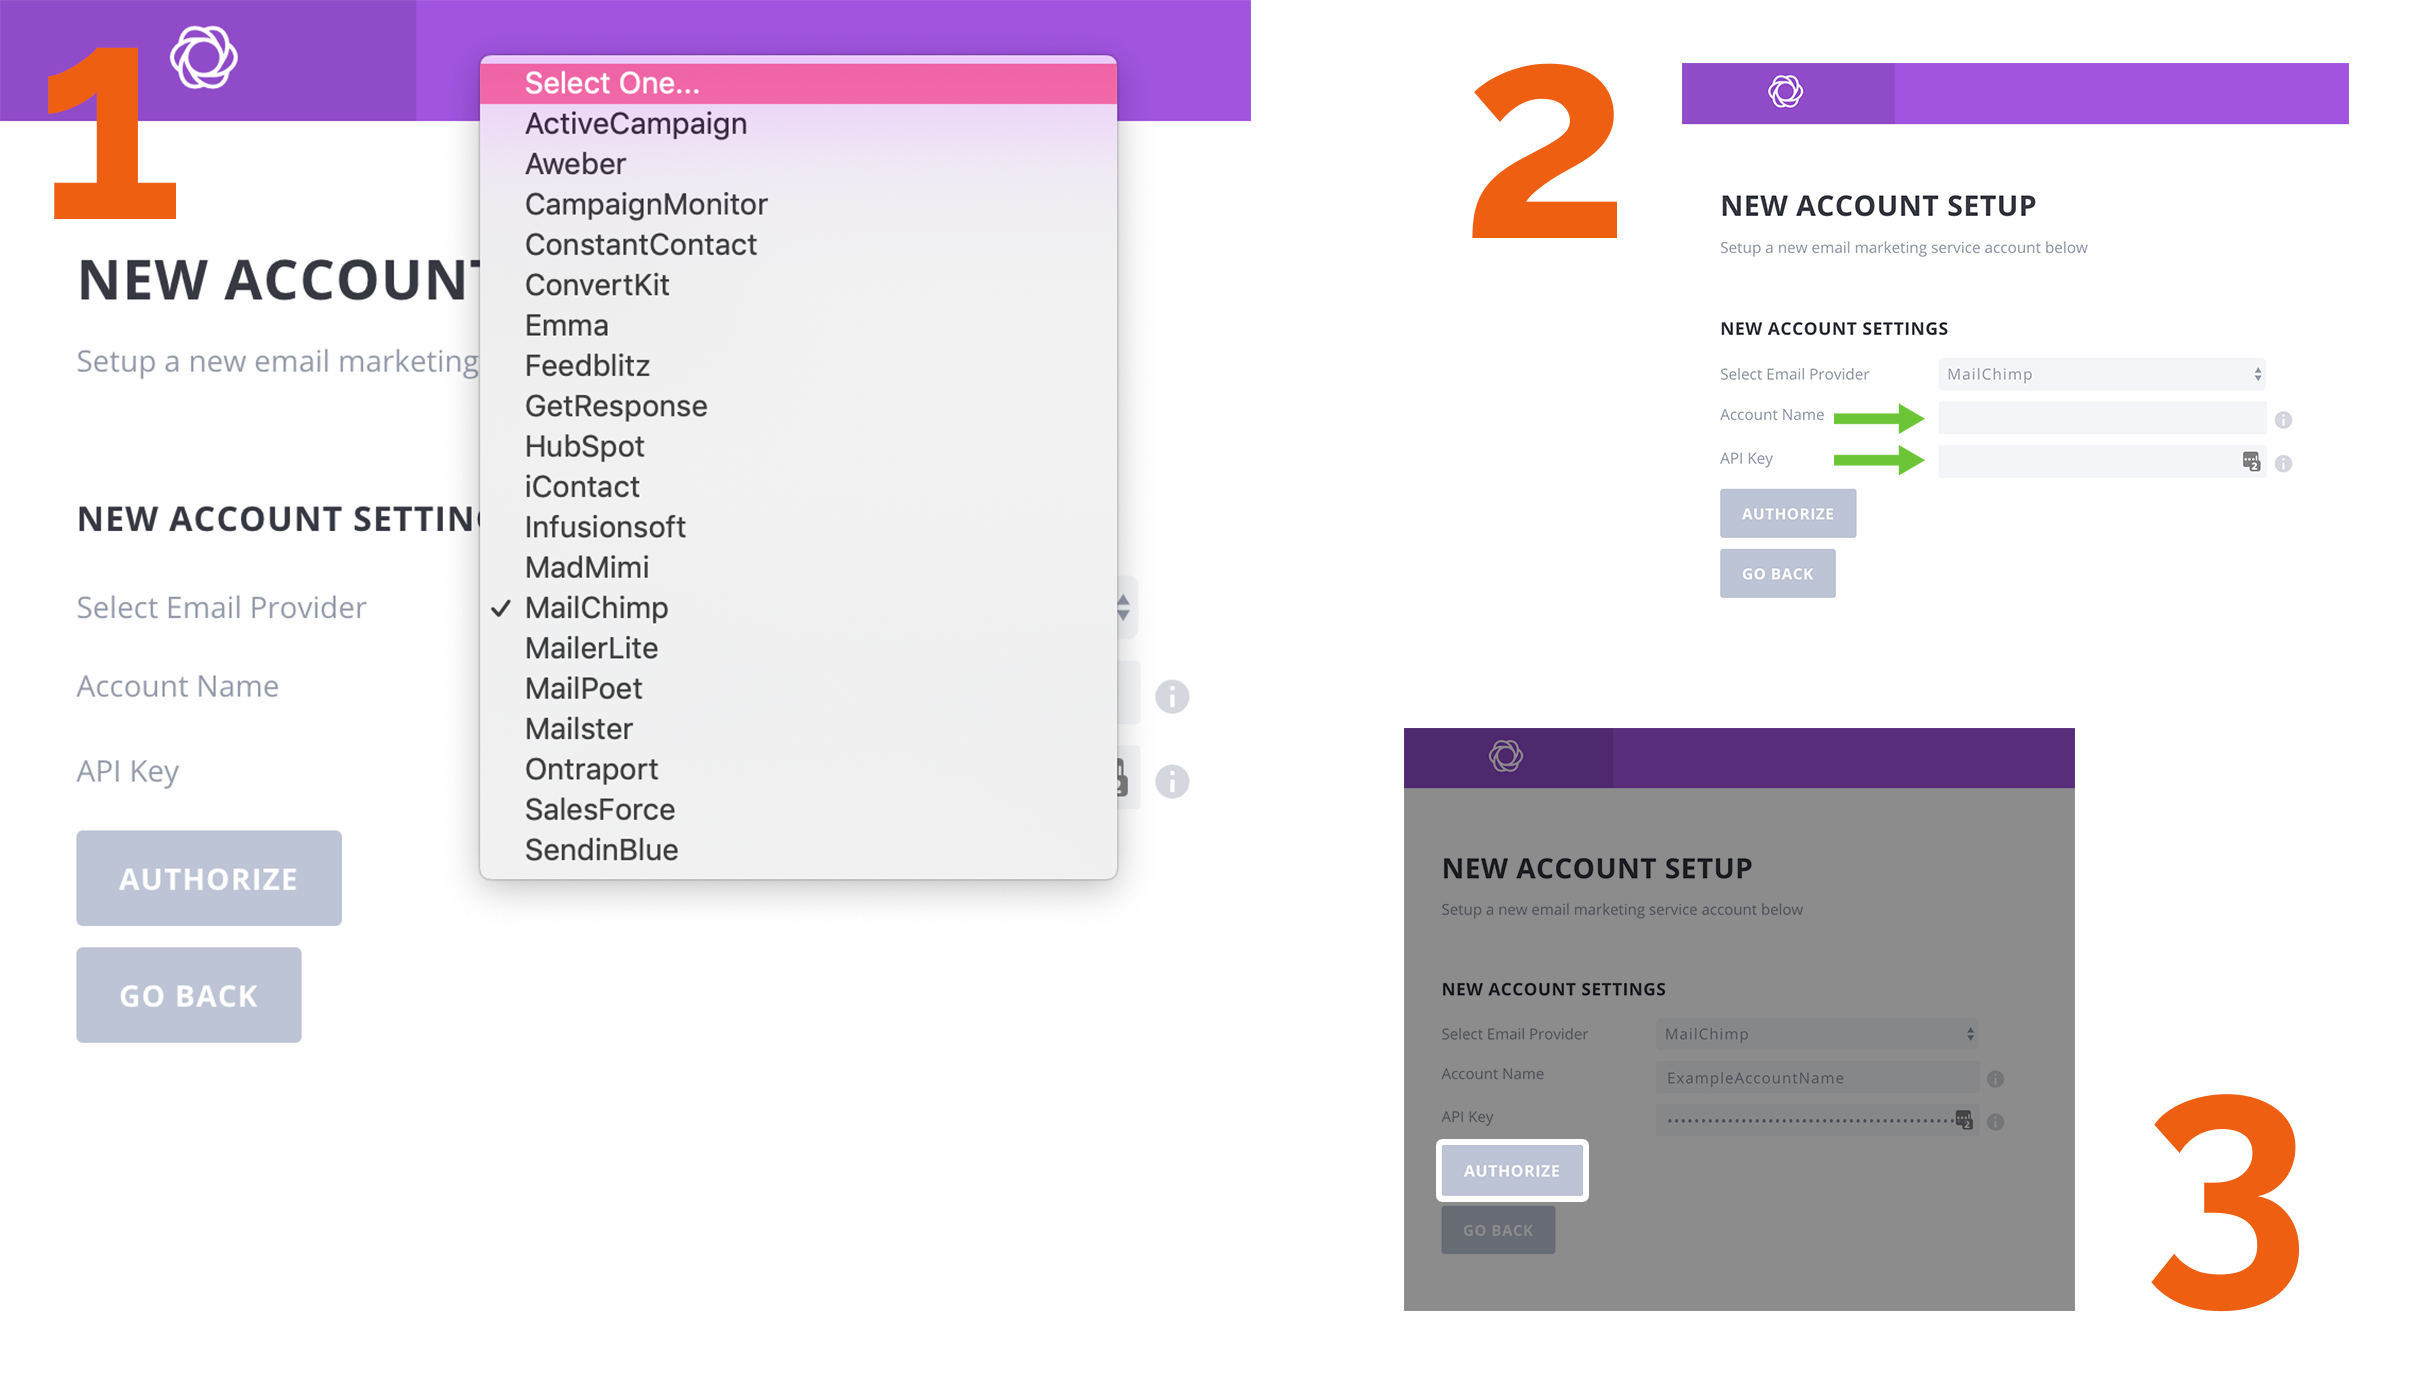
First, we need add new account email marketing software. Click Tools > Bloom Settings and then click the accounts icon to open up the accounts tab. To add a new account, click the “New Account” button.


Now, we need set up Account:
- Select your favorite Email provider. We’re choosing MailChimp for this demo but this won’t effect anything happening in the next steps, so just the service you use for managing marketing emails.
- Add Account Name and API Key.
- Click Authorize.
Once you have added an account, it’s time to create your opt-in form!
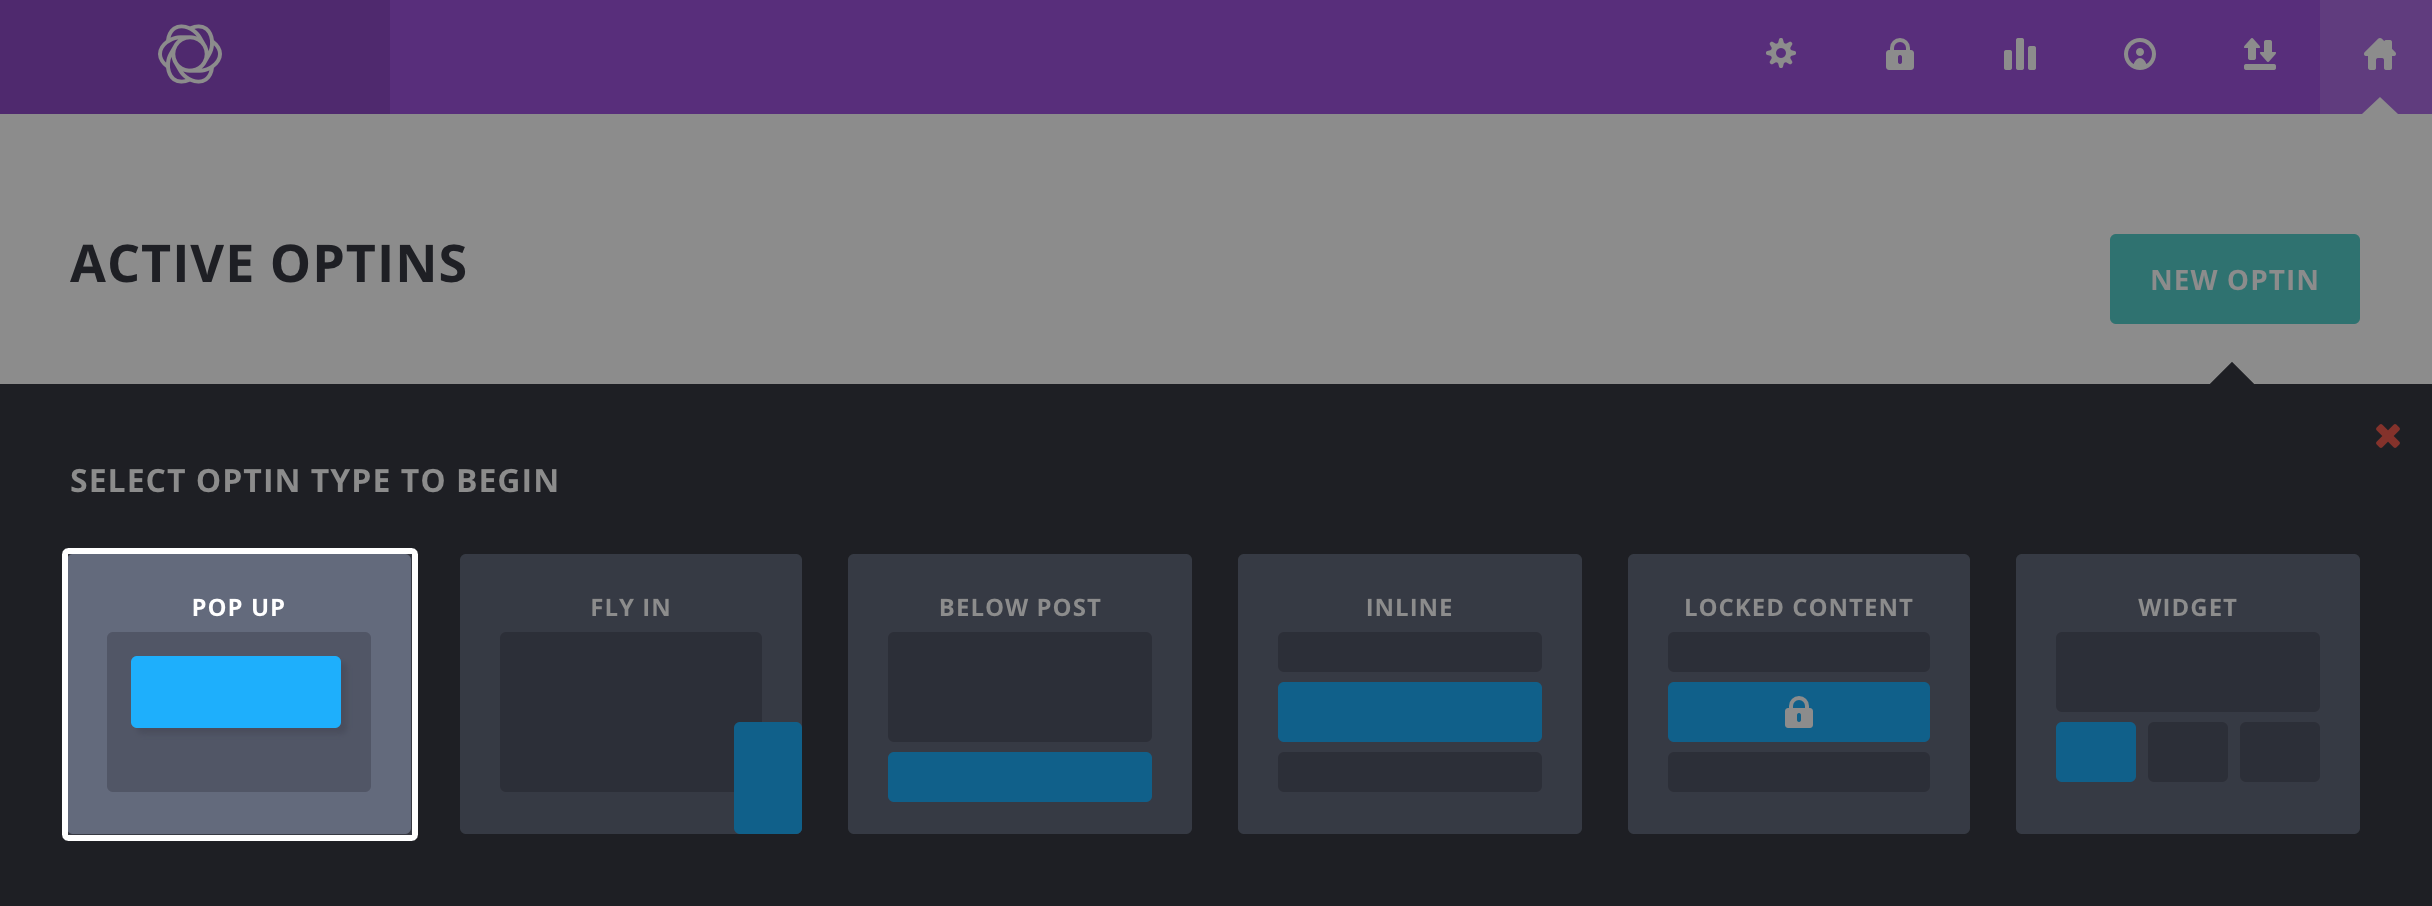
3. Create a New Opt-in
Now we create an opt-in form. Go to your Bloom settings and click the Home icon. Click the NEW OPTIN button.

You will see 6 types of opt-in available in Bloom. Choose the first one labelled POP UP. This creates a light-box pop-up that contains your opt-in form on the pages you choose to run it on.
Once you select your opt-in type, you’ll be taken to the opt-in creation screen.
- OPTIN NAME – Name of your opt-in form.
- Select Email Provider – MailChimp
- Select Account – Choose your account
- Select Email List – Choose your email
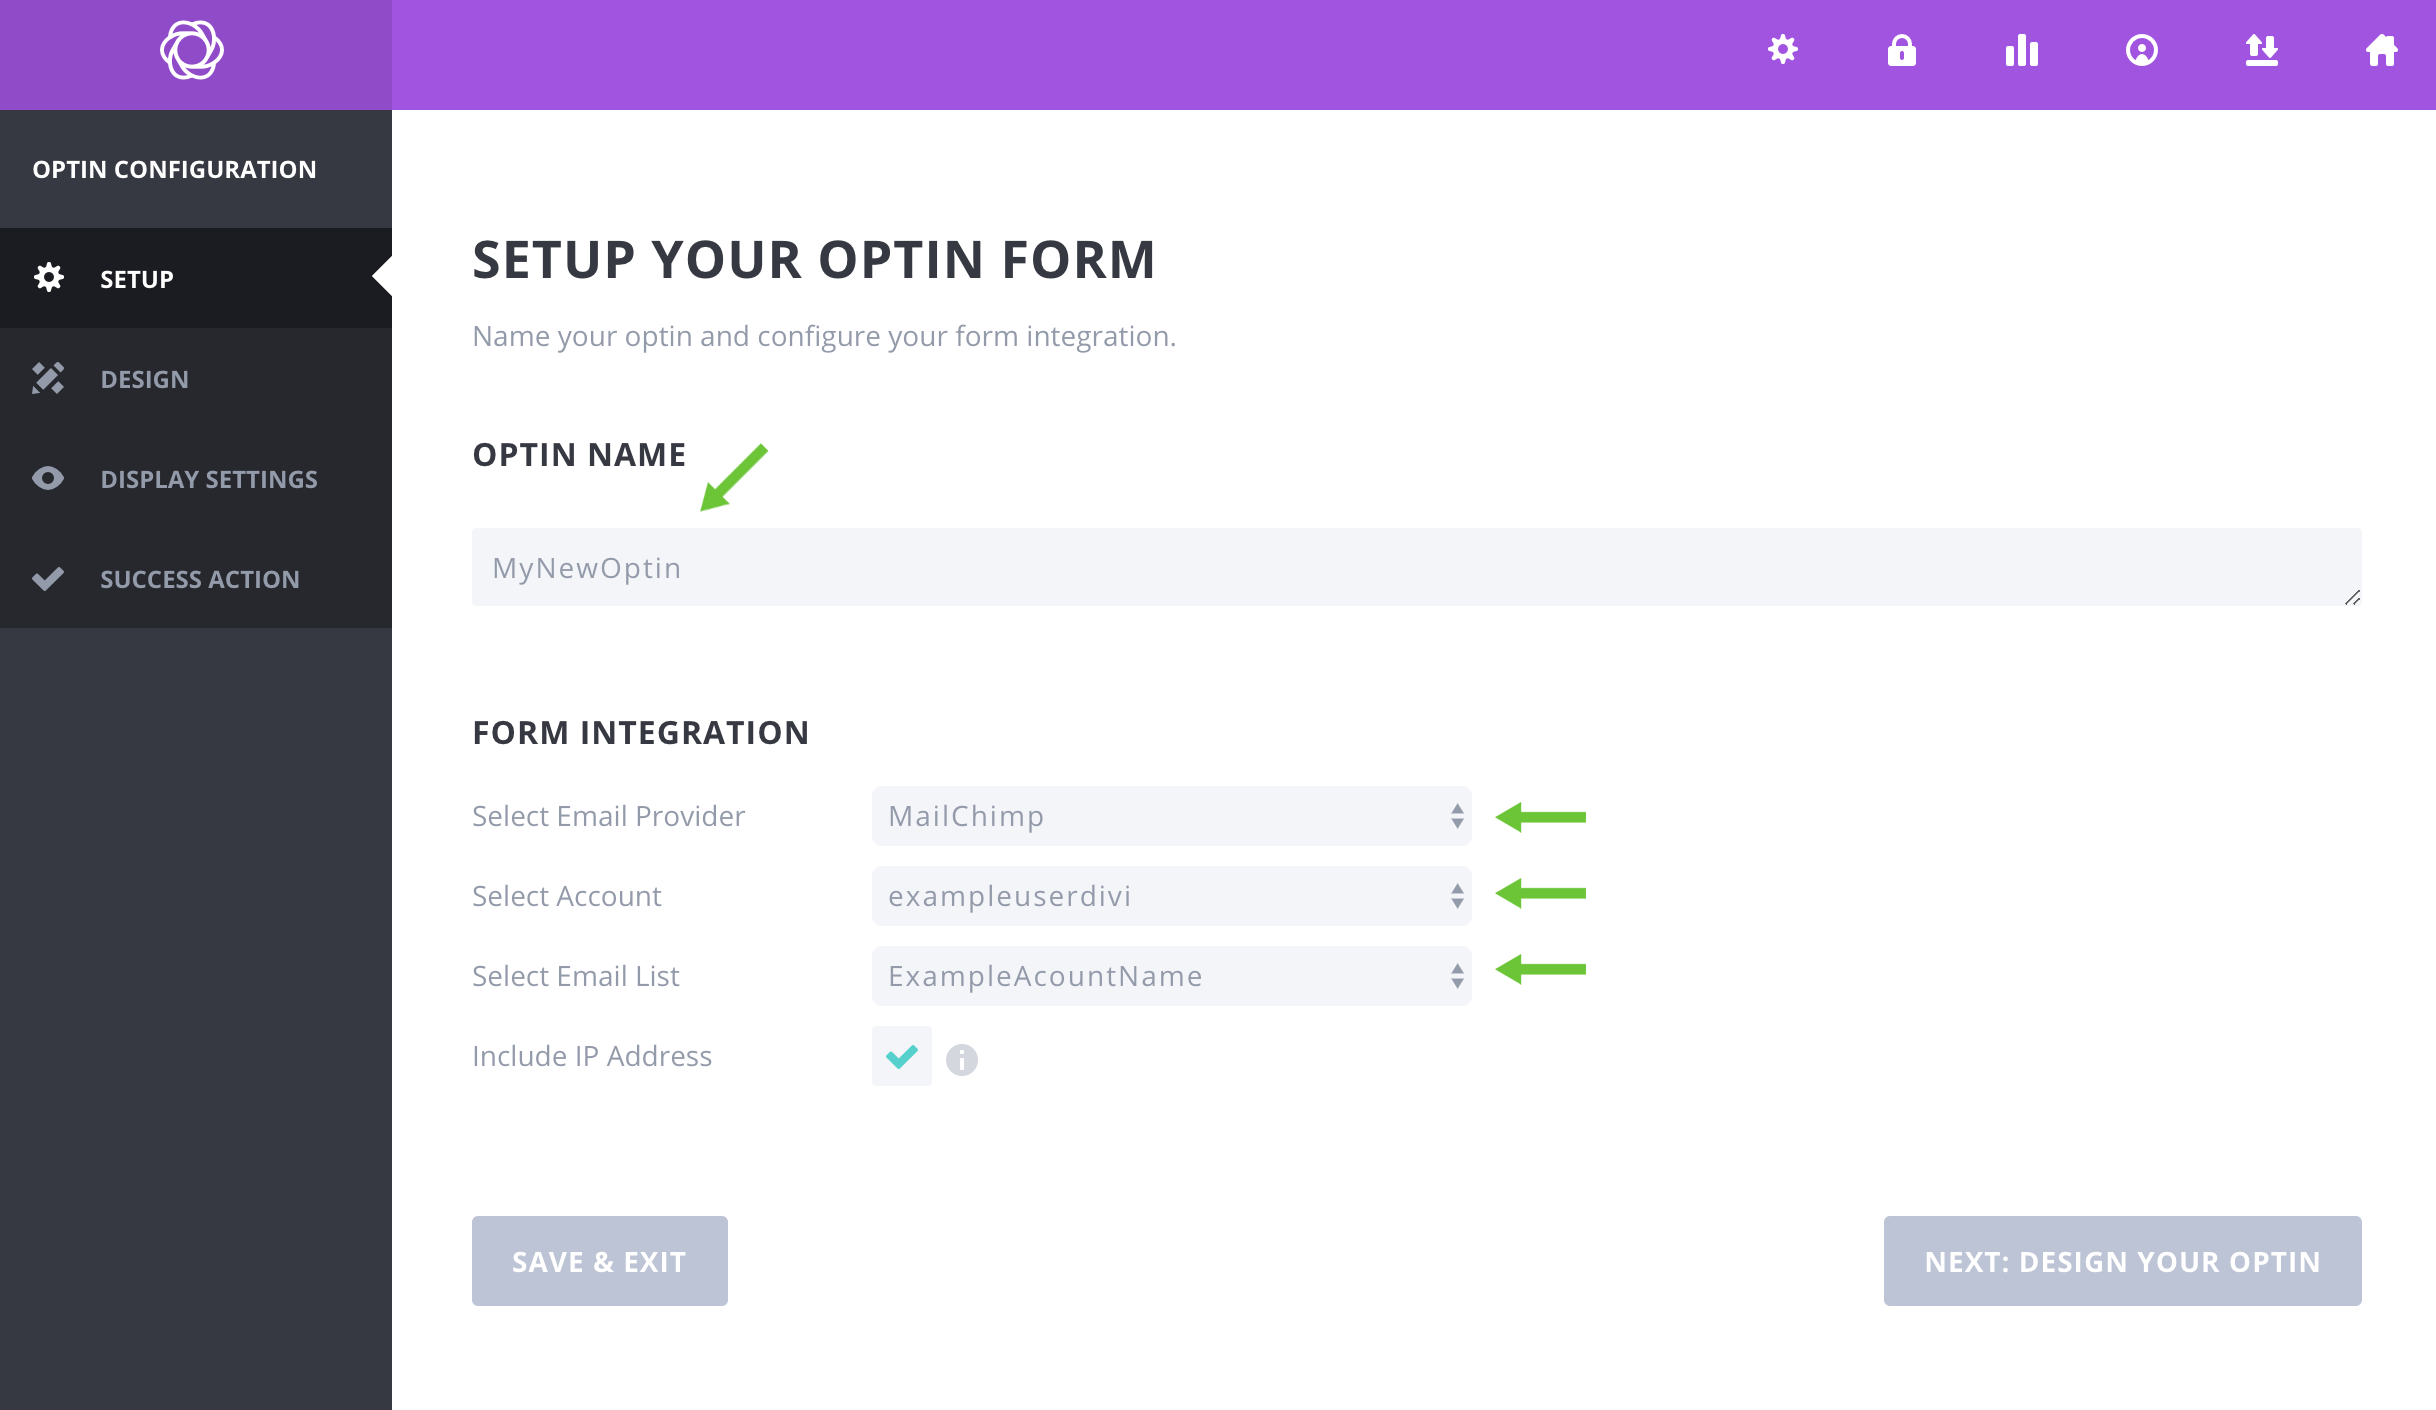
If you are ready, click NEXT: DESIGN YOUR OPTIN button, to get started with the design of your popup.
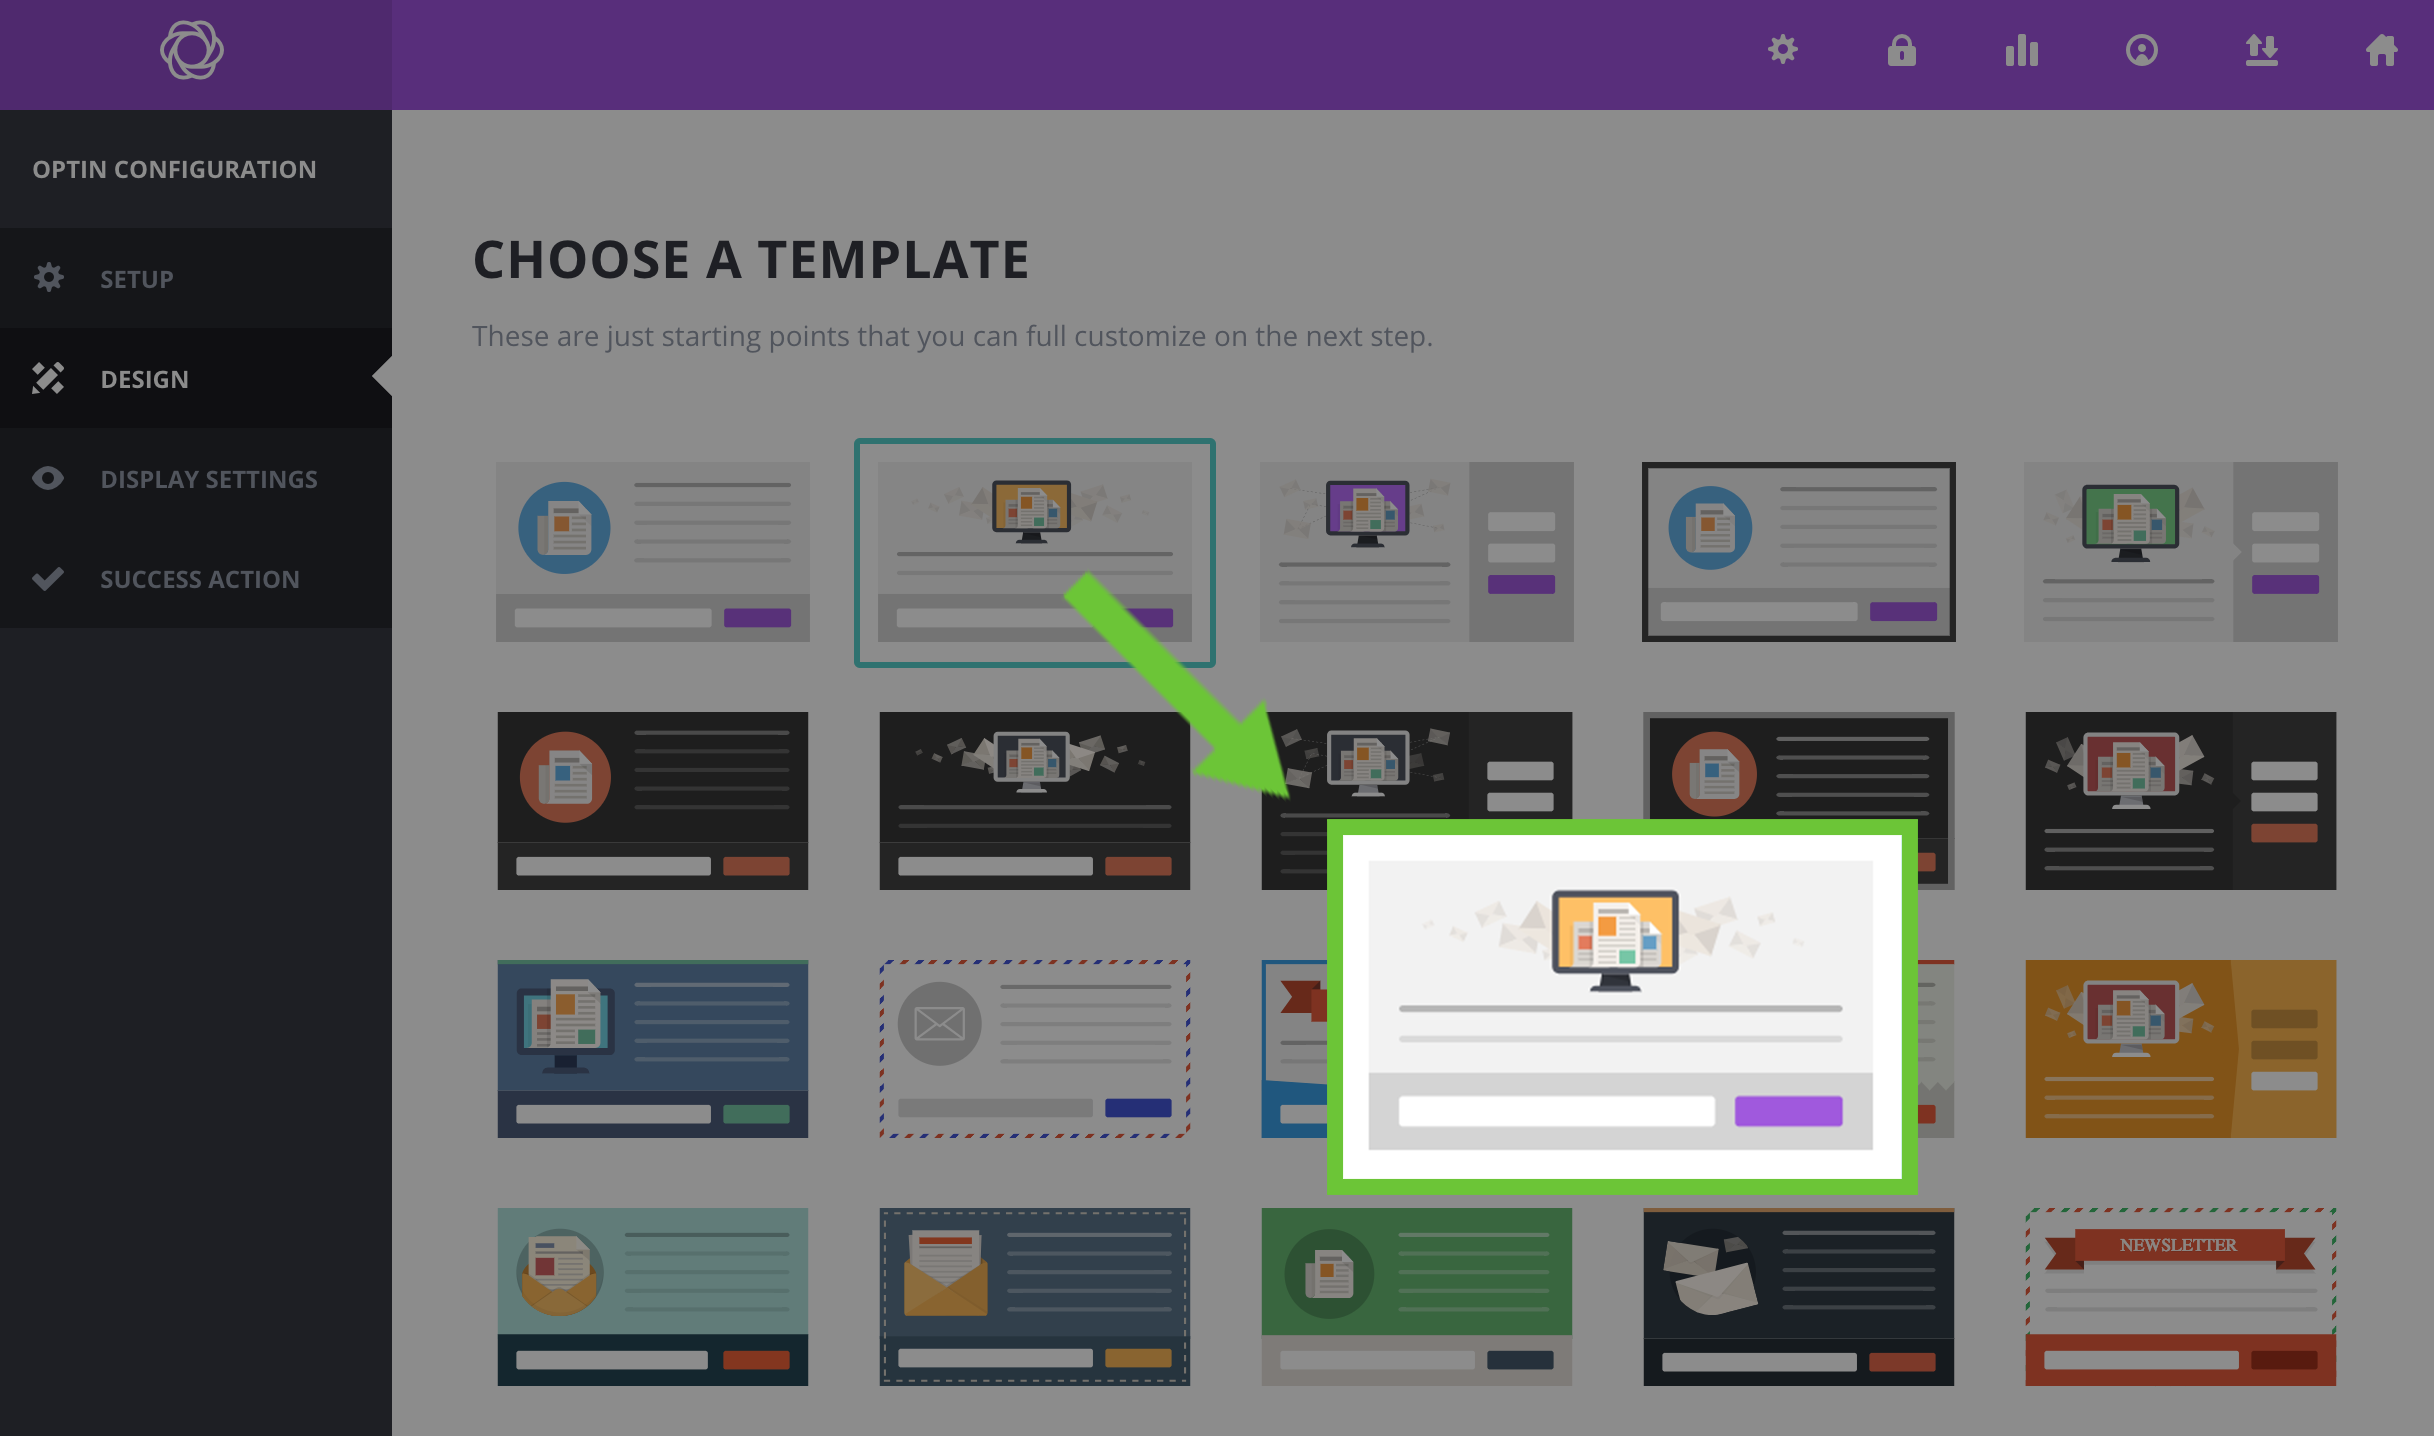
4. Design Your Popup
From the list of pre-made templates, select the higlighted template, click the next button to bring up the design customization settings.
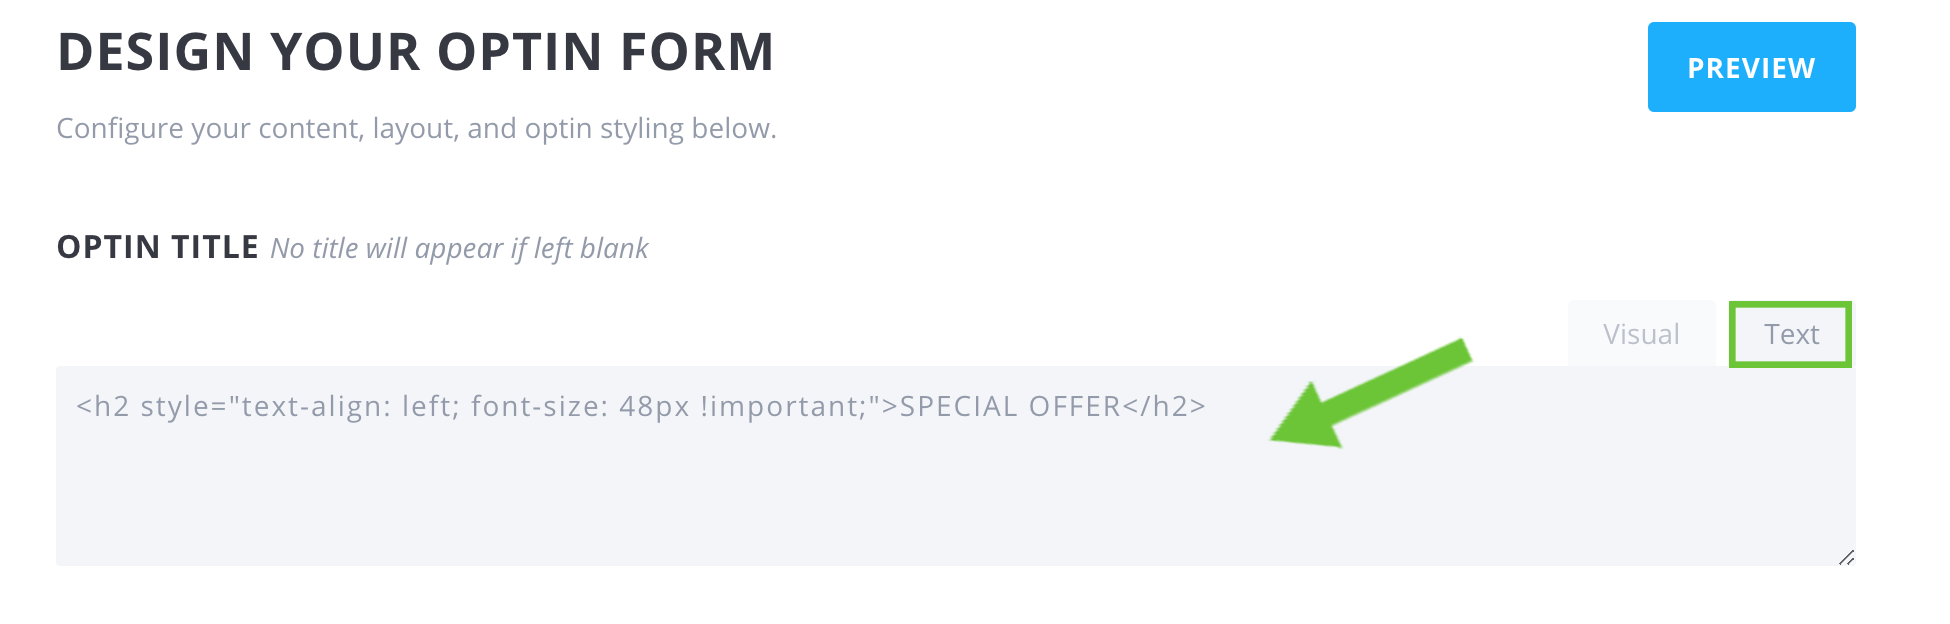
Now we will be stylling our optin. Step by step:
4.1. Copy below code and paste to Optin title:
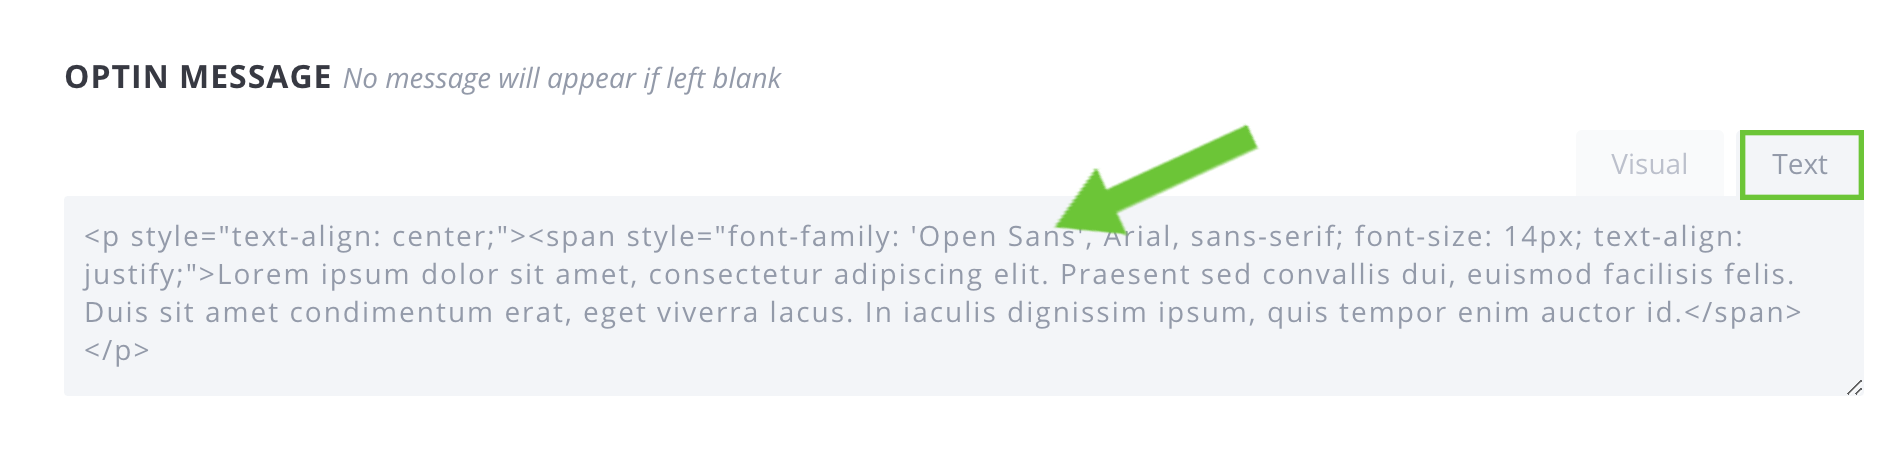
Be sure to make sure you’re in the ‘TEXT’ panel when copying the code below.
4.2. Copy below code and paste to Optin Message:
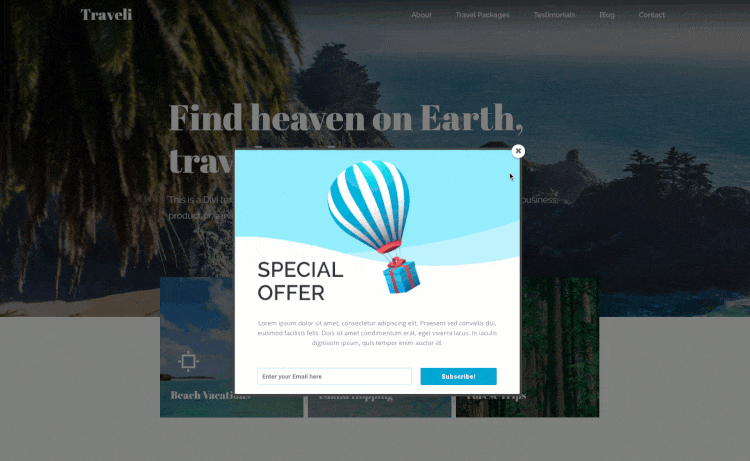
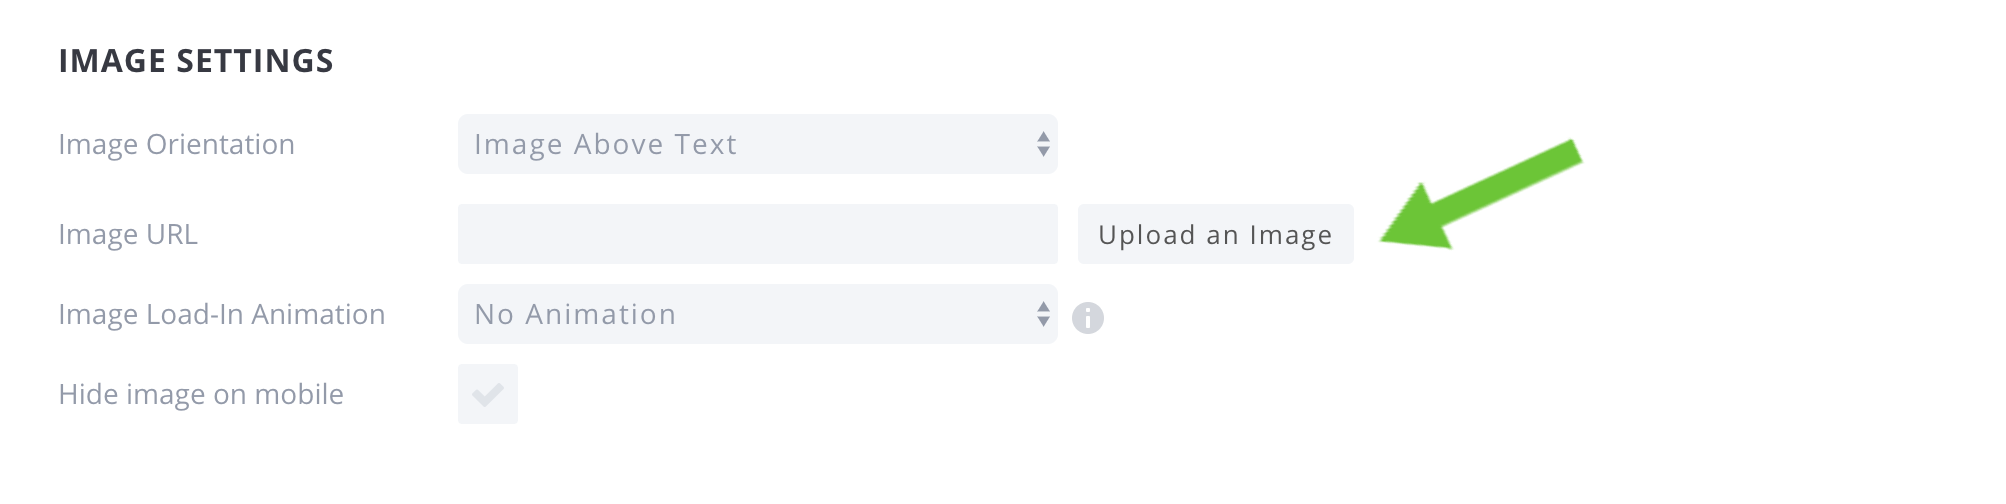
4.3. Add An Image and Select Image Above Text.
You can download our image here: Download image
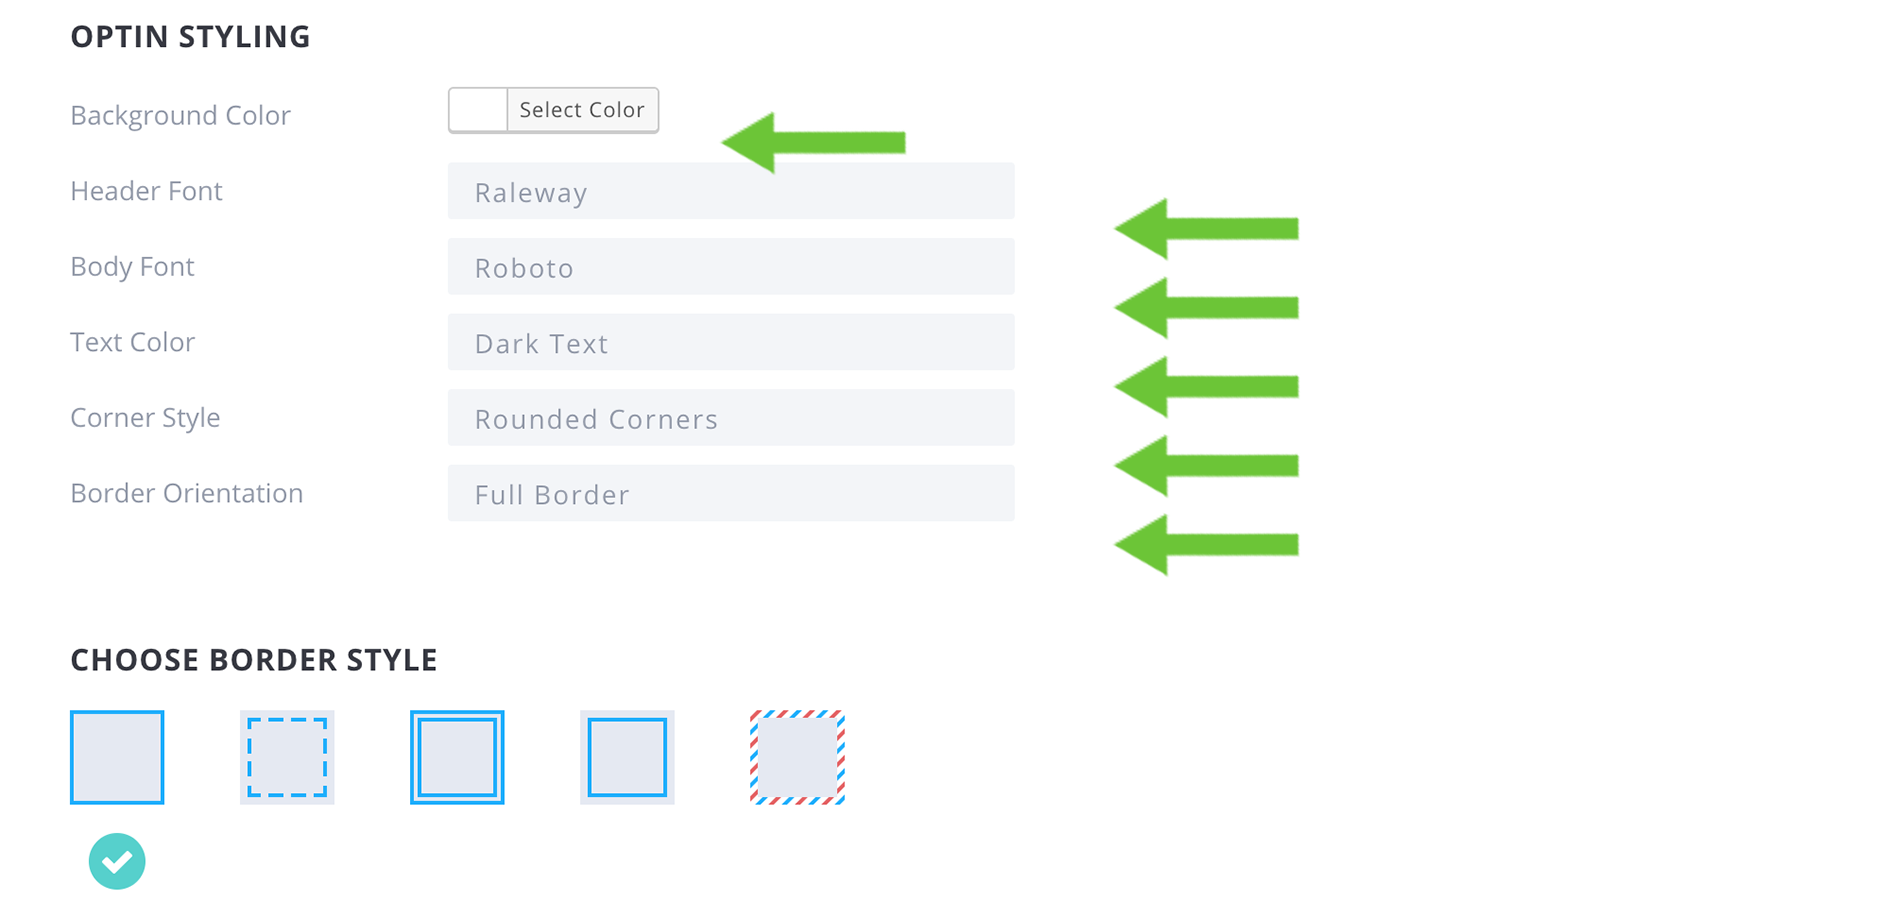
4.4. Apply Opt-in styling:
Header Font: Raleway
Body Font: Roboto
Text Color: Dark Text
Corner Style: Rounded Corners
Border Orientation: Full Orientation
Choose Border Style: First Border
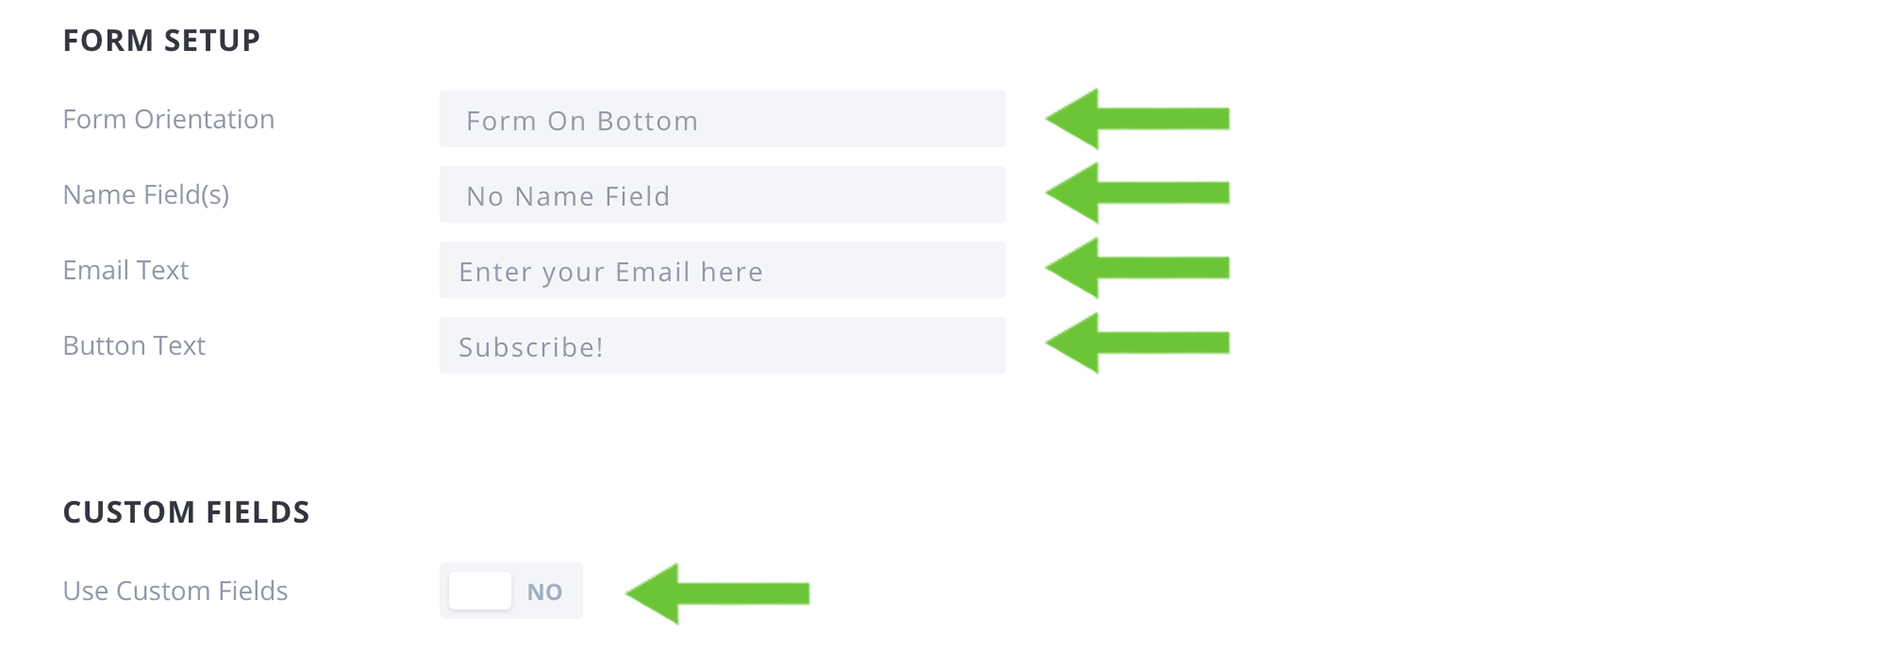
4.5. Add Form Setup:
Form Orientation: Form On Bottom
Name Field(s): No Name Field
Email Text: Enter your Email here
Button text: Subscribe!
Custom Fields: NO
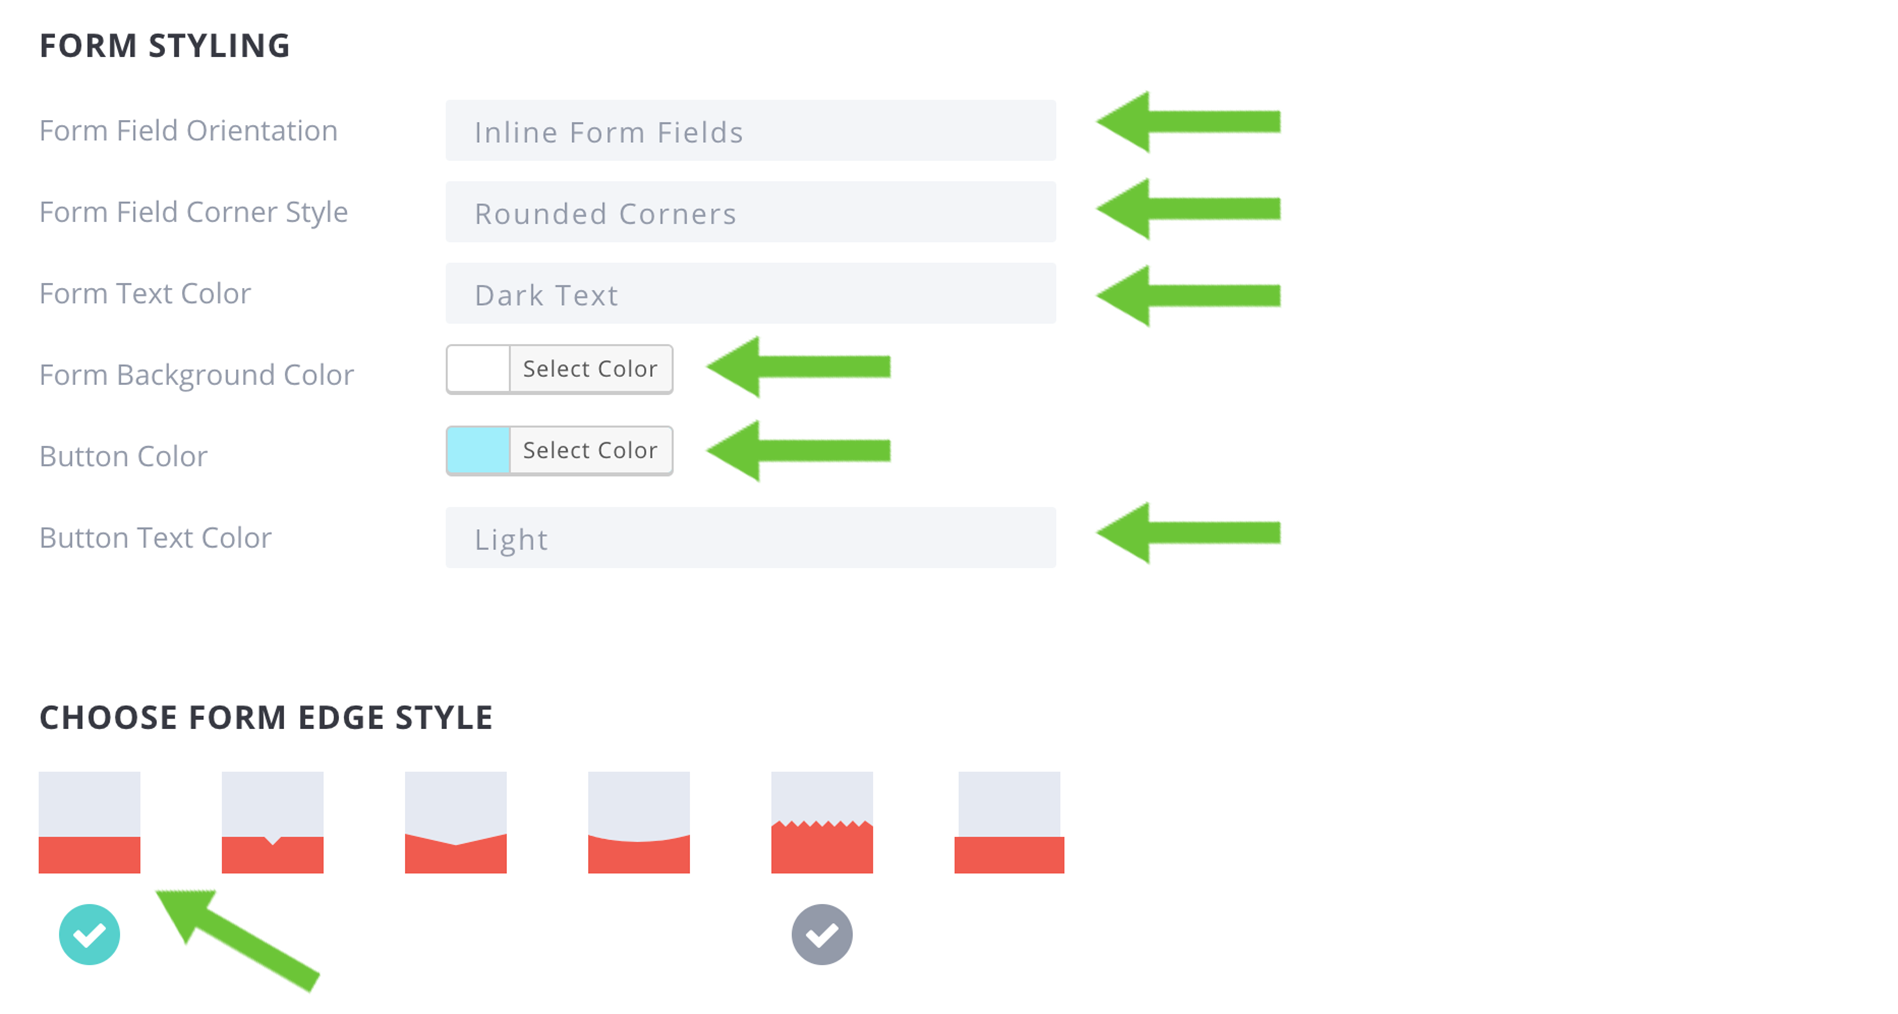
4.6. Add Form Styling:
Form Field Orientation: Stacked Form Fields Form Field Corner Style: Rounded Corners Form Text Color: Dark Text
Form Background Color: #FFFFFF
Button Color: #9deefc
Button Text Color: Light
Succes Message Text: Default

4.7. Add Custom CSS:
Copy the code below to the Custom CSS box:
.et_bloom .et_bloom_form_header img {
padding: 0 !important; width: 100% !important; position: relative;
}
.et_bloom .et_bloom_form_container .et_bloom_form_header {
padding: 0 !important; position: relative;
}
.et_bloom .et_bloom_form_header h2 {
max-width: 250px !important; margin-top: -120px !important; padding-left: 50px !important; padding-bottom: 20px !important;
}
.et_bloom .et_bloom_form_header p {
padding: 25px 50px !important;
}
.et_bloom .et_bloom_form_header .et_bloom_form_text {
padding: 0 !important;
}
.et_bloom .et_bloom_form_container .et_bloom_form_content {
padding: 25px 50px !important;
}
.et_bloom .et_bloom_1_field p.et_bloom_popup_input {
border: 1 px solid #9deefc !important;
}
@media all and (max-width: 713px) {
.et_bloom .et_bloom_form_header h2 {
margin-top: -100px !important; padding-bottom: 0!important;
}
}
@media all and (max-width: 657px) {
.et_bloom .et_bloom_form_header h2 {
margin-top: 0!important;padding: 10px 20px !important;max-width: 610px !important;text-align: center!important;
}
}
.et_bloom .et_bloom_form_container .et_bloom_form_content .et_bloom_popup_input input {
border: 1px solid #9deefc !important;
}
.et_bloom .et_bloom_form_header:after {
content:'' !important; width: 100%!important; height: 100%!important; background-image: url("https://wpzone.co/wp-content/uploads/2019/02/background.gif")!important; background-repeat: no-repeat!!important; position: absolute!!important; background-size: cover; background-position: center;
}
.et_bloom .et_bloom_popup:after {
background: url("https://wpzone.co/wp-content/uploads/2019/02/background.gif") !important; background-size: 1000px 1000px !important; background-repeat: no-repeat !important; background-position: center !important;
}
.et_bloom .et_bloom_popup {
background-color: rgba(0, 0, 0, 0.5);
}
OK, so far so good, if you’ve got this far, you’re ready to choose your display settings. Click the NEXT: DISPLAY SETTINGS button.

5. Display Settings
The opt-in display settings control how, where, and when your opt-in form appears on the front end of your site.
Set up Intro Animation on Fade In and Delay 10 seconds.
Check: Trigger After Time Delay
Check: Trigger At The Bottom Post

Next, select where your opt-in will show up.
Choose: Everywhere
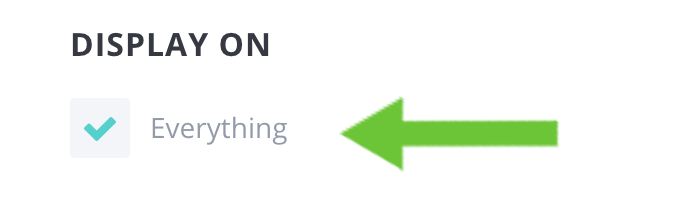
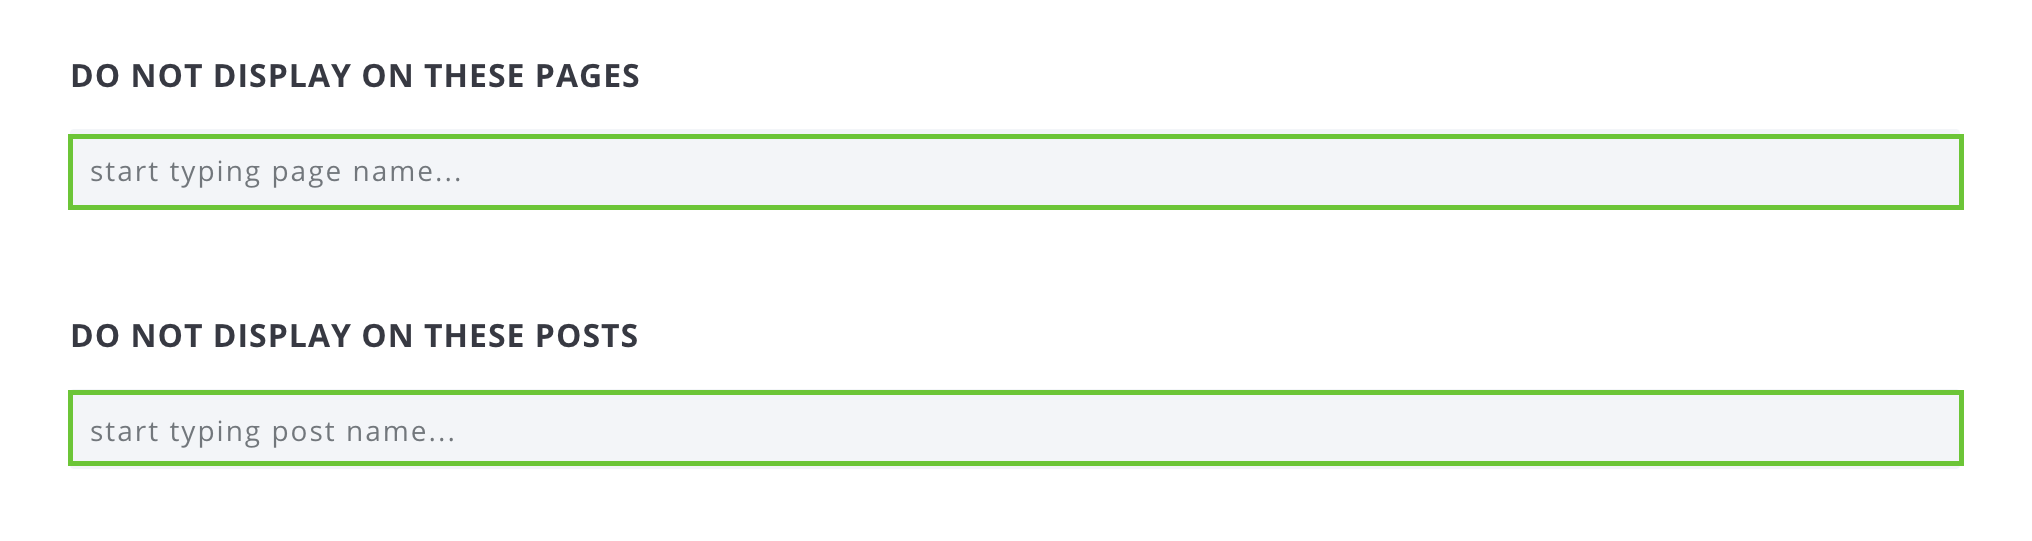
You can also target individual posts and pages, or exclude individual posts and pages using the following input fields.
Next click NEXT: SUCCESS ACTION button.

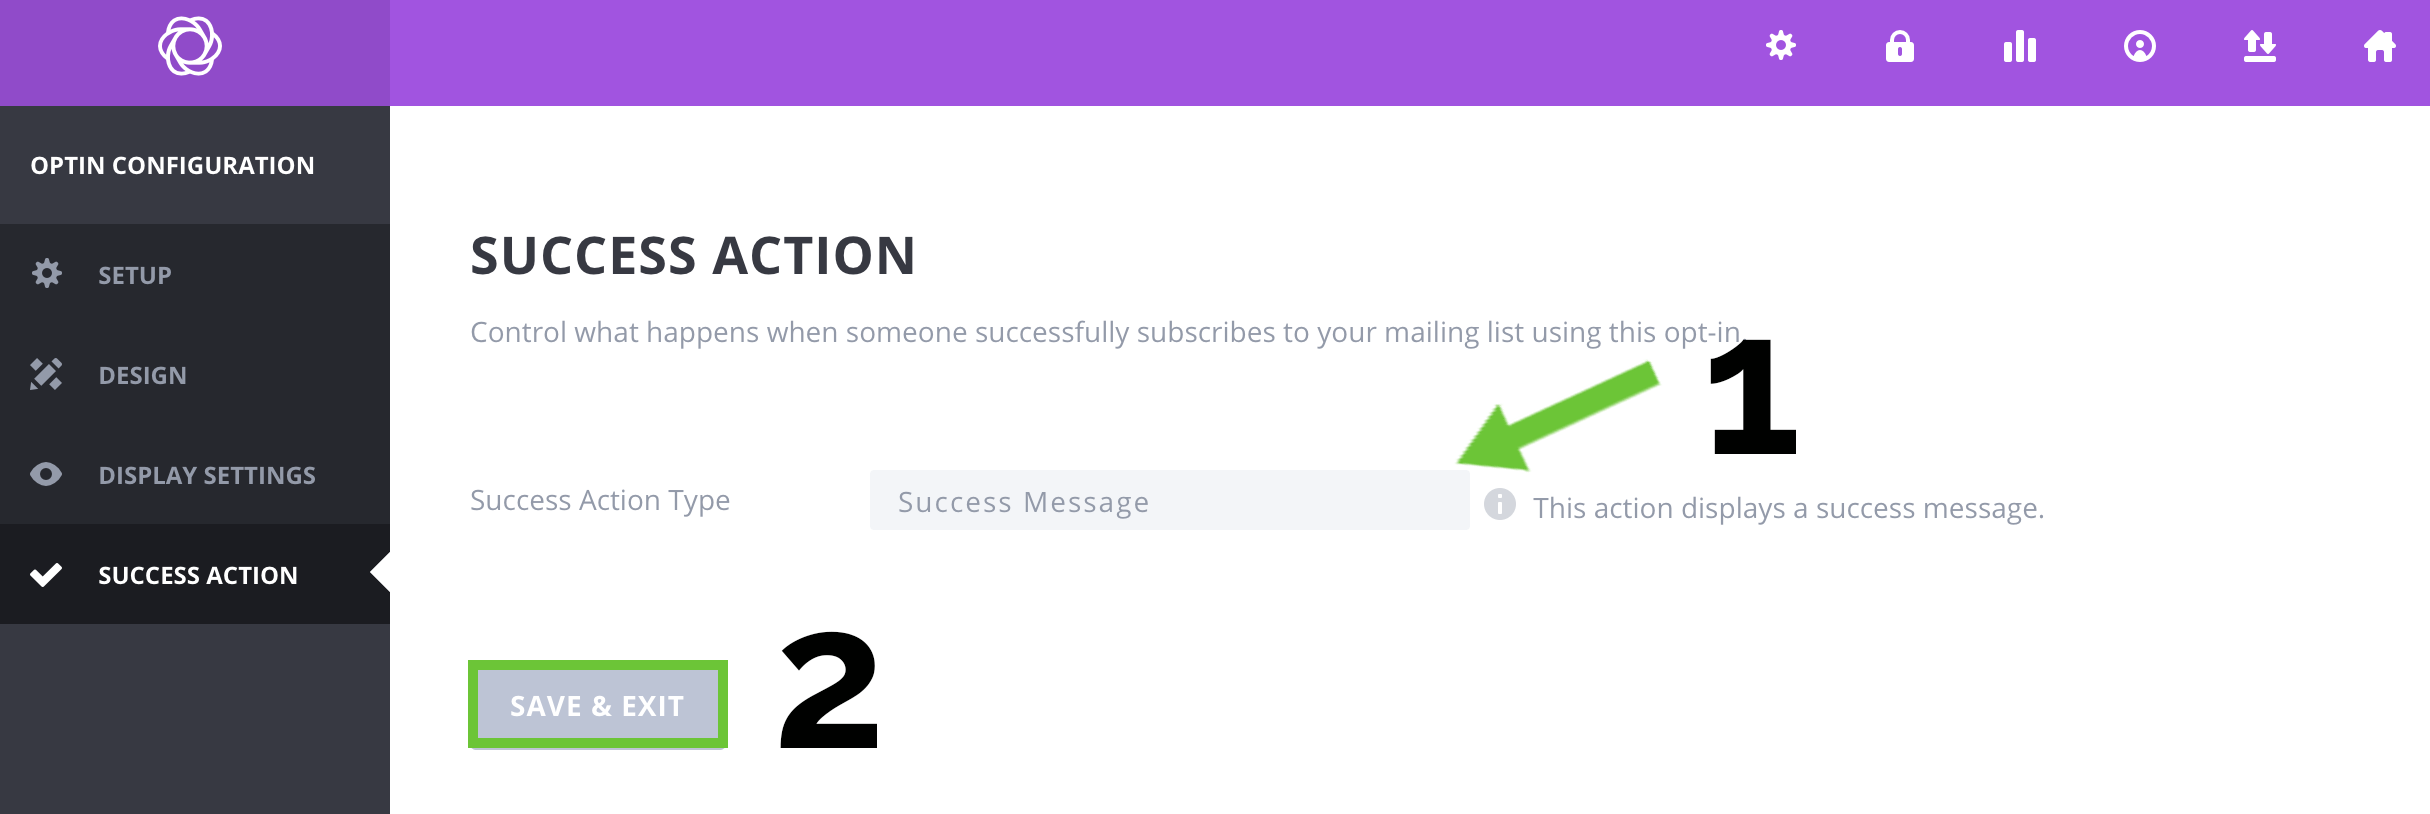
6. The Success Action Settings
You can control what happens when someone successfully subscribes to your mailing list using the Bloom opt-in.
We have two options :
1. Add Success Message
2. Redirect to URL
In this tutorial, we’re choosing the first option. Next click the SAVE & EXIT button.
Phew, it’s a lot of steps but you’re almost there! Now you will see your opt-in on your pages. You can manage it in the Bloom panel.
import ANIMATED popup DEMO to your website!
In a hurry? Download the Animated Popup Demo and save some time.
Read Elegant Themes’ tutorial how to export from within the Bloom settings panel and import them into your new website: read full article.
Final Thoughts
We hope you enjoyed this tutorial. If you’ve implemented it on your own sites, we’d love to hear from you in the comments 🙂 Thanks for sticking with us to the end and we hope that you find this useful in your projects.

Great popup.
I am having an issue with it. I’ve got a series of button-triggered demo popups and fly-ins all active on a site. When the balloon popup is active it throws everything off on all the other ones. I would appreciate a simple solution to target the balloon plugin itself to allow all the others to not be affected by it. When the balloon popup is active by itself it displays perfectly. Ideally, the custom CSS could be modified inside the popup within Bloom instead of through the mani Divi CSS window.
Thanks
Hello, you can find the unique CSS class of your popup, for example,
.et_bloom_optin_5,and modify our CSS to target only that specific class.i like so much everything with design like that 🙂 and your tutorial is very helpfull.
LOVE IT. THANK YOU
Animation is not working
Please help.
looks great.
The animations didn’t work. Did I miss anything?
Hi, could you send me a link to your popup?