Building an online store is no easy feat, but thankfully, WooCommerce is one of the most robust ecommerce platforms around. If your online store sells physical goods and products, one of the most important steps in creating your store is to configure the WooCommerce shipping setup.
When purchasing products online, customers want tip-top service. They want their items to arrive safely, without hassle, in good time, and not be tampered with. As the online store owner, it’s your responsibility to ensure that all order fulfillment goes off without a hitch. The first step is to make sure your shipping settings are correct.
When setting up your online store, there are a variety of shipping options available to you. In this post, we’ll walk you through the main configuration options of the WooCommerce core software. You’ll learn how to configure WooCommerce shipping zones, methods and classes so that you can get selling as soon as possible.
Please note: we are not ecommerce export experts. We have written this tutorial as a guide to advise you on the technical set up of your store. The example cases offered in this tutorial are for demonstrations purposes only. Please do not use the shipping settings for your store. If you are unsure about the shipping implications of your online store, please seek out professional help from either a trade expert or lawyer.
Getting started with the WooCommerce shipping setup
To begin the WooCommerce shipping setup, you can make use of the WooCommerce wizard. It’ll offer you a very basic set up process, which can be expanded on later.
To use the WooCommerce wizard, navigate to the WooCommerce Home page, click Set up shipping.
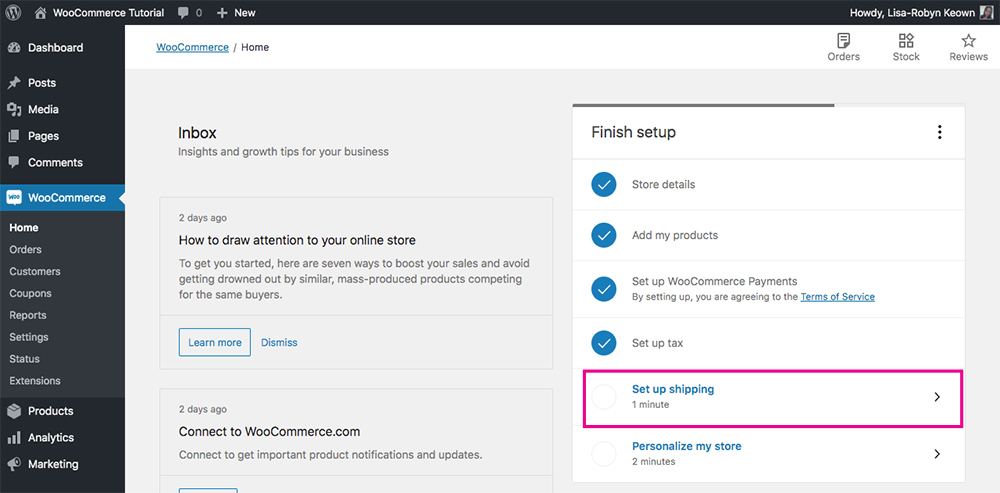
Use the WooCommerce wizard to set up basic shipping
You’ll be directed to a new settings page.
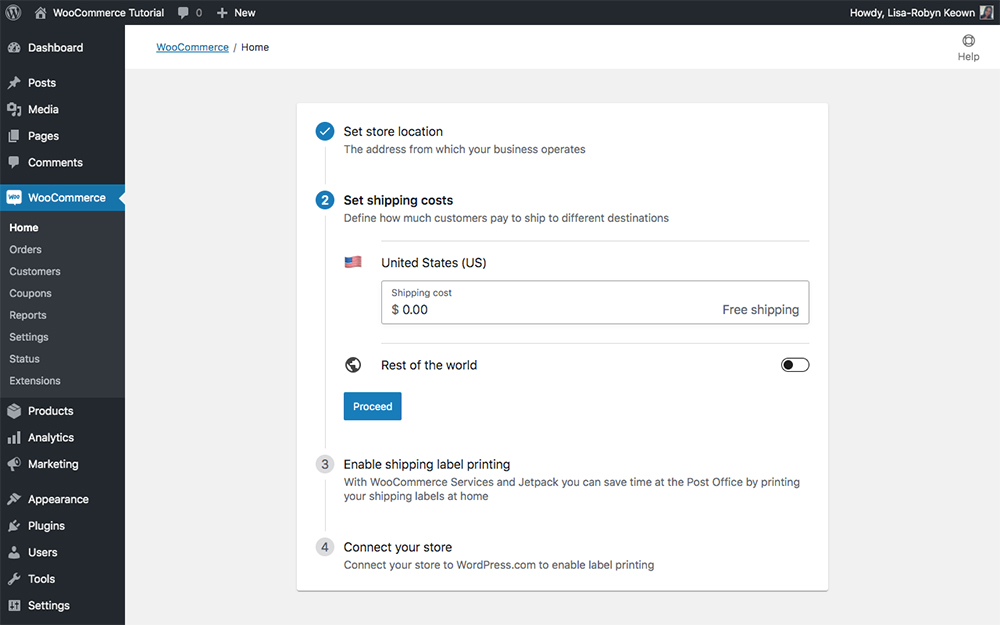
Use the WooCommerce wizard to configure basic shipping settings
Here, you can choose the rates for national and international shipping for your store. Please note, the setup pictured here is extremely simplified. We go into way more depth later in this post.
If offering free national delivery is part of your business strategy, leave it as zero value. In this demo store, I’ll set a domestic/national shipping rate of $10.00. Under ‘Rest of the world’ I’ve set a WooCommerce international shipping rate of $30.00. When you’ve set your rates, click Proceed.
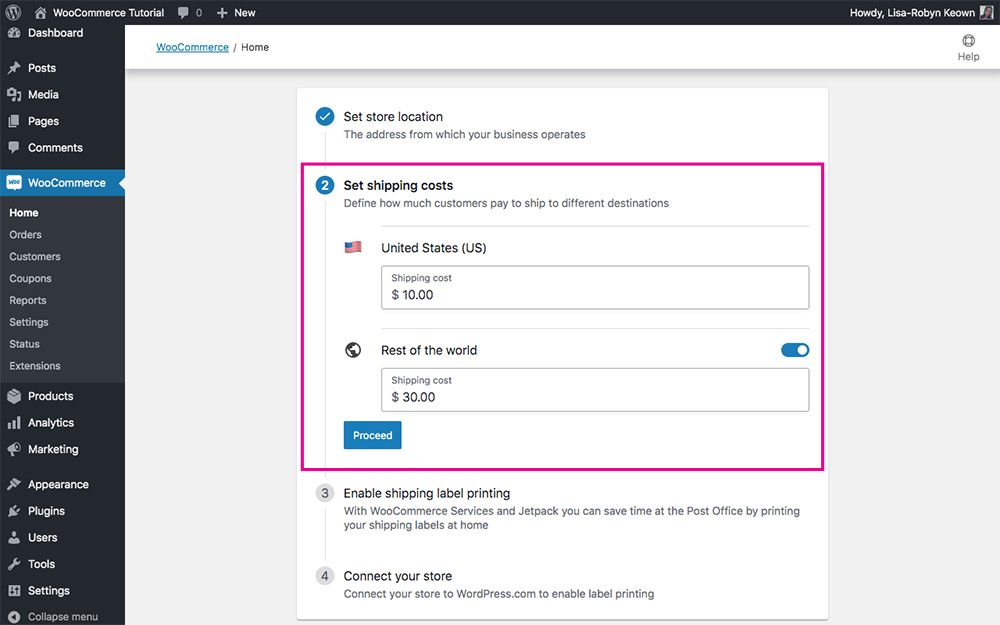
Use the WooCommerce wizard to configure basic shipping settings
Next, you’ll have the option of enabling the Jetpack plugin for label printing. If you are based in the United States, this feature enables you to automatically generate shipping waybills for USPS.
If you are outside of the United States, or are not a Jetpack user, click No thanks to skip this step. If you are in the US and are a Jetpack user, click Install & enable and let the configuration process begin.
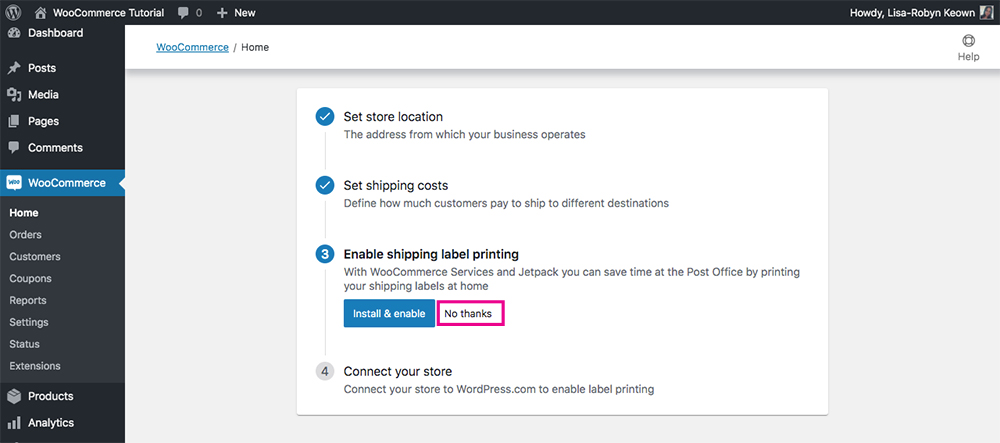
If you are not using Jetpack to print shipping labels, click No thanks
To continue configuring shipping, head to the WooCommerce > Settings menu. Click on the General tab, find the setting titled ‘Shipping location(s)’ and select the appropriate shipping destination from the drop-down menu. Once you’ve made your selection, scroll to the bottom of the page and click Save changes.
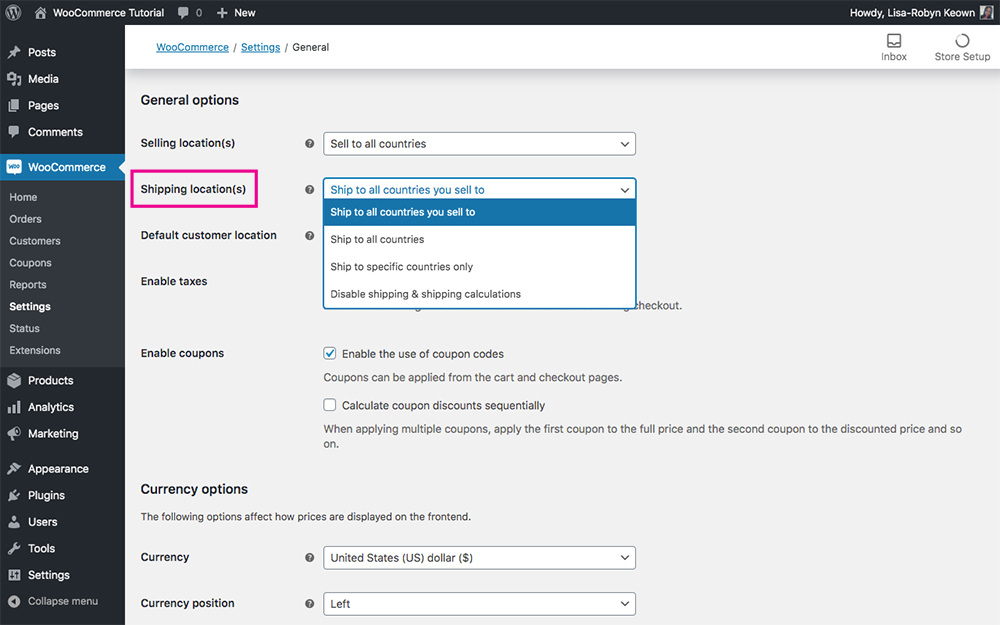
Set the shipping locations for your store
Now, navigate to the Shipping tab. Here, you’ll see three menu options of Shipping Zones, Shipping Options, and Shipping Classes.
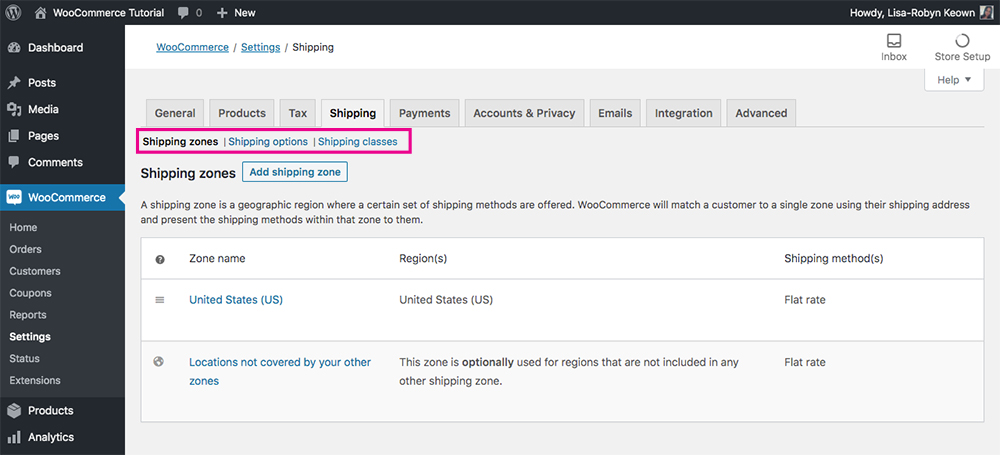
An overview of the shipping tab options
Begin at the first tab, Shipping zones
WooCommerce shipping zones
Depending on the nature of your online store, you can set various WooCommerce shipping zones to fit your sales strategy. To make things easy for you, WooCommerce allows you to set up varying degrees of shipping zone options without having to add an additional plugin or extension. Depending on your business’ shipping strategy you can set up flat rate shipping, free shipping or free local pickup options.
In the Shipping zones tab, you’ll define the geographical locations where you’ll ship your products to, and set the respective shipping rates and methods for each region.
We’ve already set up a shipping rate for the zone of the United States of America. Now it’s time to add some more regions and specify the shipping particulars.
By default, WordPress assigns a fallback category called ‘Locations not covered by your other zones’. If a product must be sent to a region outside of the defined shipping zones, it’ll automatically fall into this ‘blanket’ zone.
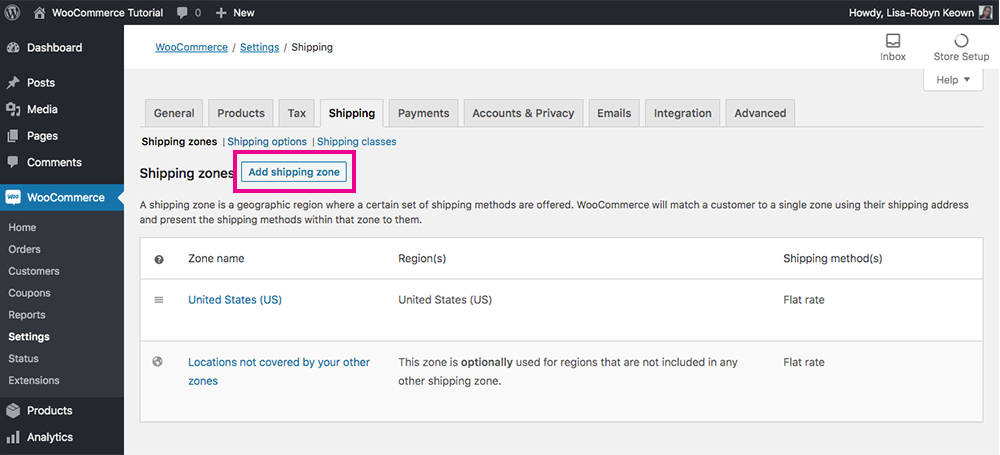
Add a new shipping zone
To add a new shipping zone, click Add shipping zone.
Add a shipping zone
You’ll open to a new section that’ll let you define a new zone. First, give the zone a name. This can be Local, Domestic, National or any name that you can use and understand easily.
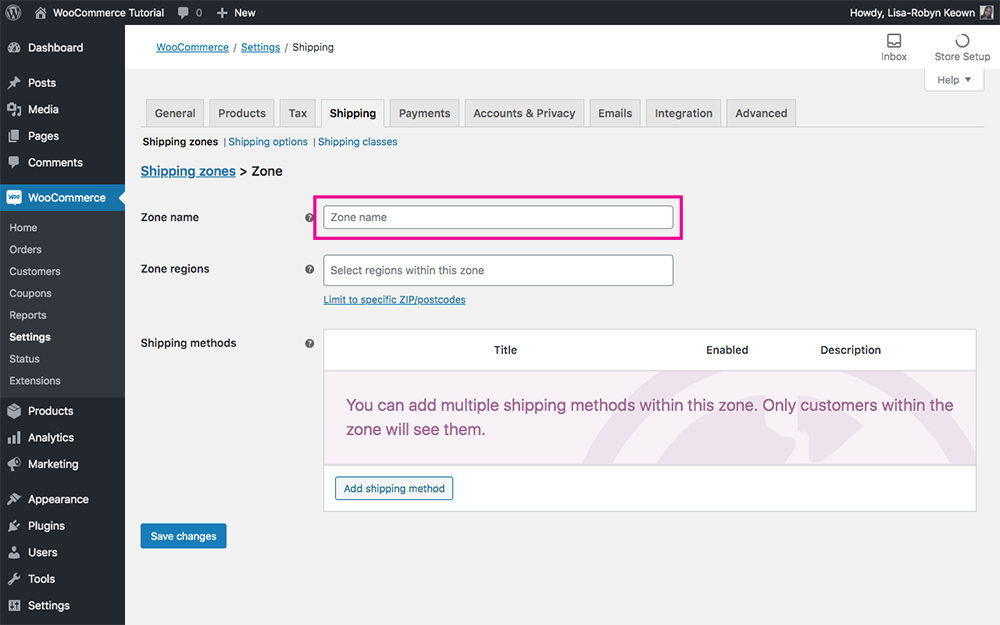
Enter a zone name for your shipping zone
Next, you need to set the Zone regions. Here, you can specify states, cities, countries or continents. To do so, start typing the region’s name in the text area and selecting it from the prompts list. Alternatively, you can click ‘Limit to specific Zip/Postcodes’, which will open up another text field. Here, you can enter a range of zip or postal codes to set a limit to the shipping zone.
Add a shipping method
Once the region is set, you need to assign the WooCommerce Shipping methods. To do so, click the Add shipping method button.
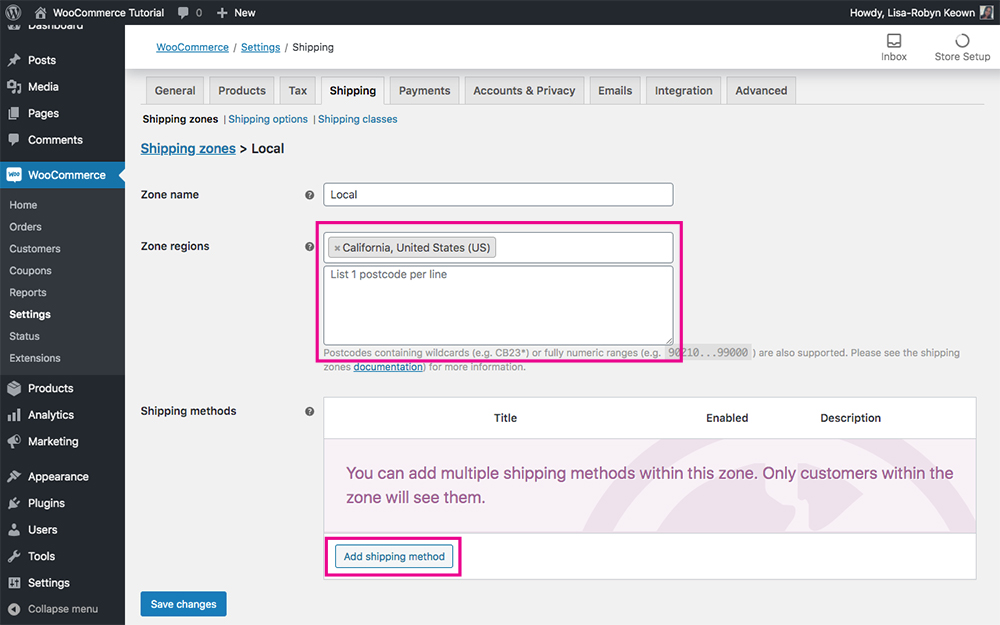
Enter a zone region for your shipping zone
Now, a pop-up window will appear. From the drop-down menu, select the appropriate shipping method.
You can select:
- Flat rate
- Free shipping
- Local pickup
Once you’ve selected a shipping method, click Add shipping method.
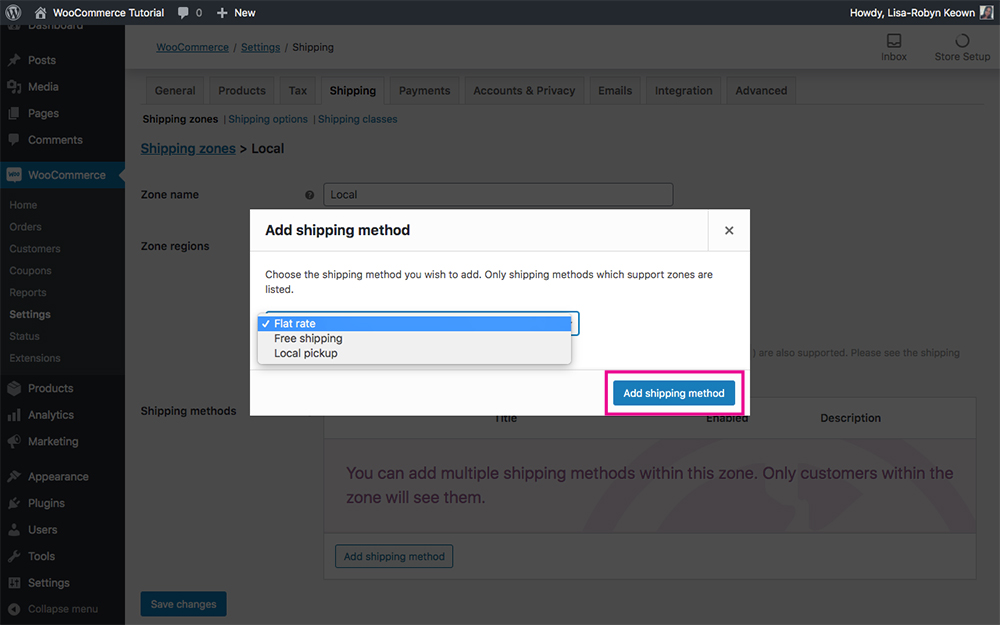
Add a shipping method to a shipping zone
You’ll see that the shipping method of choice is now listed. Hover over the shipping method and two options of Edit or Delete will appear. Click Edit.
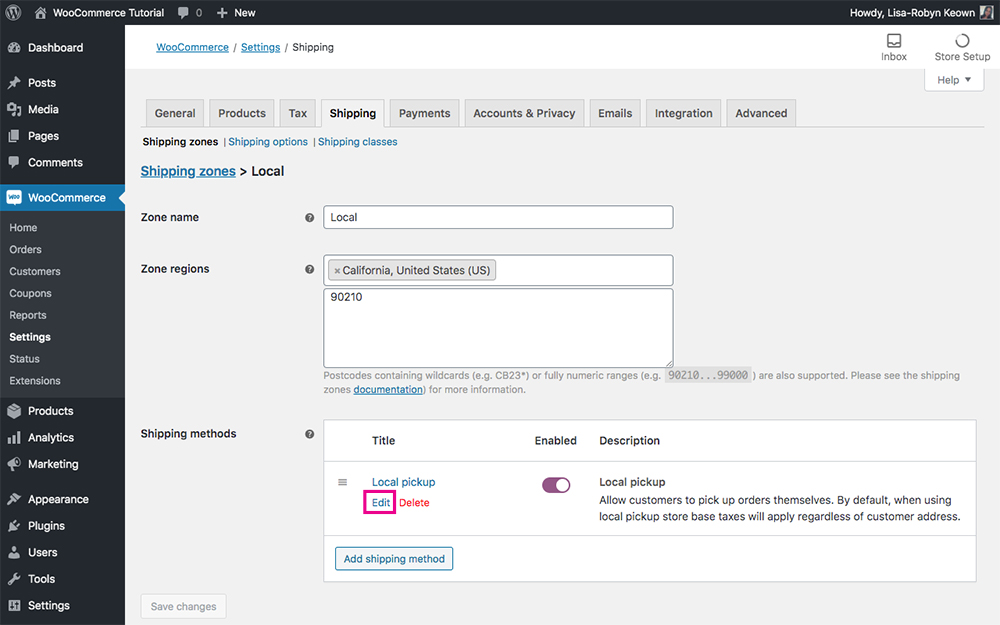
Set up a local pickup shipping option
Another pop-up will arise prompting you to configure the shipping method.
Local pickup settings
For the local pickup shipping method, you’re giving the customer the option to collect the purchase from your physical store location or distribution warehouse. This is great if you want to give people the option to avoid shipping costs.
In the Local pickup settings pop-up you have the following options:
- Title: By default, this is titled as Local pickup, but customers may not fully understand what the term means. You can change the name to something clearer like ‘In-store collection’ or ‘Collection at pick up point’. The text you enter here will display in the checkout options on the front-end of the site.
- Tax status: Decide whether this shipping method is taxable or not.
- Cost: Potentially assign a cost to the shipping method.
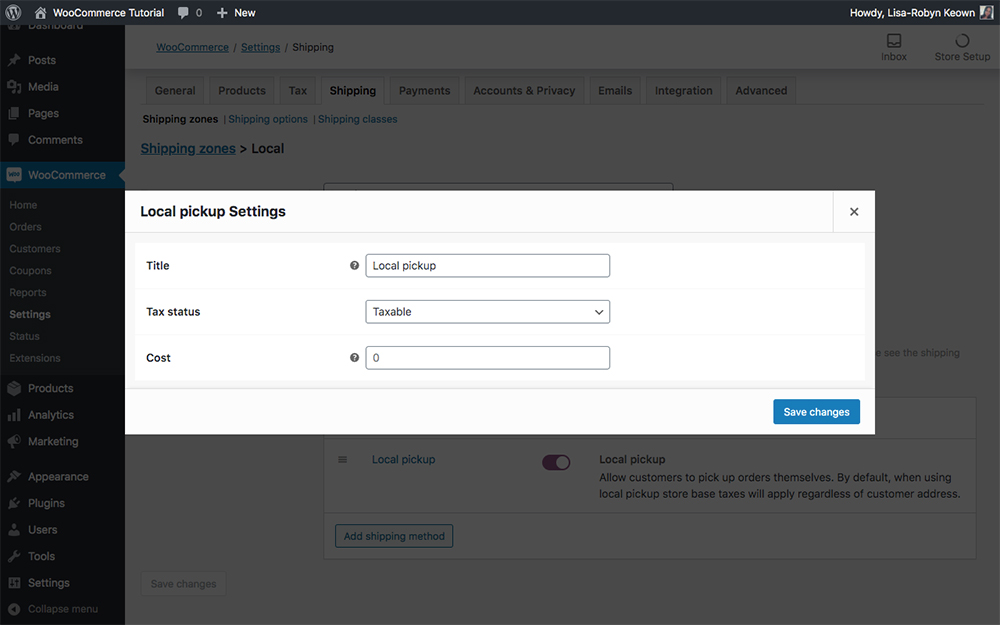
Configure the local pickup shipping settings
Free shipping settings
The next shipping option is for Free shipping. Again, a pop-up window will arise asking you to define the terms for free shipping.
Again, there is a Title field where you can change the name ‘Free shipping’ to something else. There is also a section ‘Free shipping requires…’ which asks you to declare any conditions for free shipping eligibility. There are a few options via the drop-down menu.
Selecting N/A means that there are no conditions and the shipping is free.
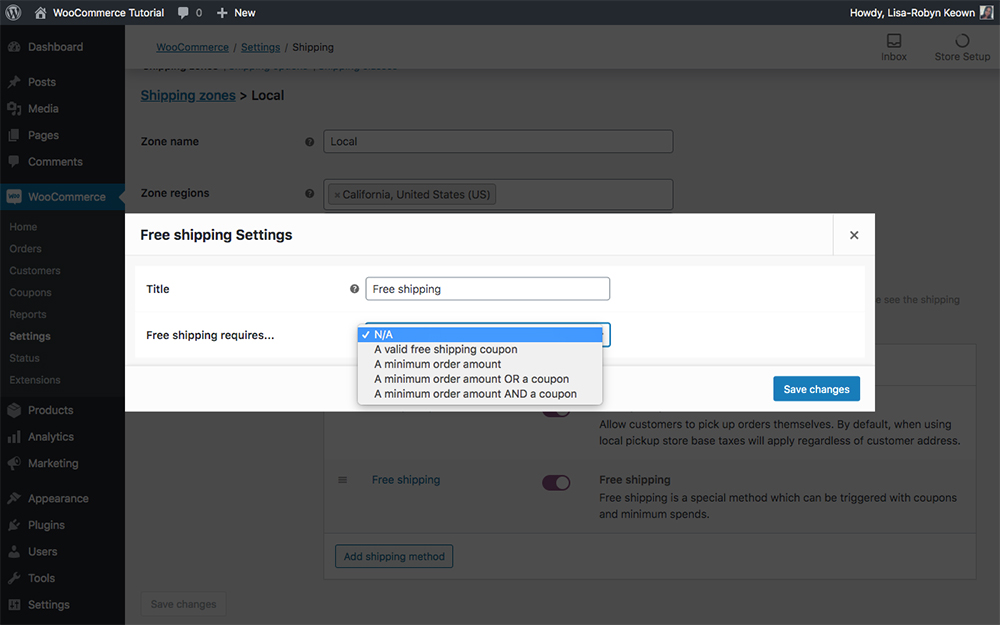
Configure the requirements for free shipping eligibility
You can add conditions that state that shipping is free either with a valid coupon, after a minimum order spend is reached or a combination of either option or both.
If you decide to make free shipping conditional on a minimum spend, you are then asked to specify the minimum spend value and how coupons can be used within this condition.
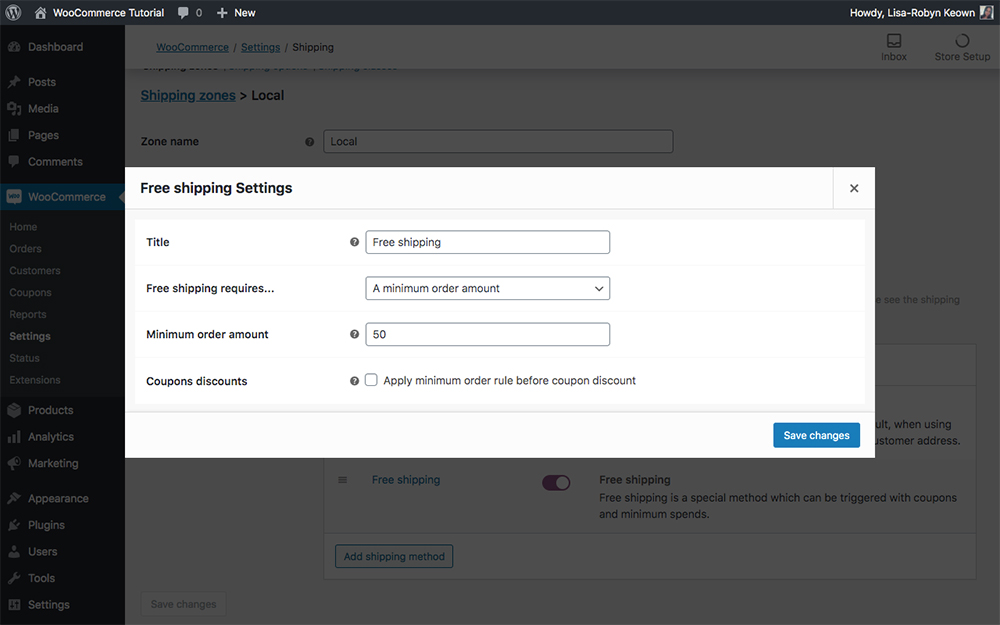
Configure the free shipping settings
Flat rate settings
The final shipping method is WooCommerce flat rate shipping. Here you have the following options for setting up flat rate shipping in WooCommerce:
- Method title: Changing this text changes what the customer sees at checkout
- Tax status: Determines whether the shipping method if taxable or not
- Cost: Defines the rate for shipping
Setting the cost variable here can be a bit tricky. If you hover over the little question mark icon, a prompt will arise to give you a bit more information.
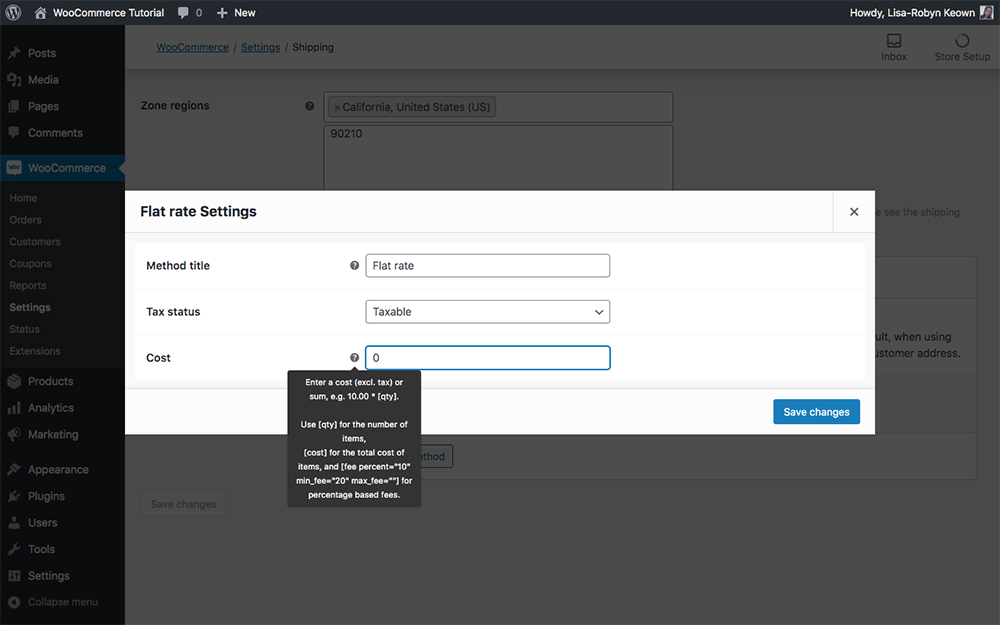
Hover over the question mark icon for an explanatory prompt to understand the Cost calculation
The flat rate shipping cost can either be set using a simple flat rate ($10, for example), or it can be set using variables in a particular formula. It can be set in a few ways:
- Quantity: Using the placeholder [qty], set the shipping rate based on the number of items purchased. For example, if you want to charge $7 for each item purchased, you would enter the rate as [qty] * 7.
- Cost: Using the placeholder [cost], set the shipping rate based on the total cost of the order. For example, if you want to charge the shipping rate as 12% of the total items purchased, you would enter the rate as [cost] * 0.12.
- Fee: Using the placeholder [fee], set a percentage of sales fee with a minimum shipping rate. For example, if you want to charge 15% of the total cost of the order, but want the order to include a minimum shipping cost of $10, you could enter the shipping rate as [fee percent=”15” min_fee=”10”].
Once you have added the shipping methods, your Shipping Zone screen could look something like this:
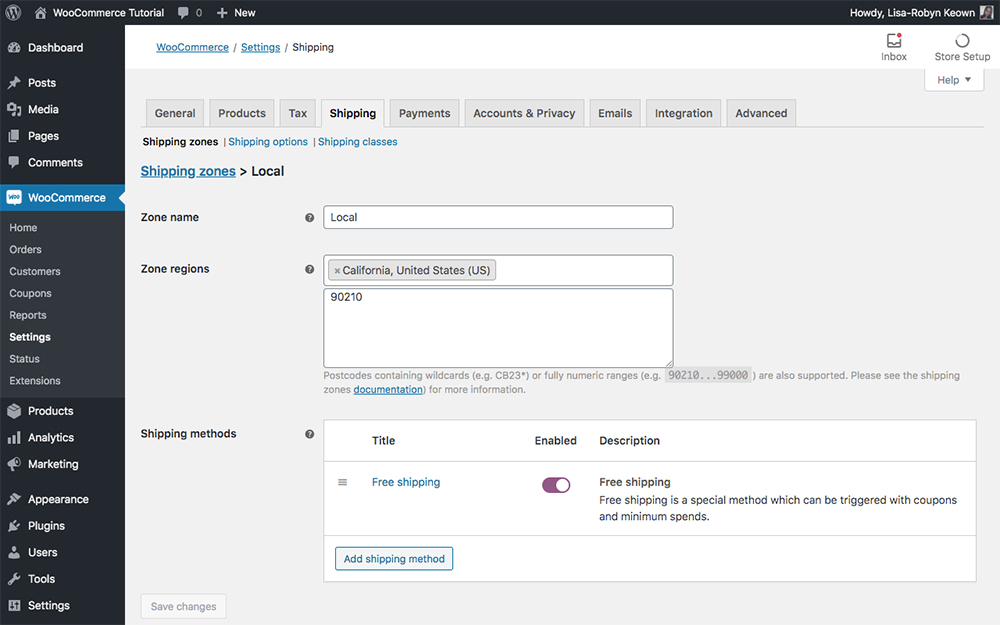
Local shipping method set up
In the example, I am offering free shipping to orders from within the state of California.
Once you have completed configuring the shipping zone, click Save changes and return to the main Shipping zones screen.
You’ll see that the Shipping zones are set, charging a flat rate to the United States and offering free delivery in the state of California.
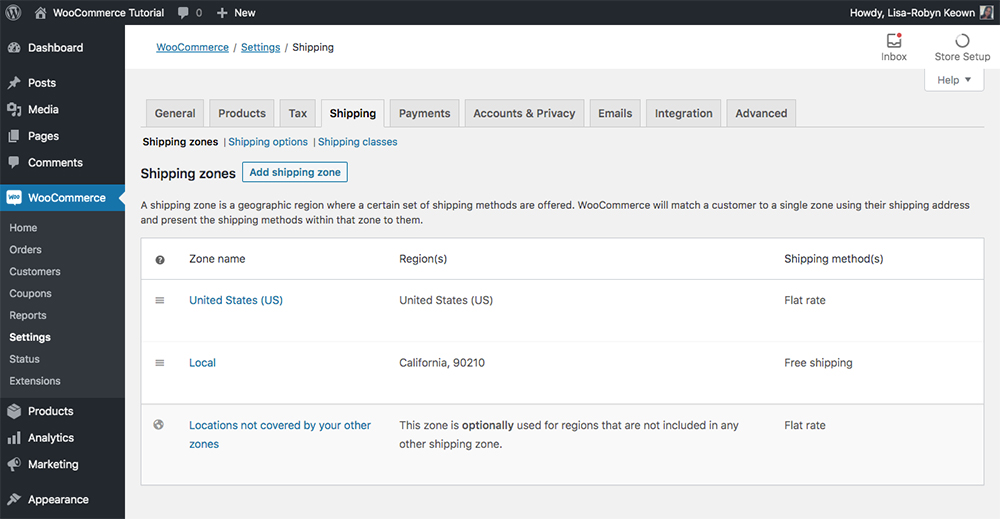
WooCommerce shipping zones configured
Locations not covered by other zones settings
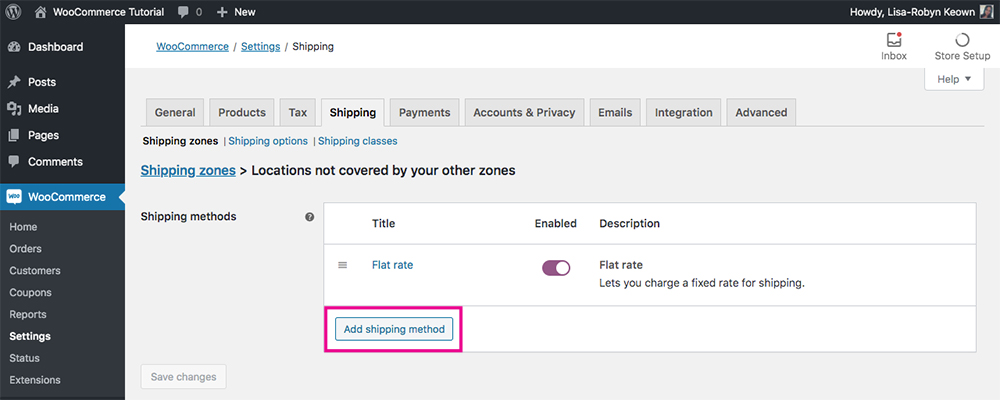
Below the defined shipping zones is another setting called ‘Locations not covered by your other zone’. This takes care of all regions not explicitly defined by an individual Shipping zone. For example, if someone ordered a product but they were based outside of the United States, the shipping rate stipulated here would apply to their order.
To set this rate, hover over the ‘Locations not covered by your other zone’ text and two options will display. Click Manage shipping methods.

Manage other shipping zones
You’ll be directed to a new screen to enter the shipping method. Previously, I entered a flat rate for other zones, so this is the Flat rate shipping method appearing here. If you did not previously add a shipping method, and this interface is blank, click Add shipping method to begin.
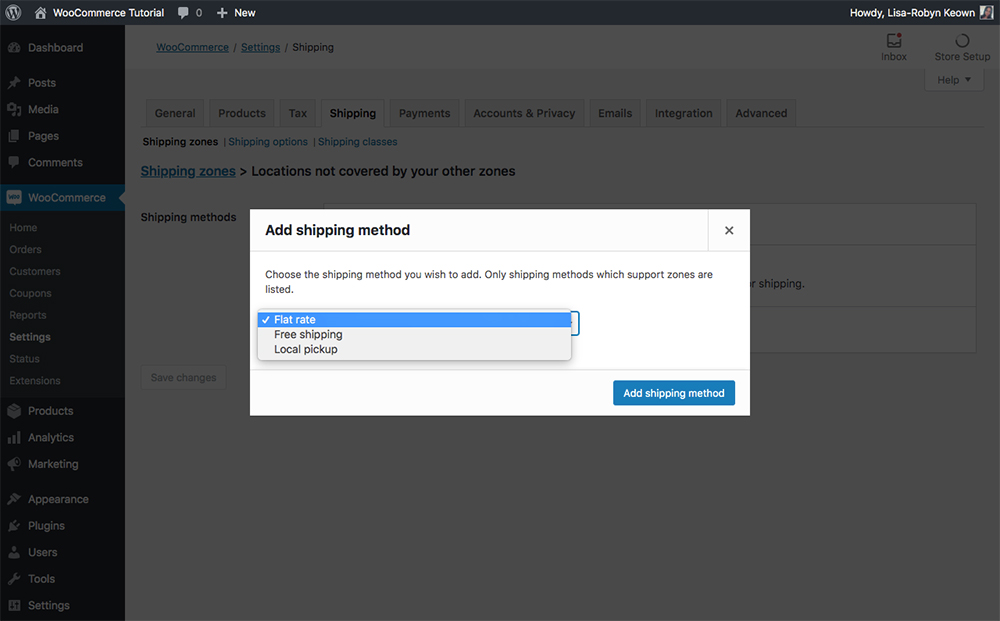
Add a shipping method
If you are adding a new shipping method, a pop up will appear asking you to select which of the three shipping methods are applicable to the ‘other zone’ destinations. Again, you can select from flat rate, free or local pick up.
Once you have made your selection, click Add shipping method.
Select the shipping method for your shipping zone
Once you’ve added the shipping method, hover over the text thereof and two options of Edit and Delete will appear. Click Edit.
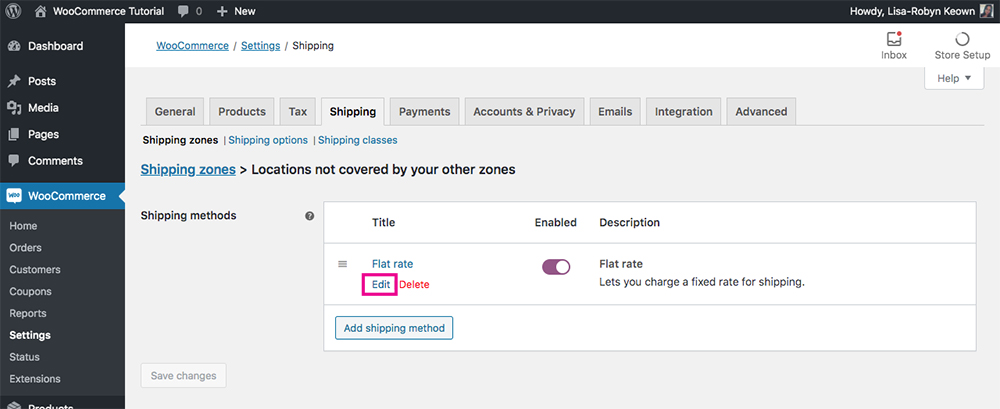
Edit the shipping method
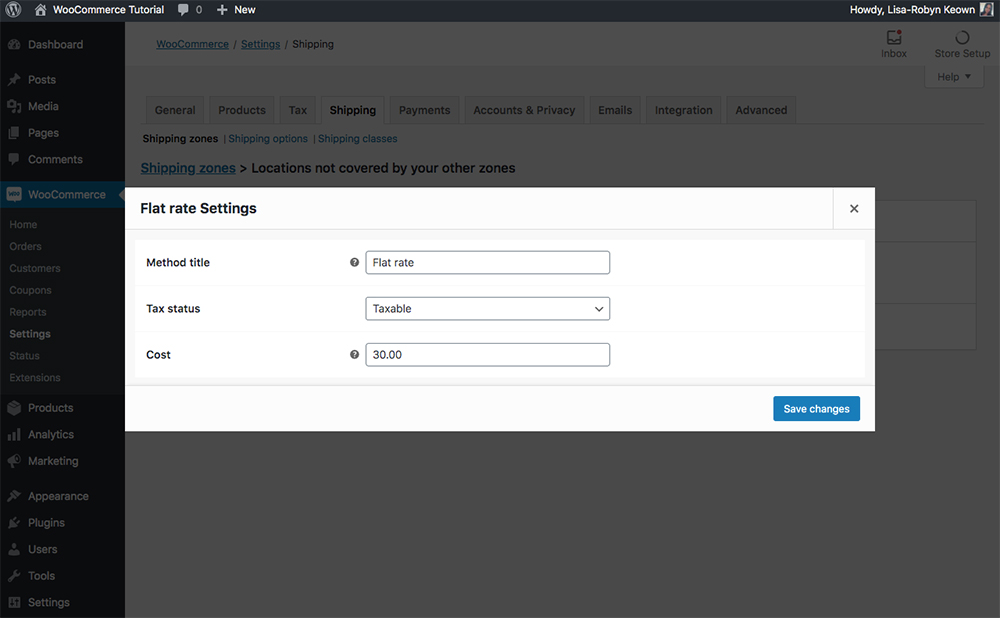
At this point, you’ll be asked to configure the settings of the respective shipping method. When editing a Flat rate shipping method, similar to before, you can decide to change the Method title, status and cost.
Here, the cost is fixed to a flat rate of $30.00, but if you want to use specific costs as mentioned before, you can use:
- Quantity, using the placeholder [qty].
- Cost, using the placeholder [cost]
- Fee, using the placeholder [fee].
When complete, click Save Changes.
An example of a flat rate settings
Configuring WooCommerce shipping options
Now that your shipping zones, methods and rates are all set up, there are a few final configuration steps to get your store ready for shipping. Next, let’s explore the Shipping options menu.
The Shipping Options tab shows a number of settings that are concerned with how shipping calculations will display on the front-end of your website. These options can have an effect on the user experience of your site, so really think about how you want your customer to interact with your store.
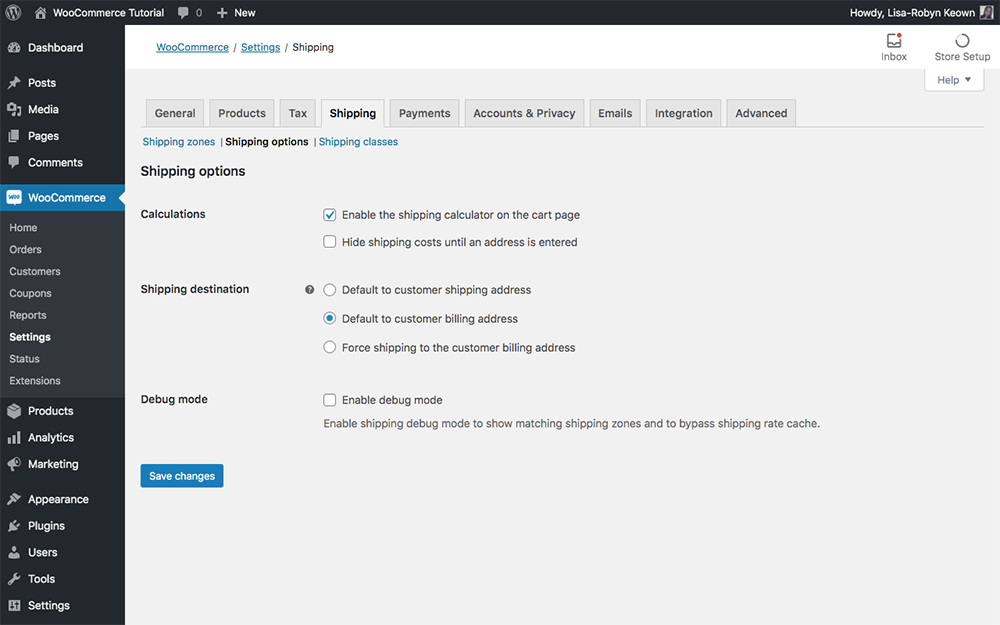
An overview of the shipping options settings
Here, you’ll find the following options:
Calculations
The first checkbox lets you decide if you’d like to display the shipping cost calculation upfront by enabling the shipping calculator on the cart page. This is useful for your customer as they’ll have a rough estimate of what they’ll spend on shipping as they shop.
The second checkbox lets you hide the shipping calculations until the customer enters a delivery address. This is equally helpful as it’ll give your customer an accurate shipping charge once they enter their location.
Shipping destination
This is concerned with the shipping and billing addresses entered by the customer. WooCommerce offers three different options for setting shipping addresses. They are:
- Default to customer shipping address: This option asks your customer to specify both a shipping and billing address.
- Default to customer billing address: This option sees that the billing address will by default be set as the shipping address. If necessary, the customer will have the option to specify a separate shipping address.
- Force shipping to customer billing address: This option only gives customers the option to enter a billing address. They cannot enter an alternate shipping address.
Debug mode
If ever you need to do some development work on the shipping configurations, you can enable debug mode to find matching shipping zones without the threat of caches displaying shipping rates.
Set up WooCommerce shipping class
The final shipping configuration setting is for Shipping Classes. This is a feature best used for products or product ranges that need a particular approach to their shipping strategy due to the nature of the product. For example, if you have a product that is really large and heavy, and needs special attention in shipping, it’s a good idea to set up a special WooCommerce shipping class for these products.
If you have an online sneaker boutique and typically sell sneakers, streetwear apparel and accessories, but one of your items is a massive, heavy wall-to-floor cabinet for displaying sneakers, you’d need to create a particular class for this product as it will not be catered for in your standard shipping options.
To begin click Add shipping class.
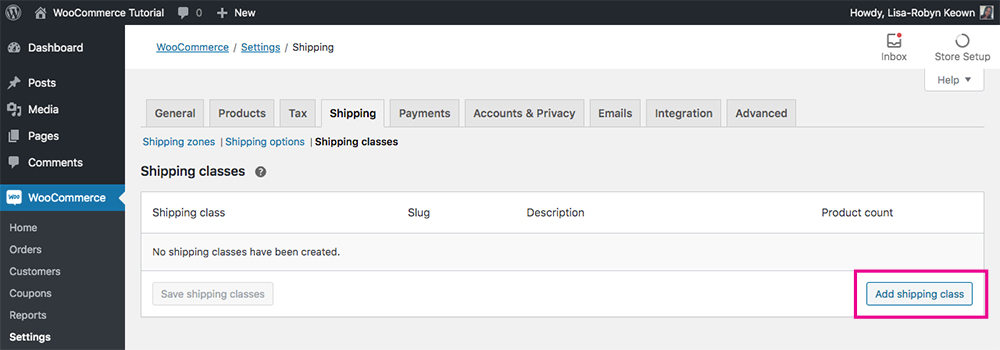
Add a shipping class
You’ll be taken to a new screen and asked to specify:
- Shipping class: Assign a name for the shipping class
- Slug: If desired, enter a custom slug title
- Description: Enter a description of the product type ort shipping class
- Product count: As soon as you assign products to this shipping class, they’ll begin to display here
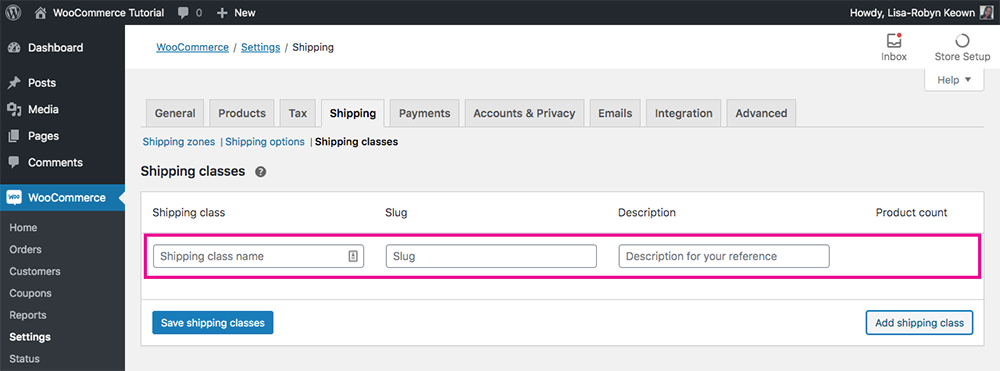
Enter shipping class data
You can add as many shipping classes as you like by clicking the Add shipping class button.
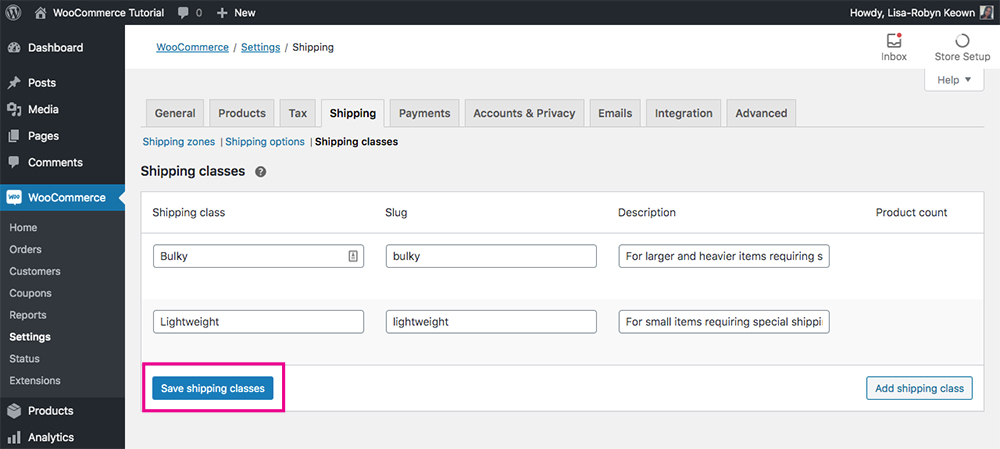
Save the shipping class
When you have added sufficient shipping classes, click Save shipping classes. Now that a shipping class has been created, it’ll reflect in the flat rate shipping options you’ve already configured.
You’ll need to update your shipping zones to include the new shipping classes in case a customer in a specific shipping zone buys a product of a particular shipping class. Returning to the sneaker display wall cabinet example, if you are only shipping this product for national delivery, you’ll need to update the specific shipping zone to accommodate this product. If this shipping class is applicable to all zones, you need to amend all zones accordingly.
To view this, return to the Shipping Zones tab, click Edit on the specific shipping zone you wish to revisit and then click Edit under the Flat Rate shipping method.
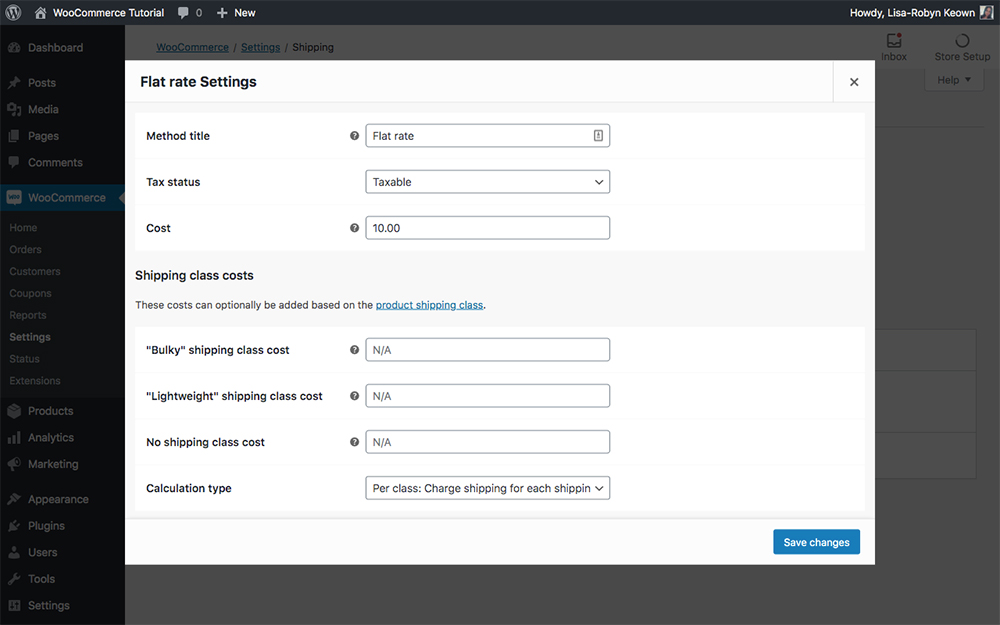
Assign shipping classes to flat rate shipping methods
Now you’ll see a new section called Shipping class costs has been added.
- Here you’ll see cost declaration boxes for each shipping class you’ve created. You can use the same Cost formulas mentioned above ( [qty], [cost] or [fee] ) to specify the shipping class costs.
- The next option ‘No shipping class cost’ lets you set an additional fee for any products that do not fall under any specific shipping class.
- Finally, the Calculation type setting lets you set alternate calculations for shipping cost calculations for multiple items purchased. You can select between charging shipping individually for each shipping class, or charge for the most expensive shipping class.
Once you’ve configured the shipping classes remember to click Save changes.
Ending thoughts
Configuring shipping for an online store can be tricky. There are so many options and settings to keep track of that this can get confusing, especially if you sell lots of products to various regions.
It’s important to make sure your shipping settings are correct. If not, you may make a financial loss or disappoint a customer.
Now that you’ve set up shipping for WooCommerce, don’t forget to configure taxes too! If you need help deciding which theme to use for your WooCommerce store, our top recommended theme is Divi. If you need some help choosing the best plugins for your store, read this guide.
We hope you’ve enjoyed reading this post and that it helped to demystify the WooCommerce shipping configuration settings. If you have any questions, feel free to share them below! Thanks for reading!

hi is there any way i can see which states ive shipped to?
To compile this information you would need a reporting plugin like Export Order Items Pro https://aspengrovestudios.com/product/export-order-items-pro-for-woocommerce/