One of the most important steps in setting up your online store is configuring WooCommerce sales tax. When selling goods or services, the accurate taxation value must be calculated and taken into account for your product listings. It’s crucial that your store operates in accordance with the tax laws of your country of operation.
When setting up taxes in WooCommerce, the plugin is geared in such a way that it’s straightforward and relatively easy to configure, but still, it can be complicated to navigate especially the first time around. If this is your first time setting up WooCommerce sales tax, follow along in our tutorial.
In the following post, you’ll learn about WooCommerce sales tax and how to set it up for your online store.
How to Set Up WooCommerce Sales Tax for Your Online Store
Configuring taxes for WooCommerce is a vital step in the process of building your online store. You’ll need to make sure that your operation is running in accordance with the correct taxation laws and that your store is operating lawfully.
Please note: We are not accountants or tax practitioners. The information we provide in the following article so meant to guide online store owners by advising best practices. Please consult your accounts and legal team when configuring sales tax for your online store. If you are unsure about the tax implications of your online store, seek out professional help from either a tax practitioner or tax lawyer.
Once you have received accurate tax rates, you’re ready to set them up on your online store.
Enable sales tax
First things first, you need to enable sales tax. To do so, from the WordPress dashboard navigate to WooCommerce > Settings and click on the General settings tab.
Scroll down until you see the Enable taxes option, check it to select it, and click Save Changes.
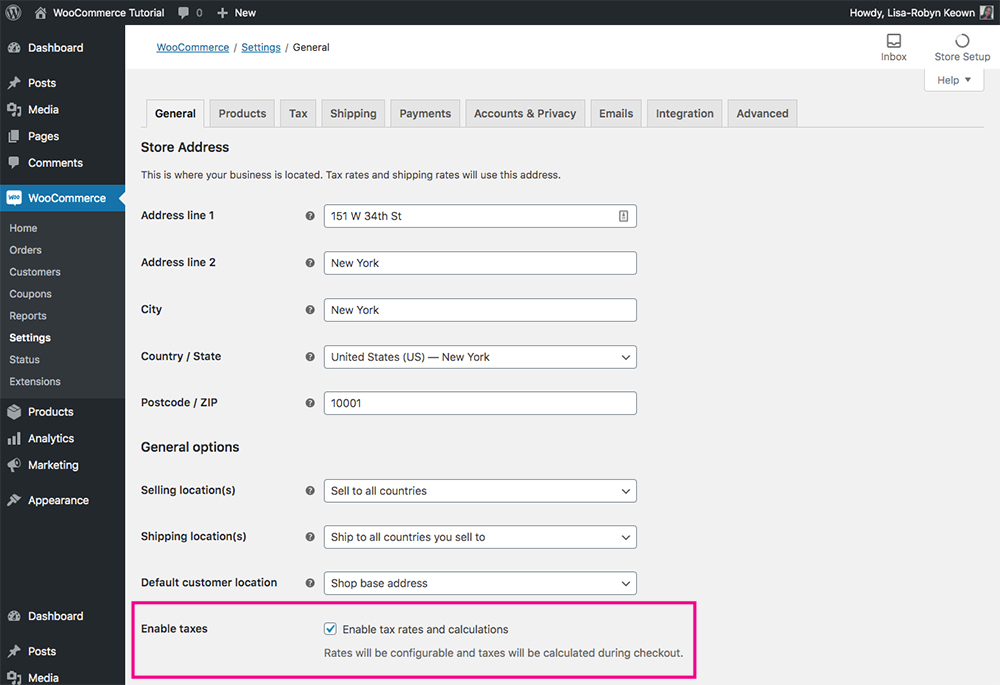
Select the enable taxes checkbox
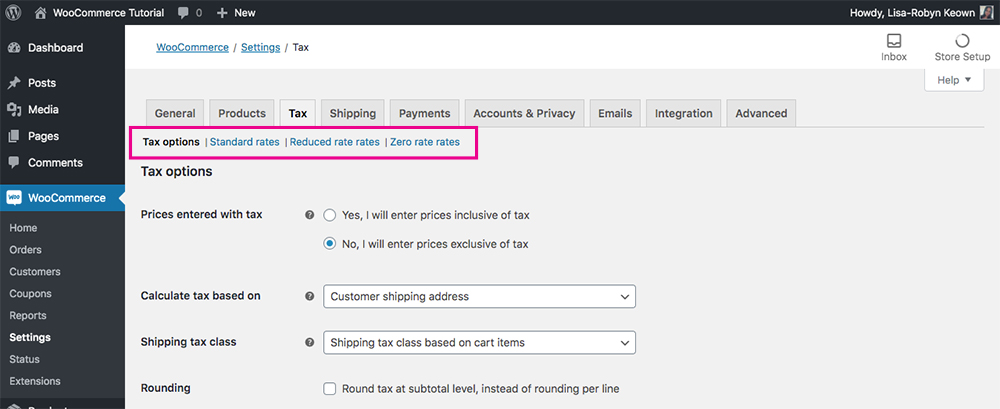
Once you’ve enabled taxes, a new tab called Tax will appear.
Navigating the WooCommerce Tax tab
Now, open the Tax tab. You’ll see four menus:
- Tax options
- Standard rates
- Reduced rate rates
- Zero rate rates
WooCommerce tax settings options
Let’s take a closer look at these options.
Understanding the various WooCommerce sales tax options
In the Tax Options menu, you’ll have the following settings:

Overview of the WooCommerce Tax options menu settings
Let’s unpack these a bit more in detail:
Prices entered with tax: First, you need to decide whether your product prices will be inclusive or exclusive of tax.
- Selecting the first option, Yes, I will enter prices inclusive of tax will allow you to calculate prices inclusive of the store’s tax rate. For example, if a certain location includes a tax rate, it’ll apply to purchases made in the relevant location. Purchases outside of the location will not include the tax rate.
- Selecting the second option, No, I will enter prices exclusive of tax means that prices will be exclusive of tax. Tax will be calculated as an additional cost and supplied at checkout. For example, if you display a product for $10 in your store, its total cost will display as $13 (with a $3 tax fee) at checkout.
Calculate tax based on: The next option is a drop-down menu. It gives you three options and lets you decide which location you’ll use to set up your tax form. You can choose from the:
- Customer shipping address
- Customer billing address
- Shop base address
Shipping tax class: Next you’ll need to define the shipping tax class. Typically, the shipping tax class is set in relation to the items in the cart.
For example, if a customer adds a product to their cart that falls under a different tax rate, the respective shipping tax will also get calculated at the same rate.
‘Shipping tax class based on cart items’ is the most common option, however, if this is not the way your store operates, you can select an alternate Shipping tax class such as Standard, Reduced rate or zero rate from the drop-down menu. There’s a detailed section on shipping rates and classes below, if this doesn’t make perfect sense just yet, wait until the next section.
Rounding: Now you’ll be asked about rounding. This setting is asking whether you’d like to round the taxes off to the nearest approximate digit on the subtotal or for each line item or product.
Additional tax classes: As well as giving you a few standard tax rates, WooCommerce also lets you add your own. If required, you can do so here in the Additional Tax Classes section. If you create a new tax class, it’ll display as a new option in the Tax menu items.
Display prices in the shop: Here you can decide whether you want your product prices to display including or excluding the tax rate within the Shop.
Display prices during cart and checkout: Similarly, you can decide whether you want your product prices to display including or excluding the tax rate within the Shop.
Price display suffix: If you’d like to add a suffix to the end of the product price, you can add it here. For example, you could add text along the lines of “inclusive of VAT” or similar.
Display tax totals: The final option lets you decide whether you’d like to display the final tax sum as a single total or itemized. Selecting to display a single total will display the taxes due on the total of the products in the cart, whereas itemized will display the tax due for each item.
Setting up tax options
Once you’ve configured the tax options for your online store, it’s time to set the tax rates. This is done via the tabs in the menu. There are three tabs:
- Standard rates, here you can set up different tax rates for your shop
- Reduced rate rates, here you can set up tax rates for reduced rate items
- Zero rate rates, here you can set up rates for tax-free items
Note: It is your responsibility to calculate and enter the correct taxation rates for your store, as per each location you are shipping to.
If your products are sold globally and there are tax rate discrepancies between countries, for example, you may wish to enter a standard rate and reduced rate depending on the complexity of your store’s operation.
Adding a standard tax rate
By default the standard tax rate section is blank. To begin, click Insert new row.
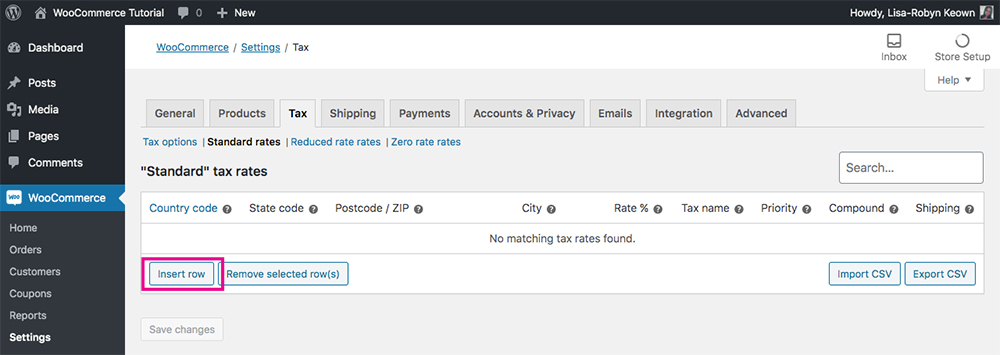
Click Insert row
Next, a table will display. You can click in any cells of the table to enter data.
Standard tax rates settings
Enter the following information as relevant for your store:
- Country code: First you need to enter a two-digit country code. You can find the ISO 3166-1 alpha-2 country codes for each geographic location here. If you don’t want to specify a single county, you can leave this blank.
- State code: Next, enter the two-digit state code for the respective states. Again, if you don’t want to specify a single state, or this is not relevant for your store, you can leave this blank.
- Postal Code / ZIP: Then, you need to specify the ZIP code or postal code for the tax region in question. If you are entering multiple zip codes, you can separate each code using a semicolon.
- City: Here you need to specify the city wherein the tax rate is applicable. If you don’t want to specify a single city, you can leave this field blank. If you need to stipulate multiple cities, you can separate them using a semicolon.
- Rate %: Next you need to specify the tax rate in question. When defining it, it must be specified with four decimal places, for example, a tax rate of 5% must be entered as 5.000, and similarly, a tax rate of 6.5% must be entered as 6.5000.
- Tax name: Then, you’re asked to specify a name for your tax rate. This can be custom text but make it easy to understand, especially if you’re entering multiple tax rates.
- Priority: If you are defining multiple tax rates for the same area, you can set one priority rate here.
- Compound: Compound tax rates are applied on top of other tax rates. For example, if you have two sets of taxes assigned to a region, like a state tax and an additional tax variable, selecting the Compound checkbox will add this tax figure on top of other taxes.
- Shipping: If you want the tax rate to apply to both the product purchase and the shipping cost, select this checkbox.
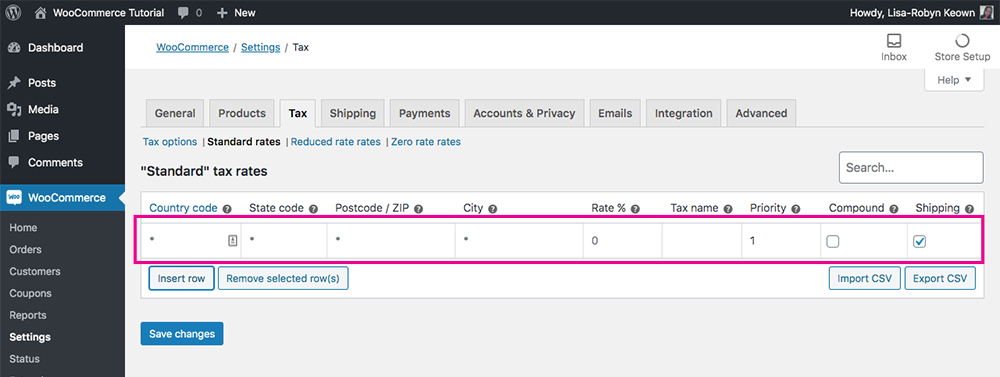
Here is a basic example of a Standard tax rate set up at 5% for the entire United States. The tax rate applies to both the product and the shipping cost.

Example of a standard tax rate for the United States
You can add multiple tax rates depending on the nature of your store, product and the locations you ship to. Again, we reiterate that our examples are for demo purposes only. We are not trade exerts or tax practitioners. If you are unsure about the tax regulations for your store, please consult a professional.
Ending Thoughts
Setting up WooCommerce sales tax rates can get extremely complicated depending on the nature of your store, the product you sell and the regions you ship to. Ensuring that taxes are set up correctly is crucial, so do take adequate time when configuring taxes, if applicable to your store and business set up.
If you are not super clued up on taxes we highly recommend enlisting the services of a professional. Contact a lawyer, accountant or tax practitioner for assistance. If ever you get stuck with these configuration settings, reach out to the WooCommerce support team.
Now that you’ve set up taxes for your online store, follow our guides for more WooCommerce content. If you need to set up shipping for your WooCommerce, are looking for some guidance for WooCommerce plugins or want tips for building your WooCommerce store with Divi, we’ve got you covered.
We hope that this guide has helped you understand how to set up WooCommerce sales tax for your online store. If you have any further questions, feel free to post them below!

Recent Comments