
Completing a purchase is the most important step in the online shopping journey, and so, having an easy-to-use checkout page is critical. This post shows you how easy it is to customize the WooCommerce checkout page if you’re using Divi.
Online store owners and web developers are often so hyper-concerned about product images, sales copy, and marketing strategies that they typically brush past the finer details of the consumer buyer journey. The most critical step in the process is the conversion, which takes place on the checkout page.
To make this final step as hassle-free as possible, it’s important to have a checkout page that is easy-to-use, interesting to engage with, and quick to move through.
By default, WooCommerce can look a bit dull and boring. It serves its purpose and gets the job done, but it isn’t always the most user-friendly or fun to use. Furthermore, editing or customizing the checkout page is near impossible and can only be done with custom code or using a third-party plugin.
Our plugin Divi Shop Builder extends Divi’s drag and drop builder to your WooCommerce pages. Get a full rundown of the features available in the Divi Shop Builder for WooCommerce plugin overview.
This feature-rich plugin packs a real punch. One of its features includes creating a custom checkout page design for WooCommerce and Divi stores. If you’re ready to Wow your customers all the way through the sales funnel, follow this detailed walkthrough of the Divi Shop Builder plugin. In this post, you’ll learn:
- Why you should customize the WooCommerce checkout page,
- An installation and setup guide for the Divi Shop Builder plugin,
- A walkthrough of how to use the plugin to a custom WooCommerce checkout page,
- How you can save time by using our included checkout page layout packs.
Let’s dive in!
Why You Should Customize the WooCommerce Checkout Page
If your online store sets the scene for the play, then the checkout page is the final act. You need to ‘Wow’ your customers all the way to the end, and using the standard WooCommerce checkout page won’t have this effect.
To keep delivering a seamless online shopping experience for your customers, you need to present an easy to use checkout process.
Here are some benefits of creating a custom checkout page:
- Quick and easy purchases. Give your sales funnel an upgrade! By customizing the WooCommerce checkout page, you can remove the fluff and only focus on the important details. If the checkout process includes multiple pages and too many user entry fields, your customer may get impatient and fed up with how long the process is taking, and leave your site. Ensuring that your checkout process is streamlined means that your customer can move through the purchase journey quicker and you’ll land the sales.
- Unique look and feel. By customizing the WooCommerce checkout page design, your online store will look totally unique and unlike anything else. With so many stores using WooCommerce and relying on the default checkout page, your store will stand out from the crowd, bringing the same tried, tested and trusted Woo functionality in a totally new way.
- Decrease cart abandonment. Cart abandonment is one of the biggest factors contributing to missed sales opportunities. When a customer places items into their cart, but then leaves the site without completing the purchase, the cart has been abandoned. If your website’s checkout page is overly complicated, takes too much time to fill out or is not secure, your customer may lose interest in your brand altogether.
The default WooCommerce checkout page can only be edited using code or a third-party plugin. These options are quite advanced for new users, even more so for those who aren’t comfortable or confident editing code.
Our plugin Divi Shop Builder brings the ease of the Divi Builder to the WooCommerce interface, allowing web designers to construct and style a Checkout page in the familiar Divi way.
Are you ready to see how easy it is to build a custom Checkout page for your WooCommerce store? Let’s check out Divi Shop Builder in action!
How to Create a Custom WooCommerce Checkout Page
Before we dive into the tutorial, it’s important to discuss security, data protection and SSL certificates. An SSL certificate gives your website a much-needed layer of additional security by encrypting all user data it stores.
Once installed, a website will display a small padlock icon in the browser bar. SSL certificates are important for all websites, particularly online stores, as they signal to customers that it is safe to enter their credit card details here. If you need more information on website security, read our post about SSL certificates.
Step 1: Set the Checkout page
Before you can begin using the Divi Shop Builder plugin, you need to set the Checkout page in the WooCommerce plugin settings. To do so navigate to WooCommerce > Settings and click on the Advanced tab. Here, where it says Checkout page, select Checkout from the drop-down menu.
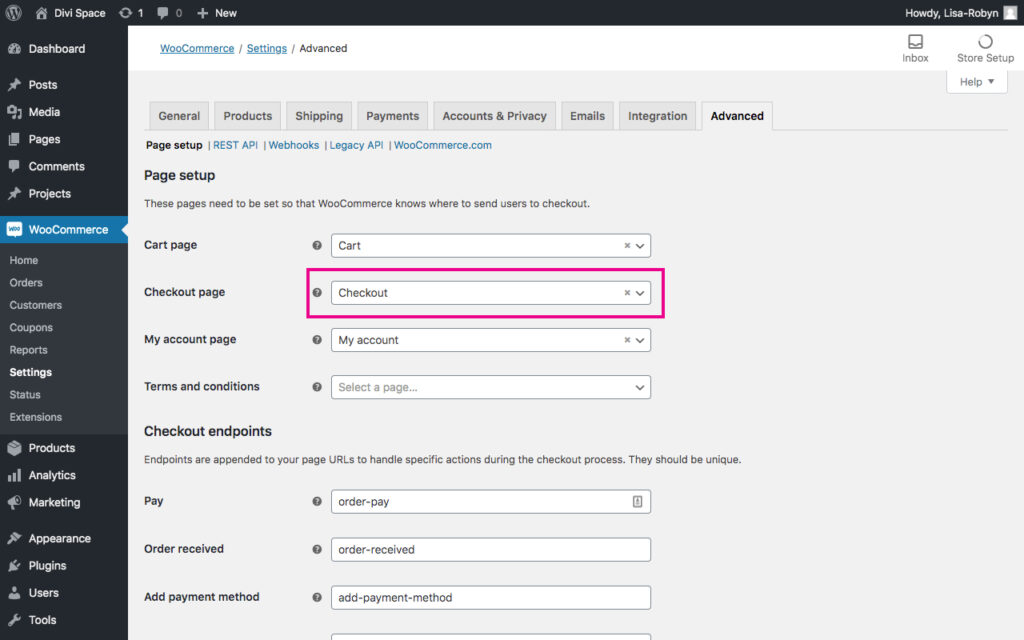
Set the Checkout page
When complete, scroll to the bottom of the page and click Save changes.
Step 2: Install and Activate the Divi Shop Builder Plugin
Now that you’ve set the Checkout page, it’s time to install the plugin. Head over to the Divi Space store and purchase the Divi Shop Builder plugin. To download the plugin, access the download link from the My Account Page. As soon as the plugin has downloaded, install and activate it in the regular fashion. When the installation is complete, the plugin will display in the Divi menu.
You’ll need to authenticate your plugin purchase by entering your license key. This can be found on the My Account page via the Divi Space website. Once you’ve authorized the plugin, you can begin using it.
The Divi Shop Builder plugin has no set up steps or configuration. Once it’s installed, it’ll work from directly within the Divi Builder itself. The plugin dashboard page serves more as a space that recaps the plugin features and promotes a link to the plugin documentation.
Step 3: Create a Custom WooCommerce Checkout Page
To begin using the Divi Shop Builder plugin, open the Checkout page and enable the Divi Builder.
When you open the Divi Builder and begin adding a module, you’ll see five new modules:
- Checkout Billing
- Checkout Coupon
- Checkout Order
- Checkout Shipping
- Cart/Checkout Notices
These four new modules will help you build a custom Checkout page for your WooCommerce store. Let’s take a closer look at each of these modules a bit further.
Checkout Billing Module
First, there’s the Checkout Billing module. This module allows you to customize the form entry fields where your customers enter their billing details. Here, you can change each of the field labels if required.
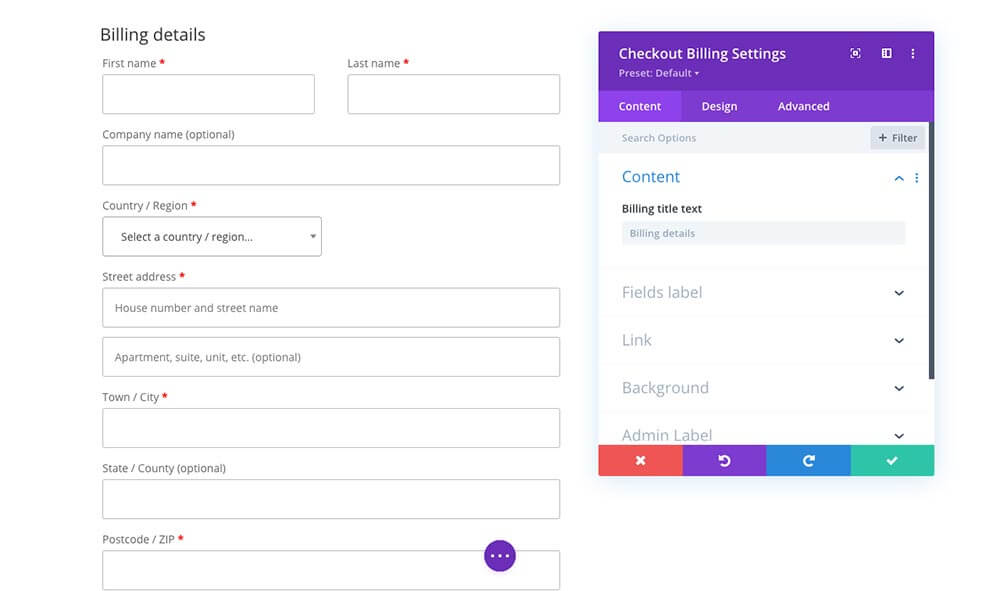
Add the Checkout Billing module
Checkout Shipping Module
Next, in the Checkout Shipping module, you can offer your customers the option of specifying a secondary address. Similar to the Checkout billing module, you can change the form fields to custom text with ease.
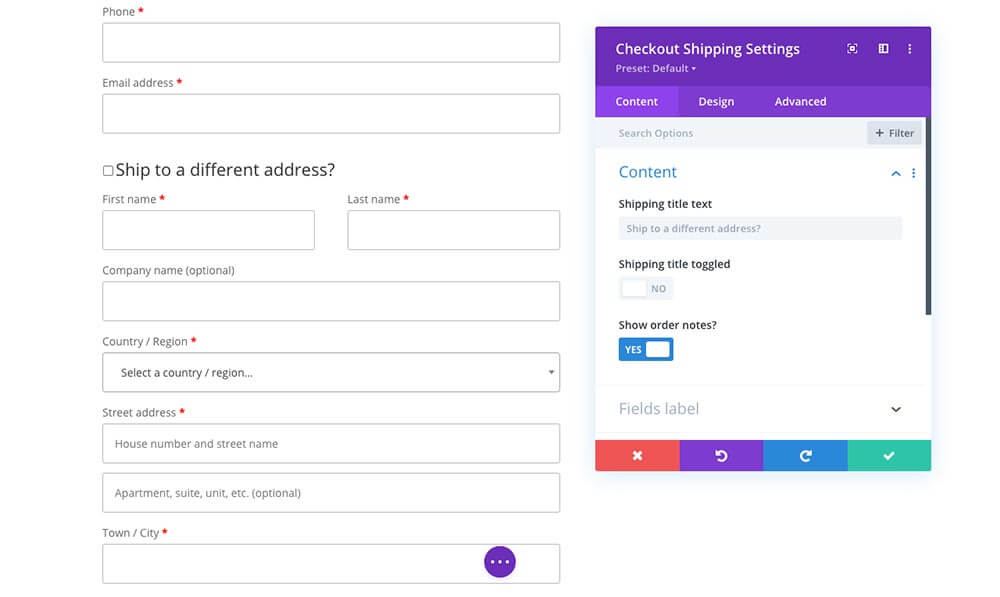
Offer your customers an alternate shipping address by adding the Checkout Shipping module
Checkout Coupon Module
Then, there’s the Checkout Coupon module. This module lets your customer enter a secret code to claim a special discount.
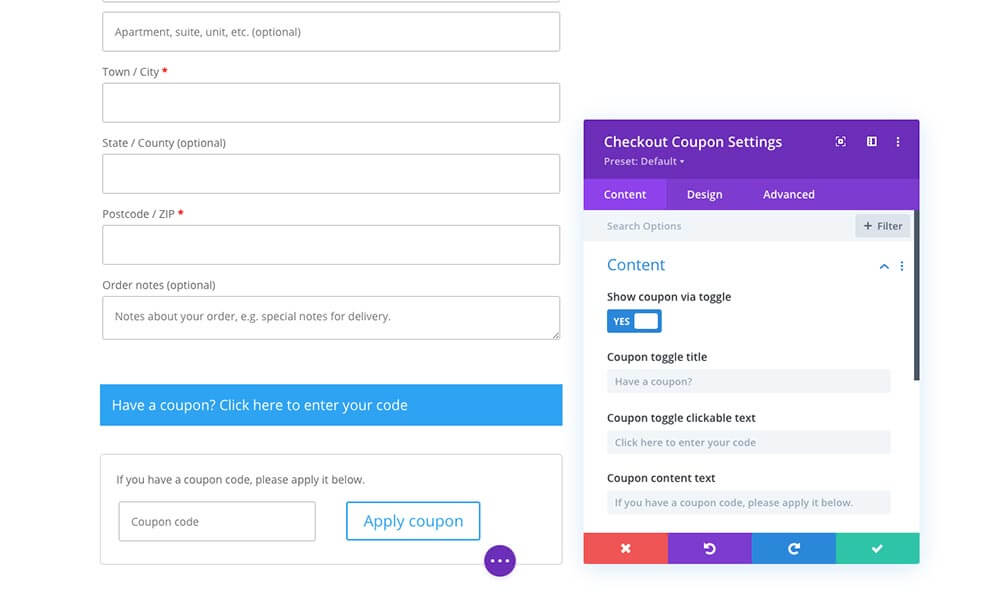
Include the Checkout Coupon module in your layout
Please note, the Checkout Coupon must be placed in a separate section from the other Checkout modules. If the Checkout Coupon module is in the same section as one of the other Checkout modules, neither will function.
If you are concerned about the space between the two sections, you can easily decrease the padding between the respective sections and rows. Remember to check the tablet and mobile views as well.
When configuring the Checkout Coupon module, you have the option of giving it toggle functionality. If you enable this, the coupon entry section will display when clicked on. For example, if your customer clicks the ‘Have a coupon’ button, the code entry section will display on click. If you do not enable this function, it’ll display in full.
Checkout Order Module
Then there is the Checkout Order module. This module is where your customer confirms their order and proceeds to their payment method of choice.
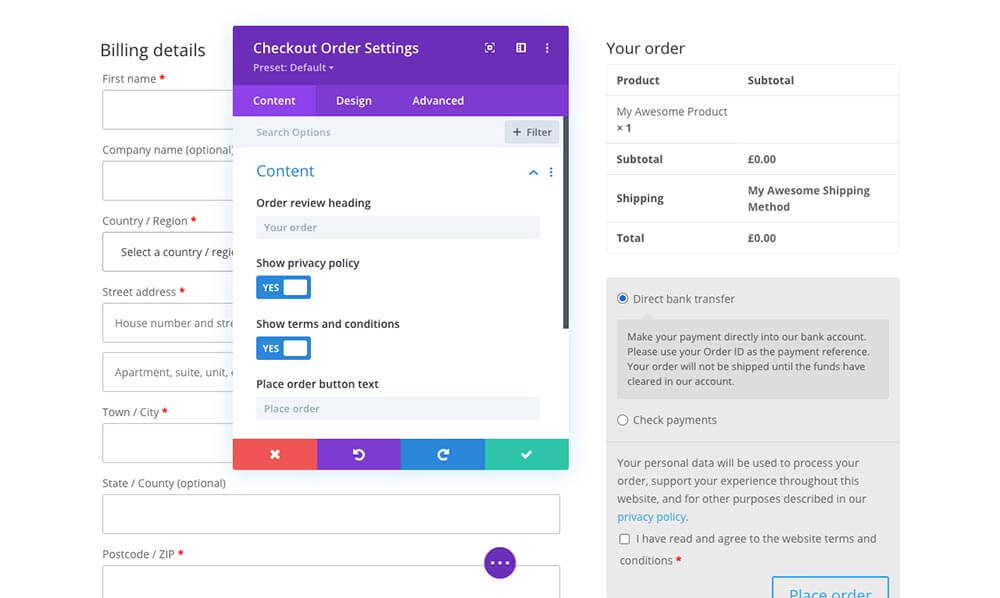
Add the Checkout Order module
Checkout Notice Module
Finally, the last module in the Cart/Checkout Notices module. This module is compatible with both cart and checkout page designs. If you need to add a notice to either of these pages, the module lets you do so in a few seconds.
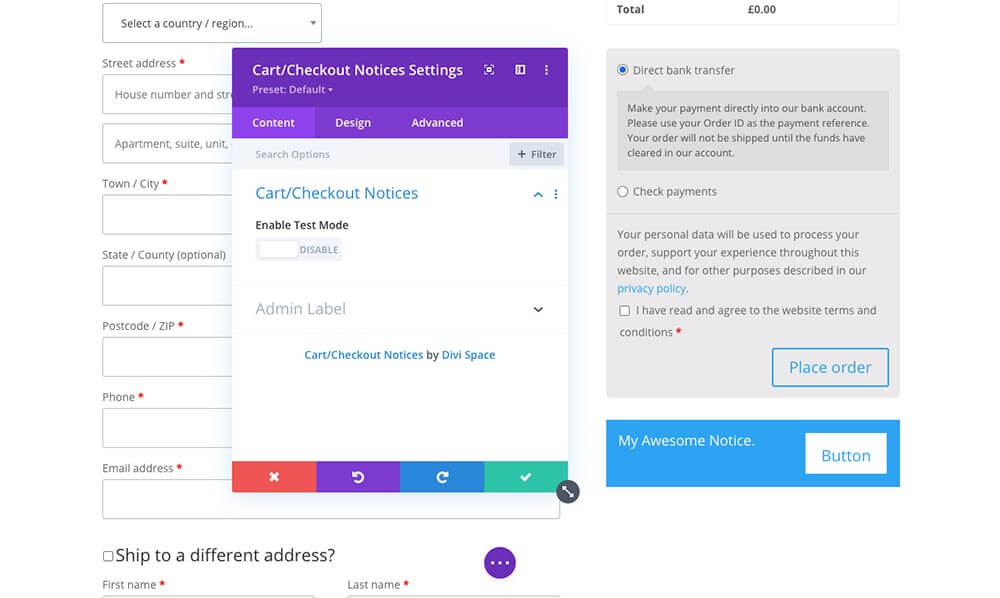
Add a notice with the Cart/Checkout Notice module
Using the Checkout Modules
One important thing to note about the Checkout modules is that they cannot be in the same sectionals as any other form module. Forms cannot be nested within the same section, if they are placed together, they won’t function. When building your Checkout page, remember to place the following modules in a separate section.
- Contact form module
- Opt-in form module
- Comment module
- Login module
Customizing the WooCommerce Checkout page
As with the other modules in the Divi theme, the checkout modules in the Divi Shop Builder plugin can be custom styled with the Divi Builder. Open one of the modules, click on the Design tab, and you can play around with styling the various elements to match your brand identity or design.
If you want to add further customization to the various checkout modules, you can do so via the Advanced tab. Here, you can set positioning, transitions, scroll effects and device visibility settings. You can also include custom classes and IDs for advanced CSS scripting.
Create Custom WooCommerce Checkout Pages Using Our JSON Layouts
Now that you’ve gotten an overview of how the modules in the Divi Shop Builder plugin work, you’re one step closer to building a gorgeous checkout page for your online store. But wouldn’t it be even better if you could skip the page design and module styling step altogether?
Our design team put together a collection of ready-made layouts that you can use for your checkout page. Here’s an example:
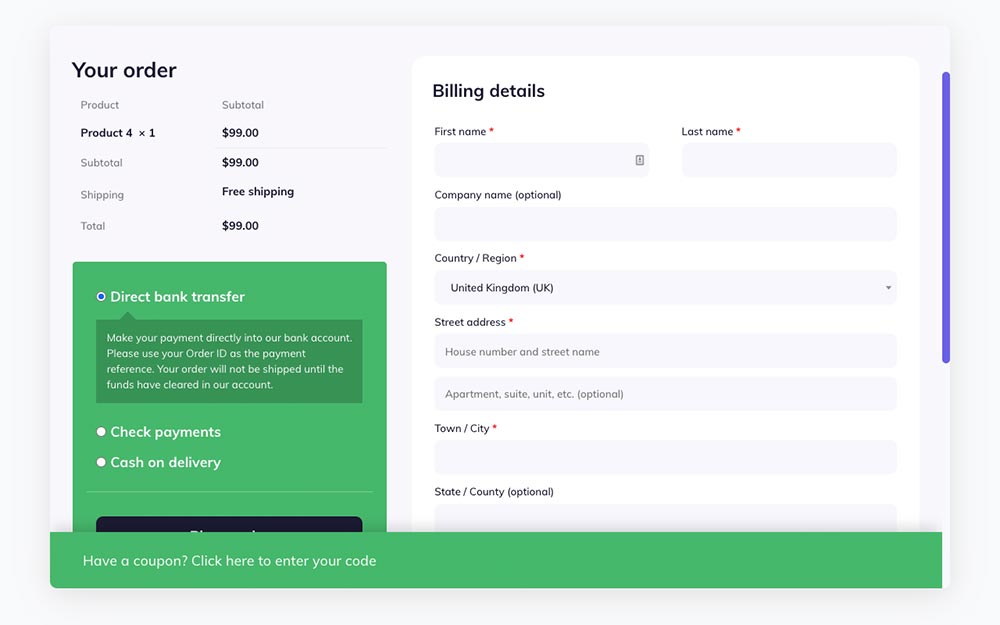
An example of one of the many free layouts included in the Divi Shop Builder plugin
These layouts, as well as countless others, come free when you purchase the Divi Shop Builder plugin. Available in JSON file format, the layouts can be imported to the Divi Library and added to a page within seconds.
Download the Divi Shop Builder Layouts
Once you’ve purchased the Divi Shop Builder plugin, head to the demo showcase page and download the checkout page layout of your choice.
Once the download .zip file is complete, unpackage the file and locate the JSON layouts inside.
Install the Divi Shop Builder Layouts. Return your website and click on the Divi Library in the Divi menu.
From inside the Divi Library, click the Import & Export button. Next, a pop up will appear. Click the Import tab and select the demo layout of your choice from your computer. Once the installation is complete, you’ll find them in your Divi Library ready to use.
We suggest assigning the layouts to a category. This helps organize your Divi Library assets.
Use the Divi Shop Builder Layouts
Now for the fun part! Create a new page, and enable the Divi Builder. The layout we’ve imported is a full-page layout. When adding it, click the plus icon and navigate to the Your Saved Layouts tab. Locate your layout and add it to the page.
In a few seconds, you would have created a stylish and striking checkout page for your online store! Once the layout is installed, you can edit the options in the Product tab and then style the modules in the Design tab.
Ending thoughts
If you’ve tried to edit the WooCommerce checkout page with either custom code or third-party plugins, and fell short, you need the Divi Shop Builder. As well as letting you edit the checkout page, you can also create a custom Cart page, showcase your products in list view and so much more!
Purchase the Divi Shop Builder plugin from Divi Space and start building beautiful, one of a kind online stores!
If you’ve purchased the plugin and are already using it on your Divi and WooCommerce stores, send us a link to your checkout page, we’d love to see your designs! Thanks for reading!

Hello Team,
Great Job !
Is it possible to use it with a filter plugin ?
Thank you! Currently not, but we are planning to implement filtering options to our plugin, be sure to be up to date with the plugin changelog!
Hi! I’m looking for a way to add my custom fields to the check-out page I created with Divi Shop Builder. For example; I want to ask my clients how they’ve found me and I want to give them the option to leave a message for on their greeting card. Beside that I do not use the field ‘State’ and I want to split the adress field in ‘streetname’ and ‘number’. Before I used the ‘Checkout Field Editor for Woocommerce’ for this, but this plugin does not seem to be competible with Divi Shop Builder…
I look forward to hearing from you!
Hello Sanne! There are plugins available for editing the checkout form. WooCommerce has their own extension called Checkout Field Editor. There are Both a free and premium option. Here is a link to the WooCommerce premium tool https://woocommerce.com/products/woocommerce-checkout-field-editor/ and here is a limited but free extension on WordPress.org https://wordpress.org/plugins/woo-checkout-field-editor-pro/
I can only recommend these layouts! it looks far more professional than woo default design