Even though WooCommerce is hands down the best platform for building an online store, there are some minor limitations to this software. Certain ecommerce elements are not as easily editable as others, the WooCommerce cart page being one. Thankfully, for Divi users, there’s an easy solution in the form of a powerful plugin.
To make things easier for online stores, WooCommerce includes several pages, such as the Cart, Checkout and Account page, each using pre-made templates. This is why WooCommerce is such a great ecommerce platform as you can have a store up and running in just a few minutes, simply add your products and link your payment processors and you’re good to go.
While some aspects of ecommerce are so fluid and easy to use, other aspects can pose a challenge. For example, changing the default WooCommerce cart page design is not an easy task. Doing so would require either editing code files or using a third-party plugin.
Luckily, WordPress users that have built their sites with the Divi theme are in for a treat. Our plugin Divi Shop Builder brings the ease of use of Divi to the WooCommerce framework. In this post, we’ll show how to edit the WooCommerce cart page.
With the Divi Shop Builder plugin in your development toolkit, you’ll be able to create unique WooCommerce cart pages for your online store like this:
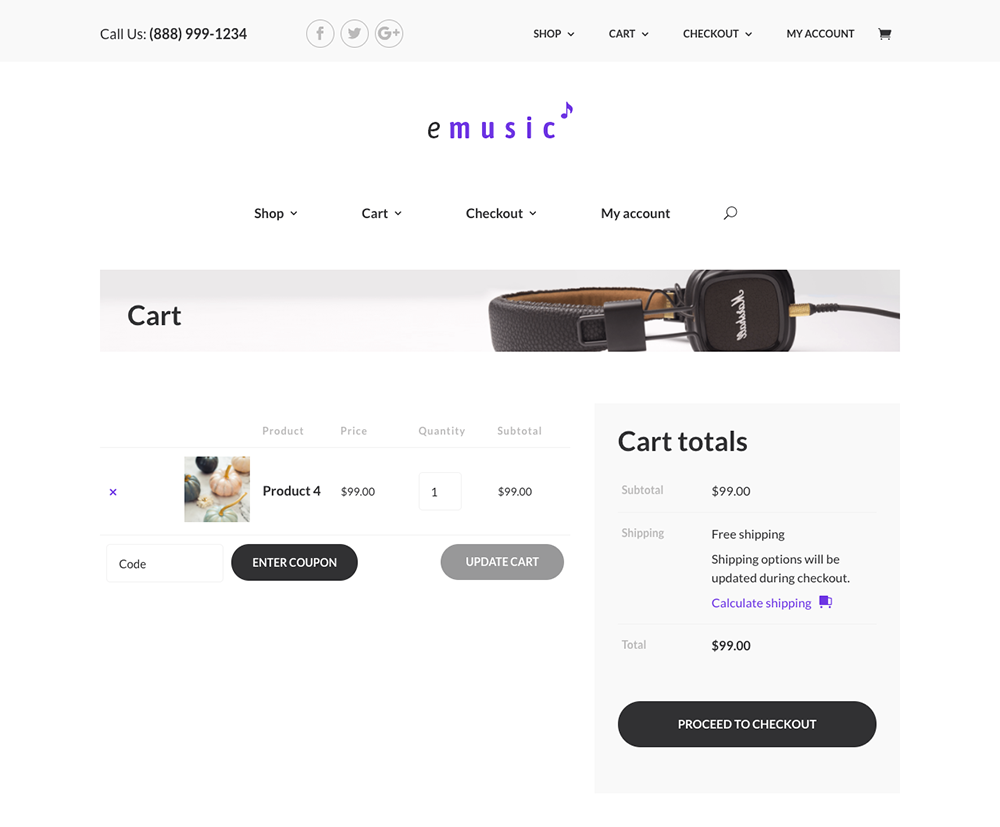
An example of a WooCommerce cart page layout
Would you like to build a striking cart page for your WooCommerce store?
In this post, we’ll showcase the Divi Shop Builder plugin and show you how you can build a custom cart page for your site. You’ll learn:
- Why you should create a unique cart page for your WooCommerce store,
- How to install the Divi Shop Builder plugin,
- How to use each of the modules to create a custom WooCommerce cart page,
- How you can save time by using the included layouts in your online store.
Why You Should Customize the WooCommerce Cart Page
The cart page is an essential element in the ecommerce consumer journey. On the shopping cart page, the customer reviews their order and decides whether they’ll continue. This is the second to the last step before they complete a purchase, so it’s important that this page is beautifully designed, easy to use, and includes a few sales tactics.
With the ability to edit the WooCommerce cart page, you can:
- Add custom text that reflects your brand voice. By default, the cart page simply says ‘Cart’. This is pretty dull and lifeless, and it doesn’t add much to the experience of your brand. With the ability to edit the WooCommerce cart page, you can change this default text to something action-orientated like ‘Review your order’ or something cute like ‘Your new wardrobe staples’.
- Encourage upsells. Displaying similar products on the cart page is a great way to encourage more sales. You can add text that says something like, ‘We think these would look great in your pantry/wardrobe/desk.’ Your customers won’t really expect to see related products on the cart page so it will catch them off guard and hopefully entice them to keep browsing.
The default WooCommerce cart page can only be edited using code or a third-party plugin. Fiddling around with WooCommerce hooks and PHP templates isn’t fun for everyone, and furthermore, not all plugins are created with Divi in mind.
Our plugin Divi Shop Builder brings the ease of use of the Divi Builder to WooCommerce, allowing Divi users to build a custom WooCommerce cart page as they would any other page. Learn more about Divi Shop Builder for WooCommerce and see how it makes it so you can style an e-commerce website without any code in our product overview:
Let’s check out Divi Shop Builder in action and build a WooCommerce cart page.
How to Create a Custom WooCommerce Cart Page Design
Step 1: Set the Cart page
First things first, you need to set the cart page in the WooCommerce plugin settings. To do so, head to WooCommerce > Settings and click on the Advanced tab. Where it says ‘Cart page’, select ‘Cart’ from the drop-down menu. When complete, scroll to the bottom of the page and click Save changes.
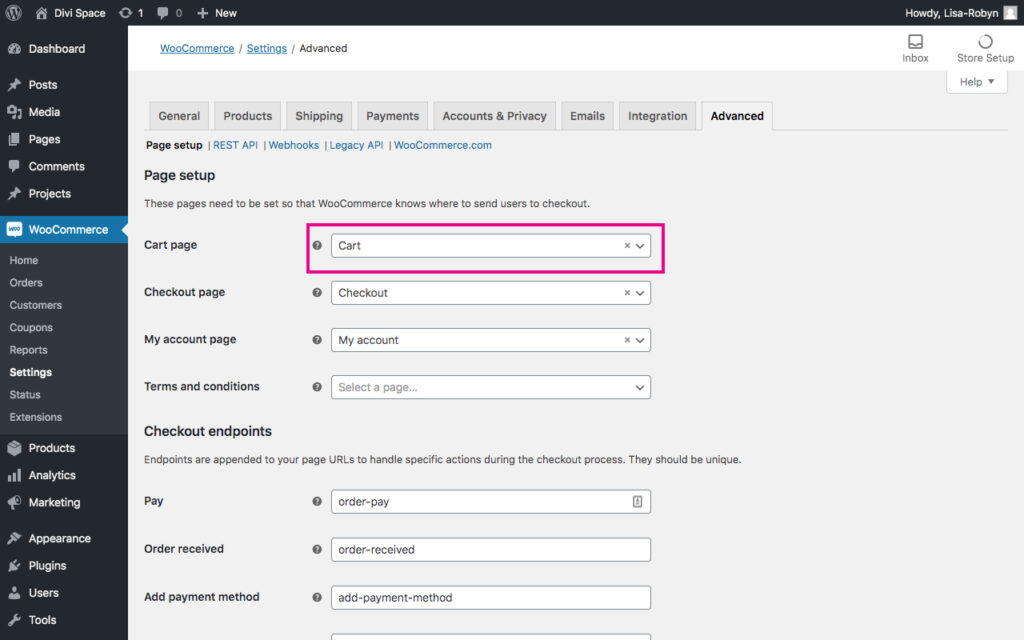
Set the Cart page
Step 2: Install and Activate the Divi Shop Builder Plugin
Next, head over to the Divi Space website and purchase the Divi Shop Builder plugin. You can access the plugin download file and license key from your Account page. Once the plugin has downloaded, install, and activate it as you would any other plugin. When complete, the plugin will display in the Divi menu.
When you click on the plugin menu, you’ll be asked to authenticate your plugin purchase. Enter your license key from the My Account page on the Divi Space website. Once you’ve authorized the plugin, you can begin using it.
There are no set up steps or configurations for the Divi Shop Builder plugin. Once it’s installed, it’ll work directly within the Divi Builder itself. The plugin dashboard simply recaps the plugin features and promotes a link to its documentation.
Step 3: Create a Custom WooCommerce Cart Page
To begin using the Divi Shop Builder plugin, open the Cart page and enable the Divi Builder. You’ll see four new modules:
- Cart List
- Cart /Checkout Notices
- Cart Totals
Let’s take a look at each of these in detail
Please note, we have pre-styled our module settings in the Theme Customizer, that’s why they import with a certain design style such as the font, font color, button design already complete. If you have not added CSS to your child theme or have not changed values in the Theme Customizer, your modules will display the default Divi styling.
Cart List Module
This module adds the cart list for your customer to review. Each of the elements in the Cart List module can either be turned on or off, depending on the look you’d like to present. Also, each text element is editable and can be done so from the Divi Builder itself.
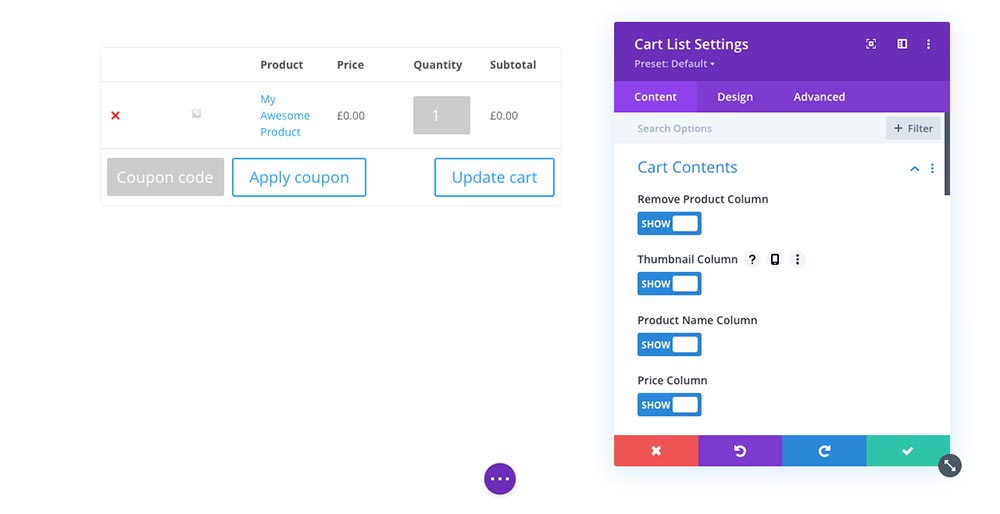
Add the Cart List module to a row and start configuring the settings
To begin, open the Divi Builder and add the Cart List module to a layout. By default, it’ll bring up a demo product called ‘My Awesome Product’.
Selecting options
There are five columns added, each of which can be toggled on or off depending on the layout and design you’d like.
These options include:
- Remove product marker
- Thumbnail image
- Product name
- Product price
- Quantity count
- Subtotal
For example, you can choose to display if you’d prefer not to have a featured image of the product in question. You can also choose to hide or display the coupon code row.
Renaming options
As well as deciding which options you’d like to display in your Cart List, you can then choose to rename the columns too. For example, you could add a title to the thumbnail column and title this ‘Preview’, or you could change the title of the quantity count from Quantity to Number of Units.
This same renaming convention applies to the coupon code section too. By default, the text reads as ‘Coupon code,’ but in the Cart List Module, you can rename this to something else like ‘Enter your coupon code’ or something similar. You can also rename the ‘Apply coupon’ text to something like, ‘Click to grab your discount.’
Empty cart settings
If a customer hasn’t placed any items into their cart, the cart page will display a notice with something like ‘Your cart is currently empty,’ as well as a button to return to the shop.
With the Cart List module, you can change this to anything you like. You could change the text to say, ‘Oops! You don’t have any products here.’ You can also change the button text to ‘Start shopping!’ and add a particular redirection URL too.
Through the Cart List module, you can also configure the Empty Cart page, offering a custom notice and redirection button with a URL.
Cart/Checkout Notices Module
Next up, you can add notices to your cart page using the Cart Notices module.
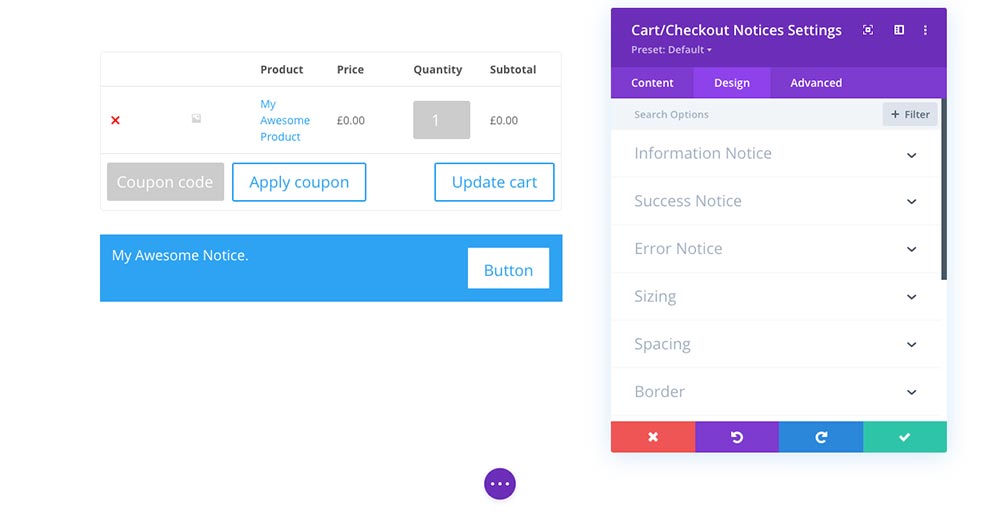
Add and customize a notice to the Cart page
Next is the Cart/Checkout Notices module. This module can be used on both the Cart and Checkout page.
Once added you can custom style the appearance of the information, success and error notices.
Cart Totals Module
Finally, add the Cart Totals module to wrap up the page and take your customers through to Checkout.
The Cart Totals module will automatically populate the final total financial value of the Cart.
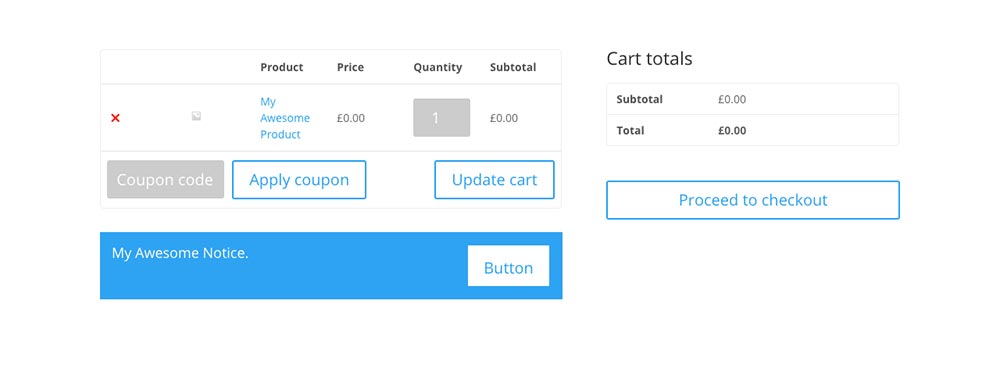
Finish off your WooCommerce cart page by adding the Cart Totals module
By default, the module is titled ‘Cart totals,’ but this can be changed to any custom text. You can also change the ‘Subtotal’ and ‘Total’ text, as well as enter custom text for the ‘Proceed to checkout’ button.
Customizing the WooCommerce Cart page
Like other modules in the Divi theme package, the cart modules included in the Divi Shop Builder plugin can be custom styled using the Divi Builder. Head to the Design tab to play around with the elements and match your brand identity or design.
If you’d like to add further customization to the cart modules, you can do so via the Advanced tab. Here, you can include custom classes and IDs for advanced CSS scripting. You can also set transitions, positioning, scroll effects and device visibility settings.
Examples of WooCommerce Cart Pages
It’s incredibly easy to create a new cart page for your online store with the Divi Shop Module. Here’s an example of a jaw-dropping cart page made with the plugin.
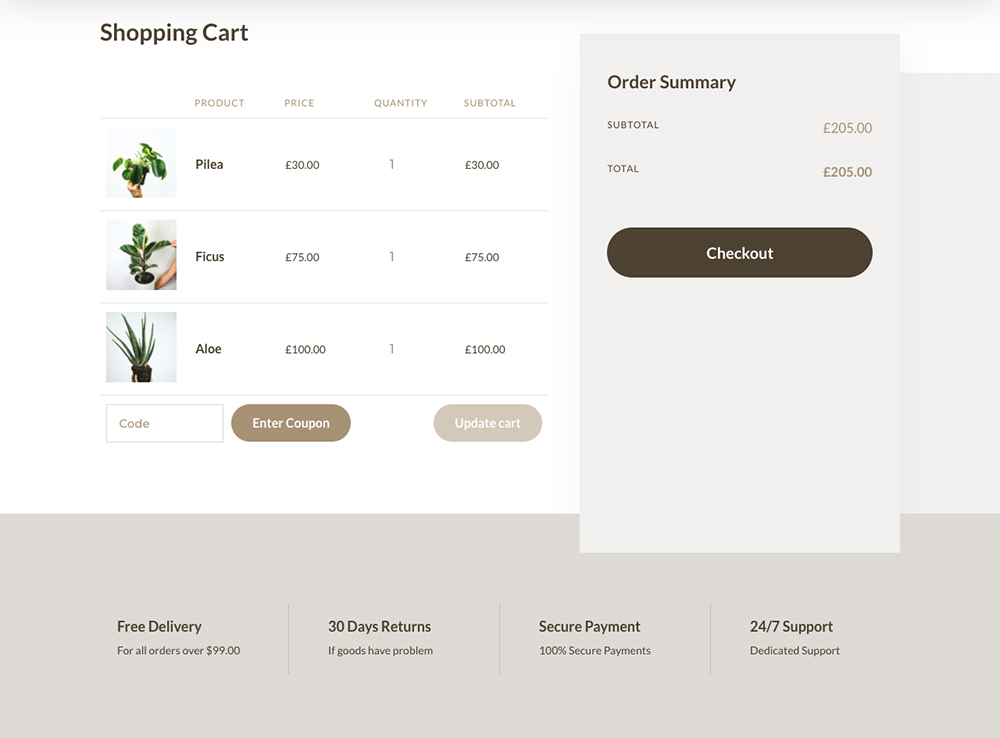
Use this layout and more when you purchase the Divi Shop Builder plugin! Skip the design steps, use this gorgeous WooCommerce cart page template in your online store. Purchase the Divi Shop Module plugin and you’ll get a collection of free layouts!
Create Custom WooCommerce Cart Pages Using Our JSON Layouts
If you want to save time in development, you can bypass the process of creating a cart page by using our premade cart page templates. Our design team crafted a series of stunning WooCommerce cart page layouts that can be used from within the Divi Library.
These JSON file layouts come free when you purchase the Divi Builder plugin from our store. Here’s an example of a cart page layout that ships with the plugin:
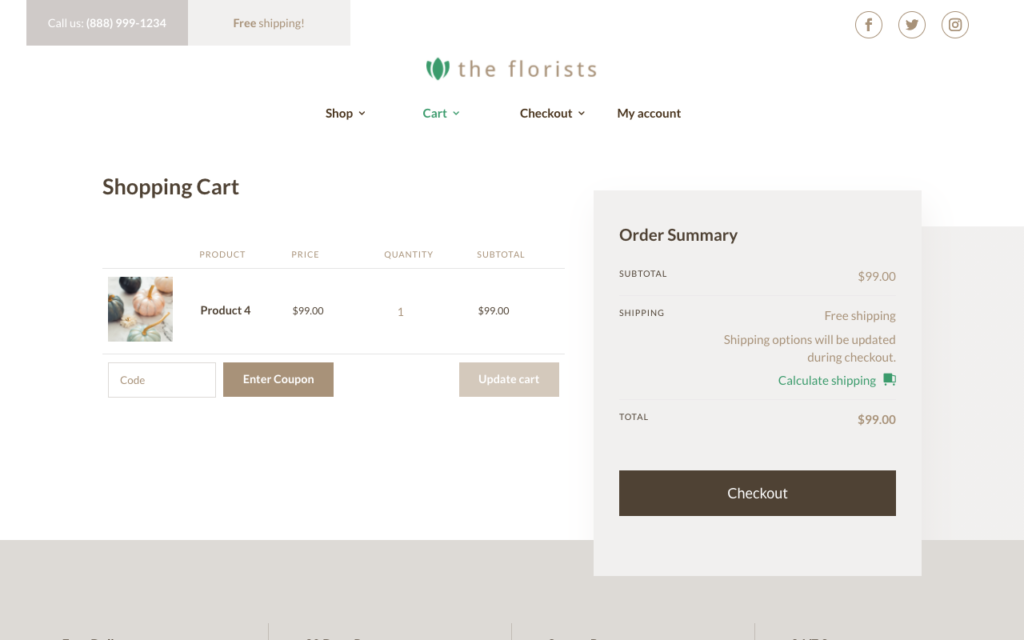
An example of a WooCommerce cart page layout
This layout, as well as countless others, can be yours to use when you purchase the Divi Shop Builder plugin.
Download the Divi Shop Builder Layouts
Once you’ve purchased the Divi Shop Builder plugin, visit our demo page and download the cart page layout of your choice. A download will start, and when complete, you’ll find a .zip file has saved to your computer. Unzip the file, and you’ll find the JSON layout inside.
Install the Divi Shop Builder Layouts
Now, head to the Divi Library. Here, click the Import & Export button. A pop-up will appear; click the Import tab and select the layout of your choice from your computer. Once the installation is complete, you’ll see the layouts added to your Divi Library.
The two layouts showcased in this tutorial are:
- Emusic Cart (displayed at the beginning of this post)
- Florists Cart (displayed at the beginning of this section)
We recommend assigning categories to the layouts. This makes organizing and finding the layouts at a later stage easier.

Brand new layouts added to your Divi Library
Once the premade layout has been added, create a new page, and enable the Divi Builder. Use the Divi Builder to add the saved layout and in seconds, you would’ve created a striking cart page for your online store.
Ending thoughts
When using the Divi Shop Builder plugin, you can create incredible designs for your store. With this plugin, you can craft a truly unique WooCommerce cart page template that reflects your brand and connects with your customers. Along with editing the WooCommerce cart page, the plugin also helps you create a custom Checkout experience for your online store as well as plenty of other features.
Purchase the Divi Shop Builder plugin from Divi Space and start building stunning WooCommerce and Divi stores that stand out from the pack.
If you’ve purchased the plugin and are already using it, send us a link to your cart page, we’d love to see your designs! Thanks for reading!


Where have you been all my life Lisa? Thank you for this. You made my day!