Published 11 February 2018. Updated 07 April 2022.
One of the most amazing things about using the Divi theme is that it comes with so many options for its users. One of the ways that the theme gives high levels of flexibility is through the many ways that Divi users can add CSS to the theme.
From adding CSS to the child theme’s stylesheet to using the Divi Theme Options console and many more, Divi users really can make their web development processes their own thanks to this really versatile and user-friendly WordPress page builder.
As well as the Divi theme’s CSS entry sections, our plugin, Divi Module Custom CSS Selectors, gives you another option for adding CSS as well.
In the following blog post, we’ll discuss the several methods that you can use to add custom CSS to your Divi theme, as well as explain the pros and cons of each method.
How to Add Custom CSS to Divi
Divi users can choose between six different methods to add Divi custom CSS to their websites. These methods include:
- Inline CSS added to the content section of a module
- Custom CSS Box in the Divi Theme Options dashboard
- Advanced options tab of the sections, rows and individual modules
- Divi Builder Page Settings of an individual page
- Divi child theme style.css file
- Add CSS with WordPress plugins
- Use the various WordPress CSS plugins
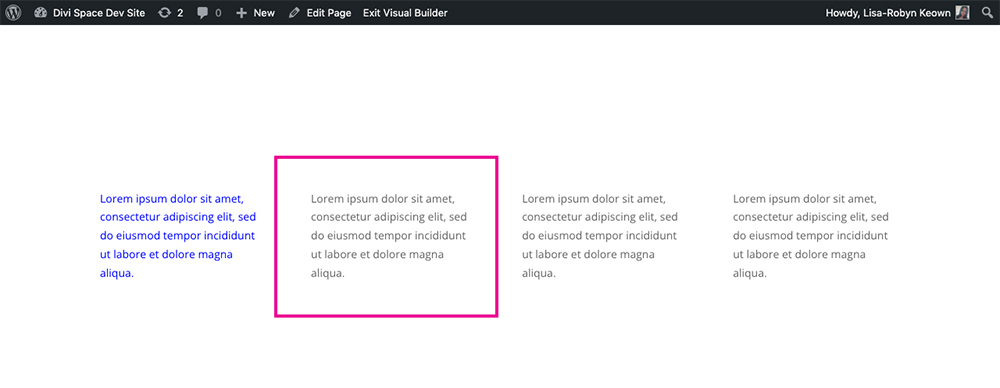
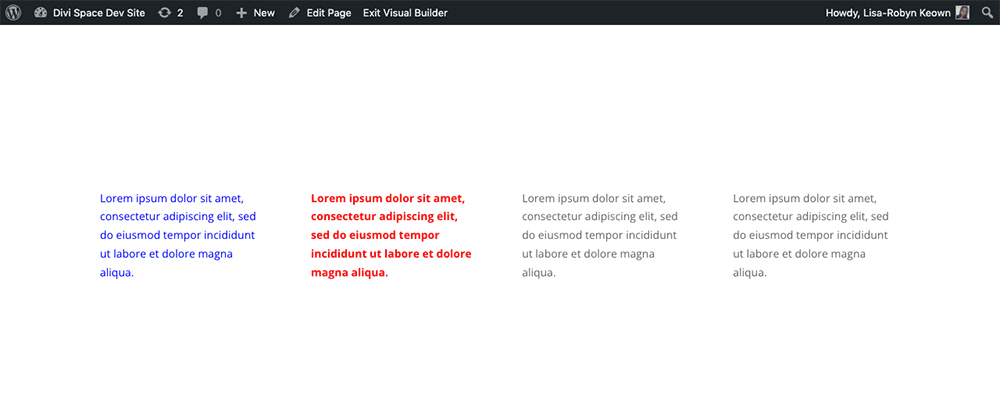
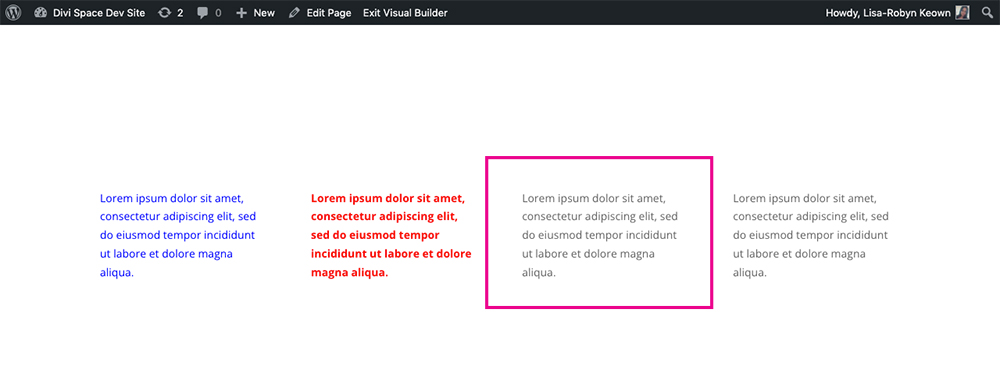
For this demonstration, I’ve set up a simple page layout using a single section and row with four columns. Each column has text module filled with a paragraph of Lorem Ipsum.
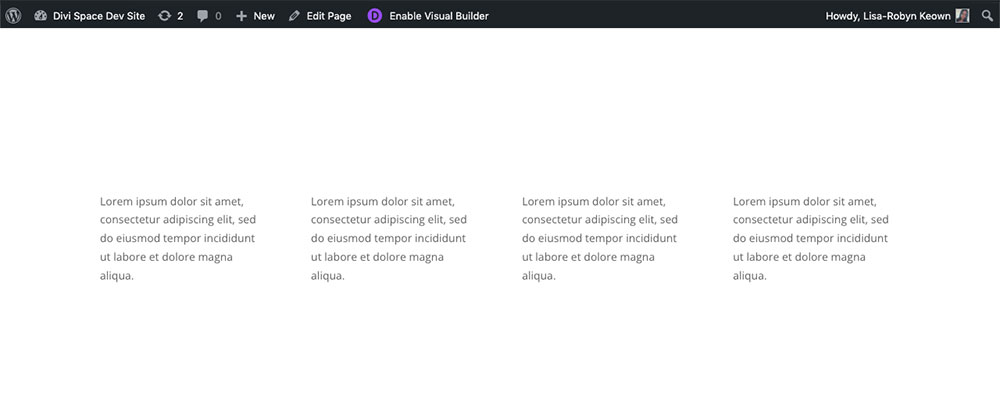
Demo set up of four text modules each with Lorem Ipsum
1. Add Styling to Divi Using Inline CSS
First up, is using inline CSS.
Any module within the Divi theme that has a content area (i.e. a place where you can enter custom text, such as the text module, blurb module etc.) will allow you to add inline styles. To add inline styles to a section of an element, you’ll need to target the element itself and add the <style> attribute, thereafter you can add any number of styling properties that relate to the specific element you’re trying to target and style.
To add inline CSS to a module in the Divi Builder (provided it has a content area), open the WYSIWYG Text editor, not the WYSIWYG Visual editor.
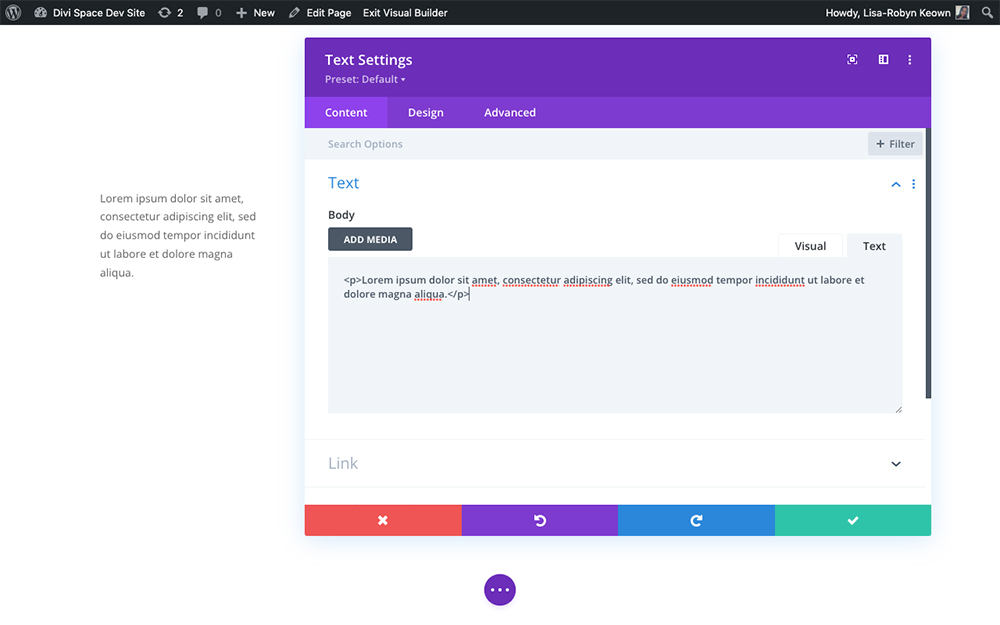
Click on the ‘Text’ editor, not the visual editor
Next is to assign a tag to the element (in this case, we’ll assign a <p> tag to make it paragraph text, and apply the <style> attribute. Once the style tag is added, you can add various properties and values.
In this example, we’ll take the first text the first text module and style the text to be a different color (blue).
The styling is as follows:
<p span style=color:blue; >Example Text</span></p>
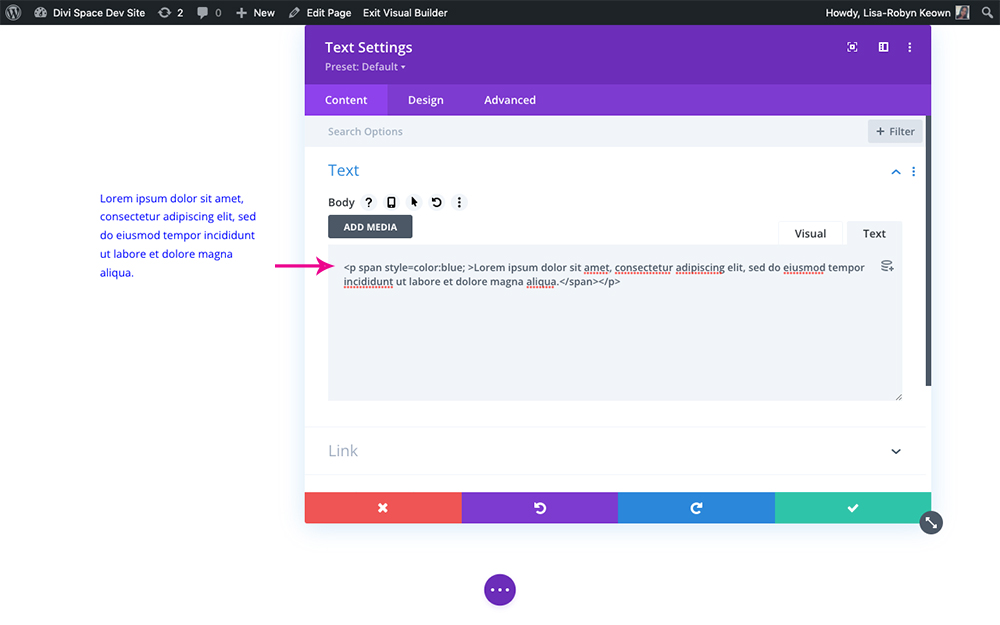
Add a span around the text and add the relevant CSS styling for it
Here you can see that the text has c hanged from the default color to the color blue, as set in the inline styles.
Pros and Cons of using inline styles to add CSS to Divi
Pros:
- Adding inline styles is a quick workaround for a simple change to a single element
Cons:
- Using this method means that you’ll need to style each individual module element in the same fashion, which is incredibly time-wasting, especially if there are many of the same styling changes and you’re working on a large website
- In the same regard, it’s really easy to forget about inline styles, especially on a large website
- As the inline styles are so deeply baked into the modules themselves, they cannot be targeted and edited using media queries, which could pose a problem later down the line
2. Add Styling to Divi Using the Divi Theme Options Custom CSS
A popular way to add CSS to Divi is by using the Custom CSS box in the Divi Theme Options dashboard. To locate the Custom CSS box navigate to Divi > Theme Options and scroll all the way down the page until you see the Custom CSS box.
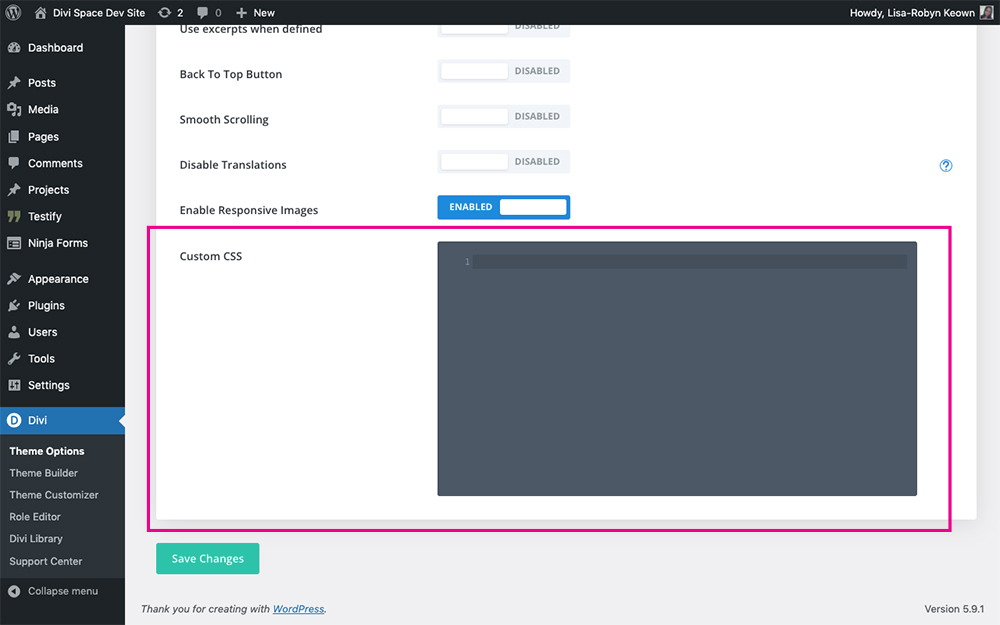
Navigate to Divi Theme Options and scroll all the way to the bottom of the screen to find the Custom CSS box
The Divi Theme Options Custom CSS box is a great place to add CSS for your website if you have a small handful of styling edits. If you have a number of edits, it is better to use a stylesheet (more on that later).
Mimicking popular IDEs or code editors (such as Sublime or Brackets), the Divi Theme Options Custom CSS includes color-coding and other scripting guides.
For the next example, we’ll take the second text module in our four-column layout and style it by increasing the font-weight and changing the color.
Next, we’ll style the second text module in the row
If you know exactly which element you are targeting, you can enter the CSS directly into the text area. To find the exact property that you need to target, you can open the specific Divi module, navigate to the Advanced tab and click in the Main Element area. The name of the property will automatically pop up just above the text area.
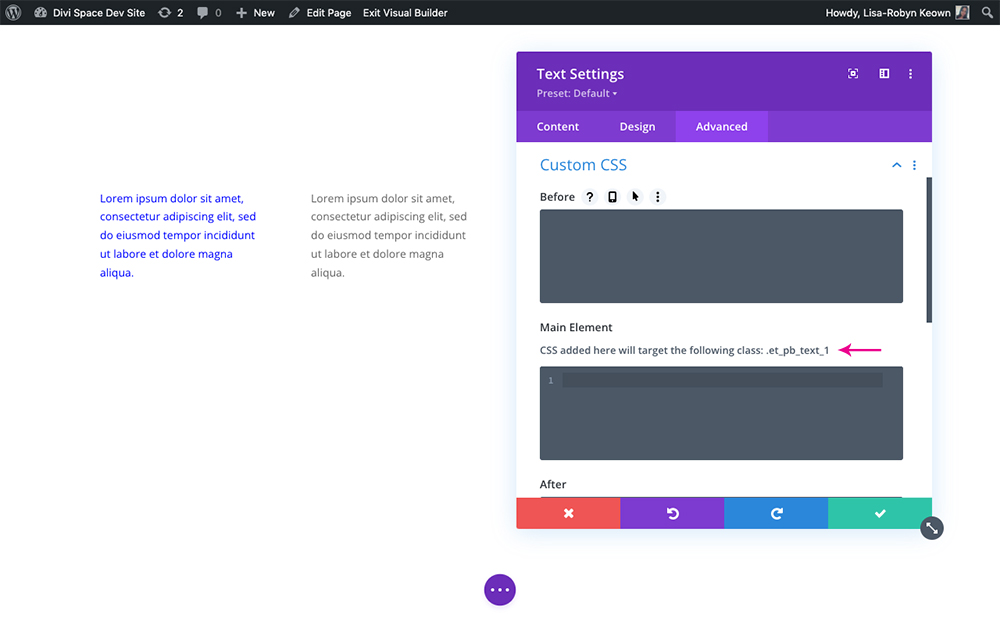
Copy the selector from the Advanced Tab Custom CSS option
Simply copy that selector, head over to the Divi Theme Options Custom CSS box, paste in the selector’s name and add the desired styling. Don’t forget to click Save Changes.
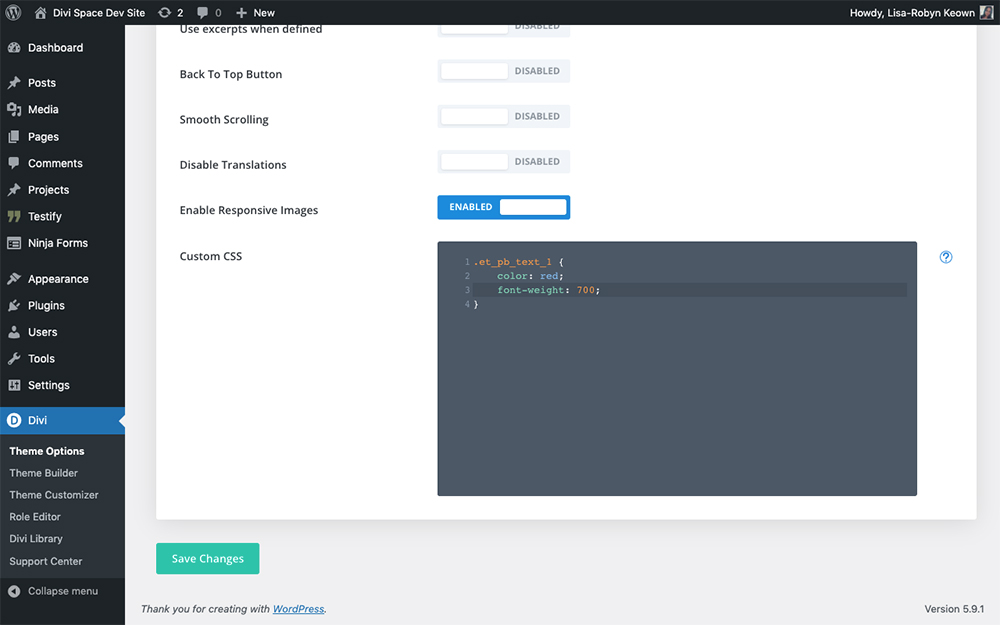
Add the styling to the Custom CSS box, remember to include the selector
In the event that your Divi module has more than one element, for example, the Blurb module includes an image, a heading and paragraph text as the content, you’ll need to be a bit more specific as to which element you’re targeting in the module. In such cases, to explicitly target the paragraph text, you’ll need to add the ‘p’ selector.
.et_pb_text_1 p {
font-size: 16px;
color: red;
}
Here is the final result:
The text has been styled in terms of color and weight
Another alternate method for adding CSS to the Divi theme that is similar to using the Custom CSS box in the Divi Theme Options is to use the Theme Customizer. To locate it, hover over the Appearance menu and click Customize.
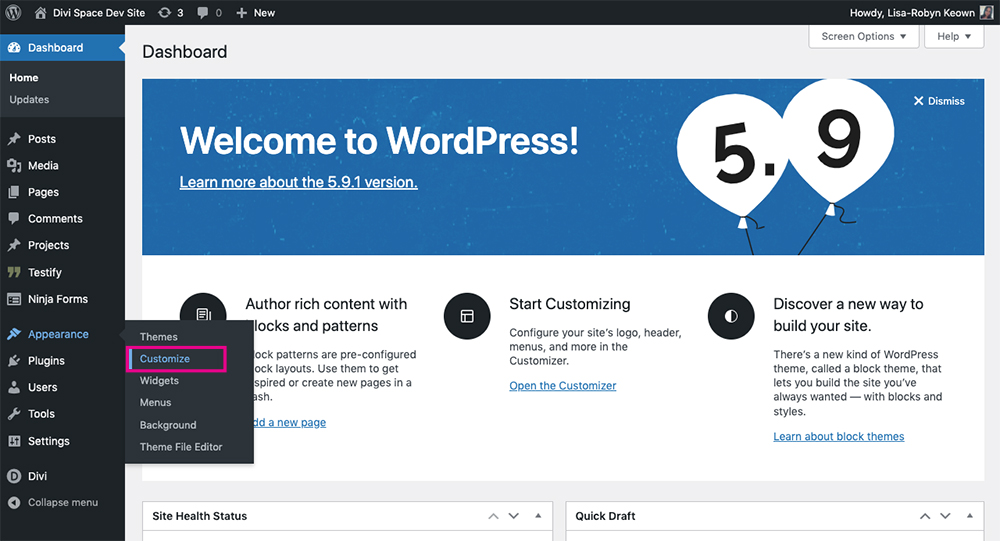
Open the Theme Customizer
This will open the theme customizer, presenting you with a plethora of additional site customization options. Scroll all the way to the bottom and click the Custom CSS option.
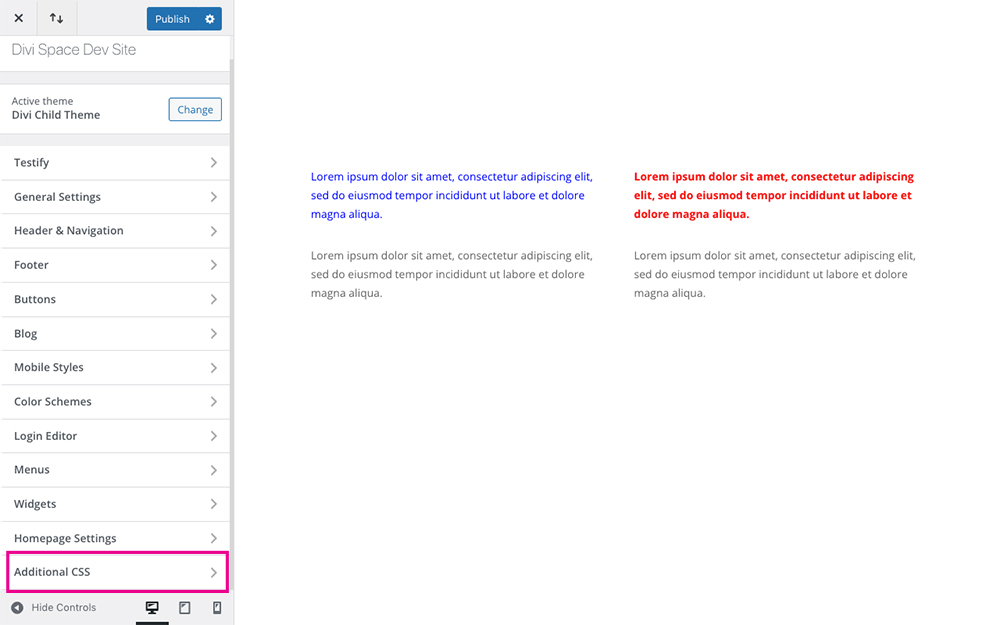
Select the Custom CSS option
Enter your CSS code in the code entry section.
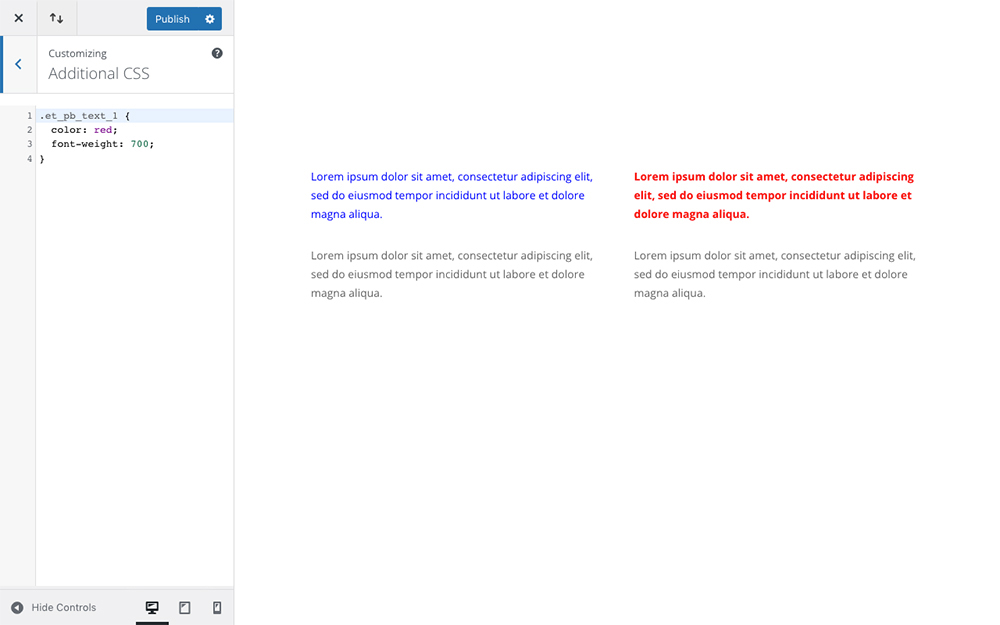
Enter your CSS
Pros and Cons of adding CSS to Divi using the Divi Theme Options Custom CSS box
Pro:
- Using the Divi Theme Options Custom CSS box is a great method if you have a few CSS edits you’d like to add to a website
- Far easier to manage than inline CSS or individual module CSS (more on that next), all of your CSS will be in one place and not scattered across a million modules
- CSS styling added to the Divi Theme Options Custom CSS box will not be overridden by theme updates
Con:
- If you have a lot of CSS to write, the Divi Theme Options Custom CSS box may be too small of an area. If you have a lot of scripting for your site, you may want to use the stylesheet in the child theme as it’ll give you more space to write script code, and you can also create and then reference multiple CSS files
3. Add Styling to Individual Divi Modules Using the Advanced Tab CSS
The next place that you can add CSS is in the Advanced Tab section of the individual module, row or section. For this, we’ll be styling the third text module in the row.
Next, we’ll style the third text module in the row
First, let’s cover the individual module’s Advanced options. Within the module’s Advanced tab, you’ll find:
- CSS ID & Classes: Here you can enter unique class or ID names that can be used to add even more layers of unique styling.
- Custom CSS: Composed of the before, main element and after boxes. The before and after areas are for pseudo-elements, to add additional elements either before or after the content. The main content box is where the styling of the specific module should go.
To add CSS to the individual module, open up the module itself by clicking on the hamburger menu and click on the Advanced tab.
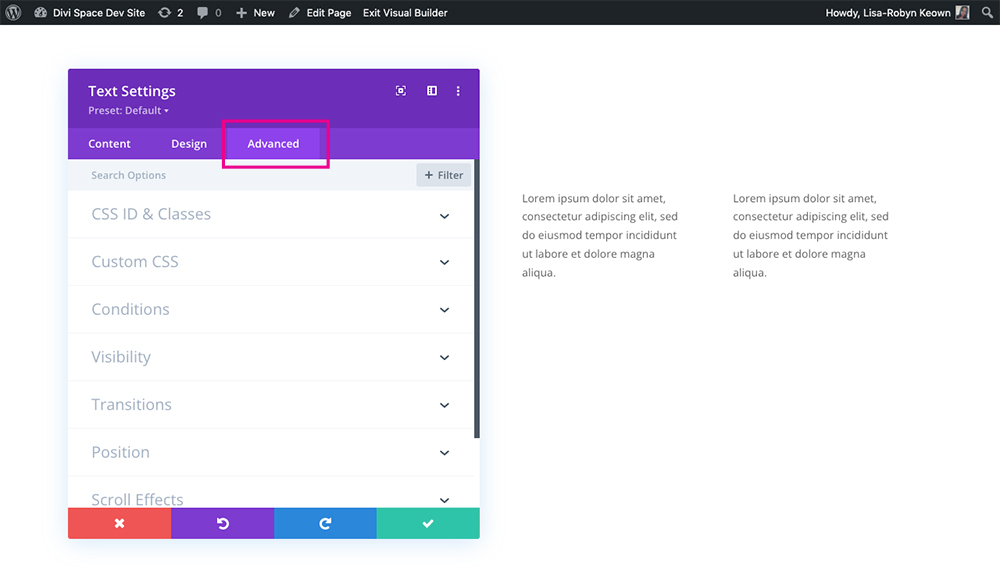
Click on the Advanced tab
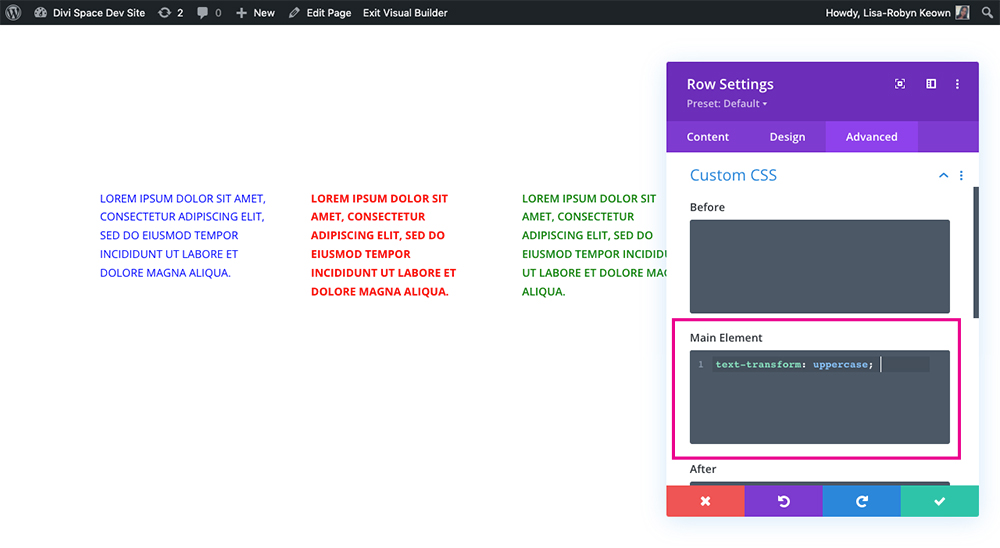
Scroll down until you see the Main Element box. Here, add the various CSS styling, but note, you only have to enter the property and the value – you do not need to specify the selector, just the property and value.
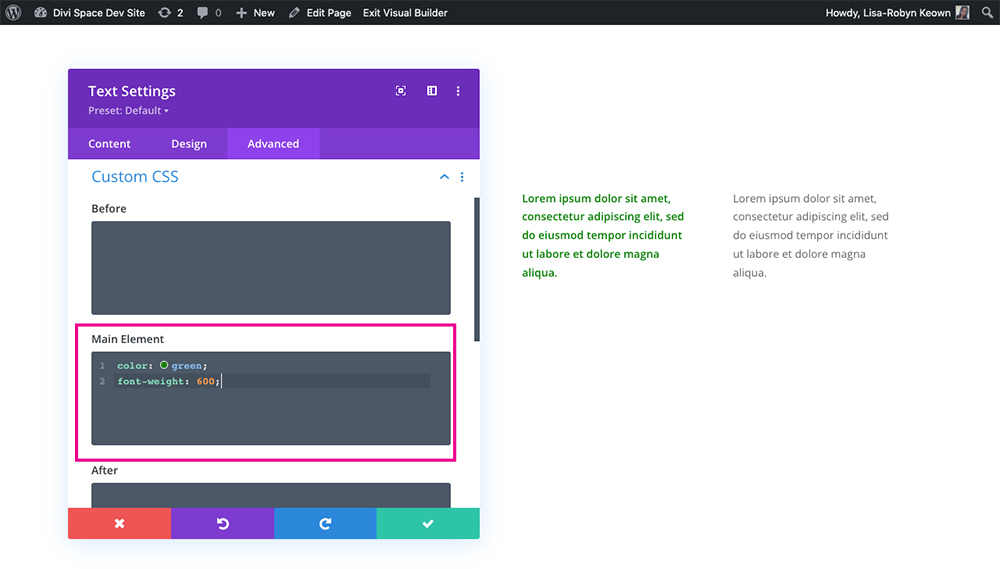
Enter the CSS
This will produce the final result:
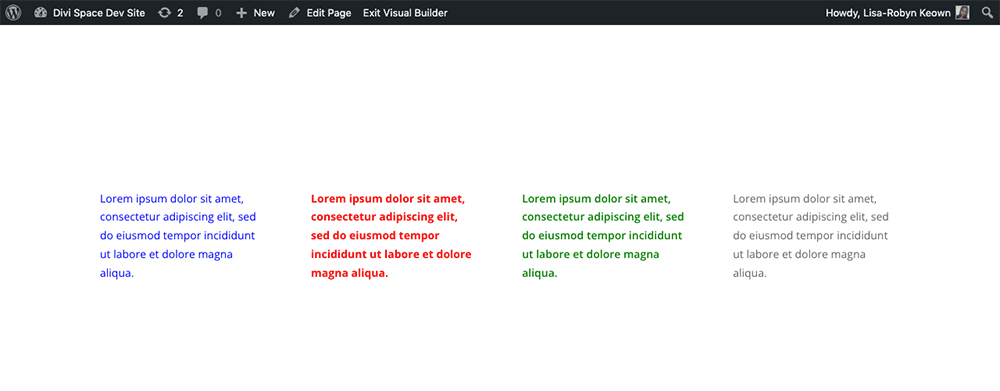
The final result
Using the Advanced Tab to Add CSS to the Rows and Sections
Going a step further, you can also add CSS styling to the various rows and sections. While the sections don’t have too many options, the rows present plenty of styling options.
First, you can add CSS styling to the entire row, in which all elements within the row will adopt the same CSS. To do this, click on the Row’s settings option.
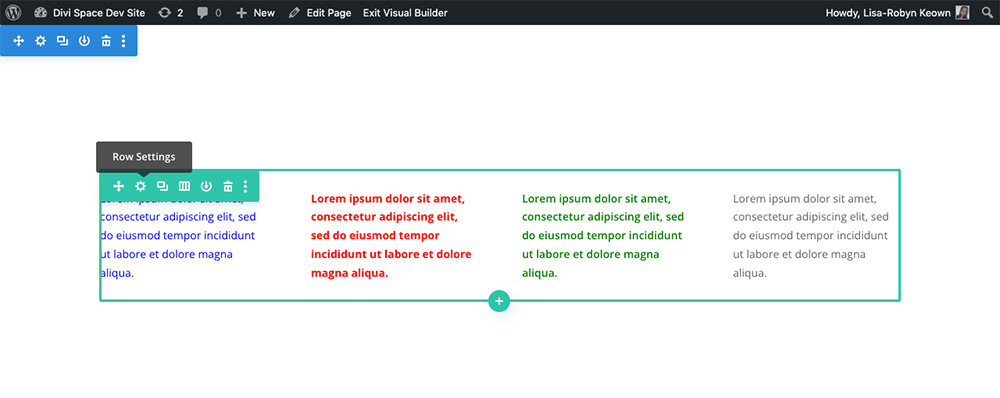
Click on the Row settings
Next, click on the Row’s Advanced tab.
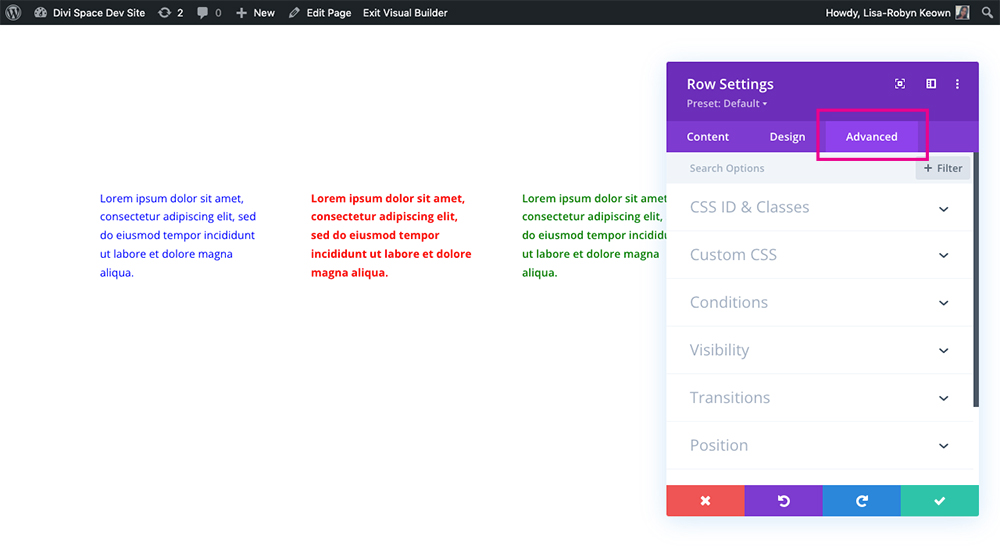
Click on the Advanced tab
Here, enter the CSS. You’ll see in my example, that by adding one line of CSS, it’s updated the look and feel of all of the modules in the row.
All of the text modules are now displayed in uppercase
If you’d like to style an individual column, head back to the Content tab and select the specific column.
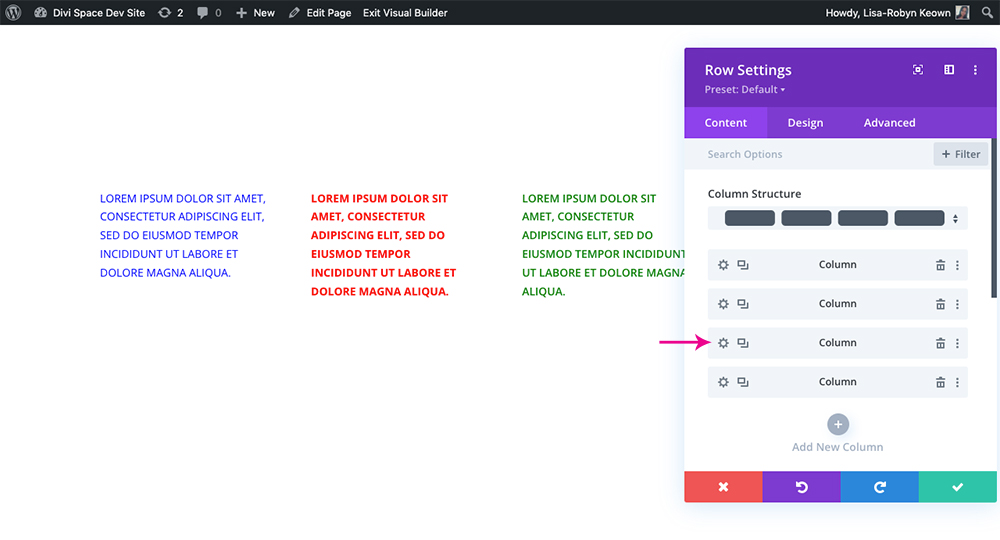
Select the column you’d like to style
Navigate to the Advanced tab and open the Custom CSS option.
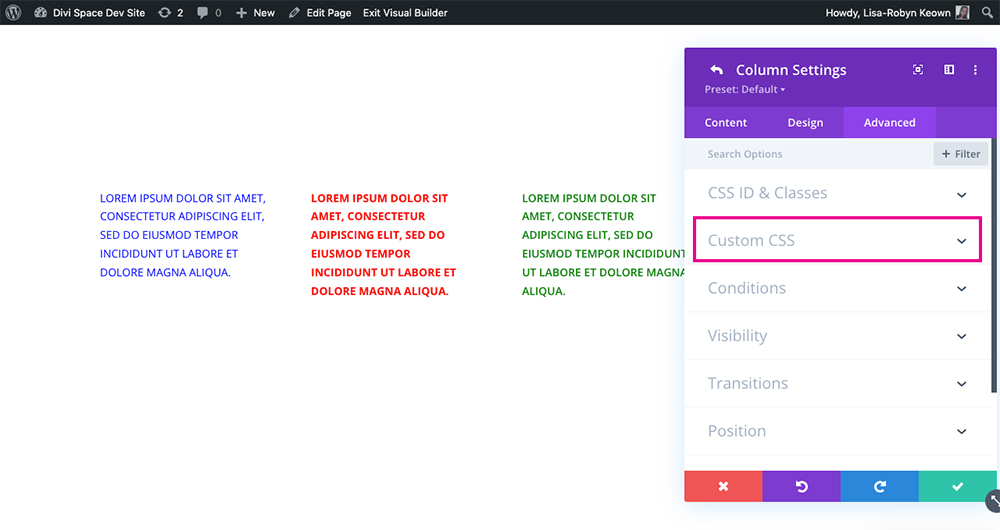
Click on the Custom CSS option
Here, enter the relevant CSS and it’ll style only the column in the row.
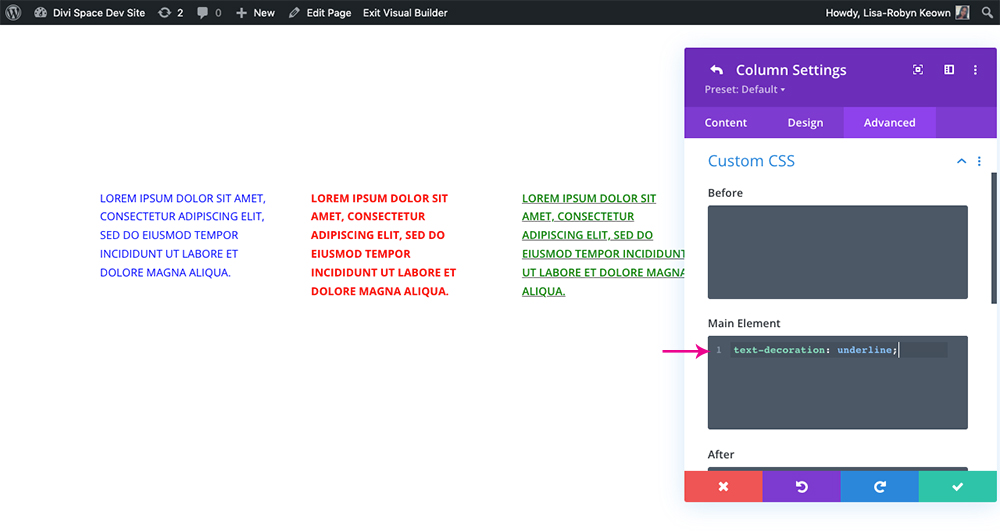
An underline style has been added to the module
Adding CSS into the modules and rows can be useful for quick, simple edits, but beyond small changes that are going to stay the same forever, adding CSS this way isn’t really recommended. If you’re going to be working on a website regularly, changing up the aesthetic or adding new content, using the module or row CSS may present a few problems down the line as trying to keep track of hundreds of lines of CSS entered into various modules scattered across a website can be confusing.
Pros and Cons of using the Advanced Tab to add CSS to Divi
Pro:
- Using the individual sections, rows and module’s Advanced tabs to enter CSS is useful for single, simple edits on pages that won’t really be looked at in the future
- These CSS edits will not get overwritten by theme updates
Con:
- Having tiny bits of CSS hidden in the Advanced settings of many modules scattered across a website can get messy and will become difficult to keep track of in the event that the website will need to be revisited in terms of design or development
- The same sort of edits can be achieved relatively easily using an alternate method, such as the Divi Theme Options Custom CSS box or a stylesheet where all of the styling is kept in one place
4. Add Styling to Divi Using the Divi Builder Page Settings
Another way for Divi users to add CSS to their website is to use the Divi Builder Page Settings. From the front-end builder, click on the Divi + icon to reveal the full menu selection. Click on the gear icon and you’ll reveal the Page Settings.
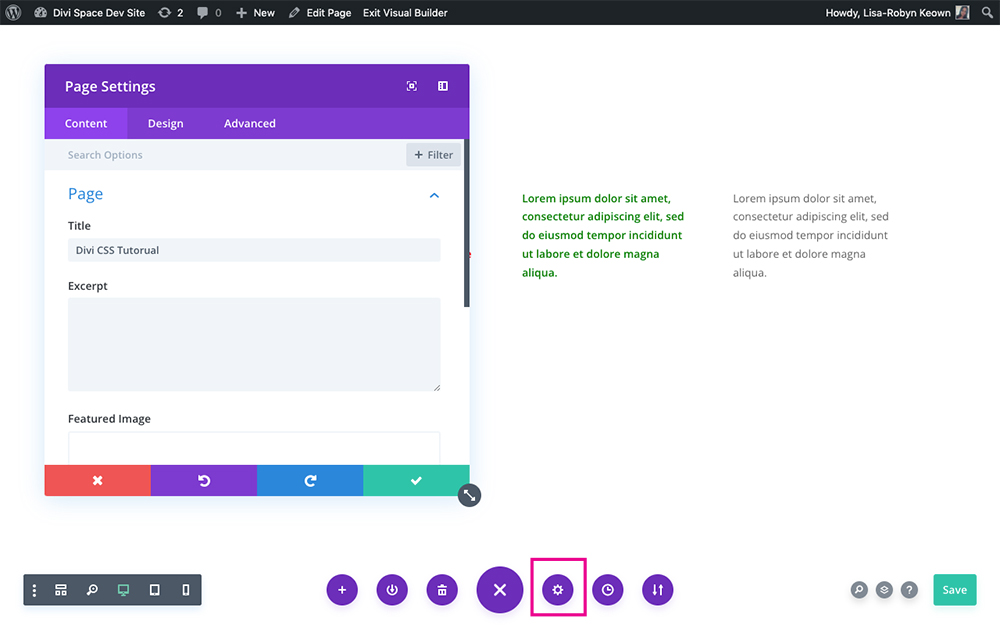
Open the Page Settings
Great for quick changes that only apply to a single page or a small handful of pages, the Divi Builder Page Settings let users adjust variables per page without having to adjust each individual modules. Any changes added to the Divi Builder Page Settings will only be applied to the page itself. An incredibly useful tool, the Divi Builder Page Settings replaces the need to write out very complicated, highly targeted CSS.
Within the Divi Builder Page Settings, there is Custom CSS box. As well as the Custom CSS box, additional per-page customization options within the Divi Builder Page Settings include:
- Enabling split testing
- Adding a custom color picker palette per page
- Setting the pages’ gutter width, default light and dark text colors, and section and content background colors
To demonstrate the per page settings, we’ll style the final column of text in the row, on the far right. To do so, get the module selector as before by opening the individual module’s settings, navigating to the Advanced tab and clicking the question mark icon next to the Main Element box.
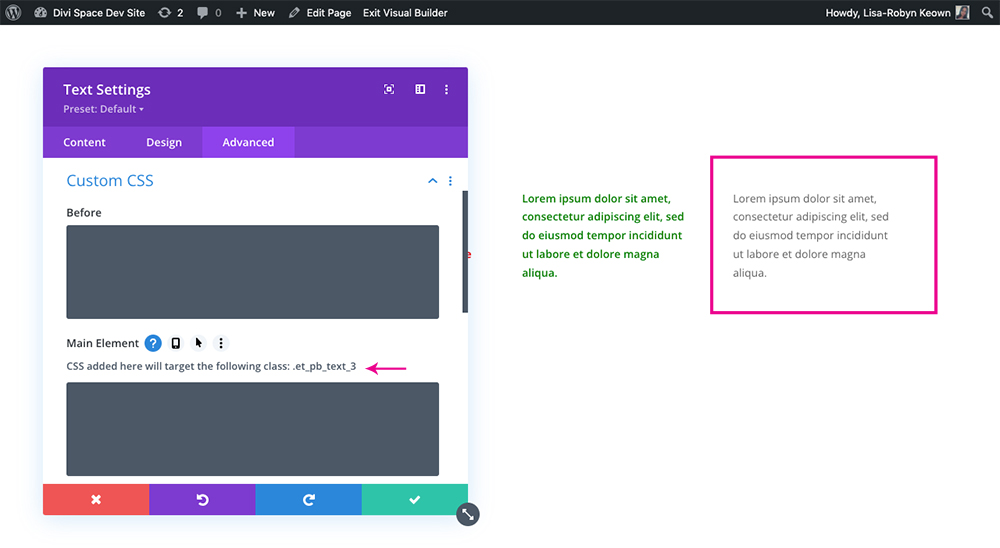
Copy the selector
At this point, open up the Divi Page Settings console, click on the Advanced tab and open the Custom CSS option.
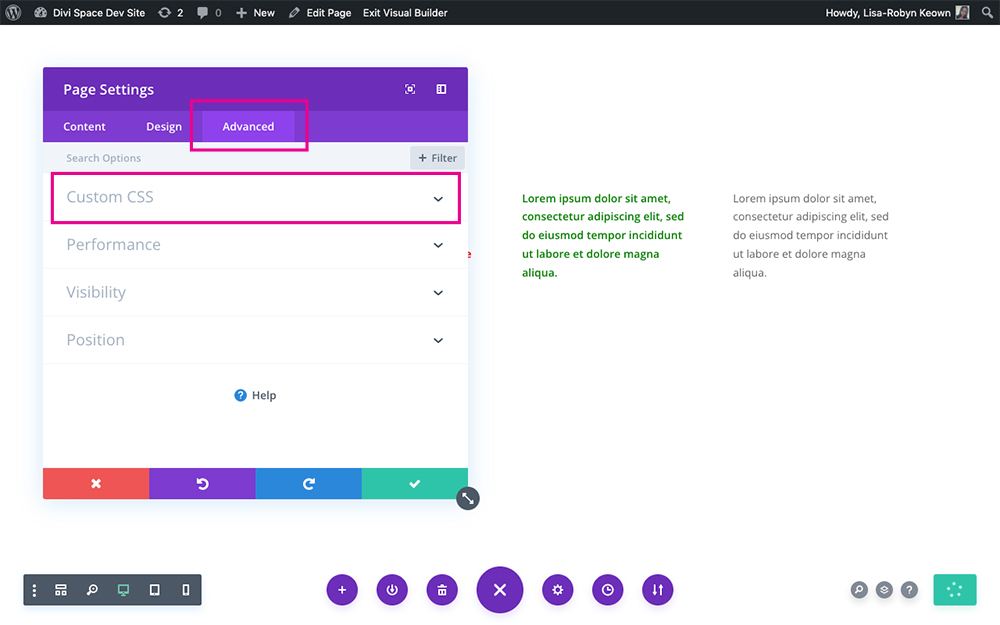
Click on the Custom CSS option
Enter the relevant CSS styling. Note, here it is important to specify the selector that you’d like to target.
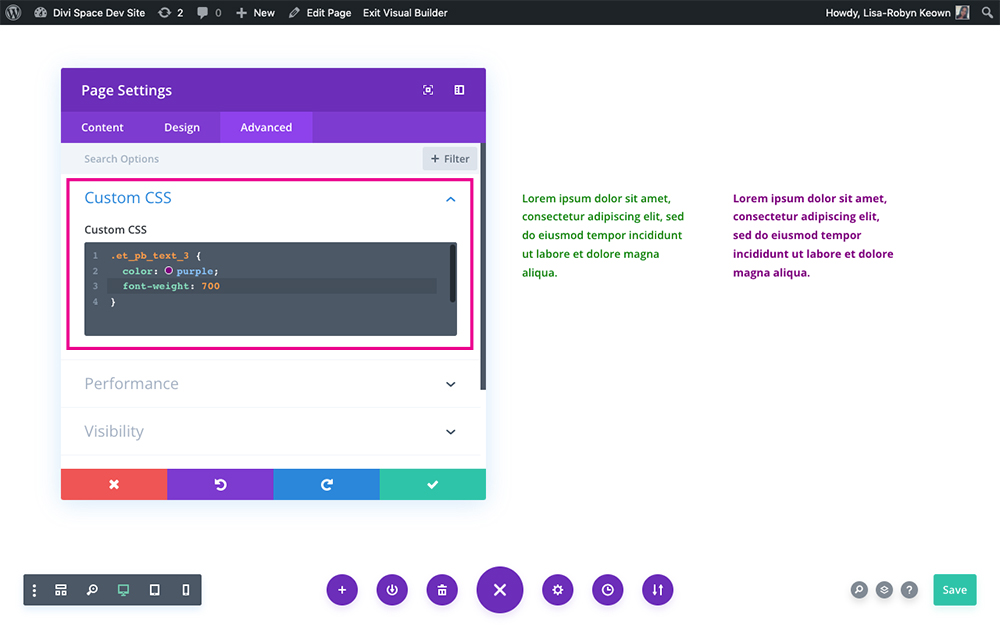
Enter the CSS
Pros and Cons of using the Divi Builder Page Settings to add CSS to Divi
Pro:
- Great for adding CSS styling that is only meant to reflect on one single page, not site-wide
- Easy to style a few page elements rather than writing complicated CSS with heavy levels of targeting
Con:
- If you have a website with many pages, each with individual Custom CSS entered into the Divi Builder Page Settings, you may lose track of all of the styling enhancements, in which case using a stylesheet would be a better idea
- Just like the Divi Theme Options Custom CSS box, there is no formatting in the Divi Builder Page Settings so it may be tricky to keep track of styling especially if you have loads of CSS
5. Add Styling to Divi Using a Stylesheet
In our opinion, one of the best ways to add CSS to the Divi theme is by using a child theme and a unique stylesheet.
If you’re brand new to WordPress and Divi, the term ‘child theme’ may sound completely foreign to you. All that is, is a series of files that, when added together, form a ‘secondary theme’ to a parent theme, in this case, the Divi theme. Using a child theme in development is repeatedly recommended as best practice as it’ll safeguard your web design efforts.
To learn more about child themes, why they’re important and how to set them up, we highly recommend going through the following blog posts as essential reading:
- Everything You Need to Know About Using a Child Theme with WordPress and Divi
- What Is The Difference Between a Child Theme and a Premium Divi Child Theme
Every Divi user has the ability to access the parent theme files and edit them. The theme files can be located in the Editor console, but it’s really not advised to tinker around here, as one wrong move can cause the entire Divi site to break.
Even if you were to successfully add CSS riles to the parent theme (again, NOT advised), your changes would be overridden every time a new theme update would be released.
To help safeguard your website and preserve your CSS changes, use a child theme and enter your CSS into a stylesheet.
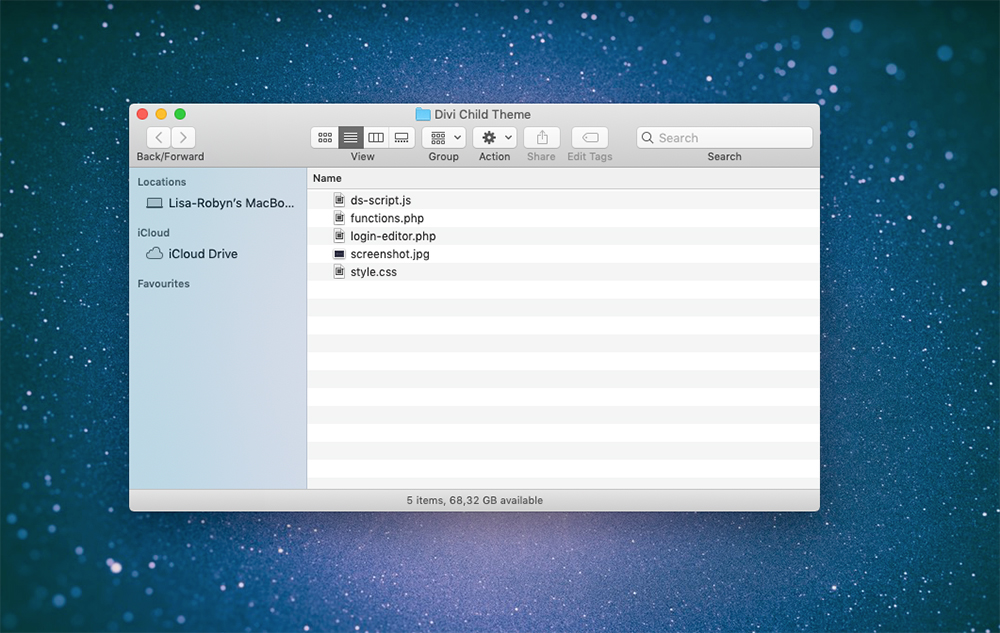
Divi child theme files and folders
In our opinion, using this route – of creating a child theme and using the stylesheet – is the best method to suit our needs. We like using a child theme as it ensures that all of our styling is in one, easy to access place, and not spread across various spaces throughout the website’s pages and modules.
Beyond simply having the CSS styling in the same place, our custom websites created for clients tend to get a bit complicated, and thus, we need the ability to reference multiple stylesheets. This just simply isn’t possible using one of the alternate Divi CSS methods mentioned above.
To get started with a child theme, we recommend using our Divi Space Child Theme Generator. All you have to do is enter your details and the details relating to the website you’re building and your child theme will be mailed to you. Once you’ve downloaded your Div child theme, you can install it on your website by navigating to Appearance > Themes and clicking Add New. Then, click Upload Theme and select the Divi child theme from your downloads folder. Install the child theme as you did the parent, click activate, and in no time, you’ll be running a child theme to protect your Divi website.
Once installed and activated, you can make changes to the stylesheet by navigating to Appearance > Editor, and selecting the style.css file from the child theme itself.
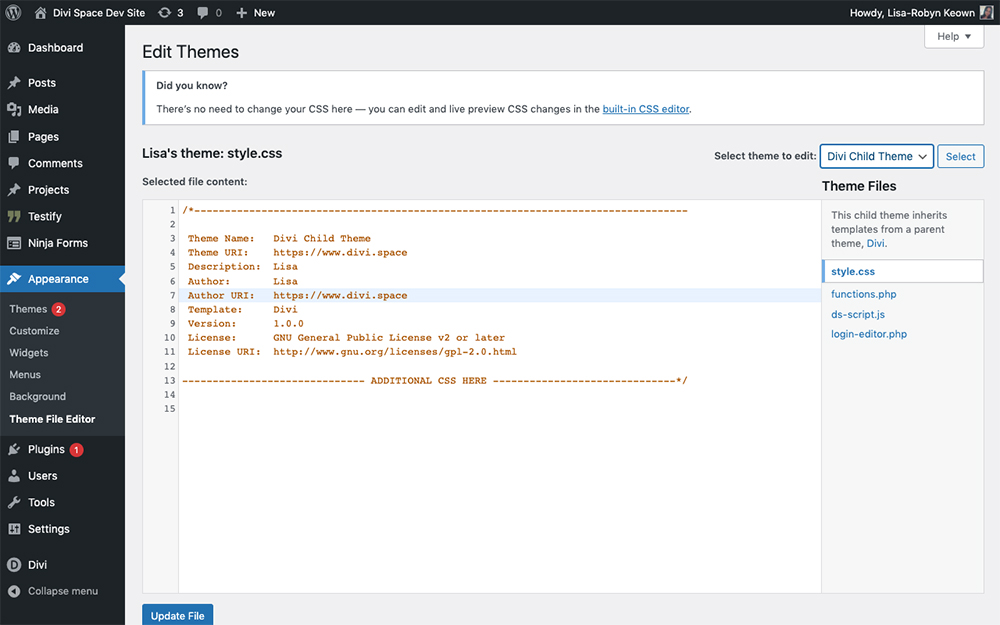
Enter your CSS below the code comments
If you’re interested in learning how to write CSS code for the Divi them, we have an incredible online course that’ll teach you just that! The Transforming Divi with CSS and jQuery course, created by the Divi Space founder, takes you through all of the steps in writing CSS, from explaining CSS foundations to element selection, CSS classes and IDs, and even advanced CSS scripting principles. The course will also teach you how to write jQuery for Divi, which will allow you to add mini-applications, intriguing animations and much more to your site.
Find out more about the Transforming Divi with CSS and jQuery course here.
Pros and Cons of using a Divi child theme and editing the style.css file:
Pro:
- Using a Divi child theme will safeguard your web design processes and protect your website by preventing you from tinkering with the parent theme (Divi) files
- All of your website’s styling is stored in one place that is easy to access and edit
- Using a child theme and stylesheet will allow you to use and enqueue multiple stylesheets (great for large websites)
Con:
- This method is the most complicated to set up and is the least user-friendly of the above-mentioned methods
6. Add CSS to Divi Using WordPress Plugins
Plugins are a great way to add CSS because they don’t require any special coding. Simply install a WordPress plugin and you can start adding your CSS. There are lots of good options available in both free and premium versions. Here’s a look at a few of the best options.
Divi Module Custom CSS Selectors
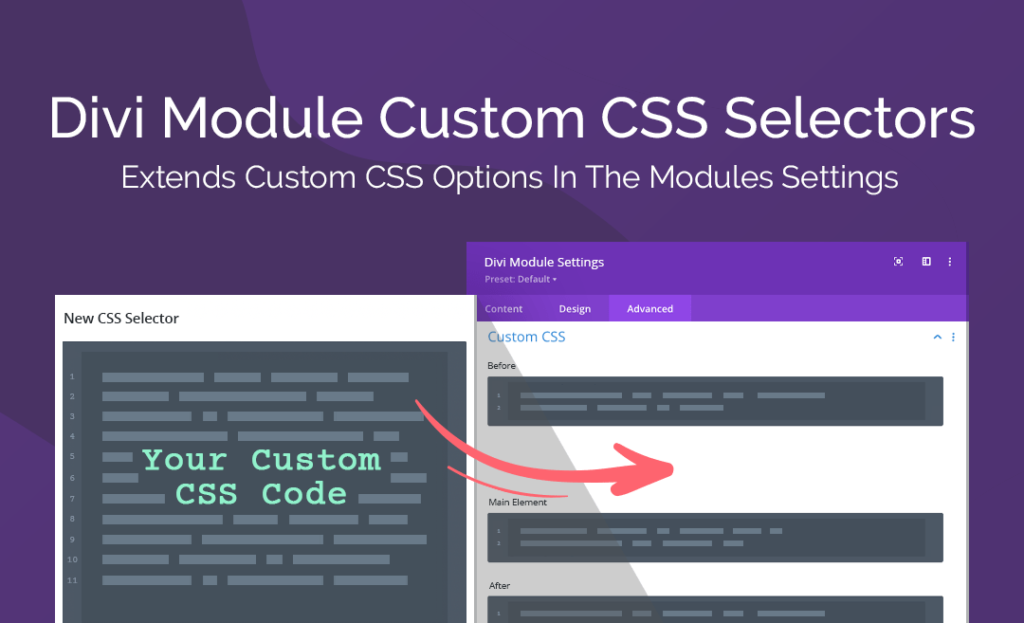
Divi Module Custom CSS Selectors
First on the list is the Divi Module Custom CSS Selectors CSS plugin for Divi. This powerful plugin acts as a silent CSS assistant working behind the scenes of your Divi website. The Divi Module Custom CSS Selectors plugin builds on the default Divi Theme Custom CSS scripting boxes within the Divi Theme and expands them to include over 500 new selectors that can be targeted when writing CSS.
Instead of searching for the correct Divi selector, having to figure out scripting for multiple classes, the Divi Module Custom CSS Selectors plugin brings the selectors to you, helping you bypass time and streamline your development.
The plugin is so robust that it also allows you to write highly detailed CSS for all screen sizes directly from the Custom CSS selector boxes in the Advanced tab. You can also write CSS active and hover state styling for elements at each of the CSS breakpoints for desktop, tablet and mobile too.
The Divi Module Custom CSS Selectors plugin is a game-changer. It’ll help you save time and script CSS with ease. Purchase the Divi Module Custom CSS Selectors plugin.
Custom CSS and JavaScript Developer Edition
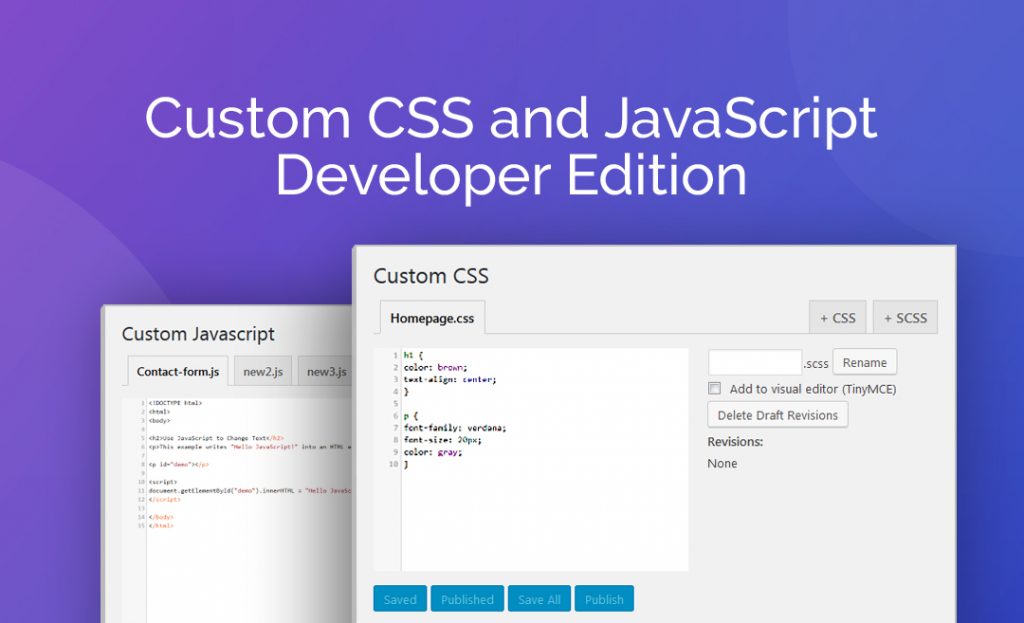
Use our plugin Custom CSS and JavaScript Developer Edition
Custom CSS and JavaScript Developer Edition works with any WordPress theme and adds an editor with tabs for CSS and JavaScript. It has a multi-file interface to help keep your code structured and organized. It splits the files into multiple virtual files, allowing you to work with individual snippets or portions of code independently.
The code is served to WordPress through this file system rather than the MySQL database. This code can be minified if you want. It utilizes a single-file compile process so the browser doesn’t have to make multiple requests to receive all of the files individually. This speeds up the website.
The editor numbers and color-codes the code through syntax highlighting. You can preview the CSS changes as you edit, so you can get your styling exactly the way you want it before going live. You can see the changes on the page you’re working with and in a new tab.
All changes to the code are documented with a time-stamped history feature. You can restore to any revision you want. It saves your code through AJAX so you don’t lose your place when saving the files. An import/export feature makes it easy to reuse code.
It’s available to purchase separately and it’s included with the membership plans. Purchase the Custom CSS and JavaScript Developer Edition plugin!
Simple Custom CSS and JS
Simple Custom CSS and JS
Simple Custom CSS and JS is a free plugin that adds an editor to any WordPress theme to make it easy to add CSS and JS. The editor adds syntax highlighting to make it easier to follow. Add the CSS on the frontend or backend.
Once you’ve created your code you can print it inline, add it to an external file, print it to the header, or print it to the footer. The code is cached within your files so they don’t have to load from the server every time the page loads.
A pro version is available that adds even more features such as Less and SAAS preprocessors, editor themes, the ability to choose specific URLs to display the code, and more.
Download the Simple Custom CSS and JS for free from the WordPress repository.
SiteOrigin CSS

SiteOrigin CSS
SiteOrigin CSS is a free CSS editor that works with any WordPress theme. It includes visual controls to make editing even easier and you can see the results in real-time. Choose colors, styles, and measurements with the click of a button.
It has a lot of help for writing CSS. Click on any element and it will identify the best selector to use. The code auto-completion feature for selectors and attributes makes writing CSS faster. It also has tools to identify issues with your code before it’s published.
Pros and Cons of using a WordPress plugin:
Pro:
- Many include intuitive interfaces that highlight the syntax.
- You can see your styles before publishing the code.
- You don’t have to modify your theme’s files.
- You won’t lose your CSS if you change themes.
- Some include support.
Con:
- If the developer stops updating the plugin you’ll have to replace it with another one and move your CSS to the new plugin.
- They might add tools or features you don’t need.
- Poorly coded plugins can slow down your website.
Ending Thoughts About Adding CSS to Divi
There are many ways to add custom CSS to the Divi theme, the trick is to find the method that feels the most comfortable and suits your Divi design habits the best.
As mentioned above, we recommend going the child theme add stylesheet route, even if it is a bit more tricky to manage in the beginning. If you decide to add CSS to the modules, pages or content areas as inline CSS, we recommend possibly keeping a note of this so that if and when you return to a website, you don’t spend hours trying to figure out where certain CSS is being served from.
Alternately, there are some great plugins available that’ll help you streamline and speed up the CSS scripting process. Two of our favorites are the Divi Module Custom CSS Selectors plugin and the Custom CSS and JavaScript Developer Edition plugin.
We want to hear from you!
How do you add CSS styling to your Divi website? Which is your favorite and also least favorite method? Please feel free to share your comments or questions below. Thanks for reading!

Great tutorial. Thanks much.
Anna, how are you doing, I can not apply color to the background of the search form added to the main menu in the header, the magnifying glass, opens on a white background and goes unnoticed, sure is solved with some CSS add-on, I prefer the option from the menu because I do not want to add a form as it is out of tune with the design.
Thanks…
I have upgraded to the latest wordpress and divi today. I wanted to follow the tutorial on “Creating Endless Horizontal Swipe Cards for Mobile with Divi”. However, I cannot get it to work because I do not have the ‘Column Main Element’ box to place the CSS into. Instead I only have three boxes – Before, Main element, and After.
I have tried a few things to fix this but to no avail. This is very frustrating and I believe may indicate a more fundamental problem with my installation.
Any help would be appreciated.
Hi Dave, this post may be helpful: https://www.elegantthemes.com/blog/theme-releases/the-new-divi-column-options-column-editing-interface. To add custom CSS to the column, you need to open row settings and click on the column. Click the Advanced tab and add CSS to the main content box. It will work the same as with “Column Main Element” in the previous Divi versions.