In today’s digital marketplace, the key to a successful e-commerce website lies not only in the products offered, but also in how customers interact with the site. The Divi Shop Builder Plugin, specifically designed for WordPress sites using the Divi theme, introduces an innovative feature to enhance customer interactions: the interactive side cart. This comprehensive tutorial embarks on a journey to explore the integration, customization, and optimization of the side cart, aiming to transform the online shopping experience and boost your website’s conversion rate. When it comes to positioning the Mini Cart icon, you can choose whether to embed it within your navigation menu, display it as a floating icon on your webpage, or even employ both methods for maximum user convenience. This guide focuses on the setup of the floating icon. For insights on incorporating a Mini Cart into your Divi Menu, refer to our earlier blog post (although you may notice some repetitive steps). Our focus in this article is on the implementation of the floating icon and the sidebar Mini Cart.
Introduction to Divi Shop Builder plugin
The Divi Shop Builder Plugin is more than just a tool; it’s a revolution in e-commerce functionality. With its introduction of the interactive side cart feature, the plugin offers a seamless way for customers to review their shopping cart without ever leaving the page they’re browsing. This not only streamlines the shopping process, but significantly enhances user experience, encouraging longer site engagement and potentially increasing conversion rates. The end goal is clear: to provide a shopping experience that feels intuitive, efficient, and wholly integrated within the aesthetic of your Divi website.
Live Demo: See the Side Cart in Action
To truly grasp the transformative power of the side cart, one must see it in action. We invite you to explore our live demo at Divi Shop Builder Demo Zone , where the side cart’s functionality is showcased in a real-world scenario. This hands-on experience allows you to interact with the side cart, witnessing firsthand its responsiveness, design integration, and user-friendly interface. It’s a peek into the potential uplift in user engagement and high conversion potential your WordPress and Divi website could achieve by implementing this feature.
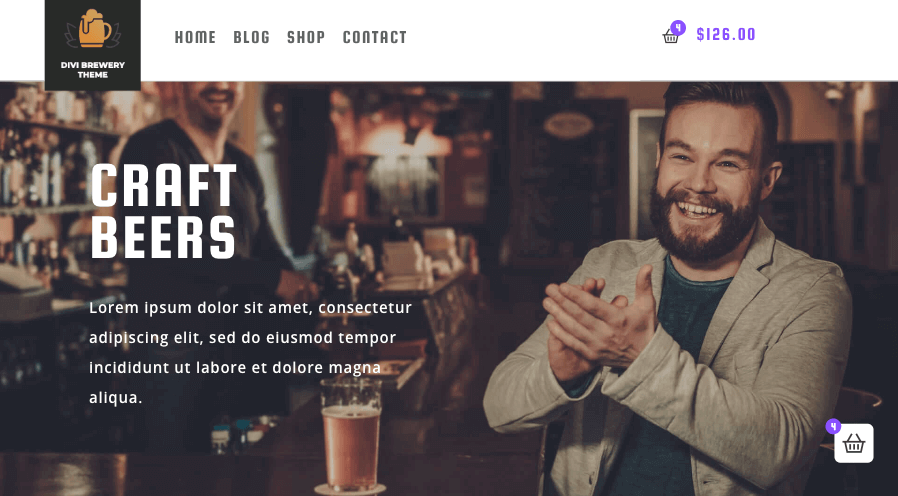
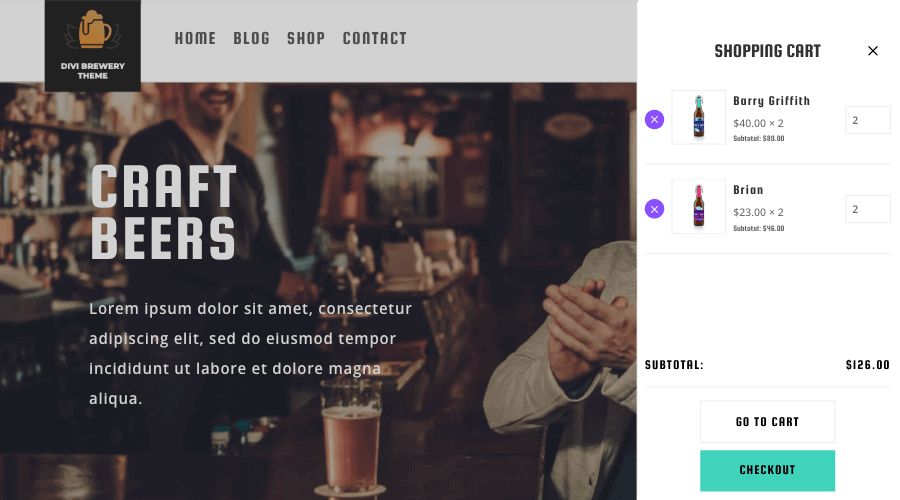
This demo is based on the Divi Brewery Child Theme design. For more information, please refer to the Divi Brewery Child Theme product page.
Integrating the Mini Cart Into Your Divi Site
The power and flexibility of the Divi Shop Builder Plugin is evident in the multiple approaches available for integrating the mini cart into your site, catering to diverse site structures and design preferences.
Using the Theme Builder
For those who use header and footer Divi Theme Builder templates, the Divi Shop Builder offers a straightforward solution. By embedding the mini cart within global elements like headers or footers, you ensure its presence on every page, maintaining consistent access for your customers. This method involves:
- Accessing the Theme Builder from the Divi dashboard.
- Selecting a global header or footer template or creating a new one.
- Adding the Mini Cart module and customizing its appearance to match your Divi website’s design.
Menu Navigation Integration
To achieve a comparable outcome, consider integrating a mini cart into the menu of your Divi website, which is especially useful if your site doesn’t utilize theme builder global templates. Follow these detailed instructions:
Step 1: Create Divi Library Item With Mini Cart Module
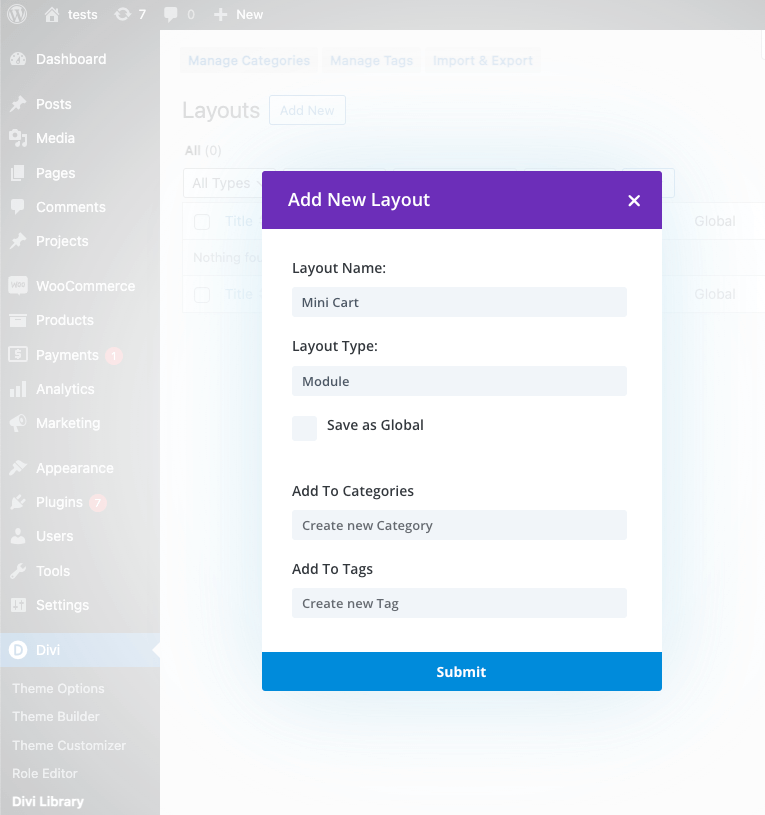
- Navigate to the ‘Divi Library’ within your Divi theme settings.
- Click on the ‘Add New Layout’ button to initiate a new design.
- Name your layout, for instance, “Mini Cart,” to easily identify it.
- Choose “Module” as your layout type from the given selections.
- Optionally, you can categorize your layout for more organized management.
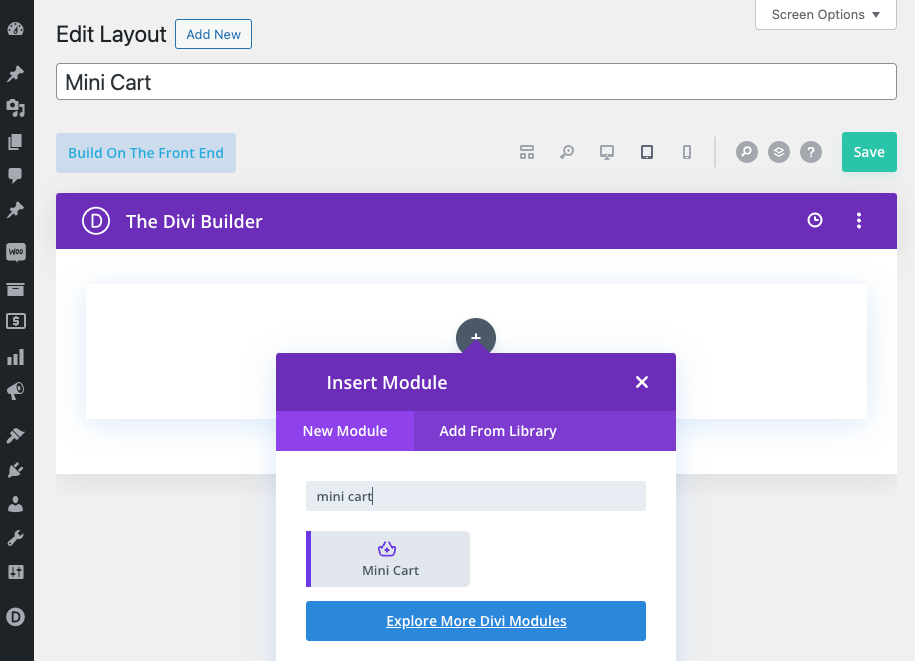
- Click “Submit” to save your layout. Post-submission, you’ll be redirected to the Layout Editor, where you can access the Divi Builder interface. For a graphical layout view, select the “Desktop View” icon.
- In the Divi Builder, add your module by clicking ‘Add New Module’ and then pick the “Mini Cart” option. If you don’t see the “Mini Cart” module, verify that the Divi Shop Builder plugin is activated on your site.
Step 2: Add the Mini Cart to Your Menu
- Navigate to ‘Appearance’ > ‘Menus’ in your WordPress dashboard to access your site’s menu settings.
- Choose the menu where you’d like to include the mini cart feature.
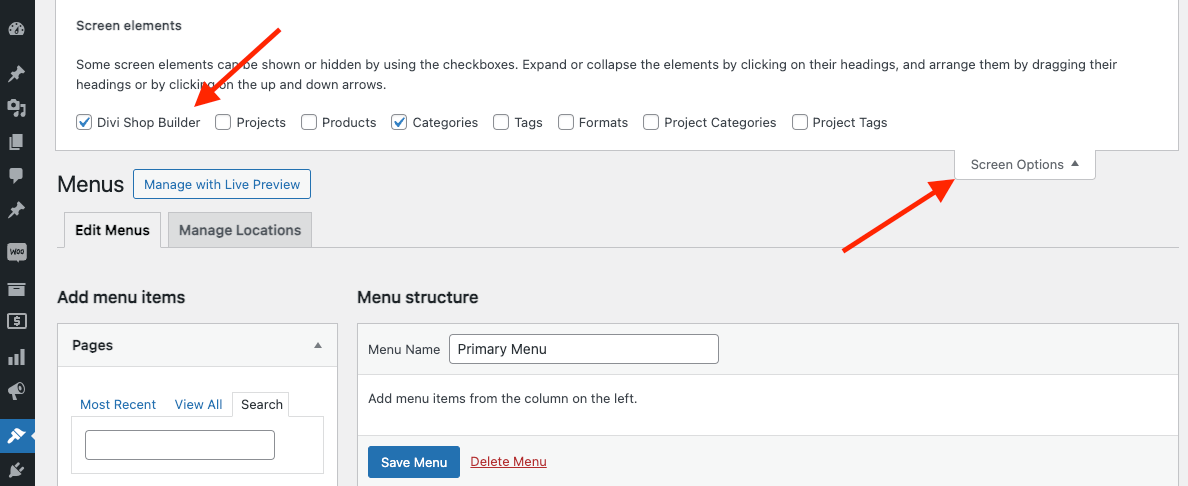
- Click on ‘Screen Options’ at the top of the page and check the ‘Divi Shop Builder’ option to enable it. This action will unveil the ‘Divi Shop Builder’ category in the menu item addition section.

- Locate and select the “Mini Cart” layout you previously created in the Divi Library.
- Add the “Mini Cart” layout to your chosen menu and remember to save your changes.
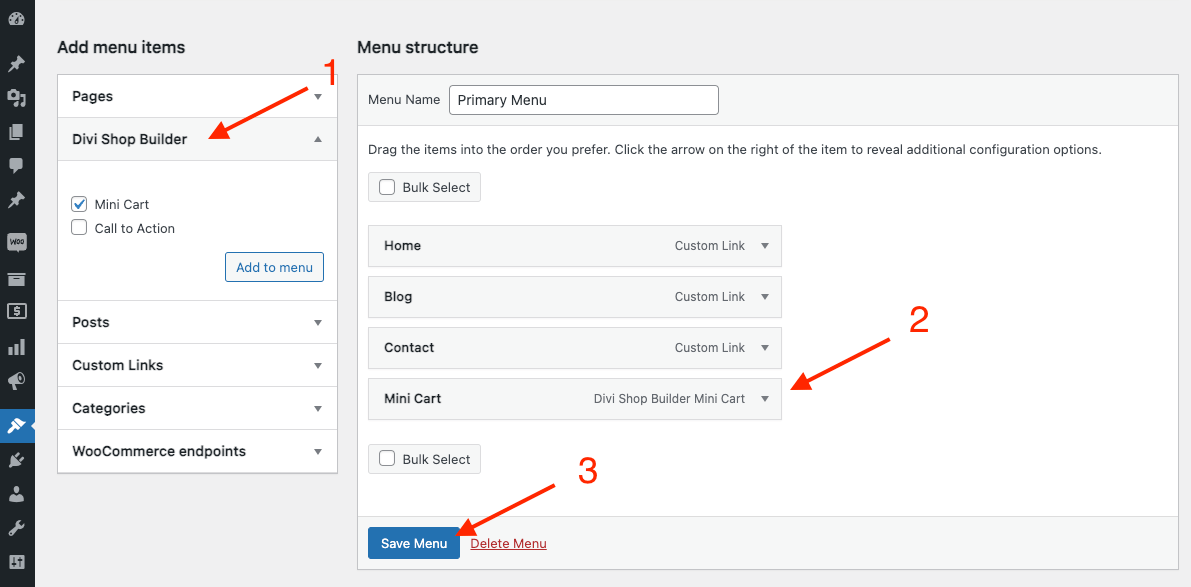
After completing these steps, visit your website’s front end to see the mini cart feature integrated into your menu, enhancing the shopping experience for your customers.
Making the Mini Cart Icon Float for Enhanced Visibility
Ensuring your mini cart icon is always within reach and visible to your users can significantly enhance the shopping experience on your Divi e-commerce site. A floating mini cart icon remains in a fixed position on the screen as users scroll, providing constant access to the cart without disrupting the shopping experience. Here’s how you can make your mini cart icon float:
- Navigate to Divi Module Settings: Start by opening the page or layout where your mini cart icon is located in the Divi Builder.
- Access the Position Settings: In the Divi Module settings, look for the ‘Advanced’ tab, and then find the ‘Position’ settings.
- Set Position to Fixed: Within the ‘Position’ settings, change the position type to ‘Fixed’. This will make your mini cart icon stay in a fixed spot on the screen.
- Adjust the Vertical Offset: Set a vertical offset. A good starting point is 15vh (viewport height), which places the icon at a comfortable position from the bottom of the screen.
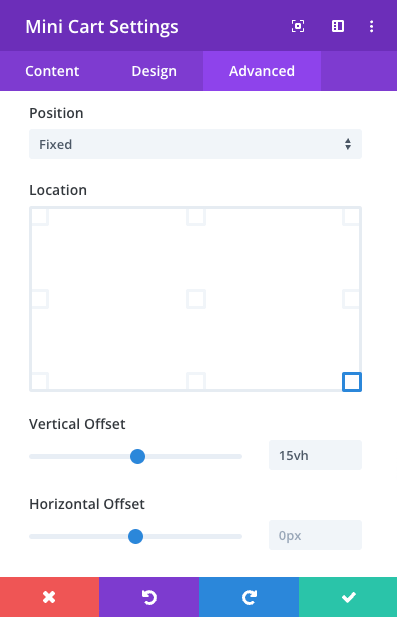
This adjustment can lead to a more intuitive and efficient shopping experience, encouraging users to review their cart and proceed to checkout with ease.
Tailoring Mini Cart Visibility
Beyond mere placement, the visibility of the mini cart can be finely tuned to align with the user’s journey through your e-commerce website. The module’s advanced settings allow for the mini cart to be displayed or hidden under specific conditions, such as on certain pages or in response to particular user actions. This level of customization ensures that the mini cart is present when beneficial to the user and discreetly absent when not, enhancing the overall shopping experience. Read more about using The Divi Condition Options.
Customizing the Mini Cart for Enhanced User Engagement
The mini cart’s true value lies in its ability to be customized to fit the unique style and needs of your Divi site. The Divi Shop Builder Plugin offers an array of customization options that allow you to control how the mini cart interacts with customers and how it’s presented.
Interactive Behaviors: Hover and Click Dynamics
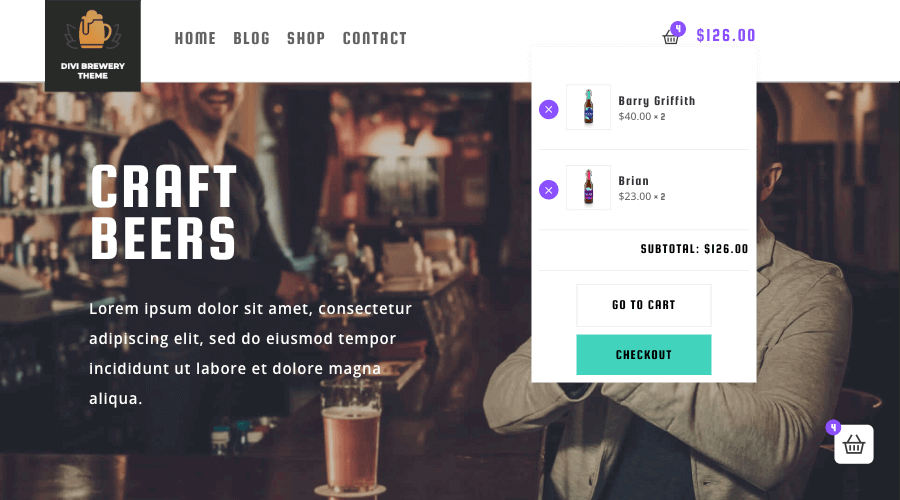
The mini cart is not just a static element; it’s an interactive component that responds to user actions. Customize the mini cart to expand or show a preview upon hover, providing immediate feedback and encouraging users to review their cart contents. Similarly, configure the click action to either display a more detailed cart view or direct users straight to the checkout, thereby streamlining the purchasing process.
Dropdown Integration
Enhance the mini cart with a dropdown feature for a quick and detailed preview of cart contents directly from the mini cart icon. Provide a full overview of the cart, allowing users to modify quantities, remove items, or view product images without navigating away from the current page.
Visual Customization: Aligning with Your Site’s Aesthetics
The appearance of the mini cart is crucial in maintaining the cohesive design of your Divi site. The plugin allows for extensive visual customization, including:
- Icon Selection: Choose from 15 prebuilt icons that best suit your Divi website’s design or upload a custom icon to align perfectly with your brand.
- Design Elements: Customize the color scheme, fonts, and layout of the mini cart dropdown to ensure it complements your site’s overall aesthetic.
- Content Display: Control what information is displayed in the mini cart, such as item count, subtotal, cart label making the mini cart informative, yet concise.
Content and Language Customization: Personalizing the Shopping Experience
To further enhance the shopping experience, the Divi Shop Builder Plugin enables you to personalize texts used within the mini cart. Set custom text for various elements within the mini cart, such as the checkout button or cart summary, ensuring clarity and brand consistency. Or, if your site operates in languages other than English, you’ll find it straightforward to customize the mini cart’s text, ensuring it accommodates your diverse audience seamlessly.
Conclusion: Elevating Your Divi Site with a Side Cart
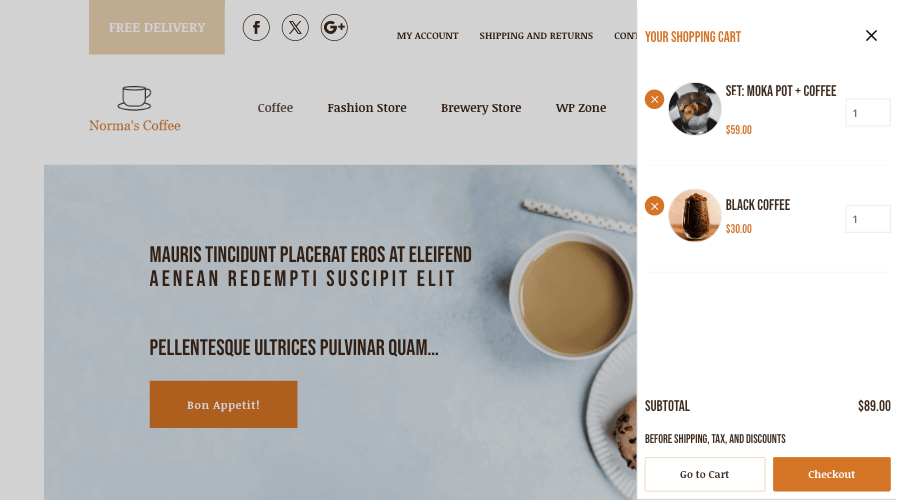
Integrating an interactive side cart into your Divi e-commerce site with the Divi Shop Builder Plugin is more than just a functional enhancement; it’s a strategic decision that can significantly impact your site’s user experience and conversion rates. By leveraging the customization options, advanced features, and strategic positioning, you can create a shopping environment that is not only user-friendly and efficient but also perfectly aligned with your brand’s aesthetic and values.
Embrace the power of the Divi Shop Builder Plugin to transform your e-commerce website into a dynamic and engaging platform that delights users and drives conversions. With the side cart feature, your online store will set a new standard for e-commerce excellence, providing a seamless and enjoyable shopping journey for every visitor.




Recent Comments