Are you ready to give your WooCommerce store a cool upgrade and increase conversions? Let’s dive into configuring a dropdown style mini cart within your Divi menu, utilizing the capabilities of Divi Shop Builder plugin from WP Zone. This little feature is like a secret weapon for your e-commerce website. It lets your customers peek at their shopping cart quickly without navigating away from the page they’re on. It is a simple and super effective upgrade that will enhance your customers’ online shopping experience, while also increasing sales.
In this guide, we’re going to walk through each step to get this feature up and running on your site. It doesn’t matter if you’re new to Divi or WooCommerce; we’ve got your back. You’ll learn how to add a mini cart to your existing menu, play around with its look and feel in the Divi Theme Builder, and we’ll give you a sneak peek into setting up a sidebar mini cart in our upcoming guide.
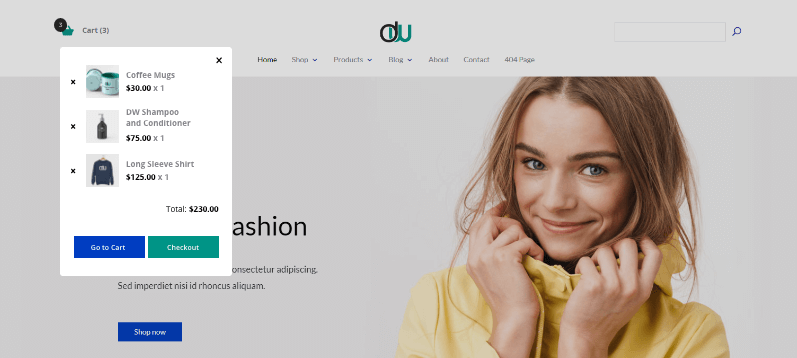
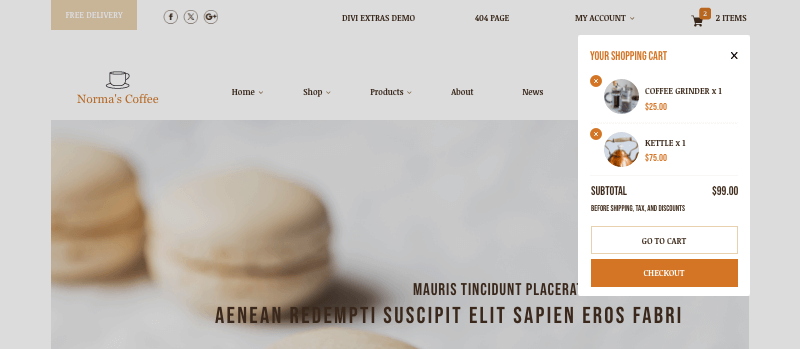
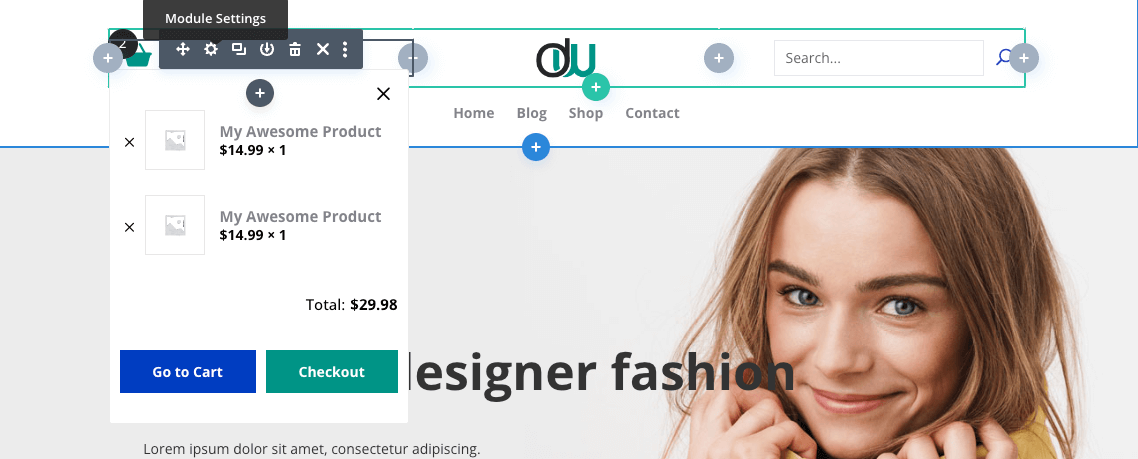
Take a look at these Divi Shop Builder live demos to see the dropdown mini cart in action within a menu.
Getting Your Tools Ready: Divi, WooCommerce, Divi Shop Builder
Before we jump into the mini cart magic, let’s make sure everything’s in place. Here’s a quick checklist to get started:
- Have the Divi theme and WooCommerce Installed: First things first, ensure you have the Divi and the WooCommerce plugin installed on your WordPress website. It’s like having the right ingredients before you start cooking.
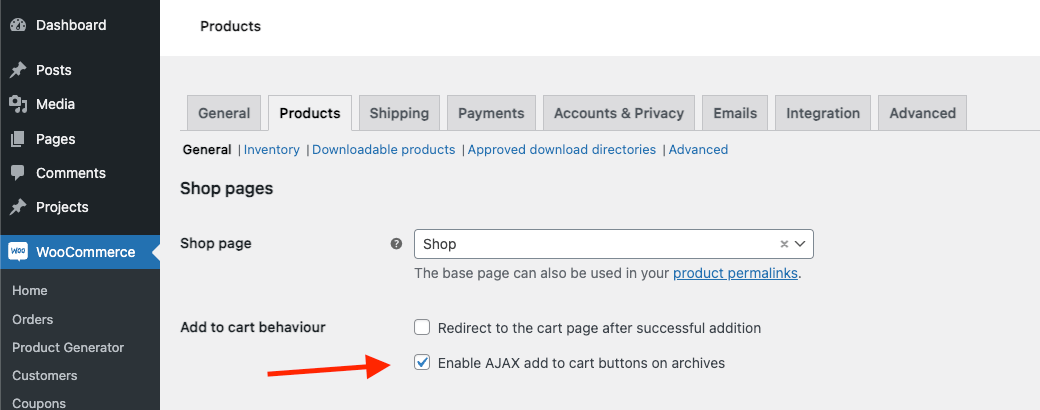
- Enable Ajax add to cart: Navigate to the WooCommerce settings in your WordPress dashboard, click on the ‘Products’ tab, and select the ‘Enable AJAX add to cart buttons on archives’ option. Remember to save your changes.

- Activate Divi Shop Builder plugin: Make sure the Divi Shop Builder plugin is active, since it provides the necessary mini cart functionality as a Divi module, crucial for our next steps
- Before proceeding, think about where to position the mini cart: It can be positioned at the beginning, middle, or end of your navigation item list, or you can seamlessly incorporate it into any section, row, or column within your theme builder layout. We will cover both options in this tutorial.
What Is the Divi Shop Builder Plugin?
Before we dive in, let’s take a quick look at what the Shop Builder plugin is all about, and talk about some of its awesome features. The Divi Shop Builder is a handy plugin for the Divi theme that really amps up your WooCommerce store. It blends perfectly with Divi, offering you a drag-and-drop interface to fine-tune every aspect of your shop’s pages. From product catalogs to individual product pages, and yes, your shopping cart, Divi Shop Builder puts the control back in your hands.
Cool Features of the Divi Shop Builder Plugin:
- Cart Dropdown Module: Introduces a new dropdown cart module for quick access to cart contents.
- Side Cart Module: Adds a new module for a side cart that can be accessed from any page.
- Offers complete control over how products are displayed on your site.
- Advanced Ajax Product Filtering: Allows for sophisticated product filtering without page reloads.
- Checkout Flow: Provides six modules to enhance the checkout process.
- Multi-Step Checkout Module: this module breaks the checkout process into multiple steps.
- Custom Cart Icon: Introduces the ability to add a custom cart icon to your site.
- A new feature for adding call-to-action buttons to your menu.
- Show Products In Search Results: Allows products to appear in search results.
- Product List And Grid View: Options for displaying products in a list or grid format.
- Product Image Flip: Introduces a feature for flipping product images on hover for additional views.
And more!
Learn More About Divi Shop Builder
So, let’s take your website’s shopping experience to the next level. By the end of this tutorial, your online store is not just going to look awesome, but it’ll also be a breeze for your customers to use. Let’s get started!
In the next section, we’ll go step-by-step on how to add that handy mini cart to your existing menu.
Integrating a Mini Cart into Your Menu In 2 Easy Steps
Step 1: Create Menu Cart Layout
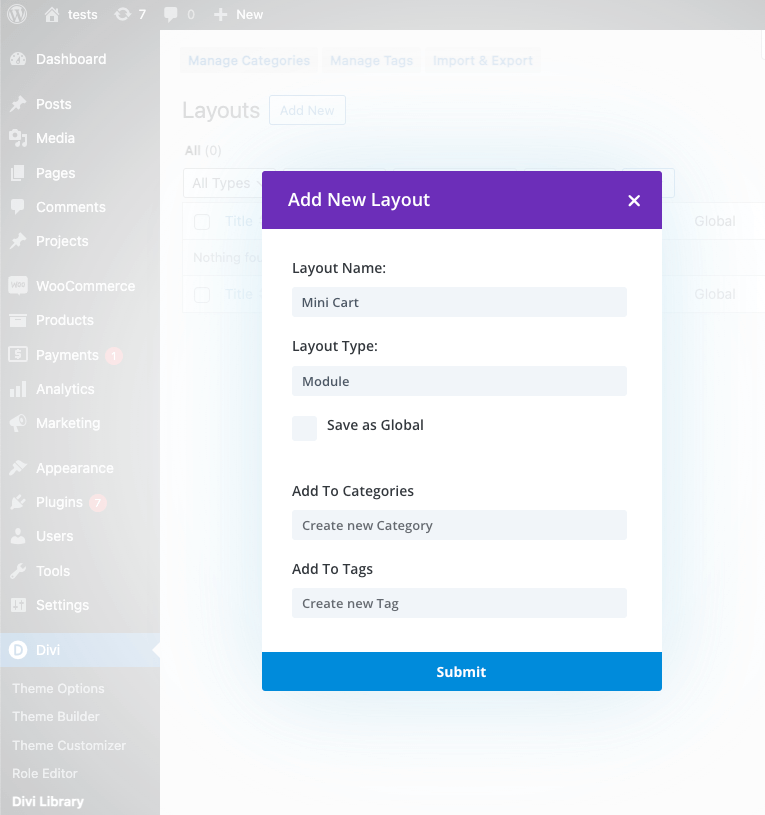
- Navigate to the ‘Divi Library’ in your Divi theme options.
- Select the ‘Add New Layout’ button to create a new module.
- Assign a name to your new layout, such as “Mini Cart.”
- For the layout type, select “Module” from the options.
- You may categorize your layout for better organization, but this is optional.
- Once configured, click the “Submit” button to save.
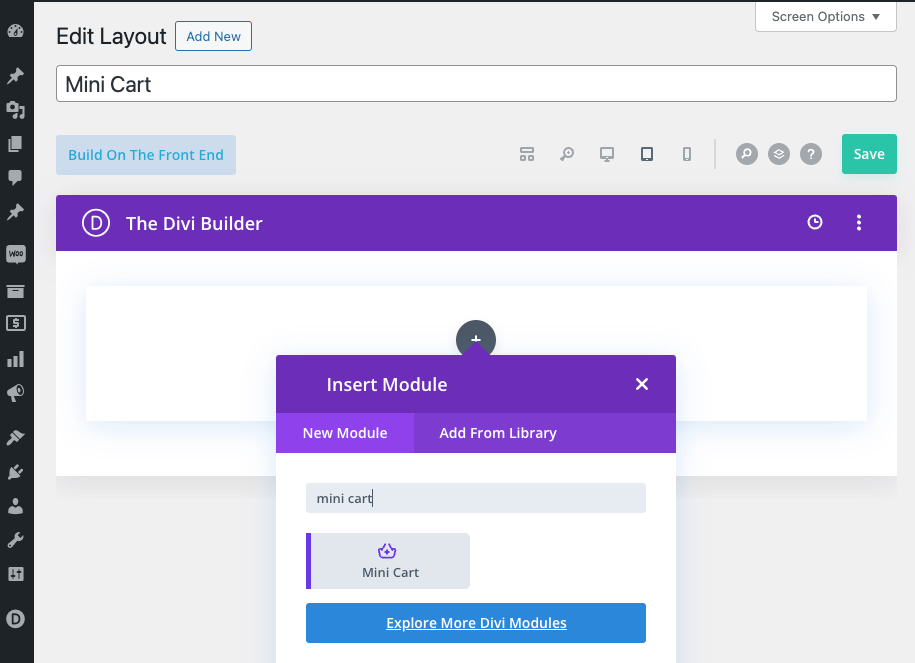
- After submission, you’ll be taken to the Layout Editor where the Divi Builder interface is accessible. For a visual representation of your layout, you can opt to click the “Desktop View” icon.
- In the Divi Builder, add your new module by clicking on ‘Add New Module,’ then select the “Mini Cart” option. Should the “Mini Cart” module not appear, ensure that the Divi Shop Builder plugin is active on your site.
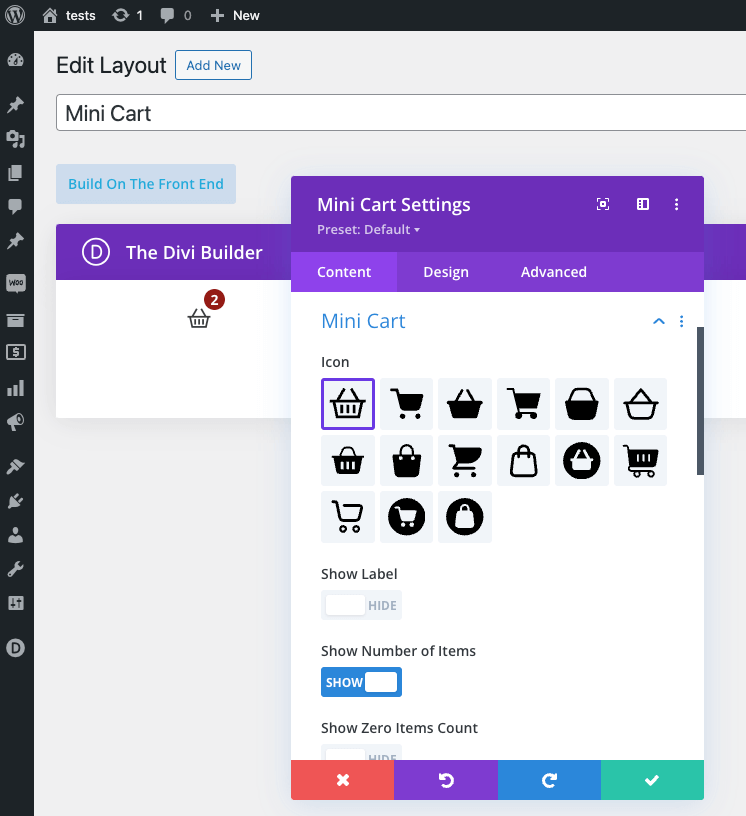
- Once the mini cart module is in place, you can fine-tune its settings to align with your website’s design and functionality requirements.
Step 2: Add Menu Cart Layout to Menu
Adding a mini cart to your existing menu is simpler than you might think. Here’s how to do it:
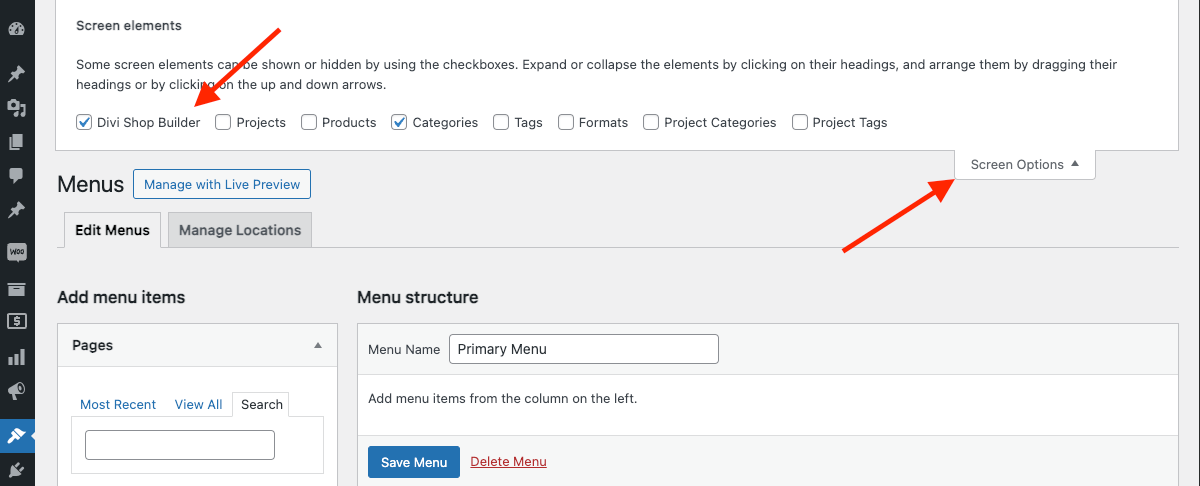
- Go to the ‘Appearance’ section on the WordPress dashboard’s left sidebar and select ‘Menus.’ This area is where you manage the menus for your website.
- Identify and select the menu where you wish to incorporate the mini cart feature.
- At the top of the page, there’s an option for ‘Screen Options.’ Ensure that the checkbox for ‘Divi Shop Builder’ is ticked. With this option enabled, you’ll find the ‘Divi Shop Builder’ category under the section to add items to your menu.
- Look for the layout named “Mini Cart” that we crafted earlier within the Divi Library.
- After adding the “Mini Cart” layout to your menu, make sure to save your modifications. Once saved, visit the front end of your website to view the mini cart in action on your menu.

And there you have it!

Your menu now proudly sports a mini cart that not only looks good but also enhances your customer’s shopping experience. In the next section, we’ll cover how to integrate a mini cart into your Divi Theme Builder template.
Enhancing Your Divi Theme Builder template with a Mini Cart Module
The Divi Theme Builder is a powerful tool that lets you customize every part of your website, and adding a mini cart to it is no exception. If you are using the Divi Theme Builder to display your menu, you can add it to your template. That gives you more control of where you want to display it. Here’s how you can make it happen:
- Access the Divi Theme Builder: From your WordPress dashboard, navigate to Divi > Theme Builder. This is where you can create and manage custom templates for different parts of your site.
- Select or Create a Template: If you already have a template for your header (where most mini carts live), go ahead and edit it. If not, let’s create one. Click on “Add New Template,” select “Global Header,” and then “Create Template.”
- Open the Header Template in the Builder: Once your template is ready, click on the pencil icon to edit it with the Divi Builder. This is your canvas for designing the header.
- Add a Cart Module: In the Divi Builder, add a new module and select the “Mini Cart” module. This is your mini cart. You can place it anywhere in your header layout. Think about where it would be most visible and accessible for your visitors.
- Customize Your Mini Cart Module: Now for the fun part – customization. You can change the layout, color, size, and even what’s displayed in the mini cart. Want to show product images in the cart? Go for it! Prefer just a list of products? That’s cool too! The key is to make it match your site’s style and make shopping easy for your customers.
- Add and Customize Other Elements: Don’t forget to balance your header. Alongside your mini cart, you might want other elements like your logo, navigation menu, or a search bar. The Divi Builder allows you to add and arrange these elements with ease. Play around until you get a header that’s not just functional but also aesthetically pleasing.
- Preview and Adjust: Always preview your changes to see how they look live. This step is crucial. It helps you catch any oddities in layout or functionality.
Save and Publish Your Template: Once you’re happy with how everything looks and works, save your template. It will automatically apply to your entire site, giving every page the new header with your mini cart.
Your Journey to an Enhanced Shopping Experience
And there you have it – a complete guide to adding a mini cart in Divi with WooCommerce. From integrating a mini cart into your existing menu, customizing it within the Divi Theme Builder, and adding a mini cart icon to your menu, we’ve covered all the bases to help you elevate your online store.
Stay tuned for next week, where we’ll delve into how to expand your shop’s functionality by adding a sidebar mini cart.
Remember, the key to a successful e-commerce website is not just in the products you offer but also in the shopping experience you provide. A mini cart is a small addition that can make a huge difference in how customers interact with your site. It’s about convenience, efficiency, and a touch of style.
Don’t be afraid to experiment with different styles and placements. The beauty of the Divi and WooCommerce is their flexibility, allowing you to tailor your site to your unique vision. And, of course, always keep your customer’s experience in mind – their feedback is invaluable.
Thank you for joining us on this mini cart adventure. We hope this guide helps you create an online shopping environment that not only looks great but also works seamlessly for your customers. Happy customizing!

Recent Comments