
White labeling WordPress themes is a hot topic amongst web designers. By adding a few extra steps to your development process, you can customize certain elements of a website as your own. This gives your brand an extra bump of credibility, disguising themes, plugins and back-end software as your property or creation.
If you’re building client sites and want to brand the entire asset as a product of your own, then you may want to white label the WordPress themes used on the back-end. If you’re using Divi, you’ll more than likely want to custom brand the Divi theme display in the Appearance > Themes section, as well as any child theme you use.
If you’re wondering how to hide the WordPress theme name from your client, this post is for you. Whatever the reason you white label the WordPress themes on your site, the actual process and steps to take aren’t difficult.
In this post, we’ll show you how you can manually rebrand the WordPress themes displaying in the Appearance > Themes console. You’ll learn how to add custom text and branded graphics of either your business or your clients. You’ll need access to your server or an FTP client.
In this post, you’ll learn:
- How to white label the WordPress themes manually
- Problems with the manual white label method
- How to white label the WordPress themes automatically with Divi Ghoster
Ready to put your website into stealth mode? Read on!
How to white label WordPress themes manually
Each theme and child theme used in a WordPress website can be found by hovering over the Appearance menu and clicking on the Themes tab. By default, WordPress will ship with the latest system themes, for example, Twenty Twenty. Any new themes or child themes you install will display here.
By default, these themes will adopt the name and branding assigned by the creator. For example, the Divi theme will display with its logo, stand-out purple brand color and the Divi name. Most developers want to hide their use of Divi in development, so they take the necessary measures to rebrand the WordPress theme section.
Although there are a few steps involved, and you’ll need to play around with the files on your server and get crafty with CSS, it’s relatively easy to rebrand the WordPress themes manually.
If you already know that you want to avoid muddling in the server or tinkering with CSS, you can jump ahead to the automatic method where I’ll demonstrate rebranding the WordPress themes using a plugin.
Here are the steps you’ll need to follow to rebrand the WordPress themes manually:
Step 1: Upload a theme or child theme
For this demo, I’ve uploaded a child theme that I made with the Divi Space child theme builder. This theme builder will give you a blank, barebones child theme that includes:
- A name,
- Image,
- Functions.php file, and
- Style.css file.
Now that the child theme is installed, I want to change the WordPress theme name to rebrand it.

A snapshot of the WordPress Themes console
Before performing these steps you might need to deactivate the current theme. WordPress will let you make changes while the theme is active, but the theme can break during this process. Also, we suggest making a backup of your site before changing server files.
If you don’t want to work directly within cPanel, an alternate method is to use FTP to access the same files in your server.
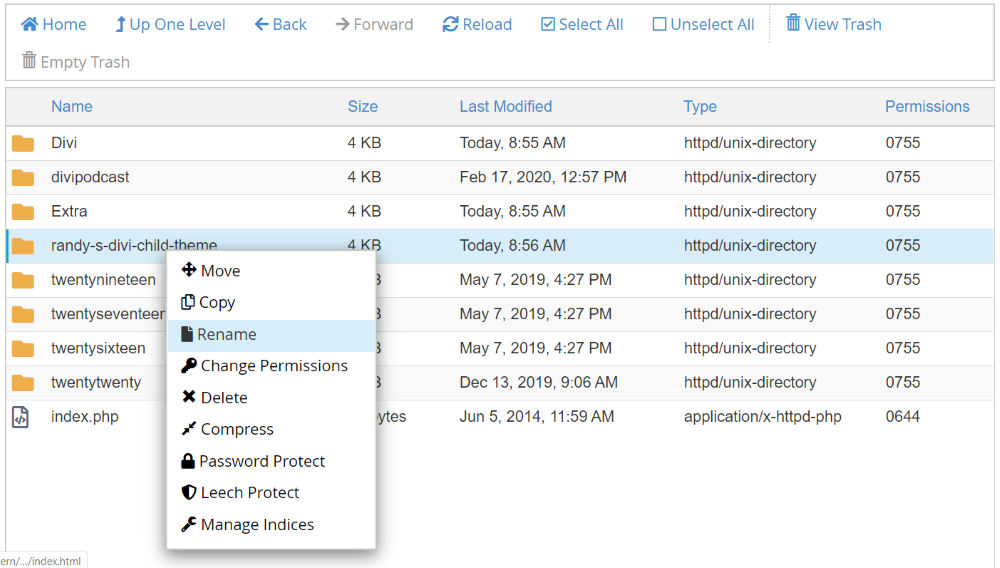
Step 2: Rename the WordPress theme folder
Sometimes, cPanel interfaces can look a bit different so if yours doesn’t display in the same way as the images in this demo, or if your server uses a different software other than cPanel, the file system, tools and processes will be the same.
Changing the WordPress child theme name in cPanel
Once you have logged into your cPanel console, click on the File Manager icon. This will open a new window displaying the entire file system of your website.
Search for the folder of the website you are working in. If the site is a subdomain, you can locate it’s folder within the main website’s folder.
Once you’ve found the folder, click through the file system until you find the wp-content folder. Inside here, click on Themes.
Find the folder of the theme or child theme you wish to rebrand, and right-click on the folder name. A menu will appear. Click Rename.
Renaming the child theme folder name in cPanel
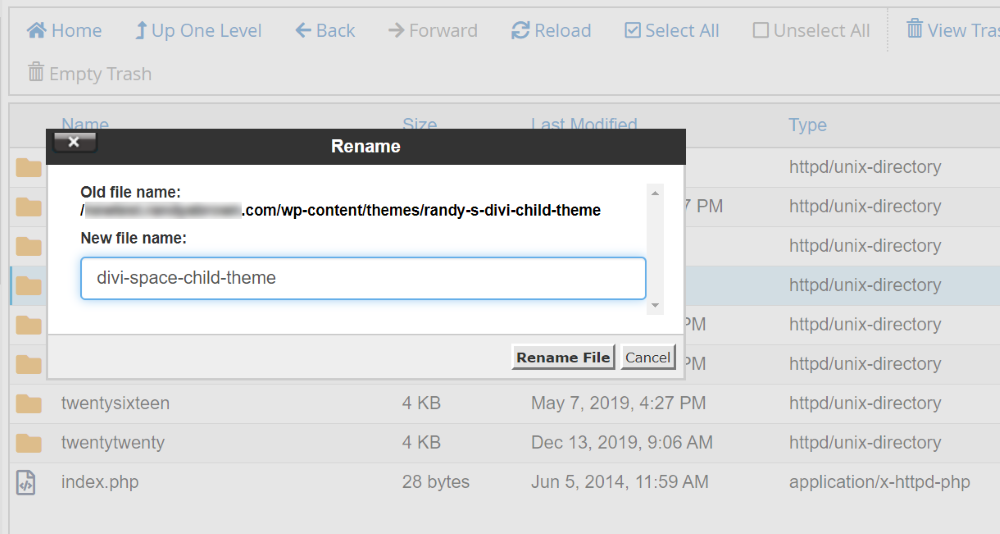
Next, a text-entry modal will appear. Enter the preferred name of your theme in the modal. If the name includes more than one word, be sure to include dashes between words and leave no spaces.
When complete, click Rename File to save your changes.
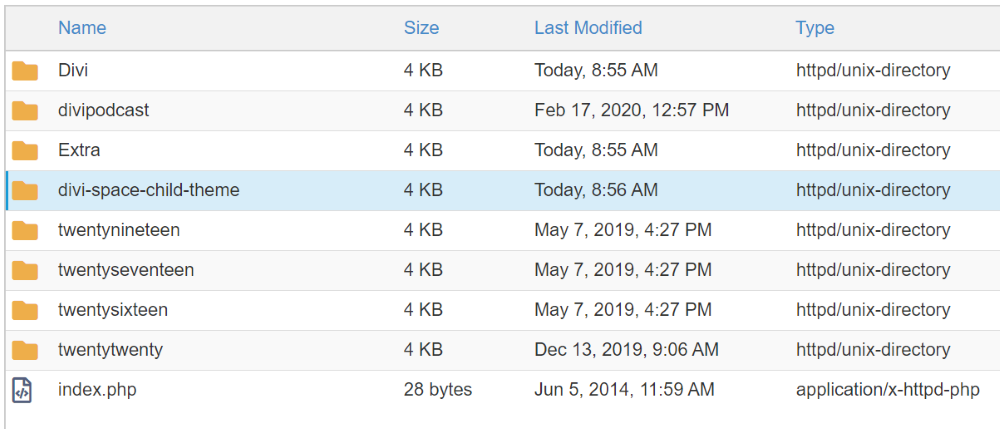
Divi child theme folder successfully renamed in cPanel
The folder will now show the new name in the server, however the job is not done yet.
For the new name to show in the Appearance > Themes console in your WordPress website, you’ll also need to change the name in the stylesheet.
A stylesheet is a file that harbors all of the aesthetic styling changes to your site. The stylesheet begins with a few opening comments, the first of which is the child theme name, the remainder includes the theme URI, description, author name, version, etc. This is the information that will display in the results of online theme detectors.
All of these variables can be changed, but for now, we’re just concerned with the theme name. You’ll need to update the Theme Name comment line for the new name to reflect in the Themes console.
Step 3: Change the theme’s info in the style.css file
To change the stylesheet, you can edit it directly via cPanel (inside the theme’s folder that you’ve renamed) or from within your WordPress website. For the latter method, head over to the WordPress backend, hover over Appearance and click Theme Editor.
Open the child theme folder and find the file called style.css. At the very top of the file, you’ll see the child theme details commented out.
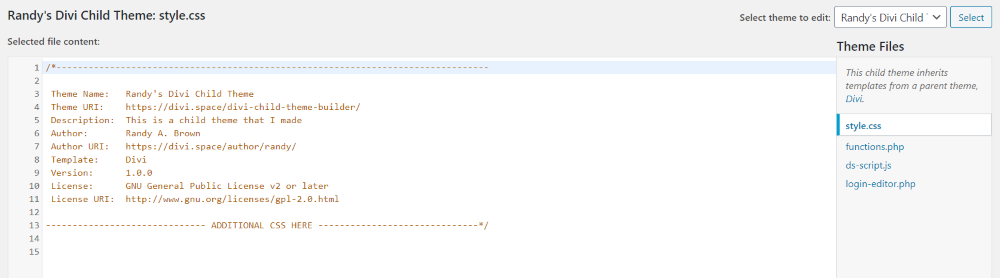
Viewing the Divi child theme stylesheet
Here you can see that the Theme Name is still set to Randy’s Divi Child Theme despite having changed it on the server. Highlight the theme name and replace it with custom text. You don’t need to include dashes in the name as you did with the folder name on the server.
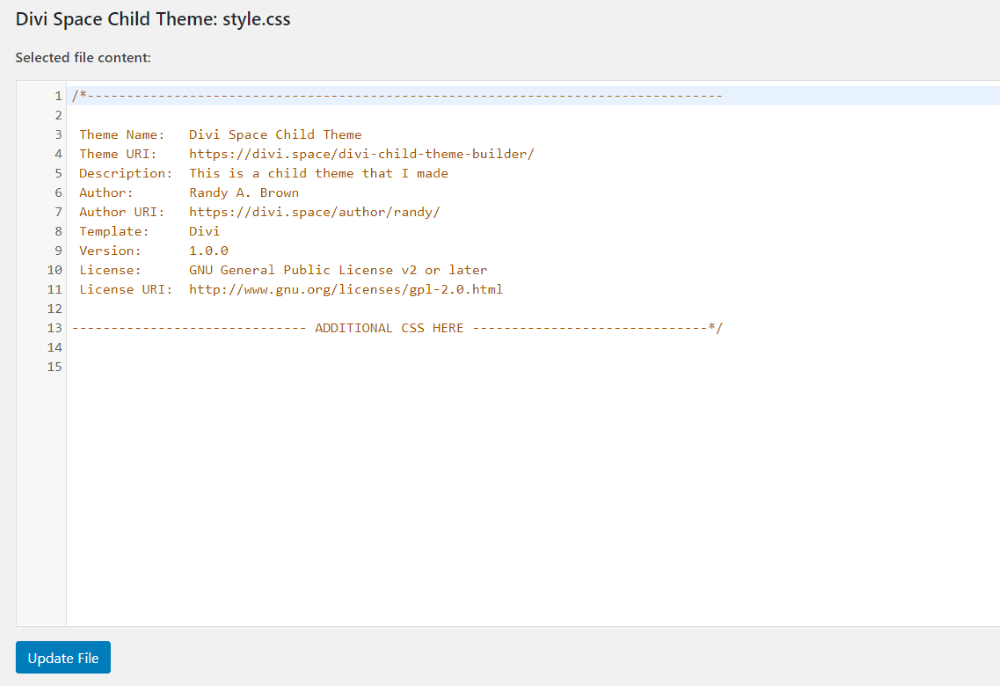
Viewing the Divi child theme stylesheet details
For this demo, the theme name has been changed to Divi Space Child Theme. Once complete, scroll to the bottom and click Update File.
Once you update the file, it will display the new both in the style.css file and in the Appearance > Themes console.

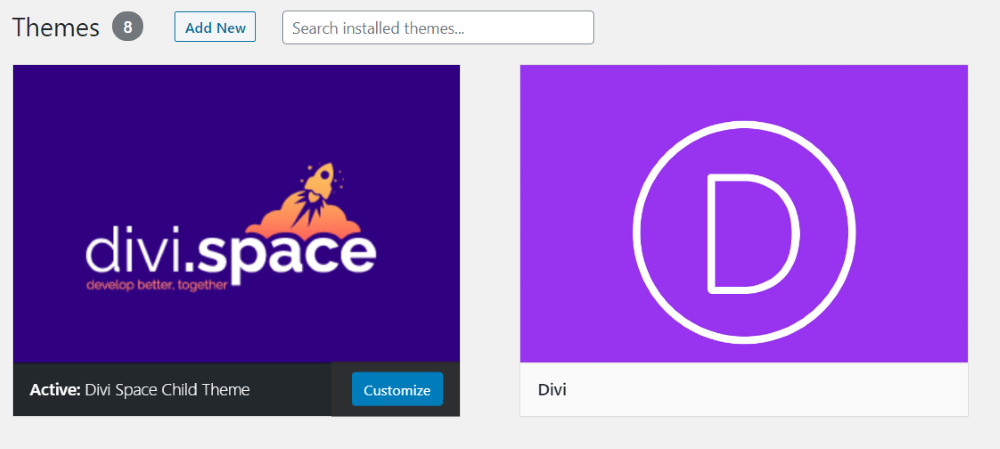
Here is the child theme successfully renamed, and displaying in the Themes console
Here’s a look at the child theme in the themes console. You can see that the name has updated, however the display image needs updating. This is an easy fix, so back to the cPanel server we go!
Step 4: Upload a custom screenshot
Back in cPanel, inside the child theme folder of your website, look for an image file titled screenshot.jpg. This is the default child theme image that we’ll be replacing.
To begin, right click on the screenshot.jpg file. A menu will appear. Click delete.
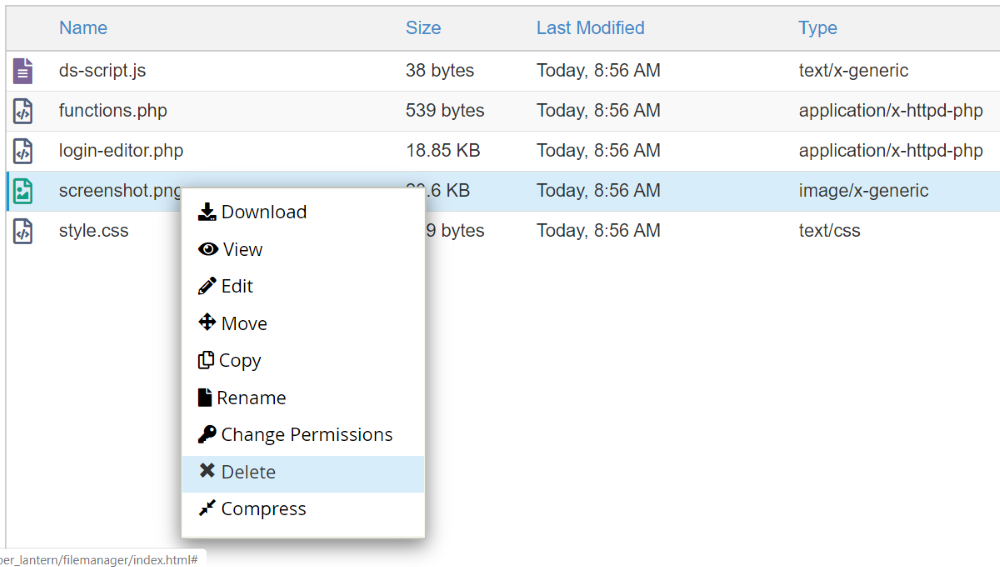
Delete the WordPress screenshot in cPanel
Now that the old child theme image is deleted, you’ll need to replace it with a custom branded image.
If you haven’t already created a new image, you can easily do so using either Adobe Photoshop or Canva. The recommended image size is 880 x 660 pixels. Make sure to name this file screenshot and that it is either a JPG or PNG file.
When you are ready to upload the new screenshot.jpg image, click the Upload button at the top of the cPanel window.
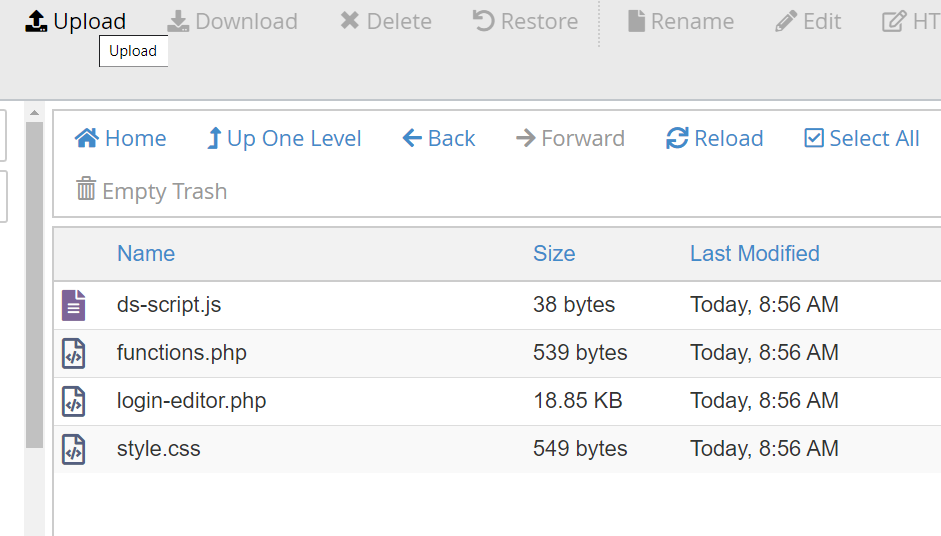
Upload a new file to a Divi child theme via cPanel
A modal will open where you can upload your file.
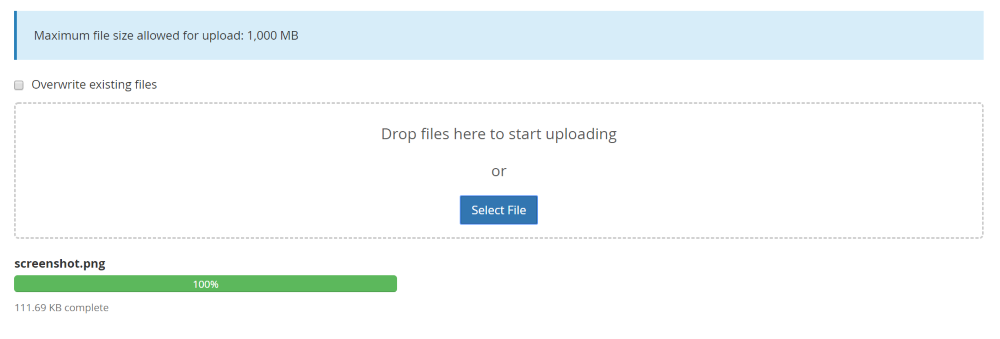
Upload a screenshot to the child theme folder via cPanel
Once the file has uploaded, return to your Appearance > Themes console in your WordPress website.
If you need to, refresh the page. Now, you’ll see that the new theme image is displaying.
The child theme screenshot is successfully updated
In this demo example, I’m using the Divi Space logo to match the name of the child theme.
If it still shows the old image, you might need to clear the cache and reload the page.
- If you are using Windows, hold shift while reloading the page to ignore the cache.
- If you’re using a Mac, click Command+Option+R.
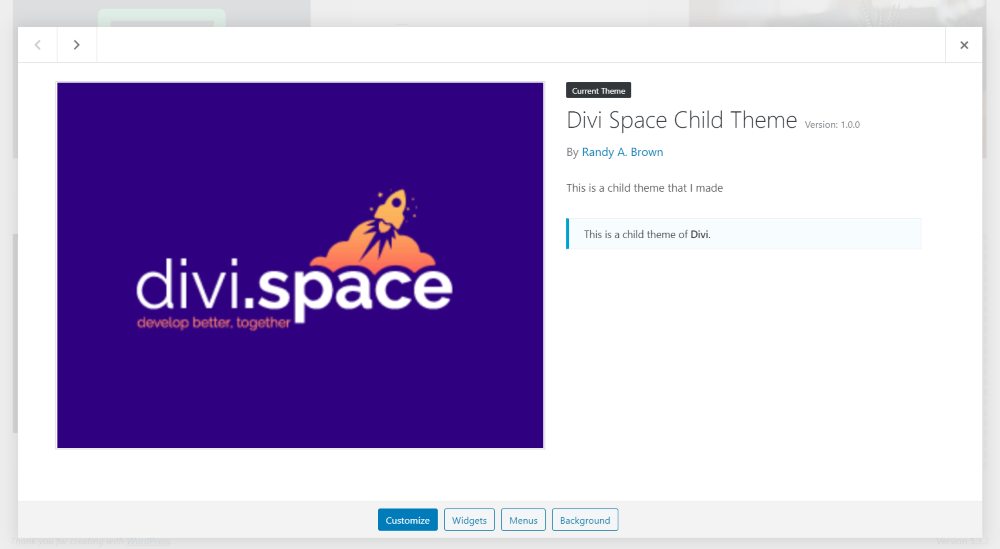
All of the updated child theme details are displaying
Clicking on Theme Details will show a large version of the image. Here you’ll see that the theme name has been updated.
Problems with changing WordPress themes manually
The manual method works well and it’s not difficult to do as long as you have access to your website’s server. There are, however, a few issues that can arise.
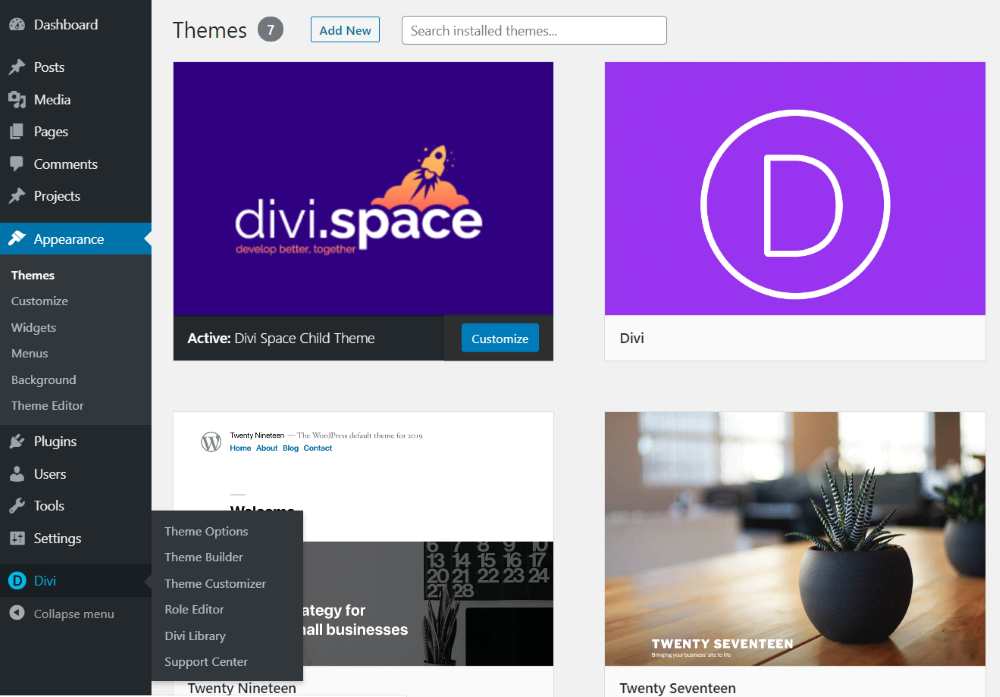
Snapshot of the WordPress themes console with themes and child themes installed
Theme detectors and people inspecting the page source will still find that the parent theme being used is Divi. Also, the Divi name will still be visible throughout the back-end of the site, such as in the Divi menu for example.
This isn’t a good option if you want to hide which theme is used. If your goal is to hide the fact that you’re using Divi or a Divi child theme, both externally and internally, then you’ll need to white label the site to a deeper degree. This is best done with a plugin.
Rebrand your Divi theme or Divi child theme automatically with Divi Ghoster
A better white labeling solution is to use a plugin such as Divi Ghoster. Compatible with both the Divi and Extra theme, Divi Ghoster will give you way more options for white labeling your site, letting you rebrand and disguise more levels of your work.
To begin, upload and activate the plugin. When activated, Divi Ghoster will have its own menu item. Clicking on this will display all of the various customization options, split over a series of tabs.
The Divi Ghoster plugin is extremely easy to use. There is no dabbling in code whatsoever, and customizations are made via a really user friendly interface.
Some of the amazing ways that Divi Ghoster will let you custom brand your site include:
- Changing the theme name, screenshot and other details
- Creating a unique login URL and login screen
- Adding custom colors to the Divi Builder itself
- Hiding the Elegant Themes product tour and premade layouts.
With Divi Ghoster, your clients will have no idea that a theme named ‘Divi’ was ever used.
Take a look at some of the ways Divi Ghoster can help your web development:
Change the Divi theme details and image
To change the display of the Divi parent theme, Divi Ghoster lets you change the theme name, screenshot and other variables directly from the plugin. Here you can change the Theme Name, Author Name and Branding Image for a custom theme display.
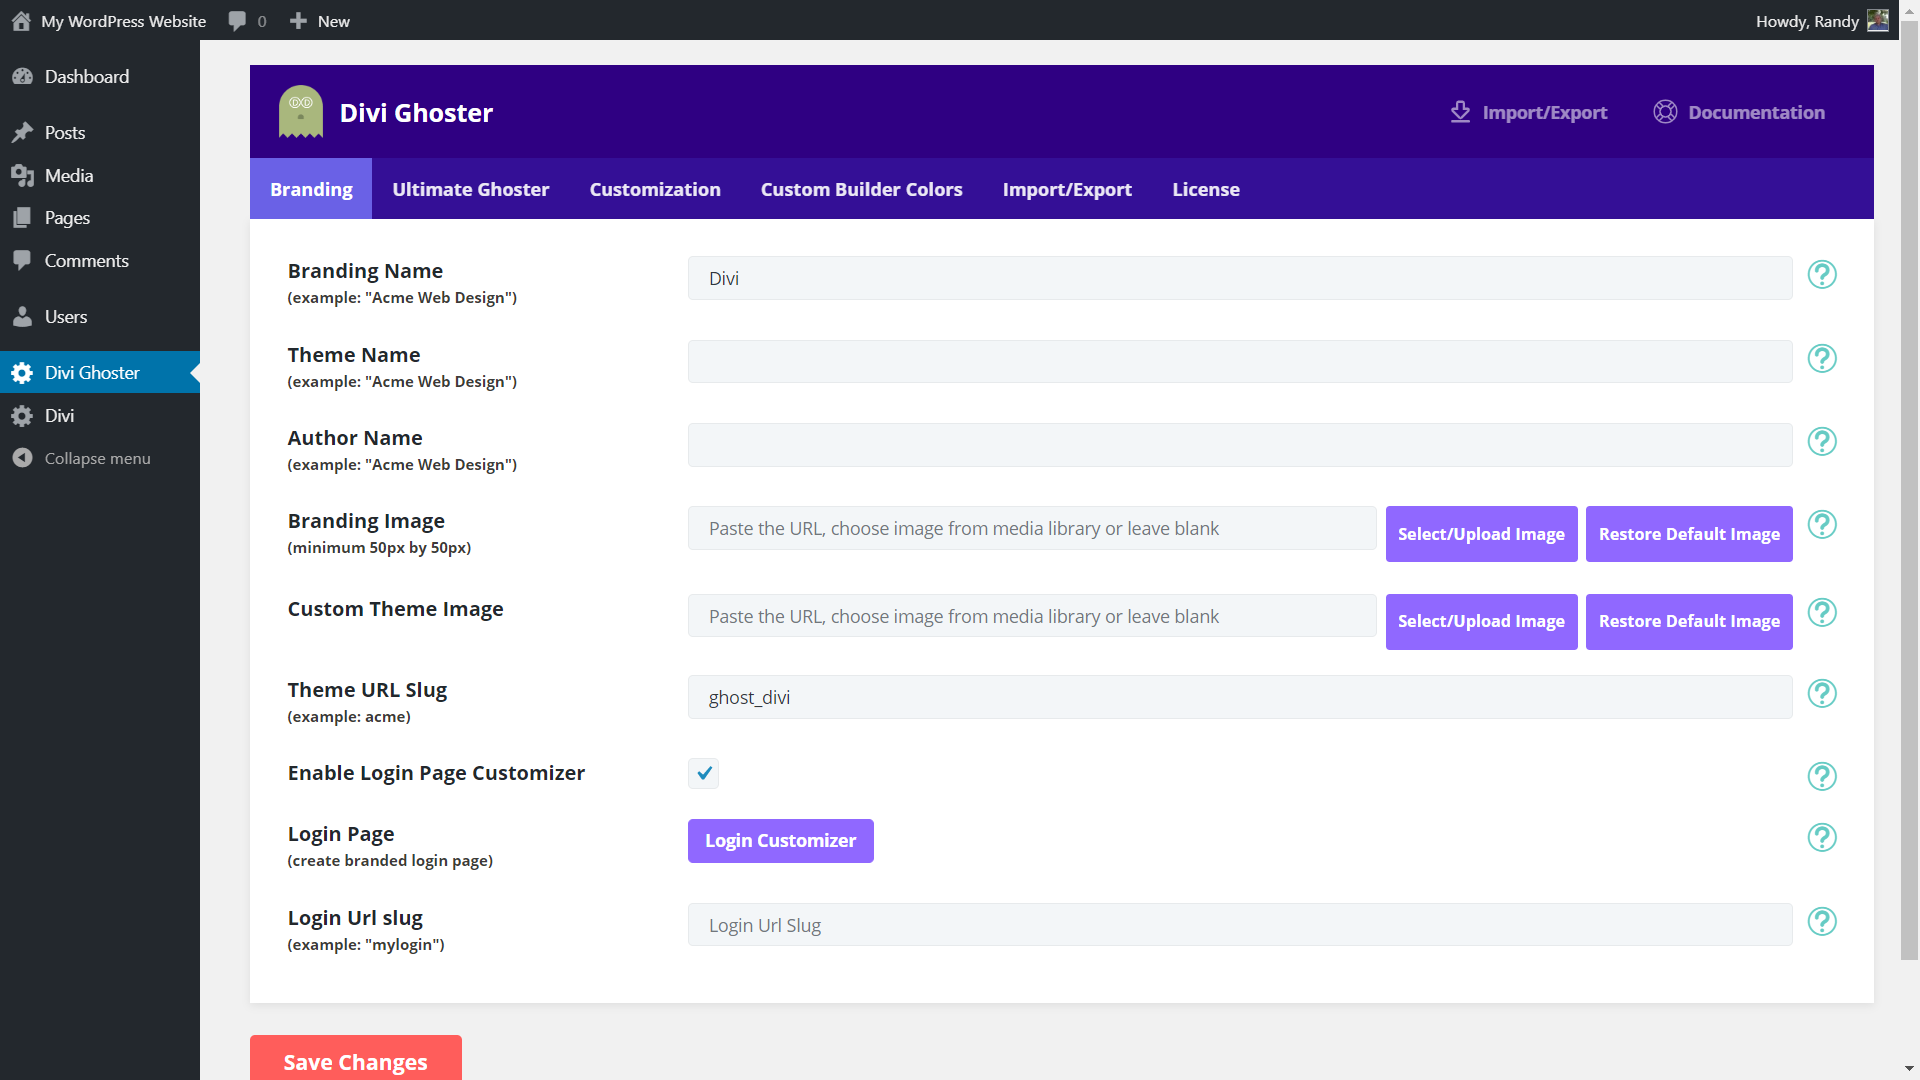
View of the Divi Ghoster Branding tab’s customization options
Change the Divi Builder’s colors with a custom palate of your own
Tired of seeing the bright Divi purple around the internet? Use Divi Ghoster’s Custom Builder Colors to add your own color palette to the mix. Once you add your custom brand colors, any place where the Divi color branding appears – such as the Divi Builder itself, Divi Theme Options, the Divi Theme Builder console and so on – will showcase your custom branded color scheme.
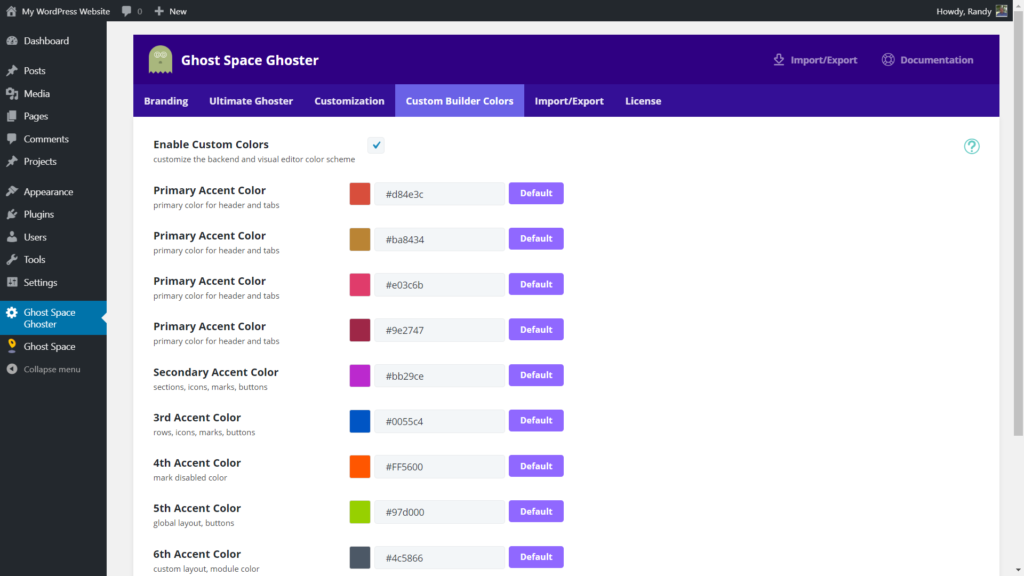
The Divi Ghoster Custom Builder Colors tab
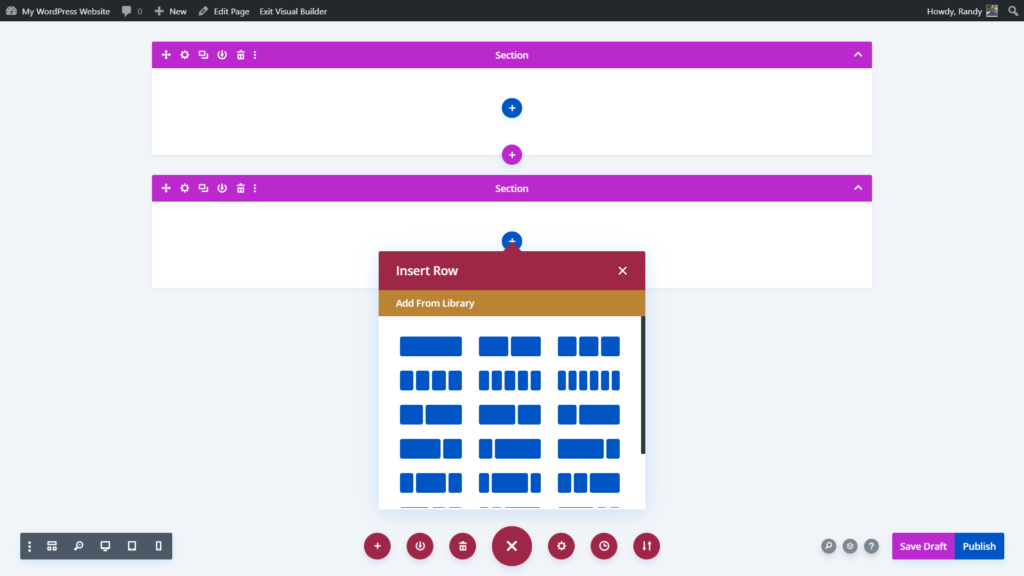
The next time you open the Divi BUilder for example, you’ll see your color scheme in action.
Here you can see the Divi Builder active in the WordPress Gutenberg editor. Instead of the standard Divi branding, you can see a custom brand icon, name, and colors that I entered in the Divi Ghoster plugin.
Add your own custom colors to the Divi Builder
These custom colors will display all throughout the Divi Builder while it’s in action.
See your custom color palette in action
Everything from the sections, rows, modules and options will display your brand palette, creating a deeper level of a branded experience at a contact point.
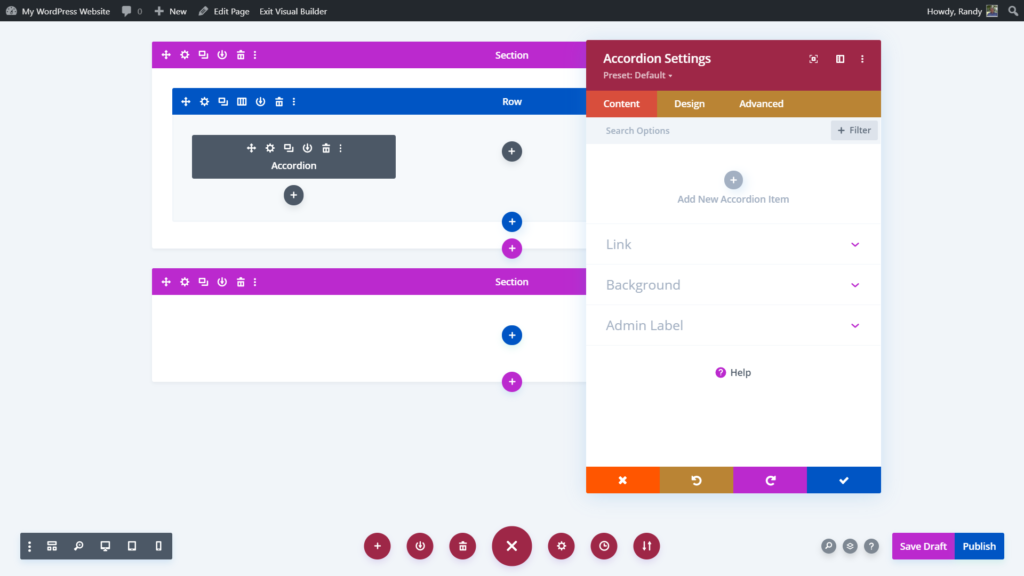
Create a totally on-brand website building experience
Hide various WordPress elements from the back-end
In the Customization tab, you’ll find a collection of settings that’ll help you disguise WordPress.
Here you can hide the WordPress icon, footer and widgets from the backend, as well as hide certain items from the WordPress menu. This is great for preventing clients from adding plugins or themes, or playing around with code.
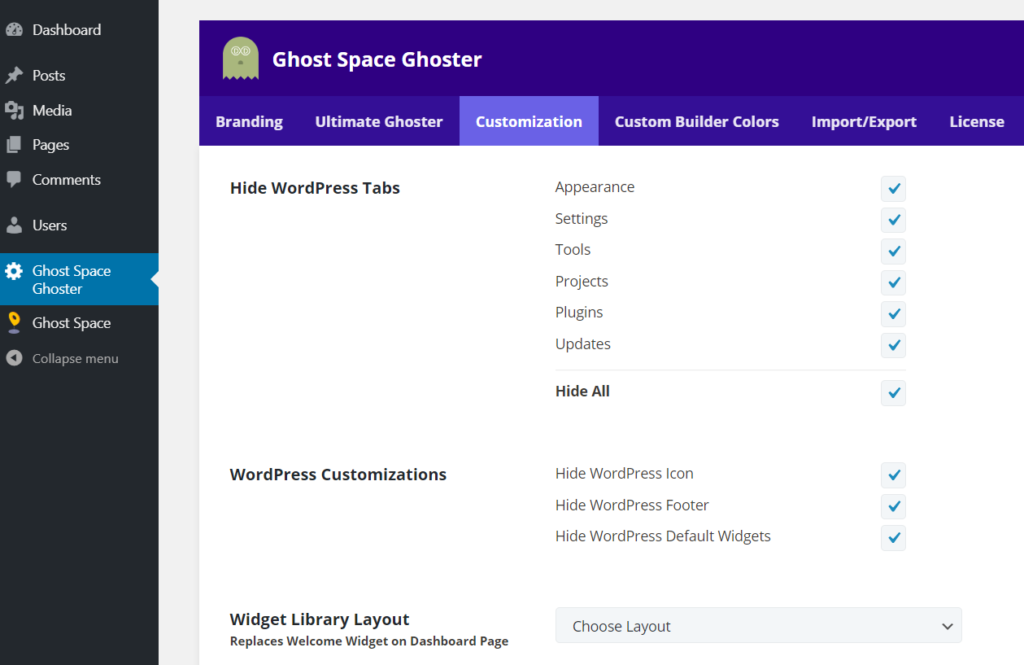
Customize WordPress with Divi Ghoster
Ultimate Ghoster
If you want to fully cloak your use of Divi in development, the Ultimate Ghoster feature will let you hide even more aspects of the Divi theme from theme detectors.
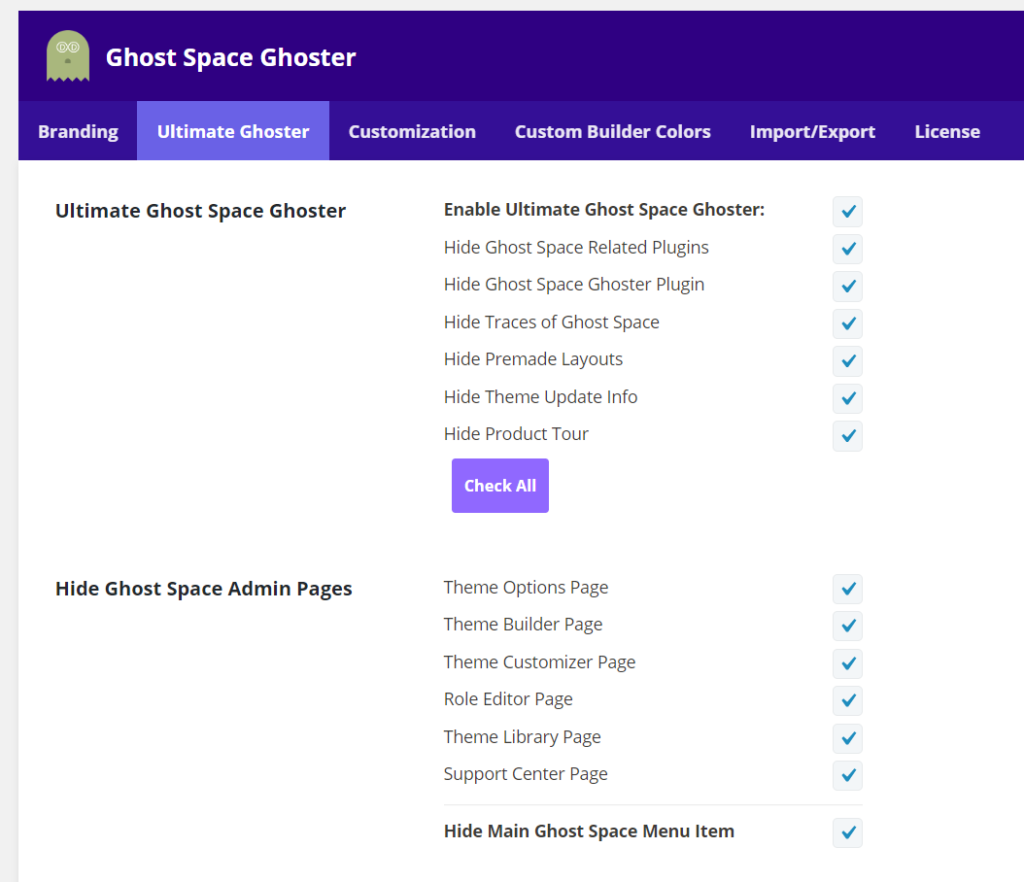
Hide all traces of Divi, check out the Ultimate Ghoster settings
Here you can hide:
- All Divi related plugins (such as Divi Switch, Page Builder Everywhere, Divi Booster etc.) including Divi Ghoster itself
- The Elegant Themes Premade Layouts and Product Tour
- The Divi Theme Options, Theme Builder, Theme Customizer, Role editor, Theme Library, and the Support Center

WordPress theme rebranded using Divi Ghoster
Ultimate Ghoster also hides the Divi thumbnail on the themes page and renames it according to the name you provided. Now you’ll have a completely white labeled WordPress theme!
Your clients and suspecting onlookers will never be able to guess your development secrets!
Check out the Divi Ghoster 5.0
Divi Ghoster is easy to use and provides a lot more white labeling features than covered in this post. The plugin which has recently been updated to Version 5.0, ships with a plethora of site customization options.
If you’re looking to white label your WordPress and Divi site, this plugin is for you!
Ending Thoughts
I’ve shown you a few ways that you can rebrand the WordPress themes on your website. The manual method via either cPanel or FTP is great, but it is a lengthy process with many steps. This will certainly be a pain to redo with each and every website.
Opting to use a plugin as robust as Divi Ghoster is a far simpler solution. To make things even easier, the plugin’s settings can be exported and imported between site builds. The Divi Ghoster plugin is easy to use and it’ll save you so much time that the purchase price will pay off in value almost immediately.
We want to hear from you! Have you rebranded your Divi theme or Divi child theme? What was your experience like?
Let us know about your experience in the comments below!
Thanks for reading!

Nice walkthrough. I’ve implemented everything except renaming the child-theme folder. That hadn’t occurred to me before.
Is there a way to make it so extensions like WordPress Theme Detector and Plugins Detector recognize the child theme instead of the Parent?