
Sliders are popular and trendy web design elements. They help brands communicate a lot of complex information without taking up too much precious space within a web layout.
Using a robust and all-inclusive theme like Divi means that, instead of purchasing a third-party slider plugin, a slider module is baked into the theme package. However, the default Divi slider settings out-of-the-box are a bit boring and could use some attention to really make a web design stand out. Also, the Divi theme does not include a carousel module, so, to achieve a similar effect, Divi users have to get a bit crafty.
In the following tutorial, I’ll give you a rundown on a few ways that you can edit the Divi slider module’s animations.
First, I’ll show you around the default slider module and it’s rather limited animation settings. Next, I’ll demonstrate a few cool tricks that can be implemented with a couple of lines of CSS. Finally, I’ll show you how our plugin Divi Switch will help you skip all of these steps to customize an eye-catching slider in just a few seconds.
Divi Switch is a super powerful plugin designed specifically to make customizing the Divi theme easier. The plugin includes over 50 settings, or switches, that can easily be turned on or off depending on the look and feel or functionality you’re looking for. Instead of slogging away with CSS edits and updating PHP files, Divi Switch will save you time and keep your stress levels down.
Included in the latest version of the Divi Switch plugin are a series of switches designed specifically for Divi slider animations. We’ll check out these switches in this post.
Ready to shake up the aesthetics of your Divi sliders? Let’s get started!
The Divi slider default look and feel
By default, the Divi slider module is a tad boring and underwhelming. It ships with a headline, paragraph text and button, and inherits the Divi theme’s default settings of a light blue background and Open Sans font styling. When slides are added, the slide description – which encompasses the headline, body copy and button – will fade in by sliding upwards.
You can add media to the slider, such as imagery or video. However, when you add one of these assets, they’ll appear on the left-hand side of the slide description and will, by default, fade in by sliding in from the left.
Here is an example of a Divi image slider.
Here is an example of a Divi video slider – the slider module using embedded video content:
Despite the many customization options built into the Divi theme, there’s no easy way to change the animation settings for the Divi slider text position or image/video content. If you don’t take matters into your own hands, you’re pretty much stuck with these standard slider animations: of the image or video sliding in from the left and the slide description sliding vertically upwards.
Thankfully the Divi theme is relatively easy to edit, and there are several ways to customize the slider so that the animations become more visually intriguing. With just a few lines of CSS or changing a setting in a plugin, you can create a much more attractive slider. This is especially great as there is no Divi carousel module in the theme package, and customizing the slider module as such can create a similar effect.
Customizing the Divi slider animations using CSS
The Divi theme integrates several CSS rules to animate various Divi modules, as well as the elements within the modules. Animations operate using a CSS property called animation-name. The Divi slider only makes use of two keyframe animations called fadeLeft and fadeBottom.
Beyond the animations used in the slider module, there are a collection of additional keyframe animations being employed throughout the Divi theme, including:
fadeTop
fadeRight
fadeBottom
fadeLeft
fadeIn
fadeInTop
fadeInRight
fadeInBottom
fadeInLeft
fadeOutTop
fadeOutRight
fadeOutBottom
fadeOutLeft
flipInX
flipInY
gridFadeIn
Grow
slideWidth
With a little bit of CSS and tinkering in the code, you can hijack the default animation settings and replace it with one of the above keyframe animations. Before you begin playing around with the code, make sure you have a backup of your live site or are working on a development or testing environment. You can choose from one of the many ways to add CSS to Divi, but we suggest adding the code to the stylesheet in your child theme. If you haven’t already added a child theme, download a free one here.
Once your child theme is set up and running, you can begin adding CSS code. Here is a quick recap of the Divi slider’s default state:
First, let’s change the slide description (the text and button) by assigning a new animation to the Divi slider text position. Copy and paste the following code into the stylesheet of your child theme.
.et-pb-active-slide .et_pb_slide_description {
animation-name: Grow;
}
This will create the effect below. Notice how the slide description expands or grows subtly.
You can adjust the look and feel of the animation by changing the value of the animation-name. For example, you could make the slide description fade in from below by adding the fadeInBottom value.
.et-pb-active-slide .et_pb_slide_description {
animation-name: fadeInBottom;
}
Here is this code in action:
Also, if you want to change the duration of the animation to either speed it up or slow it down, add the animation-duration property and assign it a value.
.et-pb-active-slide .et_pb_slide_description {
animation-name: fadeInBottom;
animation-duration: 1.5s;
}
Here’s what the code looks like in a demo. Even though 1.5 seconds is quite a long time for an animation, I’ve used it here to demonstrate the difference in speed from the default animation duration.
Next, let’s animate the content. Right now, I have a video in place making this module a Divi video slider module. Whether you use image or video content, the CSS will target the content added here.
Copy the following code and add it to the previous code in your stylesheet.
.et-pb-active-slide .et_pb_slide_image, .et-pb-active-slide .et_pb_slide_video {
animation-name: fadeTop;
}
Here you can see that, together with the slide description, which is still animating from the bottom up as declared before, the slide content is animating downwards thanks to the fadetop value.
Again, you can change the speed of the animation by adding the animation-duration property and assigning it a value.
.et-pb-active-slide .et_pb_slide_image, .et-pb-active-slide .et_pb_slide_video {
animation-name: fadeTop;
animation-duration: 1.0s;
}
Remember, you can change the property by replacing one of the animation-name values mentioned above. By playing around, you can create some awesome Divi slider layouts for your website.
If you want to take things a bit further, you can also add CSS code to animate the background image of the sliders. Here is the same example as above with different background images added to each slide.
To animate the background image, copy and paste the following code to your stylesheet.
.et-pb-active-slide {
animation-name: Grow;
animation-duration: 0.5s;
}
You can keep playing with the animation styles by changing the values of the animation-name and animation-duration properties.
If you’re looking for a far simpler method, we have a plugin that will do the trick in just a few switches.
Customizing the Divi slider animations with Divi Switch
If editing CSS code is too complicated or time-consuming for you, you can achieve the same effects far quicker and easier using Divi Switch.
Divi Switch is a powerful plugin for the Divi theme that helps web developers implement changes to their Divi sites at lightning speed. These changes come in the form of settings called ‘switches’ that can either be toggled on or off.
Switches come in an array of forms. There are switches for the:
- back-end, which alters the behind-the-scenes functionality of a website such as enabling SVG uploads or the use of shortcodes, or,
- front-end, which alters the look and feel of a site, enabling deeper levels of customization of web element aesthetics.
Along with plenty of other switches, two, in particular, are created specifically for designing Divi slider animations.
To get started, download Divi Switch and install it on your WordPress website. Once the installation is complete, you can find the plugin settings by hovering over the Divi menu.
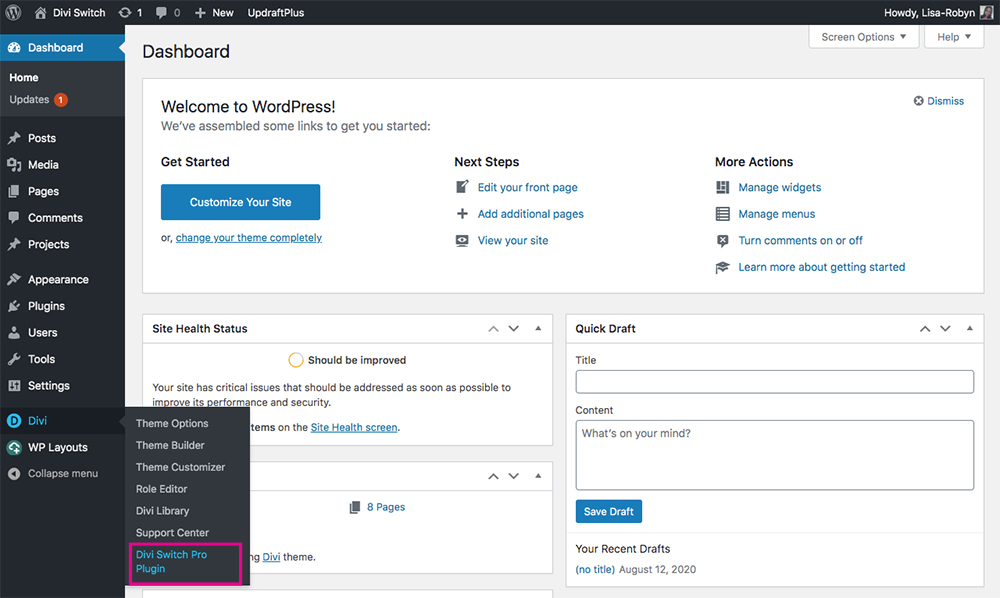
Where to locate Divi Switch on the WordPress Dashboard
The Divi Switch settings are on the far right of the Divi Theme Options settings. Clicking on the Divi Switch menu will display all of the plugin settings, split over various tabs based on the nature of the switch.
Click on the Main Content tab and scroll down. Here, you’ll find two switches:
- Slider animation – slide description, and
- Slider animation – image & video.
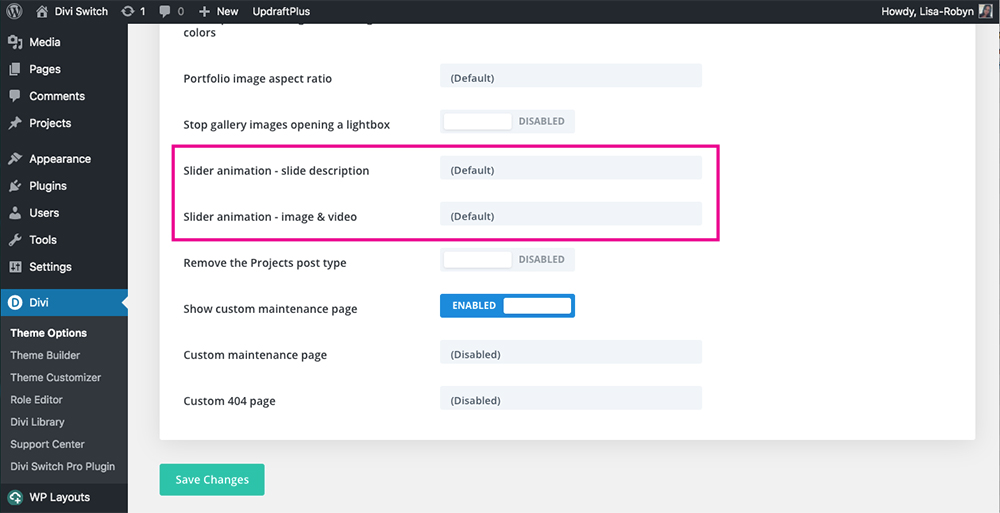
Locate the Divi slider switches in the Main Content tab
Clicking on either of these switches’ drop-down menus will give you a few animation options for either the slide description (headline, body copy and button) or the content (image or video).
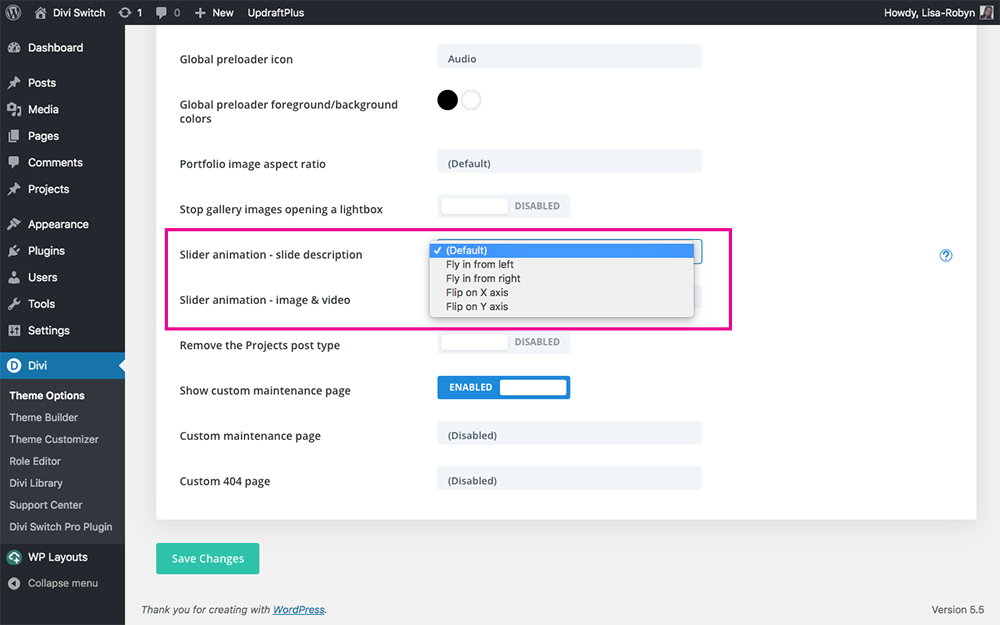
Click the drop down menu to display animation options for the Divi slide module
Keep in mind, the slide description animates vertically upwards and the image or video module slides in from the left.
For my first example, I’ll make the slide description animate by sliding in from the left and the image slide in from the right.
This produces the following effect:
Returning to the Divi Switch slider settings, I’ve set the description and image settings to flip on the respective X (horizontal) and Y (vertical) axes.
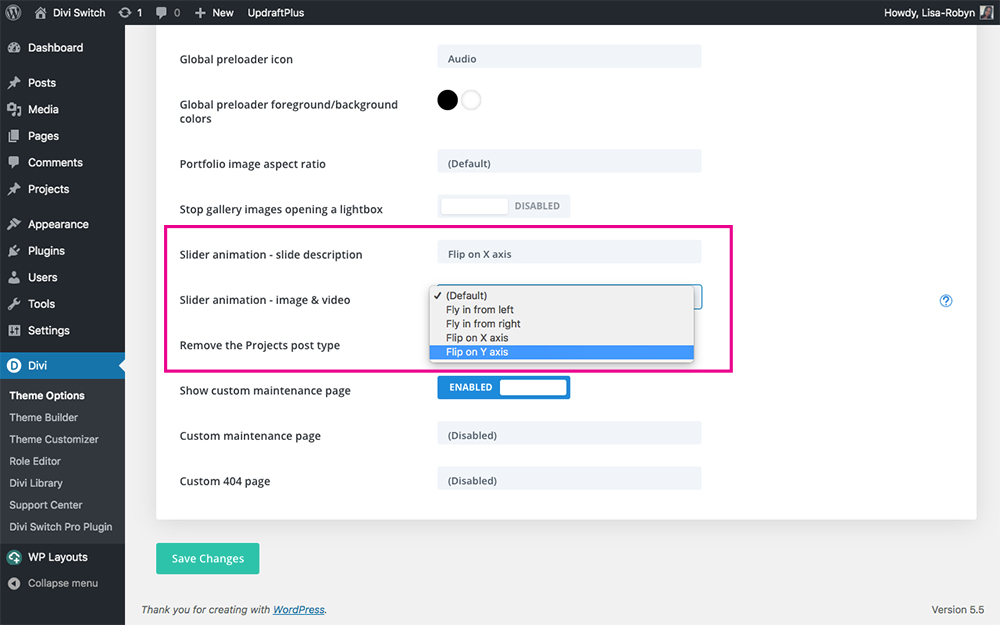
More animation options for the Divi Slider module via Divi Switch
These settings together produce the following effect:
And just like that, you would have achieved a similar effect to the customizations described above, without ever touching a line of code.
With these new animation options, you can create intriguing web design layouts that’ll pack a visual punch and make an impression on your site visitors.
Remember, Divi Switch comes with over 50 switches so you can really get crafty and creative in your Divi design. The plugin was designed to help Divi users who don’t want to deal with code, so if you’re looking to make changes to your site without any hassle, make Divi Switch your next investment.
Final thoughts on customizing the Divi slider module
The Divi theme is a powerful visual builder, and even though it may have few limitations, these can easily be overcome either with some clever CSS or the use of a plugin like Divi Switch.
In our examples of adding Divi slider animations, the Divi Switch route is certainly easier to implement as it requires no fiddling with code or back and forth testing. Also, the plugin includes a series of switches that’ll help you develop sites faster and more efficiently. With Divi Switch in your back pocket, you can quickly create a custom 404 error page for your site, add hover animations to your Divi menu, create a transparent header, and much more.
If you love customizing the Divi theme using CSS only, why not try your hand at building a custom slide-in menu with CSS. If you’re interested in kicking your CSS for Divi game up a notch, download our free Divi CSS and Child Theme eBook and check out our collection of Divi and WordPress Snippets.
Did this tutorial help you build an attractive Divi slider? If you loved this tutorial, share the love by posting in the comments section below. Also let us know which tutorials we should create to help you amp up your Divi game, as well as which switches you’d love to see in an upcoming release of Divi Switch,
Thanks for reading!

I’m trying to change the speed of the animation when moving between tabs on the tabs module. I was able to use the CSS classes you defined above to change the animation type but there is still a noticeable delay when you click that I’m assuming must be related to the javascript. Do you have any idea how I can change the fade effect on the tabs module? Right now it takes entirely too long.
Thanks for your article, you wrote it very well and helpful to me.
How to change BACKGROUND image animation between slides?
Default is a sort of flash-anim, but how can I for example crossfade background images between different slides?
Hi! I tried several options and no one worked ;(.
I was playing with CSS, and if I type on the Custom CSS inside the module:
-webkit-animation-name: fadeLeft
It only plays the animation once, I tried to type different lines below and in single and combination ways as:
animation: fadeLeft;
animation-play-state // “running and paused”//
animation-iteration-count // “numbers and infinite”//
And the only thing that It worked for me it was:
animation: fadeLeft //”time in s or ms using the same amount of time of the animation design tab of the same module”// infinite
It would be helpful if the reply appear here or somewhere else so other customers can reference. I don’t get it a win win for everybody. Cuts down on repeated support submissions and customers get answers quicker then submitting and waiting on a response form a contact form. Where is the ticket system? Not helpful to customers. Come on Divi Space it can not be all about sales.
This is just what I was looking for except I needed ‘none’ – no animation of the text just the slider moving in the BG.
THANK YOU 🙂
You might want to include a demo gif of what the end result is so those that do not understand can have an end result first and see if that’s what they’re looking for.
Thanks for the write up!
I am trying to use one background image with text 1 fading in and then fading out, followed by text 2 fading in and out. The repeat both.
Do you have any ideas how I can make this work please?
Thanks for this – when I put it in I get errors… “Expected RBRACE.” and “Unexpected token ‘}’. Is there more CSS I need to make it work?
Hello, can i remove the white transition between one slide and next slider?
I’m sorry, but for me this isn’t working. Doesn’t matter where I put the code, the transition of the slider always stays on fade. I use the fullwith slider with only background images in the slides.
Thanks Stephen, I am using fadeIn but I would actually like to cross-fade from one background image/slide to the next. Is there a way to do this? Cheers.
Is there any way to turn off the fade animation of the slide description? My client has a full width slider that has the same description, but different video backgrounds, and we’d like the slide description to stay static.
How can I avoid the fade transition on a fullwidth slider (carrusel ) I just wan them to slide from right to left.
Thank You.
I purchased Divi Switch and activated Transitions & Filters –> “Slide image & video fly in left” on my https://workhubtyler.com site, but the fullwidth slider located roughly halfway down the page is fading (not sliding) just like it was before. Is there something else I need to do? Thanks!
Hi Chad… Can you please open a support ticket regarding this? You can do so by clicking on the “buoy” icon in the lower-right of our website or by sending an email to [email protected]
Thanks!
Cory, thanks for the help. Support request sent!
@ Florian:
As far as I can see, you can switch animation completely off by using:
animation-name: none;
It really baffles me why this functionality is baked into Divi yet even now they haven’t given these transition effects a GUI to be changed via the Divi Builder 😐
Hello, thank you for this really useful explanation – it works!
Do you also know a solution for the same animation effect with the portfolio module of Divi?
By default the title of projects presented in a Portfolio are bouncing up. Is there a way to switch this off?
Thank you in advance!
Is there away to completely turn the text-sliding-effect off? I just want to have a set text and several images in the background. Right now I have a slide with the same text for each image and the text-effect does not look that great in that context.
Go to Advanced CSS>>Slide Description, then insert code below
animation-name:none;
Thanks Rotimi, I’ve been looking for that function for ages – and I mean ages. Doesn’t seem to work with Divi Switch but maybe I’m looking at the wrong option. It says in the post do this in a switch but doesn’t say where the function is. Excellent work.
Thanks !!
Hey there, building my first divi site (and have some basic css knowledge), and I’d like to turn a “slider” into a “carousel” format (i.e. so slides are visible side by side), but I can’t seem to find an answer to this anywhere – any suggestions on how I could achieve this with a tutorial, plugin, etc? Thanks in advance!
or you could just install a plugin like smart slider
Because the images are the star on the home page slider, is it possible to have to text fade out before the image to allow viewing the image alone for a 1-2 seconds longer?
Great article!
I’ve created a demo page to show off the different effects:
https://www.pagesathome.eu/slider-demo/
Nice work Richard 🙂
Thanks for the tips. I do have one question. On page load, the first image still slides in from the left, before the fade animation executes. Is there a way to make the fade animation be the ONLY animation that takes place? Thanks again for the help. Great Work.
Cool, thank you 😉
Thanks for this, but where is the CSS that needs to be edited? The custom CSS tab fields are all blank? Apologies, but I’m new to Divi and the CSS options… Thanks
You would have to style this in your style sheet or epanel. The css options in Divi modules are very limited.
Thanks for the tip! Is it possible to apply this to the main slide itself, so the background image can slide instead of fade in? For example:
.et_pb_slider .et_pb_slide {
animation-name: fadeLeft;
}
See comment above.
The easiest way is to use the divi builder > go to your module > Custom CSS > select the element u want affected and insert your code.
Yes that is possible, see my other comments on this page.
Would you help me? Where do I change the css to change the effects?
Custom css > Slide Description:
(or any other element you want affected)
Simply paste this:
animation-name: ;
Sweet write-up, SJ! And great detective work.