
Testify is a popular WordPress testimonial slider that works with any theme using shorcodes and with Divi using the built-in Divi testimonial slider module. It adds new customizations to the theme customizer to style it to match any theme, and if you’re creating Divi testimonials you can style it like any Divi module. It also integrates with popular forms plugins, making it easy for clients to submit their testimonials.
It’s been around for a while but it’s now been updated and works seamlessly with the Divi Visual Builder. You can build visually from the frontend and the backend. In this review, we’ll take a look at Testify and how it works with the shortcode and the Divi module. We’ll also look at a couple of Divi demos and see how to create them step-by-step, and see how to integrate it with a form plugin.
License Key

Upload the plugin and go to the Testify menu in the WordPress dashboard. Before you can see the settings you’ll need to add your license key. Add your key and click Continue.
About and Instructions

Once you activate your license key you’ll see the instructions. It shows how to use the shortcodes and provides links to the documentation. It also shows how to customize the colors, set the sizes, etc., within the shortcode.
Add New Testimonial

Go to Add New Testimonial in the Testify menu. You’ll see the testimonial editor where you can add the title, testimonial content, author’s name, author’s website, categories, tags, and a featured image. This is where you’ll create your testimonials.
All Testimonials

Once you’ve created your testimonials they’ll appear in the All Testimonials list. You can edit and view them from here.
Testimonial Categories

Testimonial Categories shows the category editor. It works like the standard WordPress post category editor.
Testimonial Tags

Testimonial Tags shows the tags editor. It works the same as the WordPress post tags editor.
Customize

Customize opens the customizer and provides styling tools that you can use with any theme when using the Testify shortcode. It includes settings for Testimonials, Testimonial Images, Thumbnail Navigation, Colors, and Slideshow. Divi includes styling tools in the module, but this is helpful if you’re not using Divi.
Testimonials

The Testimonials tab customizes the way the testimonials display. This example includes show the separator, change the number of testimonials, determine their order, set the alignment, add a navigation type, limit the characters, and add read more text.

This shows the customizations for the read less and more text and fonts and icons. It also includes quotation mark and author font adjustments.
Testimonial Images

Testimonial Images lets you adjust the image size and shape in pixels, choose between round or square images, and set the border size.
Thumbnail Navigation

Thumbnail Navigation lets you specify the number of images that show on a single row, the image resolution, and spacing between the images.
Colors

Colors give you the color adjustments for every element including the row background, inactive thumbnail, testimonial background, testimonial text, author text, quotation mark, separator, and image border.
Slideshow

Slideshow gives you control over the autoplay duration, transition type (none, fade, and slide), and transition duration.
Testify Divi Module

A new module is added to the Divi Builder called Testify. It includes the settings and adjustments you’d expect from a Divi module. It works with both the frontend and backend builders. Lets’ look at what’s added to the standard settings of the Content and Design tabs.
Content Tab

The Content tab provides settings for the number of testimonials, order, categories, tags, alignment (center, left, right), transition type (fade, slide, none), animation speed, and autoplay duration.
Design Tab

The Design tab adds customizations for the testimonial text, author text, read more text, layout design, navigation settings, quotation design, separator, testimonial image, and thumbnails.
Divi Examples
Here’s a look at how to recreate the Testify demos in Divi.
Testimonial Demo 1

Testimonial 1 uses a green background and places the testimonial slider in the center with a white background and shadow. It also adds a green divider to match the background. To create this, we’ll make adjustments to the section, row, and module.
Testimonial Demo 1 Section

I’ve created a section and added the Testify module to a single row. It’s showing the default settings. Open the section’s setting and set the background to #56DEAE.
Testimonial Demo 1 Row

Open the row settings and set the Background to white.

Go to the Design tab. Open Sizing and set Max Width to 900px.

Open Spacing and set the padding to:
- 85px (top)
- 0px (bottom)
- 50px (left)
- 50px (right)

Open Box Shadow and choose the third box shadow option and apply these settings:
- Horizontal Position: 0
- Vertical Position: 20
- Blur Strength: 50
- Spread Strength: 5
- Shadow Color: rgba(0,0,0,0.3)
Testimonial Demo 1 Module

Open the Testify settings and select the Design tab. Select the Testimonial Text and use these settings:
- Font: Lora
- Font Style: Italic
- Text size: 30
- Line Height: 1.4em

Open Author Text and apply these settings:
- Font: Montserrat
- Font Weight: Bold
- Font style: Italic, Uppercase
- Size: 16px
- Letter Spacing: 3px

Set Navigation Settings to show thumbnails.

For the Separator, select to show the separator and apply these settings:
- Thickness: 2
- Color: #56deae

Choose to show the Testimonial Image and use these settings:
- Image Shape: Circle
- Border width: 0
- Image Dropshadow: No

For Thumbnails, apply these setting:
- Thumbnails Per Row: 8
- < 900px: 5
- < 600px: 5
- < 400px: 3
- Resolution: 100
- Spacing: 15
- Row Background Color = transparent
- Inactive Thumbnail Color = transparent

Here’s my result from the backend builder.
Testimonial Demo 2

Testimonial Demo 2 includes a wavy background with a gradient that overlaps the image. It also adds slider arrows. Here’s a look at how to create this demo. It will require a section above the section with the testimonial slider. I’ll build this one from the frontend.
Testimonial Demo 2 First Section

Add a section above the section for your Testify module. In this top section, set the Background color to #F37387.

Select Gradient and use these settings:
- 1st color: #f59176
- 2nd color: #f37387
- Direction: linear
Testimonials Demo 2 Testify Section

Set the Background to #fff.

In the Design tab, open Dividers and use these settings:
- Dividers: Top
- Style: 14
- Color: #f37387
- Height: 165px
- Flip: both
Testimonial Demo 2 Module

In the Testify module, go to the Design tab. Select Testimonial Text and apply these settings:
- Font: Open Sans
- Weight: Light
- Text size: 21px

In Author Text, apply these settings:
- Font: Open Sans
- Font Weight: Semi Bold
- Size: 18px
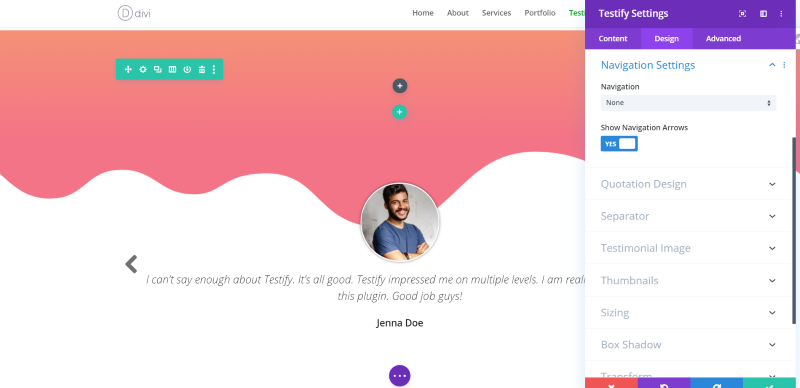
These are the settings that allow the wavy background to show correctly. In Navigation Settings, use these adjustments:
- Navigation: None
- Show Arrows: Yes

Use these settings for Testimonial Image:
- Shape: Circle
- Image size: 100
- Image width: 100
- Border width: 7
- Border color: #fff
- Dropshadow: No

Use these settings for Thumbnails:
- Per row: 5
- < 600px: 5
- < 400px: 3
- Resolution: 150
- Spacing: 0

Use these settings for Sizing:
- Max Width: 900
- Module Alignment: center

We now have a Divi testimonial slider that matches demo 2.
Using Testify with Popular Forms
Testify integrates with many of the popular forms plugins including WP Forms, Contact 7, and Gravity Forms. Here’s a look at how it works with Gravity Forms. We’ll create a submission form where visitors can upload a testimonial with a photo.
Step 1: Create the Testimonial Form

Create a new Gravity Form. Include a title, fields for the name, website, email address (if you want it for contact reference), file upload, and a paragraph field for the testimonial. You can use one of the basic forms and adapt it to fit these fields.
Step 2: Integrate the Form with Testify
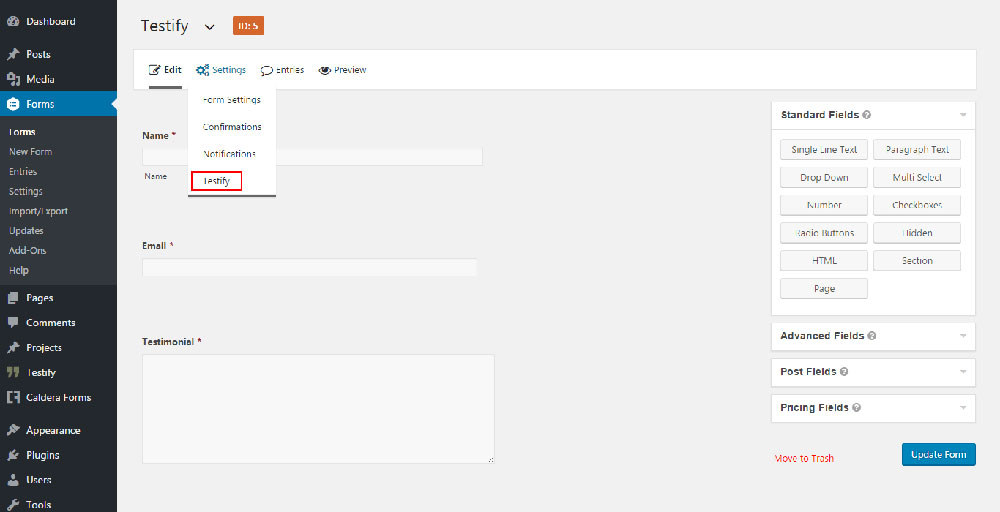
Next, you need to integrate Gravity Forms with Testify. Head to the Settings menu, click Testify and then choose the appropriate fields to match the form.
Step 3: Generate the Shortcode
To place the form on your website, you can either generate the shortcode from the Gravity Forms plugin or use the Gravity Forms button and insert the form anywhere on your website.
Step 4: Receive Testimonials

Now you’re ready to receive those amazing testimonials from your happy clients. Here’s a look at the form in a Divi layout.
How to Purchase Testify
You can purchase Testify in the WP Zone shop. There are several pricing options:
- Single Site = $26
- 3 Sites = $39
- Unlimited Sites = $69
- Annual Membership (includes all plugins and themes) $149
- Lifetime – $399
It includes 1 year of support and automatic updates. Detailed documentation is provided at the AGS website.
Ending Thoughts
Testify is an easy plugin to use. I found it to be highly intuitive for both the shortcode and the Divi module. The customizer makes it easy to style the shortcode in any theme. It worked perfectly with the Divi Builder in wireframe and visual mode on both the backend and frontend. All of my stylings appeared in real-time.
The integration with forms plugins adds an extra level of functionality. You can have clients upload their testimonials even with free versions of the forms plugin. Integrating it with Gravity Forms was just a few simple clicks in the plugin. I didn’t have to do anything else to get them to work together.
If you’re looking for an easy way to manage, style, and display your testimonials, Testify is an excellent choice.
Have you tried Testify? Let us know what you think about it in the comments.

great post my friend because I need this post to create testimonials on my site but I failed much time but solved my problem. Thanks again for your support.
Thank you for sharing this very interesting and necessary content
Hi, When did you fix it not showing up in the vb? I uninstalled the latest version yesterday for this very reason. That and the controls don’t actually make changes. I still had to style the testimonials with CSS. When you open the module, it still gives the warning that the plugin is not compatible with the VB and a preview will not be shown.
Hi Rebekah. If you require help with a product, please email support@localhost which will open a support ticket, so we can better serve you.