
If you’re brand new to WordPress, you may be unfamiliar with the concept of plugins. Plugins are tools that are installed on a WordPress website to give it a particular function. When building a website, there is a very particular way to install a WordPress plugin—this article will show you how.
Following themes, plugins are essential to the form and function of a WordPress website. They come in all shapes and sizes and satisfy a broad range of requirements. Plugins can either add particular functions such as caching or SEO assistance, or they can enhance the front-end of your site by adding a new element to your websites, such as contact forms or testimonials.
There are thousands of plugins readily available for WordPress users. Thanks to the open-source nature of WordPress itself, there are countless agencies and independent developers who are regularly contributing their expertise and products to the plugin pool.
In the following post, we’ll discuss WordPress plugins in-depth. We’ll also include a WordPress plugin tutorial that shows you several ways of installing a plugin. We’ll cover:
- What plugins are
- Free vs. premium plugins
- What to look for when choosing a free plugin
- How to install a WordPress plugin the standard method
- How to manually install a WordPress plugin using FTP
It’s important to note that plugins, in the form that they’ll be discussed in this post, cannot be added to WordPress.com websites unless a premier package is used. This is one of the core differences between WordPress.com and WordPress.org.
WordPress.com is an all-inclusive platform that bundles together hosting, web design, themes plugins and much more, whereas WordPress.org is the open-source, free and DIY solution of WordPress. In the post that follows, we’ll be discussing the process of adding a plugin to a self-hosted WordPress website.
What is a WordPress Plugin?
While WordPress is a great platform, in its bare-bones state, it is rather limited. To enhance the framework, WordPress users will add supplementary pieces of software in the form of plugins.
A plugin is a tool or application that can be installed on a WordPress website to give it extra, advanced functionality.
Plugins can satisfy a spectrum of needs, such as:
- enhancing a website’s front-end appearance by adding additional web elements not available by default in the theme package, such as contact forms, icons, sliders, testimonials and so on, or,
- changing the website’s form and function by such as adding various plugins to assist with performance, security, search health and much, much more.
Free vs. Premium WordPress Plugins
WordPress plugins come in two forms: free and premium.
WordPress is built using open-source software, meaning that anyone can add to, adapt or extend the framework of WordPress itself. This is the nature of WordPress.org, where core theme files, themes and plugins are freely available for anyone who decides to build a DIY website.
In the case of free WordPress plugins, a developer can create a plugin and make it available for download from the WordPress plugin directory; the WordPress repository. For WordPress users, getting their hands on a free plugin is easy. All they have to do is visit the repository, search for a plugin, download it and then install it on a WordPress website at a later stage.
Premium plugins come at a price, and prices may vary. Premium WordPress plugins cannot be downloaded from the repository and will need to be purchased from the respective plugin developer or agency website directly.
There are also freemium plugins available. Here, a simplified version of the plugin is available for free, with advanced features and special functions up for purchase in either a paid version of the plugin or in the form of add-ons.
While there’s no right or wrong when it comes to selecting either free or premium plugins, we recommend trying out free plugins before going premium. This way, you’ll be able to keep overall web development costs down in the long run.
Depending on the plugin and the website’s needs requirement, a price tag doesn’t necessarily indicate better quality. In fact, there are some incredible plugins that are 100% free and always will be. Some of our favorite free WordPress plugins include Yoast SEO and Ninja Forms.
Premium plugins will generally come with dedicated support, something that free plugins often lack.
Divi Plugins for the Divi Theme
Over the years, we’ve developed several plugins exclusively for the Divi theme. Some of our best sellers include:
- Divi Rocket: A caching plugin designed to make your website run blazingly fast
- Divi Switch: For making quick front and back end site enhancements without using code
- Divi Shop Builder: To create totally custom WooCommerce pages using the Divi Builder
We have plenty more plugins ready and waiting for Divi lovers to use. Our plugins are premium, so they come at a price. Once a customer has purchased a plugin, they’ll log into their account and download the plugins directly from their account dashboard.
How to Choose a Free WordPress Plugin
When selecting a plugin for use from the WordPress repository, be sure to take your time reading all of the plugin info and researching other options. There are literally thousands of plugins available, and not all of them are made equally. Some may be outdated; others may not be tested for compatibility with the latest version of WordPress. Some may have been so badly built that they may be security threats to your website and make it vulnerable to hackers. When choosing a WordPress plugin from the repository, it’s crucial that you only use top-rated and recommended plugins.
Head over to WordPress.org and search for a plugin that fits your needs.
- First, make sure that you go through all of the information present in the main tabs (Details, Reviews, Installation, Support and Documentation). Here, you’ll find all of the core plugin info, reviews, installation guides and links to the support forum.
- Next, have a look at the info present in the plugin sidebar. Here, you’ll be able to see other vital information such as the number of active installs, number of five-star reviews, etc.
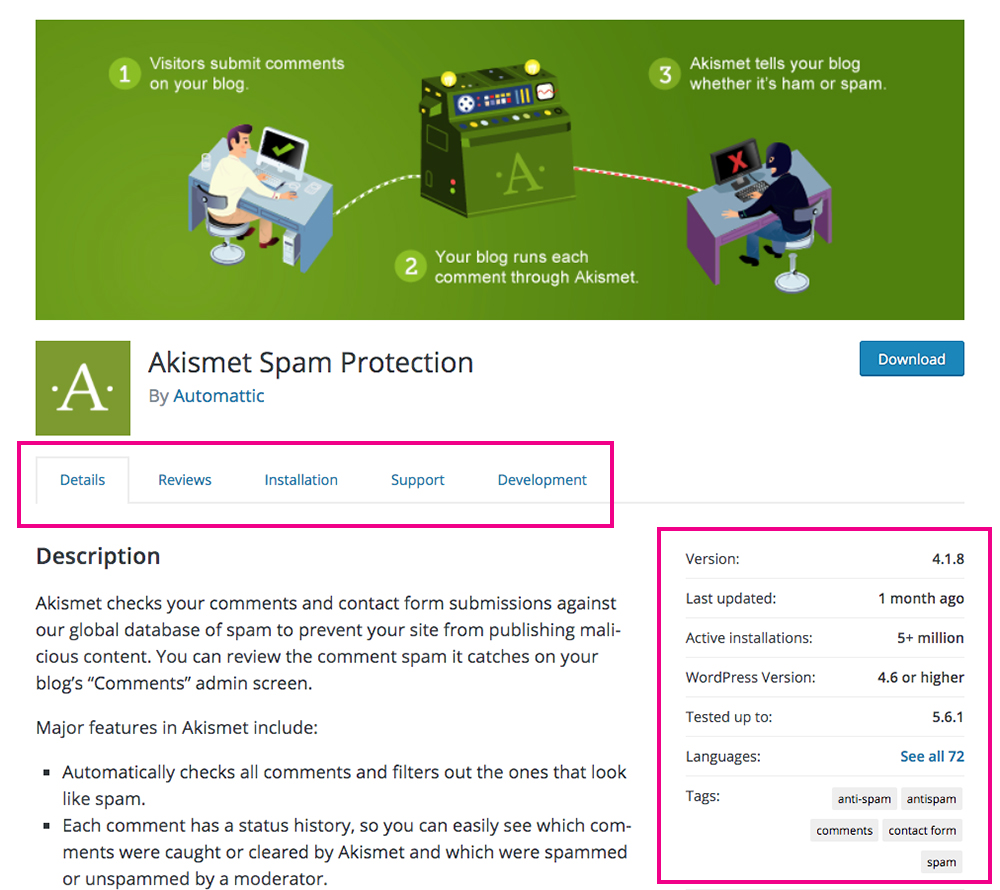
The popular anti-spam plugin, Akismet, is available from the WordPress repository
There are a few things to keep in mind as you make your decision.
- Last updated: Plugins need to be kept up to date with the latest WordPress software. Make sure that the plugin you’re selecting is compatible with your version of WordPress.
- Reviews: Nothing says ‘this product is credible’ like a five-star review. When selecting a plugin, have a look at the number of great reviews and the feedback that accompanies it.
- Support: Support for free plugins is a bit tricky as it’s not guaranteed across the board. You’ll need to spend a bit of time investigating some of the questions and answers in the support forum. This will give you a good idea as to what you can expect should you decide to use the plugin, and also, it’ll help you make sure that the plugin developer is communicative with their plugin users.
How to Install a Plugin on WordPress
The following guide will take you through the process of installing a plugin onto your WordPress website.
While plugins are all installed in just about the same way, they’ll each have unique setup options and configuration settings so be sure to follow the respective guides or documentation notes offered by the various plugin developers or agencies.
Another thing to note is that plugins will install in different locations around your WordPress site. Sometimes, they’ll create their own menu item, or they can sit in the Appearance or Settings menu. If need be, search around through various sections of your WordPress dashboard.
Next up, you’ll get three demonstrations of the different ways to install a WordPress plugin. They are:
- Directly from within the WordPress website
- Downloading a plugin from the WordPress repository
- installing a WordPress plugin manually using an FTP client
Install a Plugin from the WordPress Plugin Search
The easiest way to install a plugin onto your WordPress website is to use the plugin search function. For this, navigate to Plugins > Add New and look for the search bar.
In the search bar, type in the name of the plugin, or the function that you’d like the plugin to achieve. For this demonstration, I’ll install Ninja Forms; a contact form plugin that offers incredible functionality within the free version.
Once you have searched for and found the desired plugin, click on the Install button to begin the installation process.
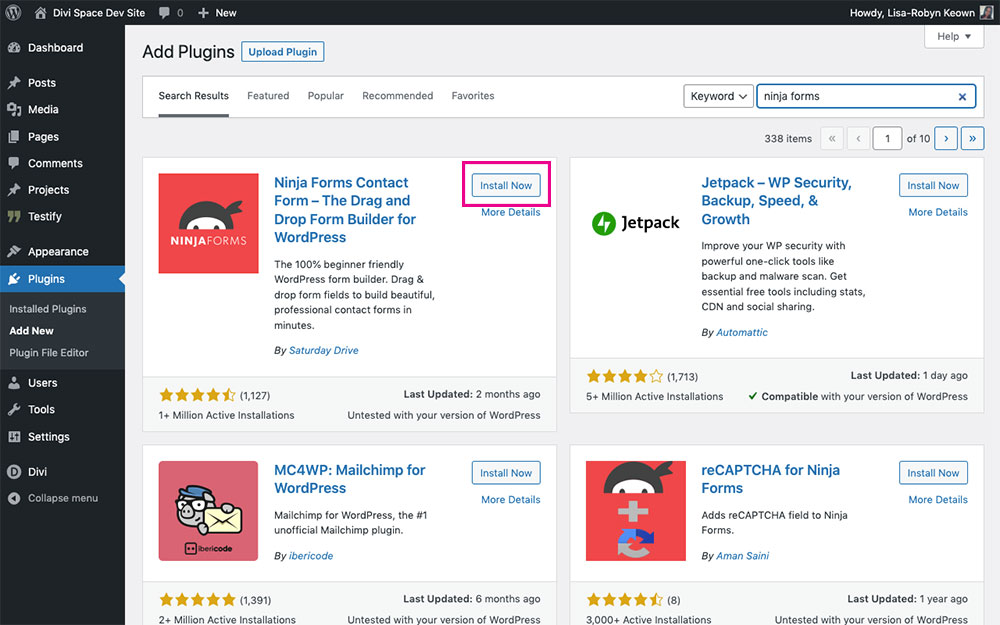
Search for the plugin’s name in the search bar and when you find it, click Install Now
Once the installation process has run its course, click on the blue Activate button. Note, you must click Activate, otherwise, the plugin won’t work.
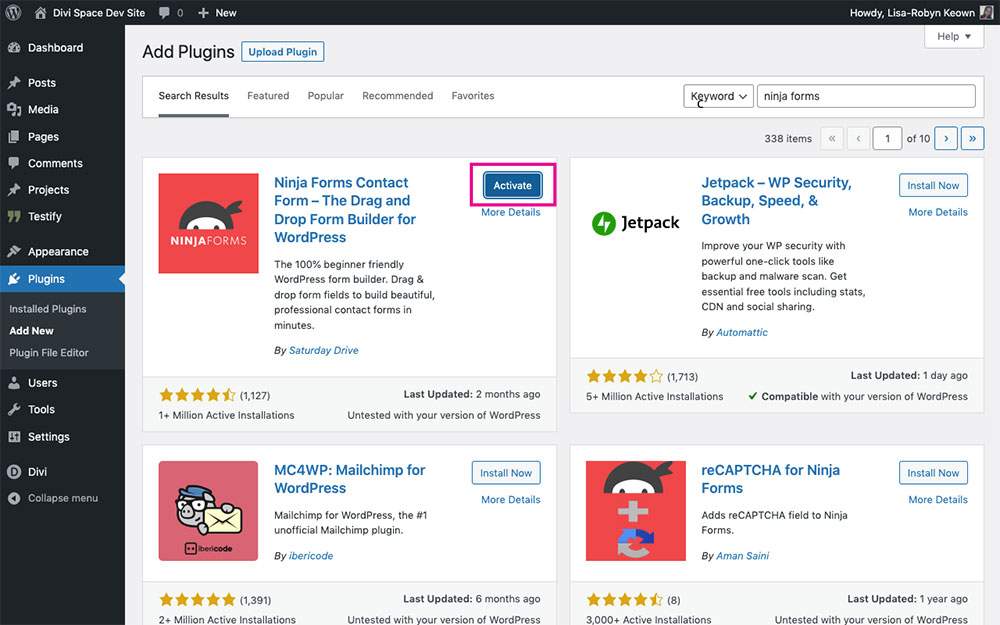
Make sure you click Activate whenever you upload a plugin, or else it won’t work
Once activated, the plugin is ready to go. Some may have set up and configuration options that’ll need to be executed before you can start using them so be sure to check out the plugin documentation.
In the example of Ninja Forms, the plugin creates its own unique menu.
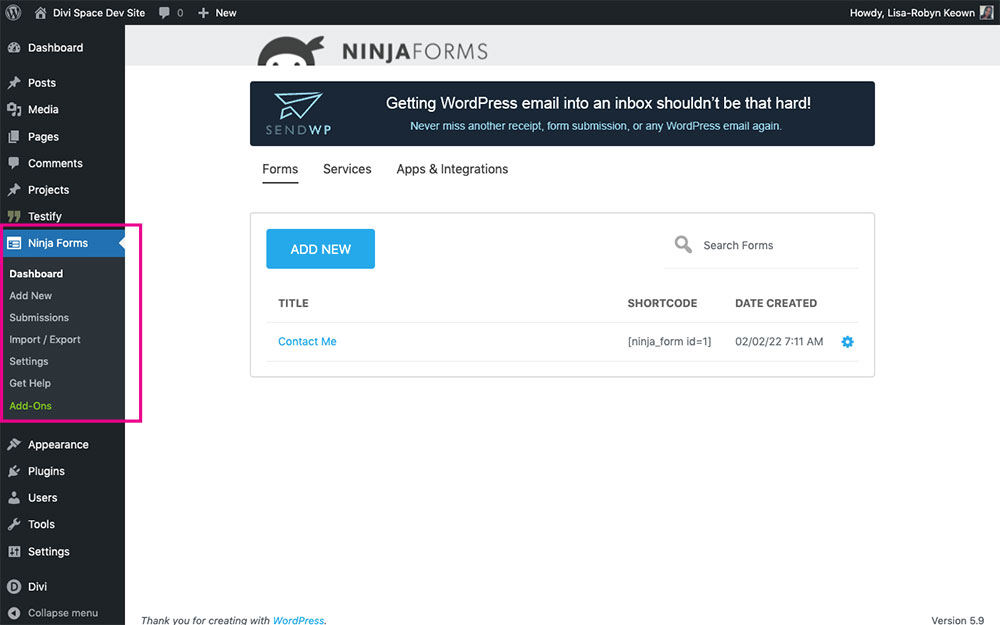
The Ninja Forms plugin creates its own menu item in the WordPress admin menu
If the plugin you’ve installed and activated doesn’t create its own menu, search around in the Settings, Plugins, Appearance menus to locate the plugin.
Install a Plugin Using the Admin Upload Plugin Function
Another easy way to install a WordPress plugin is to use the Admin Upload Plugin function. For this, you’ll need to have the plugin files at hand, previously downloaded from the WordPress repository, ready to upload.
Head over to the WordPress repository and search for a desired plugin. Remember to check out the plugin stats as instructed above (i.e., the number of active installs, reviews, last update date, etc.). You can also find key information here, such as the plugin’s documentation, support forum, installation information and much more.
Once you’ve found a plugin (for example, Yoast) click the Download button (a download will start automatically).
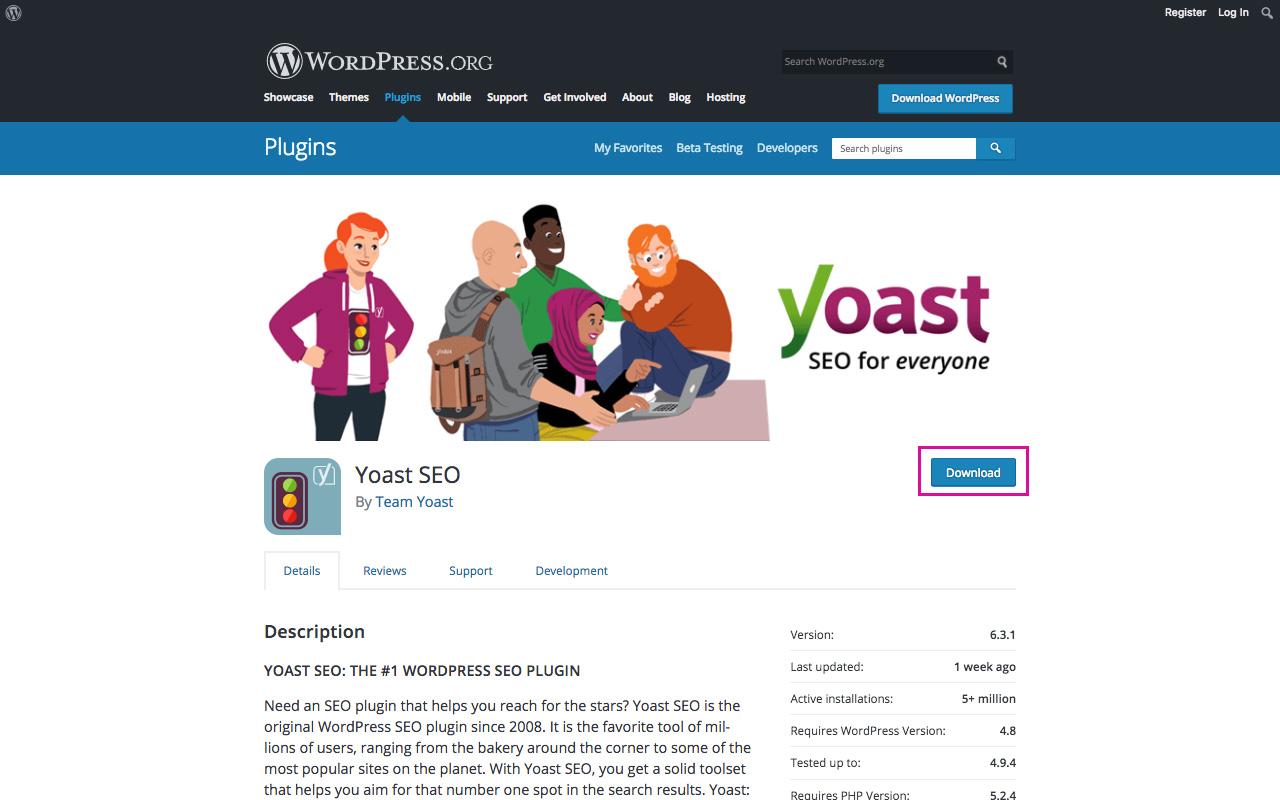
Download a free version of Yoast SEO from the WordPress Repository
Once complete, you’ll find a .zip file in your computer’s Downloads folder.
WordPress uses a .zip file format to add its themes and plugins. The .zip file that would have just finished downloading is the correct file that needs to be uploaded. Do not unzip this file, it must be uploaded in this format.
In the Plugins > Add New menu, click on the Upload Plugin button.
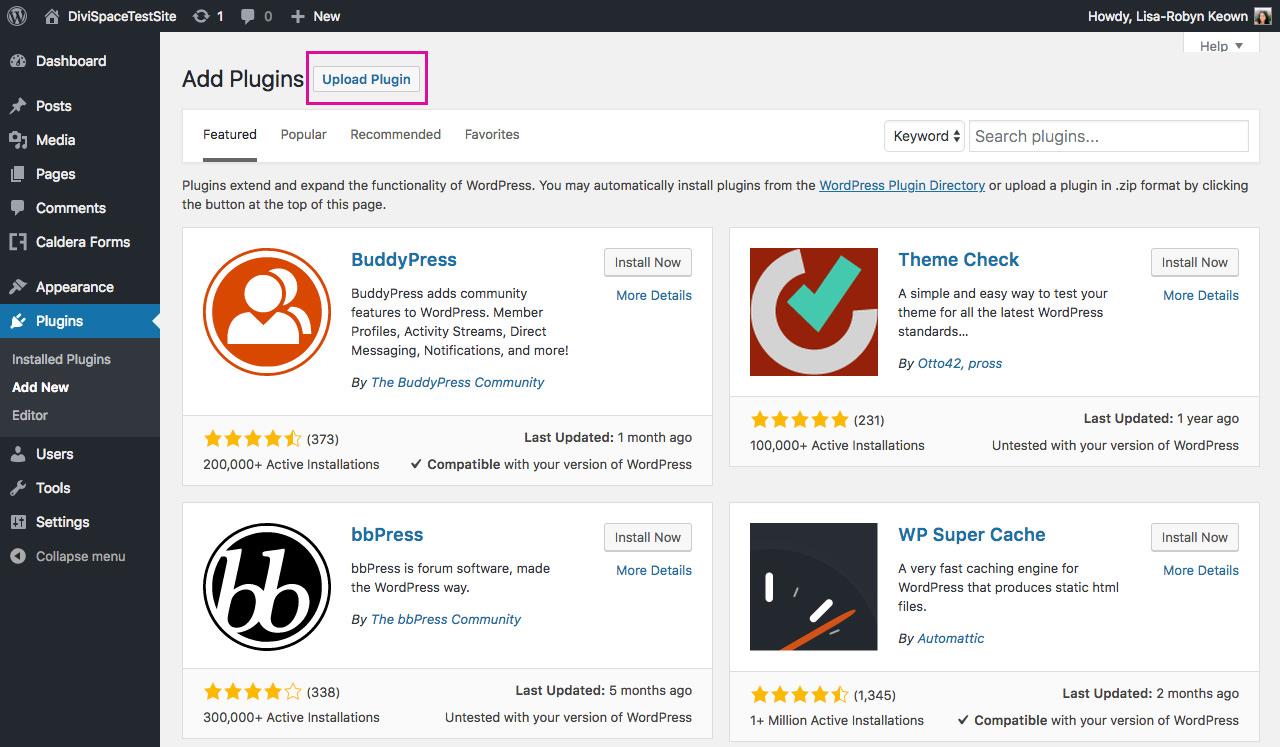
Click Upload Plugin
Then, click on Choose File and browse through your recent downloads to locate the plugin. Select the plugin’s .zip file and click Install Now. Now, let the installation run its course, and, once complete, remember to click Activate.
Again, if there are specific configuration settings, as is the case with Yoast SEO, refer to the individual plugin guide.
Manually Installing a WordPress Plugin Using FTP
Almost all of the time, the first two plugin upload methods will suffice, but in some cases, such as when certain hosting service providers impose file restrictions, you may experience a problem with uploading a plugin. For these cases, you’ll need to manually install the WordPress plugin.
This method may be complicated for first-time, beginner users. Luckily the first two upload methods should work almost all of the time, however, if you find yourself needing to go this manual route, please make a backup of the site.
To begin, download a desired plugin from the WordPress repository or purchase a premium plugin. You’ll also need to have an FTP client such as FileZilla or Cyberduck running on your computer.
For this demonstration, I’ll use one of the Divi Space products, Testify.
Just like the free plugins, premium plugins will ship in a .zip file structure, ready to be uploaded. To use the FTP method, you’ll need to unzip the .zip file and expose the file structure. This is the only plugin upload method that requires the unzipping of the .zip file.
To unzip the file, simply double click on the .zip file and after a moment or two, a folder with the same name will appear. In the case of manually FTPing the plugin to the server use the extracted folder, not the .zip file.
To begin, open up your FTP client (I’m using Filezilla) and begin a new connection to the server of the desired website. If you’re not sure what your login details are you’ll need to contact your hosting service provider. Once you have logged into the server, you’ll see two panels: the Local Site and the Remote Site.
The left-hand side, called the Local Site, is your computer. Here, you’re able to see all of the files and folders on your own computer. The right-hand side, called the Remote Site, is the server of the website you’re trying to add a plugin to.
Depending on the server set up, you’ll either land directly in the public_html folder or you’ll be able to select it. The public_html file is also referred to as the Root folder. This folder is the core folder that contains all of the files associated with your website.
To begin the upload process you need to find the unzipped plugin folder on your computer. Typically, this will be in your Downloads folder. Navigate to the left-hand panel (Local Site) and search for the plugin folder on your computer.
Once you have found the unzipped plugin folder, navigate to the right-hand panel (Remote Site). Here, you’ll need to find the Plugin folder in your site files. The path will be: public_html/wp-content/plugins. Be very careful as you navigate in this space as tinkering in the wrong place could result in breaking the website.
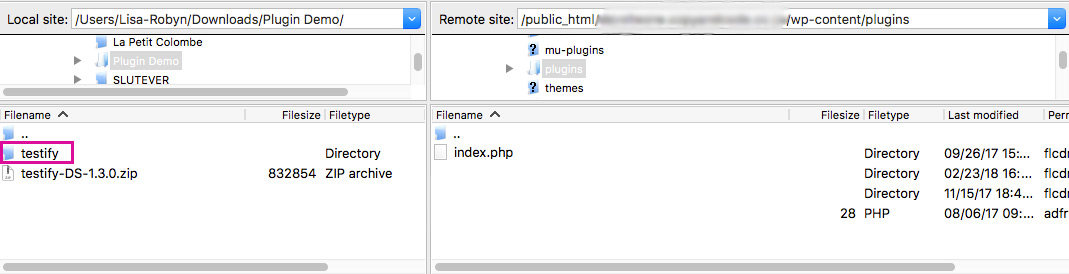
A look at the FTP program transferring a plugin folder to the server
Once you have found the plugin folder on the Remote Site simply drag the plugin folder from the left-hand panel (Local Site) across and wait for the installation to run. Once complete, you’ll see a success message.
Now, return to your WordPress website and navigate to the Plugins menu. Here, you’ll see that the plugin has been successfully installed. At this point, you need to click Activate to start using the plugin.
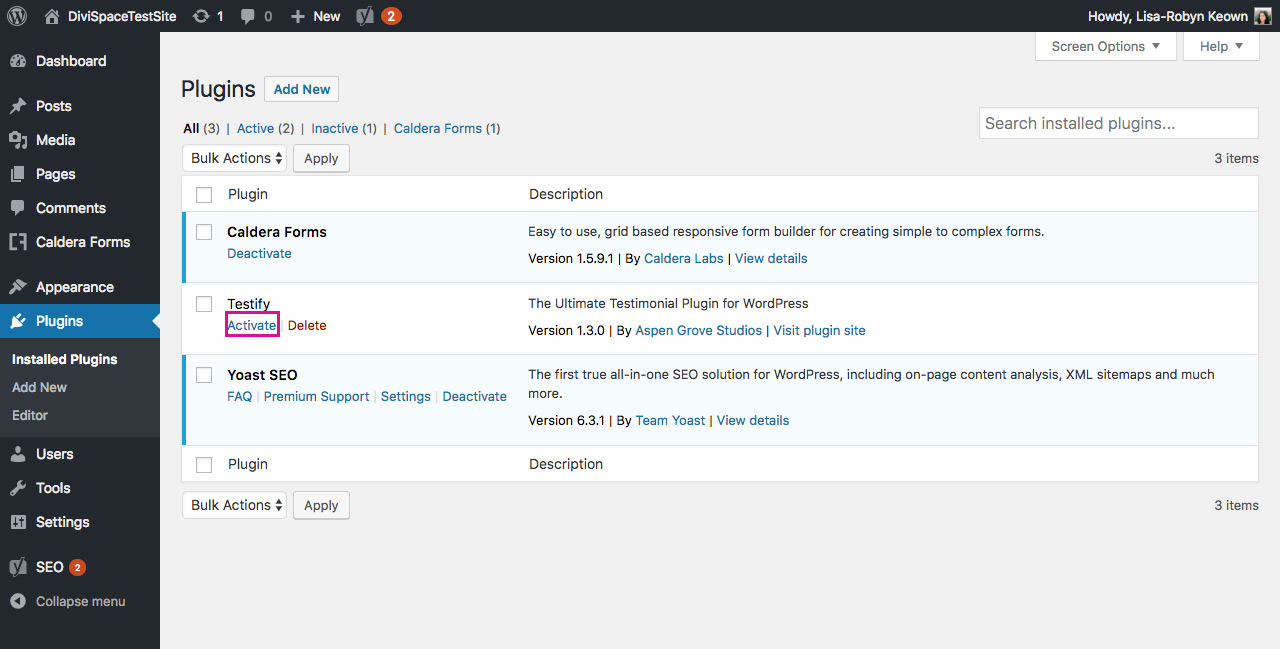
Don’t forget to click Activate to make sure the installation is complete
Again, if there are any specific configuration settings, refer to the respective plugin guide.
Ending Thoughts
Without plugins, your WordPress website would be a drag and desolate place. These tools pack a serious punch and our websites are all the better off because of them! To familiarize yourself with these little tools, we suggest spending some time researching the top WordPress plugins and take note of the most frequently recommended ones.
As a general rule, it’s not good to oversaturate your WordPress website with too many plugins, so be selective and use them sparingly.
We hope that you found this guide helpful, that it has brought you clarity on what plugins are and how to install them on your site. If you have any questions or comments, be sure to leave them below. We love receiving your feedback.
Thanks for reading!

Hi,
Informative article! Thanks for sharing such a useful Information, I keep visiting this site to learn more the best set up for the site.