
Testimonials have become a prerequisite for successful websites. Whether you sell products, services or a blend of both, you’re going to want to display quality social proof and customer reviews of working with you on your site.
While there are readily available testimonial plugins for the Divi Theme, not all of them are easy to use and effective. Our testimonial plugin, Testify, is a powerful, robust plugin that lets you add testimonials to your Divi site. You can create striking testimonials for your site, ones that grab attention and pursue potential customers to purchase your products or services.
Testify also makes it really easy for you to collect testimonials from your customers and clients. Instead of taking a testimonial submitted via email and manually adding it to your site, with Testify, you can set up a form on the front-end of your site that your customers can simply fill out and submit. Their testimonial will automatically be entered into the back-end of your site, saving you time.
Testify is compatible with any WordPress theme so you can use the plugin regardless of how your site is set up. The plugin is also compatible with the Divi theme, the Extra theme and the Divi Builder plugin so you can add and style testimonials using the familiar Divi Builder.
When using Testify, you’ll find two modules within the Divi Builder: a testimonial slider and testimonial carousel. You’ll also gain access to over 20 free testimonial layouts that you can import and customize.
In this post, we’ll give you a thorough walkthrough of the Testify plugin. You’ll learn:
- Why you should include testimonials on your website
- How to install the Testify plugin
- Two methods for adding testimonials, one using the plugin’s shortcode method, the other using the Divi Builder
- How to create a standout testimonial slider for your Divi site
Want to see Testify in action? Check out the plugin demo page and get a sneak peek at the free testimonials layouts you’ll get access to when you purchase the plugin.
Why You Should Include Testimonials on Your Website
Testimonials are incredibly helpful web elements to add to your site. They showcase a positive interaction or experience with your brand, giving your products or services a bump in credibility. As testimonials are from people, they function as a sort of word-of-mouth marketing tactic. A referral from a trusted friend or reading another customer’s positive experience will do wonders for convincing a customer that’s on the fence to commit.
A few notes on curating your website testimonials:
- They should always be authentic and written by a former or current client or customer. Testimonials should not be fabricated or false.
- If possible, try to include an image of the testimonial author’s face. Our plugin Testify makes it really easy to insert an author’s image.
- Also, if you can, share the author’s company name, their job position or title and possibly a website link thereto.
Where to Put Testimonials on Your Website
If you’re wondering how to display testimonials on your website, you have several options.
- If you have plenty of testimonials, you could create a dedicated page for them. You could divide the page into sections for each type of testimonial and create anchor links to jump to each section.
- If you have a handful of testimonials, you could scatter them across your site. You could share some on the homepage so that they catch site visitors’ attention from the word go. You could share them on the product or service page of the relevant item for an extra bump in credibility. You could include them in the sidebar of your site so that they display on multiple pages and posts. The options really are endless!
How to Add a Testimonial to Your Divi Website
To begin using this powerful Divi testimonial plugin, head to the Divi Space website and purchase the Testify plugin. Once you’ve purchased the plugin, head to the Account section, navigate to the Membership Details tab and download the plugin. A .zip file will begin downloading. When completed, navigate to the Plugins > Add New section of your WordPress website, click Upload Plugin, then Choose File and select the .zip file from your computer. Click Install Now.
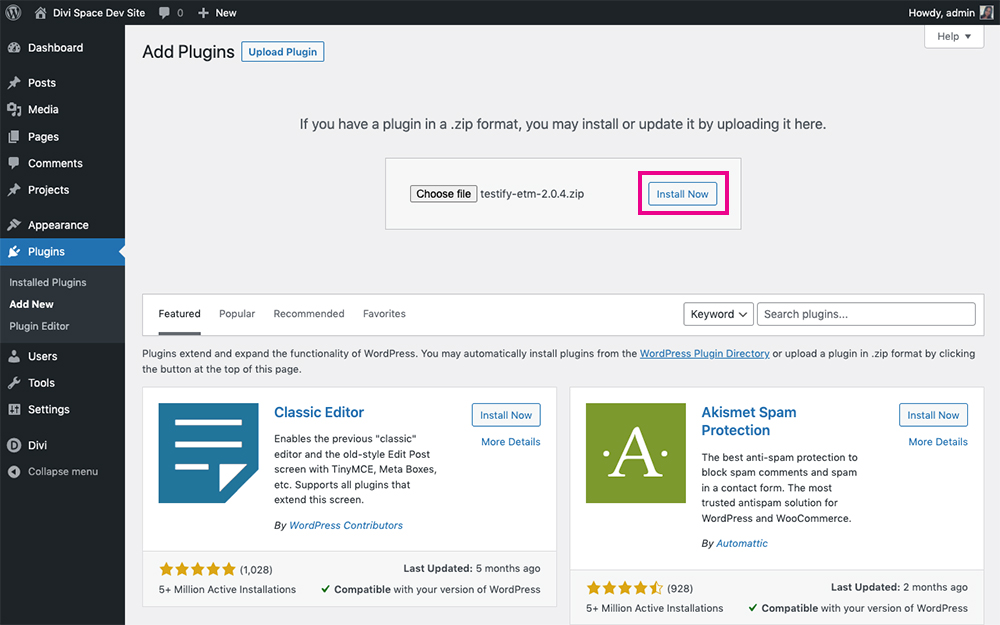
Click Install Now
Let the plugin installation run. When complete, click Activate to finish the installation. If you need a detailed guide, here’s a thorough run-through of installing and activating a plugin on a WordPress website.
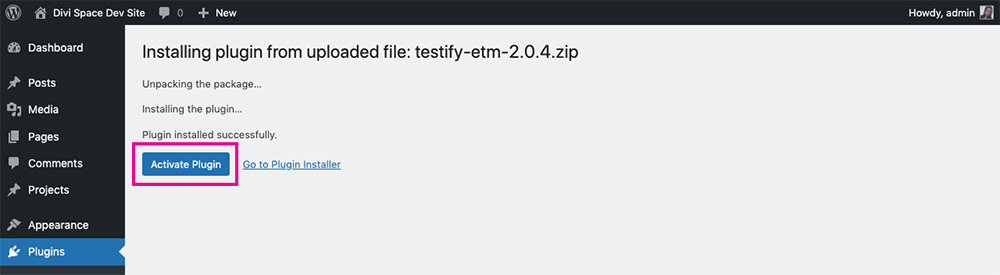
Click Activate Plugin
When the plugin is fully installed and activated, it’ll create a new menu item—titled Testify—in the WordPress dashboard.
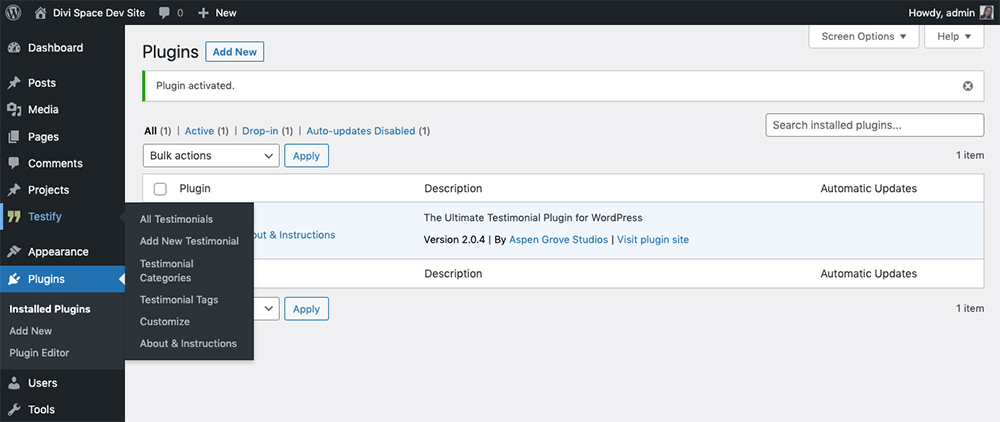
Testify will create its own menu
Now that the plugin is installed, you can start creating your first testimonial. As you add testimonials, they’ll be found in the main plugin dashboard (located when you click All Testimonials). To begin, click Add New Testimonial.
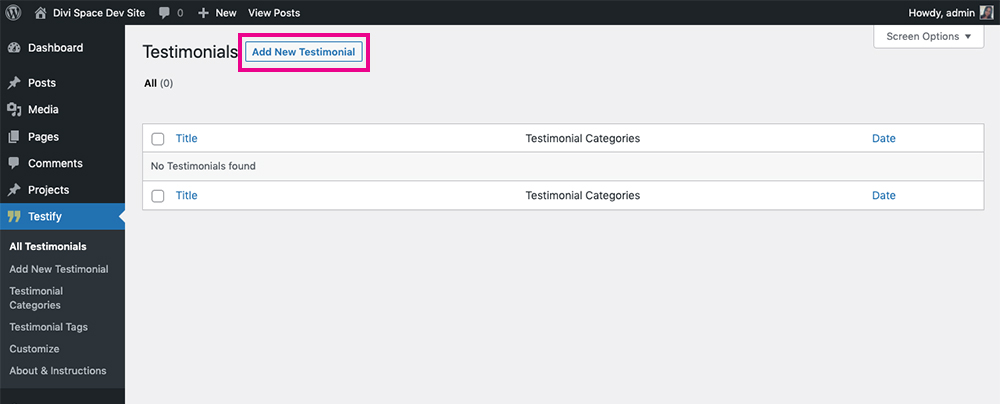
Click Add New Testimonial
Next, you’ll be taken to a screen with a WordPress post editor. Here, you can enter the details of your testimonial.
The Testify testimonial entry mimics the look and feel of the WordPress classic editor
First, enter the unique name for your testimonial. In my example, I’ve titled it ‘Testimonial 01’ for the demo. If you have a lot of testimonials on your site, it’s a good idea to make the title distinct as you may end up with a string of non-descript testimonials. Either name the title after the author name or include a few words that will help you recognize the testimonial quickly.
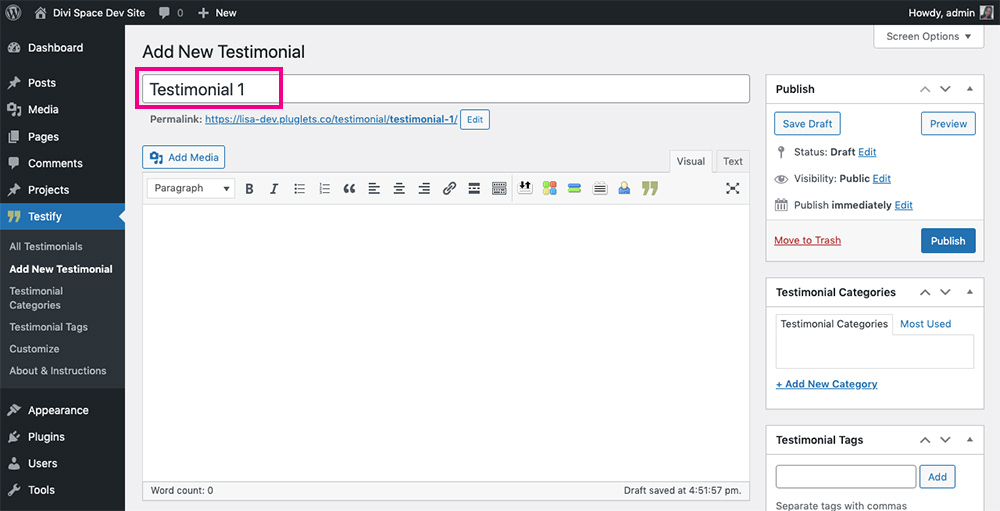
Enter a title
You could also set the title to be a shortened version of the testimonial content or summary, for example setting the first few words of the testimonial text as the title.
Use the first few words of the testimonial as the tite
Next, enter the text of the testimonial in the editor console.
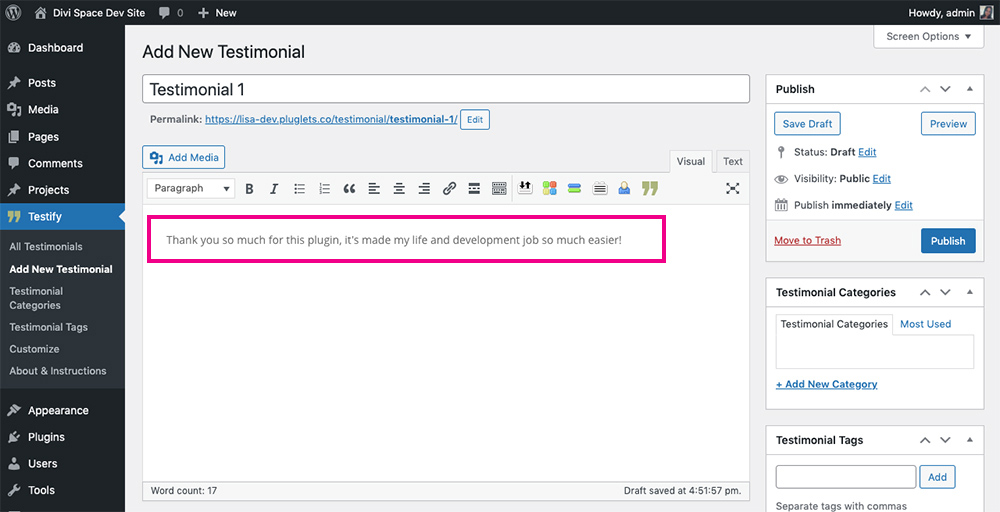
Insert the testimonial copy
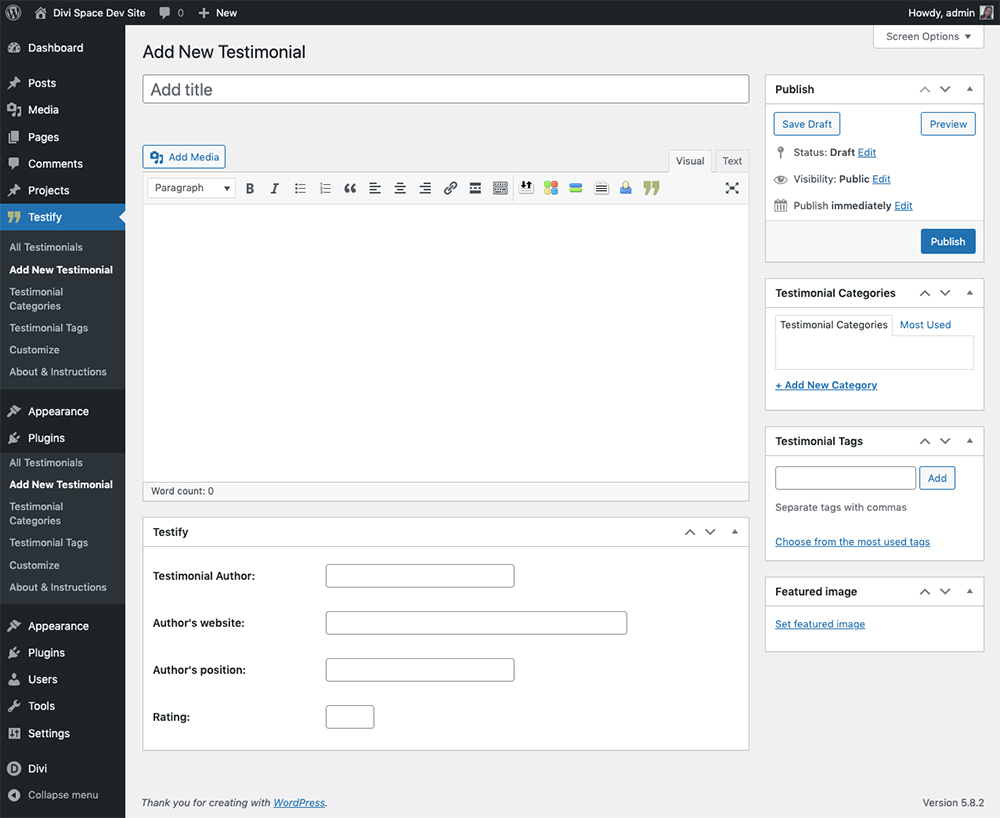
Then, enter the details of the testimonial author, including:
- Their name
- Their website (if applicable), remember to include https:// or http://
- Their position in the company (if relevant)
- A rating, if they have shared a rating along with their review or testimonial
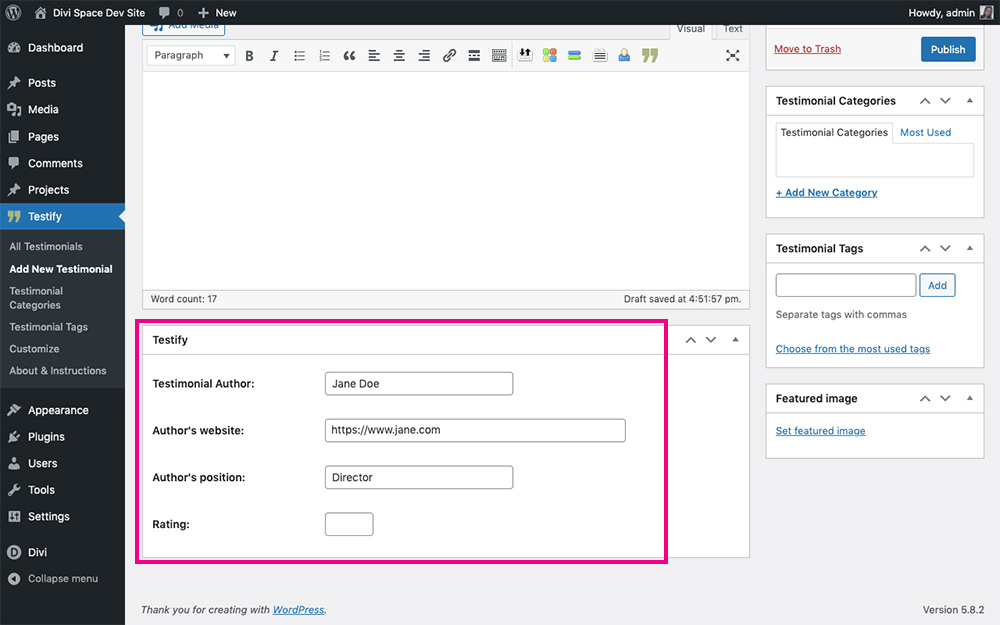
Enter the author details
Next, add a featured image of the author. To do this, click Set Featured Image and select an image from the Media Library.
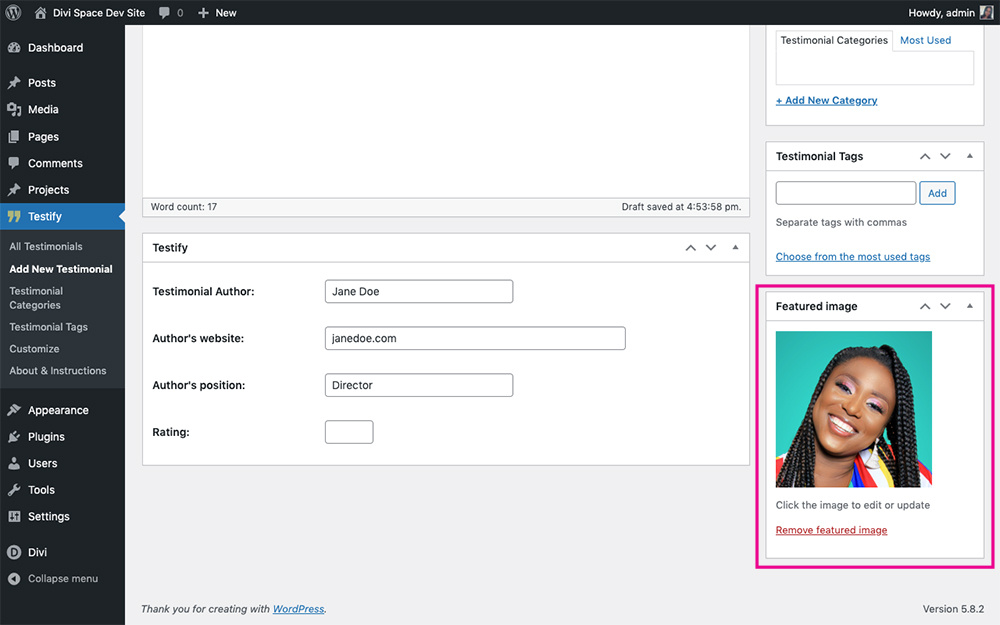
Add a featured image
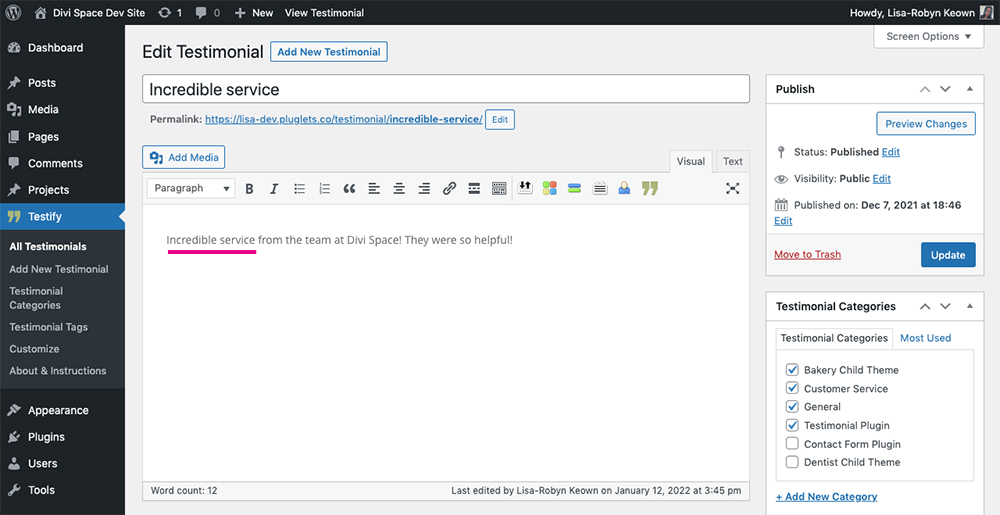
A great feature of the Testify plugin is that it allows for taxonomies. You can assign Categories and Tags to your testimonials to make the structuring and categorization of them easier.
For example, you could create a category related to your product types, for your support reviews and so on. You could also create different categories for your front-end submission forms.

Assign categories
You can use the Testimonial Categories menu to add, edit and alter your testimonial categories.
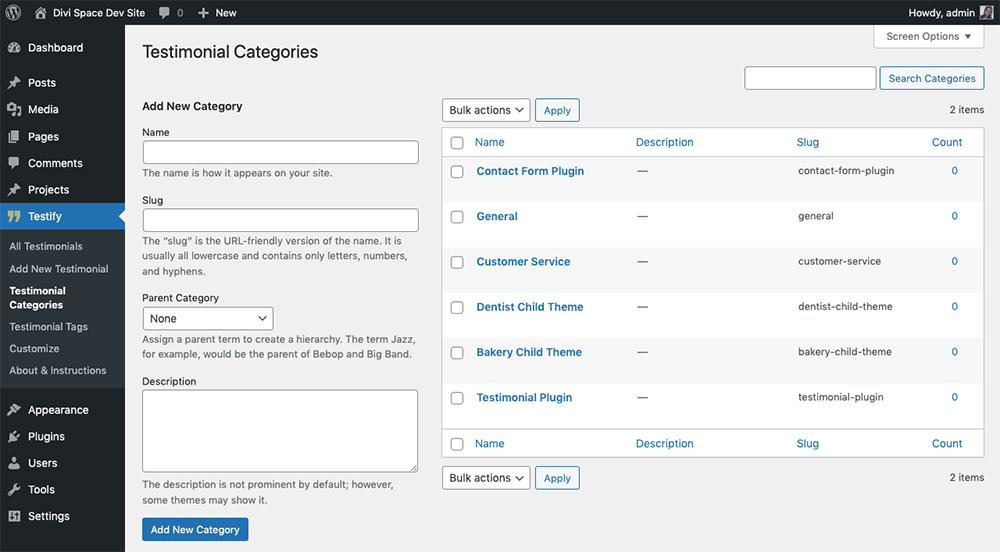
Assign and edit categories
Just like categories, the plugin allows for tags too. Adding another layer of structuring to your testimonials, you can add and assign tags directly from the testimonial editor.
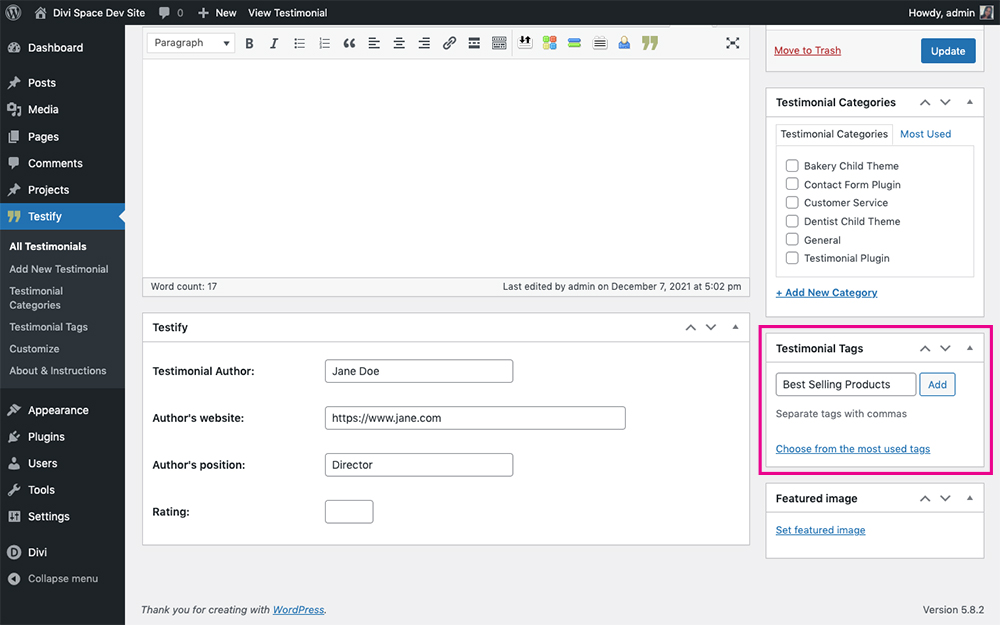
Assign tags
Alternately, you can use the Testimonial Tags menu to add or alter your tags.

Use the tags menu to add or edit tags
Once you’ve entered all of the information about your testimonial, click Publish.
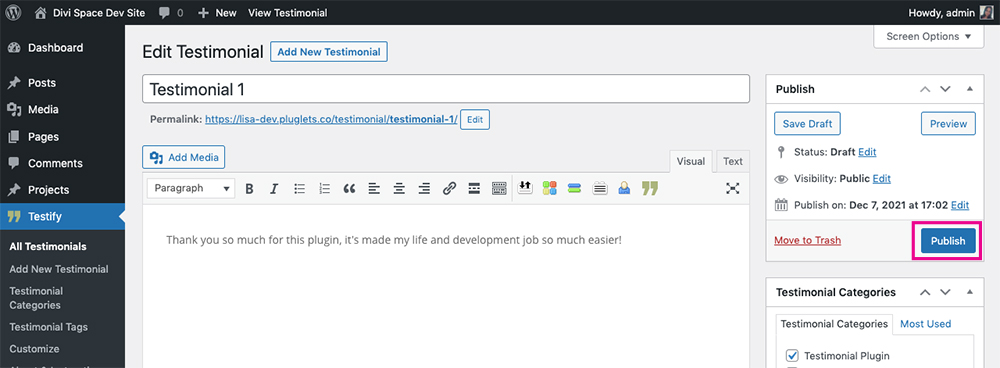
Click Publish
Once your testimonial is added, it’ll appear in the testimonial dashboard.
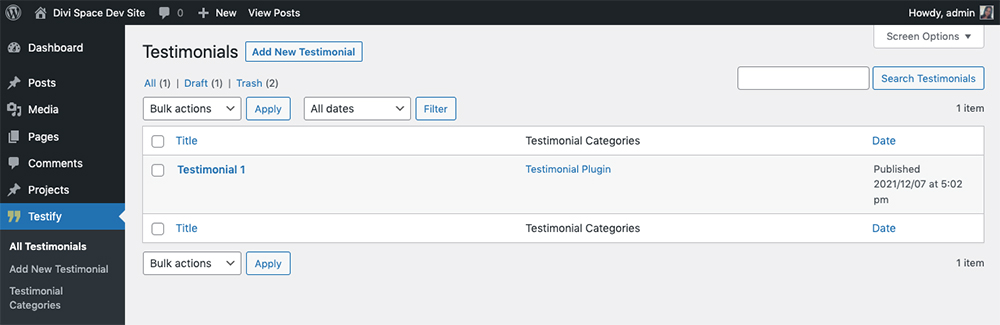
You’ve just completed your first testimonial
Continue in the same fashion and add more testimonials. They’ll keep displaying within the testimonial dashboard. You can use the Quick Edit function to assign categories and tags to your testimonials.
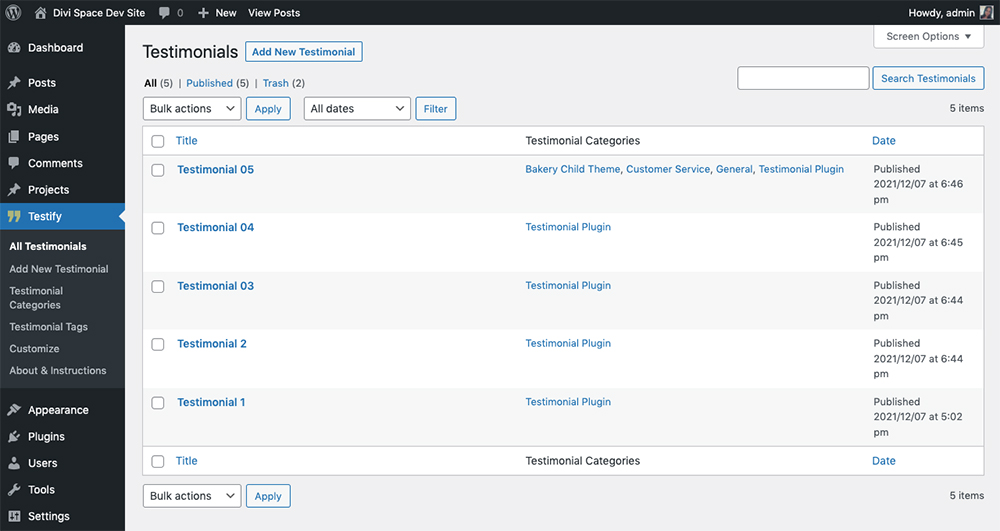
All of your testimonials will display in the Testimonials Dashboard
Now that you’ve added your testimonial content, it’s time to create your testimonials and add them to a page, post or project.
How to Add a Testimonial to Your Site
The Testify plugin gives you several options of displaying testimonials on your Divi site. First, you can create really enticing testimonial carousels that’ll scroll through several slides of social proof. You can also create testimonial sliders that function similarly.
There are two different methods of adding Testify testimonials to your site.
- First, if you are using the Divi theme, you can create a testimonial using the Divi Builder.
- Alternatively, you can use the Testify shortcode generator and add a testimonial to a page, post, project or widget.
Please note that if you are creating a carousel, you can only do so with the Divi Builder, not the shortcode via the Classic Editor method.
Testify is compatible with Elementor and Beaver Builder, however, for this tutorial, we’ll demonstrate the plugin using the Divi Builder and then later the shortcode generator via the Classic Editor.
Let’s see this powerful plugin in action!
Adding a Testimonial Carousel Using the Divi Builder
One of the newer features added to the Testify plugin is the ability to create a testimonial carousel.
Carousels are a beautiful method for displaying lots of content within a single element. In the case of the Testify carousel, you can showcase numerous testimonials in a single module without compromising space. The testimonial carousels are fully responsive and you can even set the number of columns due to display on each device screen.

Create interesting carousel layouts and designs
As you’ll see later in this post, Testify can be styled and customized in so many incredible ways, your Divi testimonial carousel will be no different. Match your brand colors and fonts, create interesting layouts alongside other elements, go wild!
Want to know more about creating a testimonial carousel for Divi? Read this tutorial and see the Testify testimonial carousel in action!
Adding a Testimonial Using the Divi Builder
One of the methods of adding a testimonial to your site is to use the Divi Builder. Create a page, post or project, enable the Divi Builder and insert the Testify testimonial module. The plugin can be used with both the back-end and front-end builder. Here is an image of the Testify testimonial module inserted via the back-end builder.
Use the plugin from the back-end builder
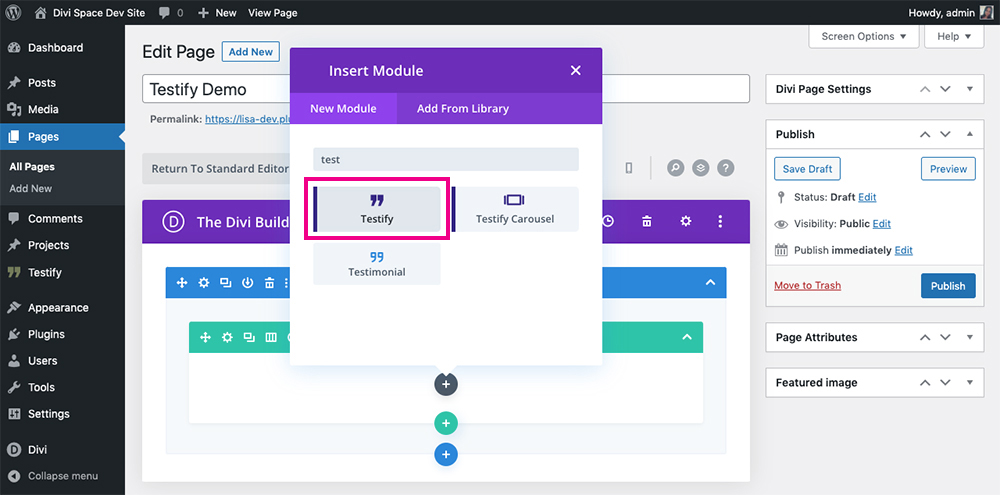
If you are using the front-end Divi Builder, create a new section and row as per usual, and then insert the Testify testimonial module.
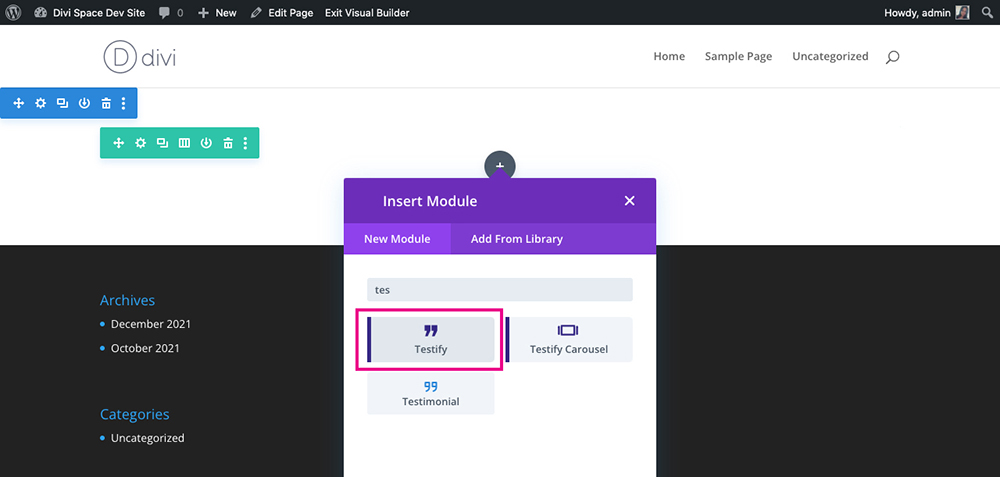
Add the Testify testimonial module
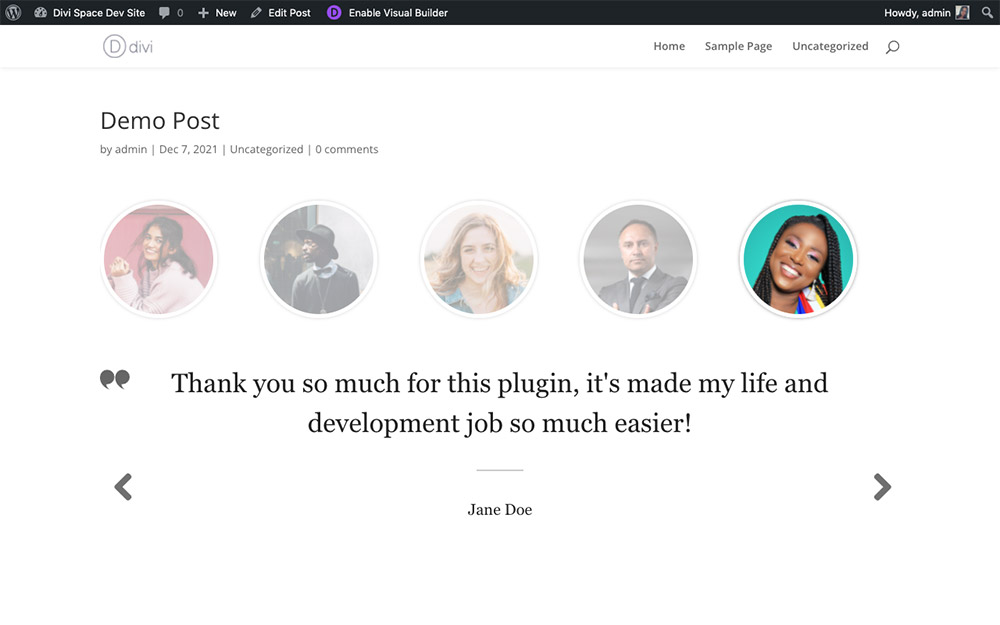
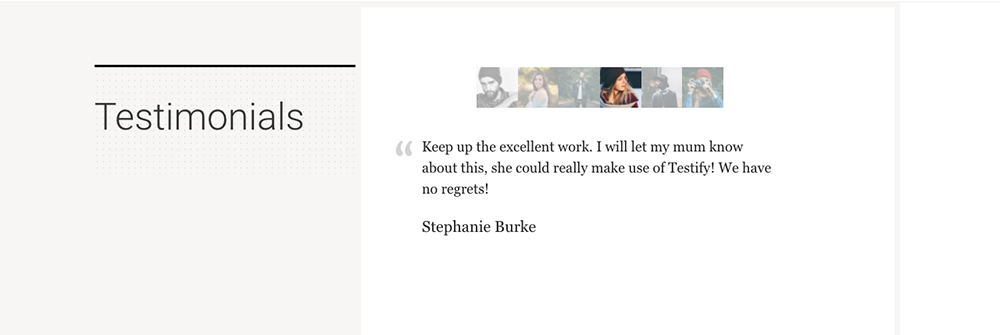
By default, the testimonial module will pull in all of the testimonials added via the plugin. These will have standard styling of simple black text on a white background with a subtle animation moving through the testimonial slides.

The testimonial slider will display as such
To begin customizing your testimonial slider, open the Divi Builder settings and configure the testimonial in the Content tab. Here you can set the following settings:
- Set the number of testimonials to display
- The order in which the testimonials will display (for example oldest to newest and vice versa)
- The testimonial categories you’d’ like to display
- The testimonial tags you’d like to display
- The alignment of the text
- The transition type as the testimonial slider swipe through
- The animation speed of how quickly or slowly each slide transitions to the next
- The autoplay duration, how quickly or slowly the plugin moves through each slide
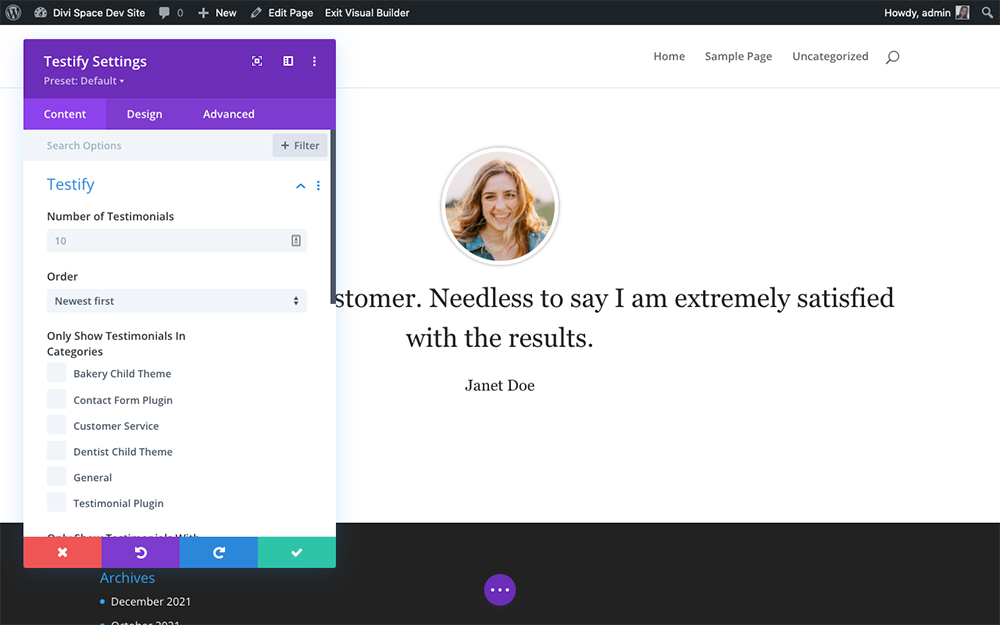
Use the Content tab to set up the module
Next, you can style each and every element in the testimonial slider. Head to the Design tab and begin playing around with each of the settings.
Here you can style the testimonial text, read more text, layout design, navigation settings, author text, quotation mark design, separator or divider design, testimonial image, and thumbnails.
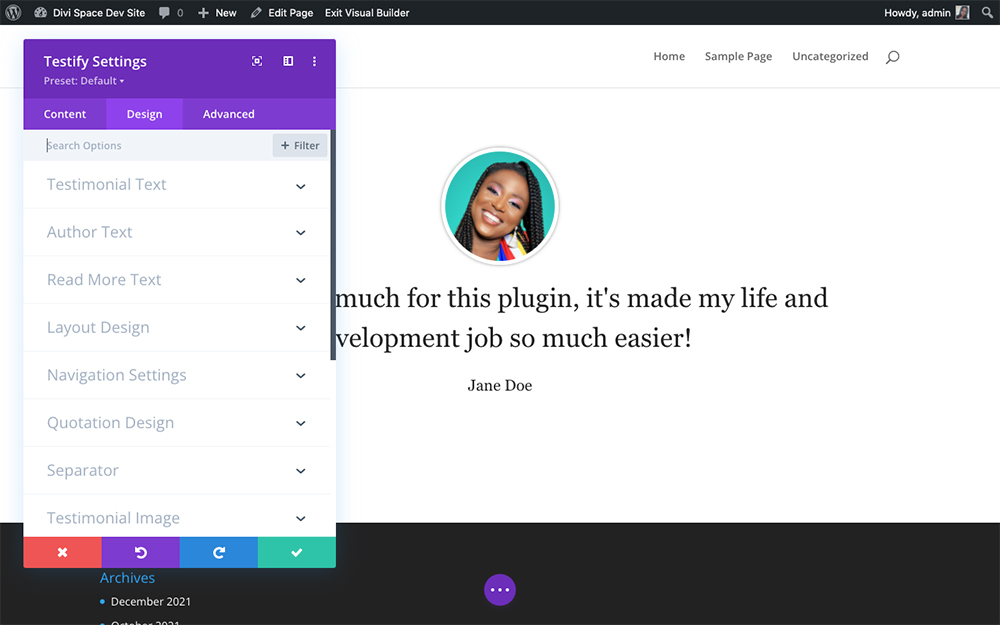
Use the Design tab options to style the look and feel of the module
Finally, if you’d like to add additional customizations to the testimonial slider, open the Advanced tab and use the options available here. You can assign a CSS class or ID to the testimonial module and set further styling in your stylesheet. Further settings you can implement via the Advanced tab include setting the module’s visibility, scroll effects and much more.
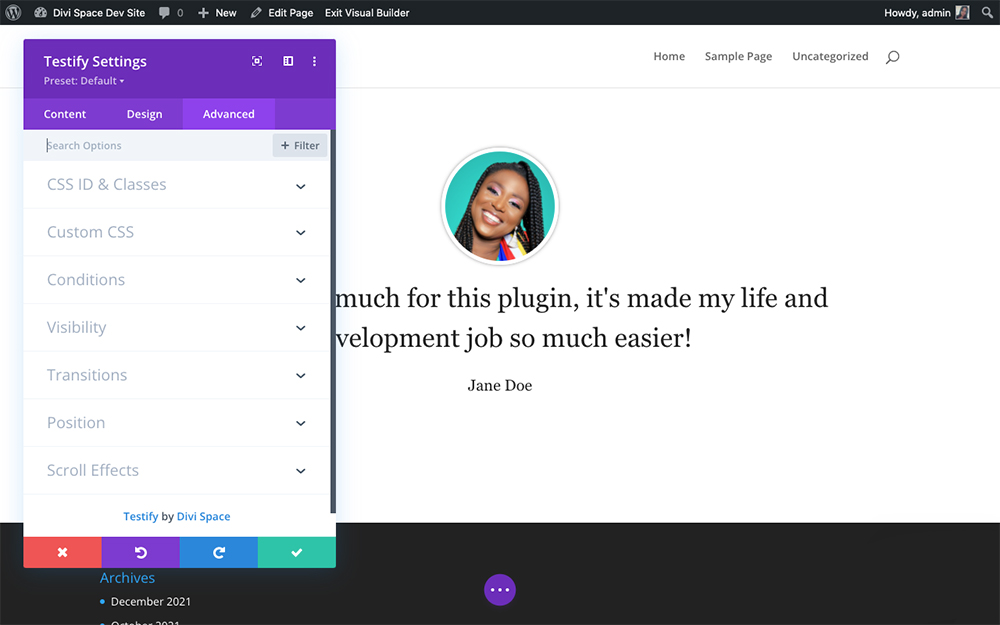
Add deeper levels of customization with the Advanced tab
Adding a Testimonial Using the Shortcode Generator
Using the shortcode generator to add a testimonial is quick and easy. Create a new page or post, and click on the Testify icon.
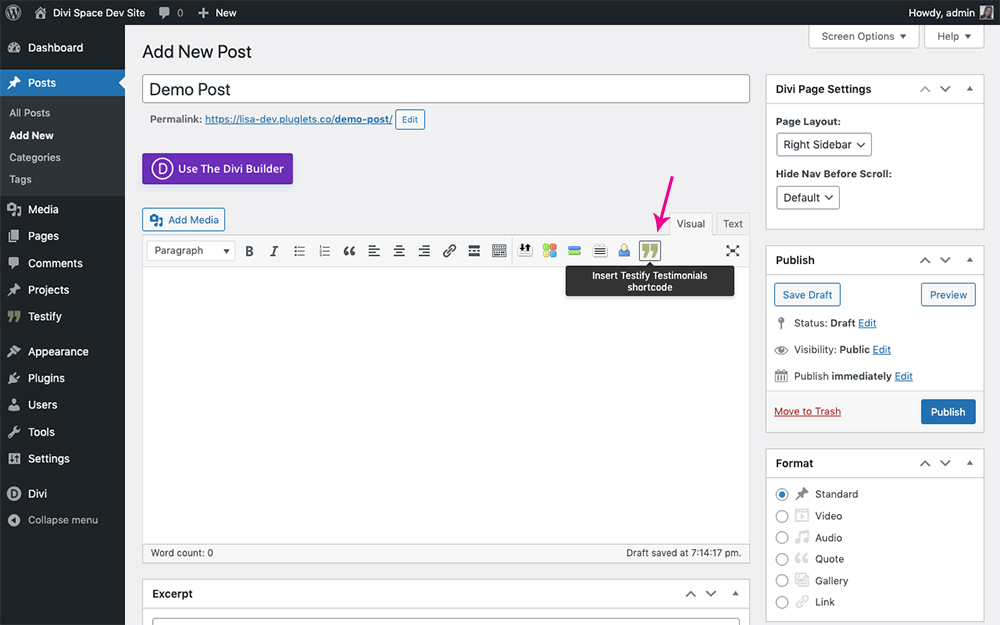
Click the shortcode generator icon to begin building your testimonial slider
If you wish to use the pre-Gutenberg classic WordPress editor and you’re using Divi, head to the Divi Theme Options menu, click Builder > Advanced and toggle the Enable Classic Editor to enabled. Remember to click Save Changes.
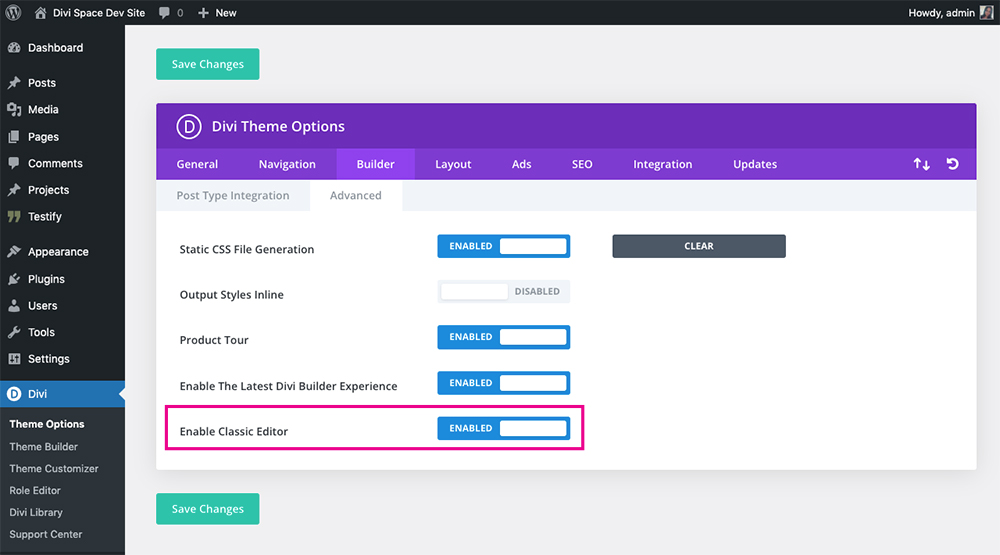
Enable the Classic Editor
As soon as you click the Testify shortcode generator, a pop-up will arise giving you several options to style and customize your testimonial. First, you can select which categories and/or tags you’d like to see inside your testimonial.
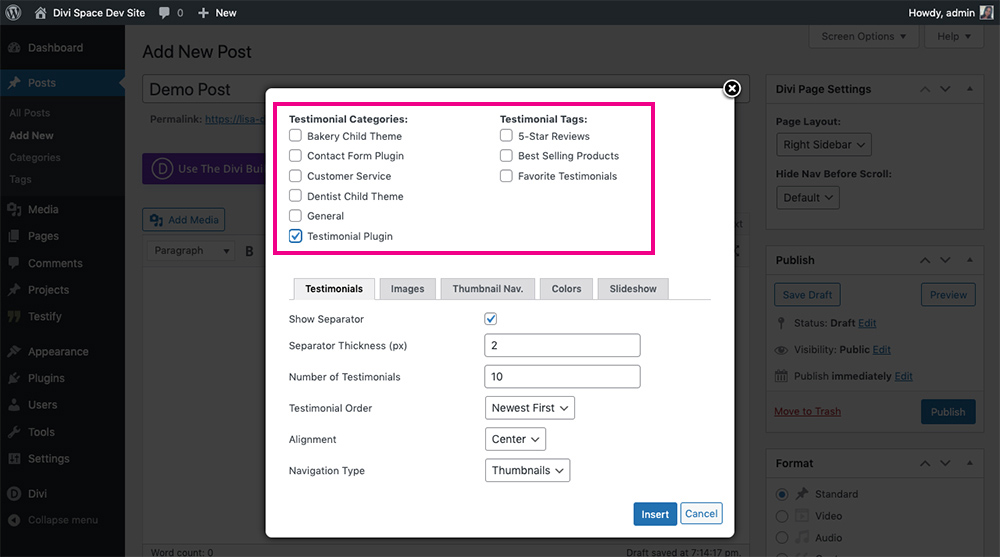
Select which categories and/or tags you’d like to display
The plugin’s settings are split into five different tabs; Testimonials, Images, Thumbnail Nav, Colors and Slideshow.
In the first tab, you’ll find settings related to the testimonials themselves.

Set the testimonial options
These settings are:
- Show separator: Decide if you’d like to have a space in between the thumbnails of each testimonial.
- Separator Thickness (px): Set the pixel width of how thick you’d like the separator to be.
- Number of Testimonials: Set the number of testimonials to show within the display.
- Testimonial Order: Select which order you’d like the testimonial to display in, either newest to oldest, oldest to newest, or random order.
- Alignment: Set whether you’d like the testimonial to align either left, center or right.
- Navigation Type: Select whether you’d like to use the thumbnails themselves as the navigation, or whether you’d prefer dots. If you select dots only, the dots will become the navigation and only one thumbnail will display, if you select thumbnails, the plugin will display each of the testimonial’s thumbnails, graying out the one’s not in use.
- Show Read More Button: For testimonials with a lot of text, you can decide whether you’d like to display a Read More button
- Testimonial length: Set the number of characters you’d like to cap a testimonial at.
- Read More Text: If you’d like to change the ‘Read More’ text, you can enter custom text here.
- Read Less Text: If you’d like to, you can change the text of the Read Less text.
- Read More Font: Set the Read More font from a selection of system fonts.
- Read More Text Color: Set the text color of the Read More button.
- Read More Letter Spacing: Add letter spacing to the Read More text.
- Add Read More Icon: If you’d like to add an icon to the Read More text, select the checkbox. If you leave this blank, the Read More text will display a subtle arrow by default.
- Read More Icon: If you’ve decided to include an icon with the Read More text, select which icon you’d like.
- Read More Icon Color: As with the text color, set the color of the icon accompanying the Read More text.
- Read More Icon Placement: If you’ve decided to add an icon to the Read More text, you can decide whether it’ll be on the left of the text or the right of the text.
- Read Less Icon: IF you have a testimonial with a lot of text, the Read More button will display. Once you’ve clicked on the Read More text, it’ll change to Read Less. With this option, you can decide whether you’d like to add an icon to the Read Less text.
- Read Less Icon Color: Set the color for the Read Less icon.
- Read Less Icon Placement: Decide whether you’d like the icon to display to the left or right of the Read Less text.
- Show Prev./Next Arrows: If you’d like to include arrows that track through the testimonials, selecting this checkbox will enable them.
- Quotation Mark Image: Set the style of the quotation mark you’d like to use for your testimonials.
- Quotation Mark Size: Set the size of the quotation mark.
- Testimonial Font Family: Enter the font family of your testimonial text.
- Testimonial Font Weight: Set the font weight of your testimonial text.
- Testimonial Font Size: Set the font size of the testimonial text.
- Author Font Family: Enter the font family of the testimonial’s author text.
- Author Font Weight: Set the font weight of the author test.
- Author Font Size: Set the font size of the author’s text.
In the second tab, you’ll find settings related to the thumbnail images.
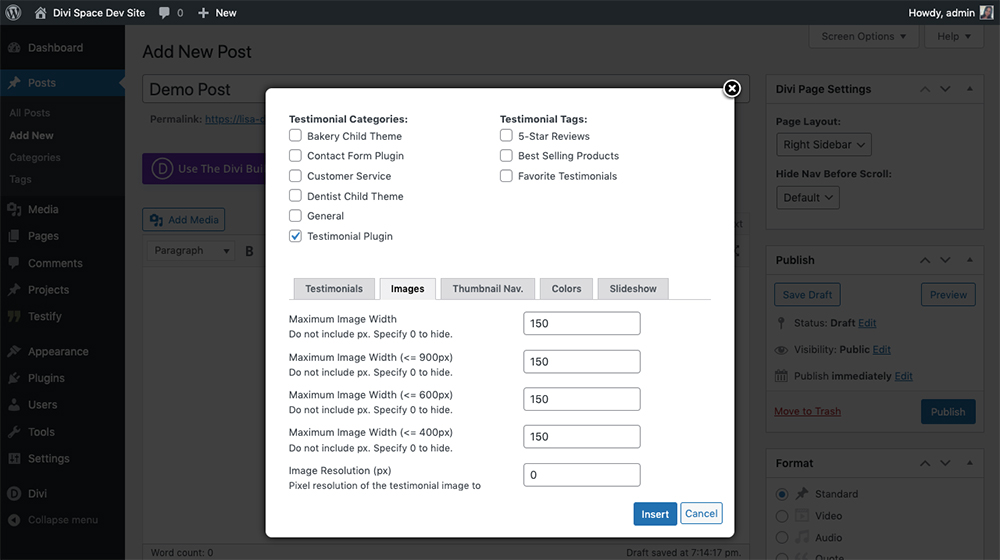
Set the image options
The settings here are:
- Maximum Image Width: Set the maximum image widths in pixels for all screen sizes.
- Image Resolution: Set the image resolution for the images in the thumbnails.
- Image shape: Set whether you’d like the thumbnails to display as circles or squares.
- Border width: Decide whether your images will have a border, and if so, the border width.
- Show drop shadow: Selecting this option will add a drop shadow to your testimonial thumbnail images.
In the third tab, you’ll find settings related to the navigation of the thumbnails:
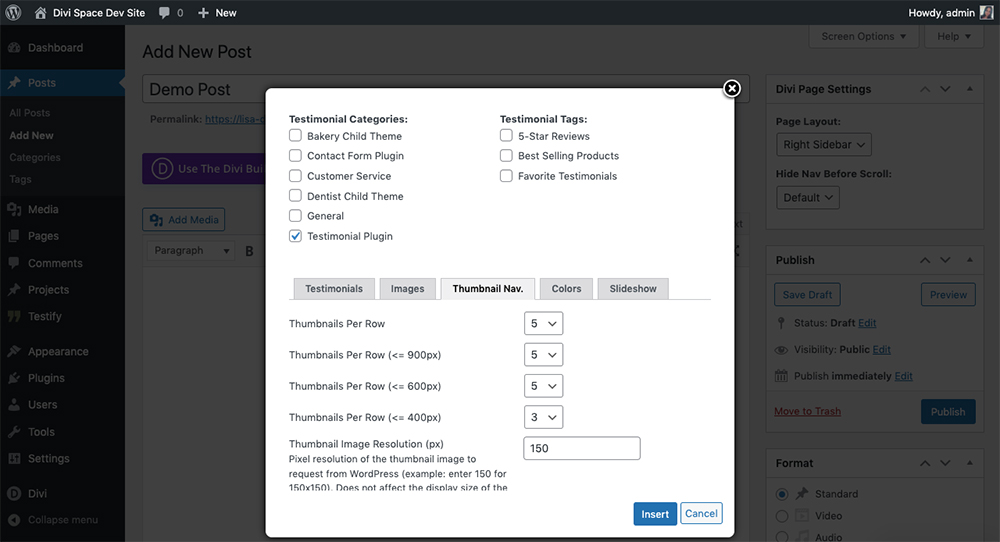
Set the thumbnail navigation options
Here you’ll find the following settings:
- Thumbnails per row: Set the number of thumbnails you’d like to display per row, also for each screen size.
- Thumbnail image resolution: Set the image resolution for the thumbnails.
- Thumbnail spacing: Set the spacing in pixels between the thumbnails.
In the fourth tab, you’ll find settings related to the color scheme of the testimonials.
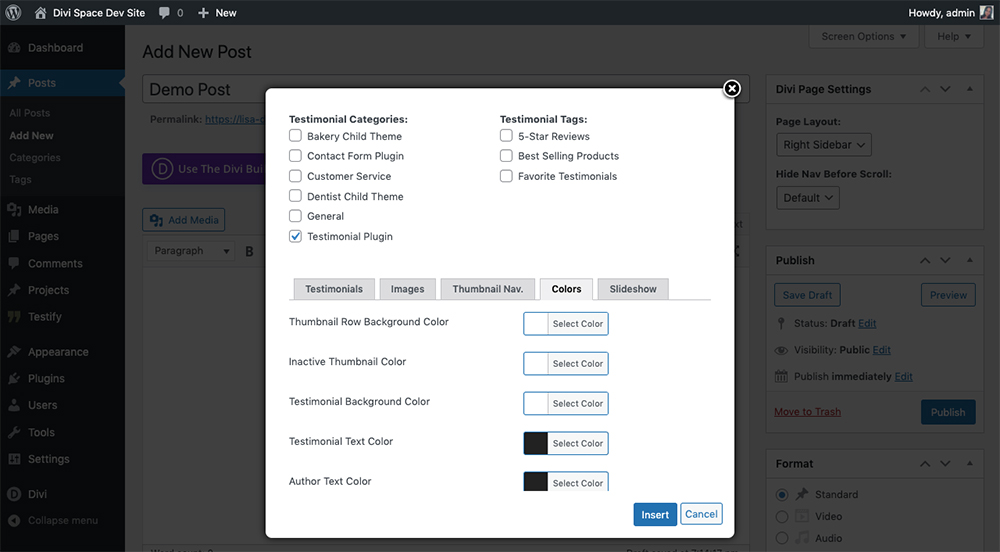
Set the color options
Here you can set the:
- Thumbnail Row Background Color: If you’d like a background color to display behind the thumbnails, select it here.
- Inactive Thumbnail Color: If you’re displaying multiple thumbnails, not just one, here you can set
- Testimonial Background Color: If you’d like a color to display behind the text of the testimonial, set it here.
- Testimonial Text Color: Set the text color of the testimonial text.
- Author Text Color: Set the text color of the author text.
- Quotation Mark Color: Set the color of the quotation mark.
- Separator Color: Set the color of the separator or divider that displays between the text of the testimonial and the author’s name.
- Image Border Color: Set the color of the image border that surrounds the thumbnail.
In the fifth and final tab, you’ll find settings related to the animation of the testimonials.
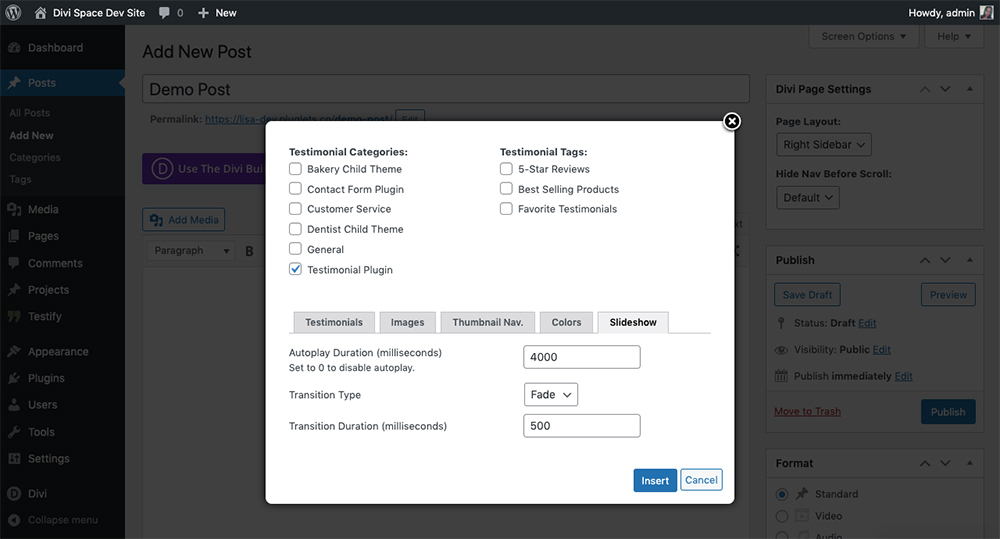
Set the thumbnail slideshow options
Here, you’ll be able to set:
- Autoplay Duration: Set the time in milliseconds that you’d like the autoplay to last for.
- Transition Type: Select whether you’d like to fade or slide through each testimonial, or whether you’d like no transition.
- Transition Duration: Set the time in milliseconds that it’ll take to swipe through each testimonial.
Once you’ve set all of the options to style your desired testimonial, click Insert. The shortcode will automatically generate. You can place this anywhere in between text or images on a page layout and the Testify testimonial will display.
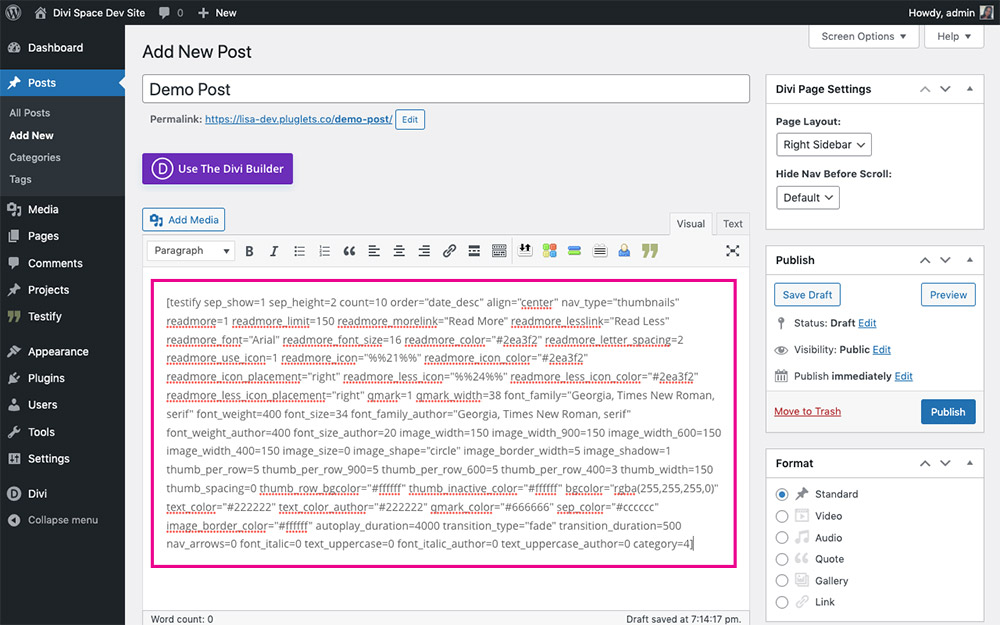
The plugin will auto-generate a shortcode
Here is an example of what the testimonial looks like on the front end.
By default, the testimonial slider will display as such
Styling the Testify Testimonial Using the Theme Customizer
If you don’t like styling the Testify testimonial from within the shortcode generator, you can style the plugin from the Theme Customizer. This will set site-wide styling for all testimonials.
To do so, open the Theme Customizer and click on the Testify menu.
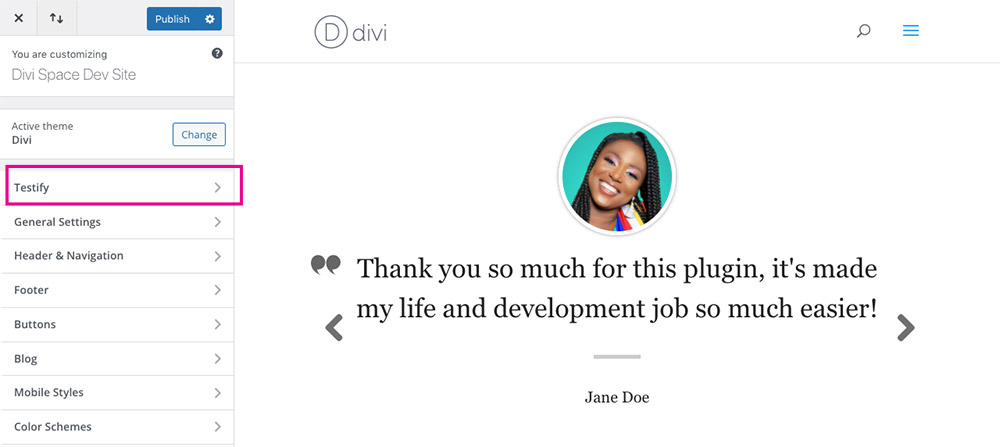
Click on the Testify menu
Here you’ll see the same menu options as the tabs in the Testify shortcode generator.
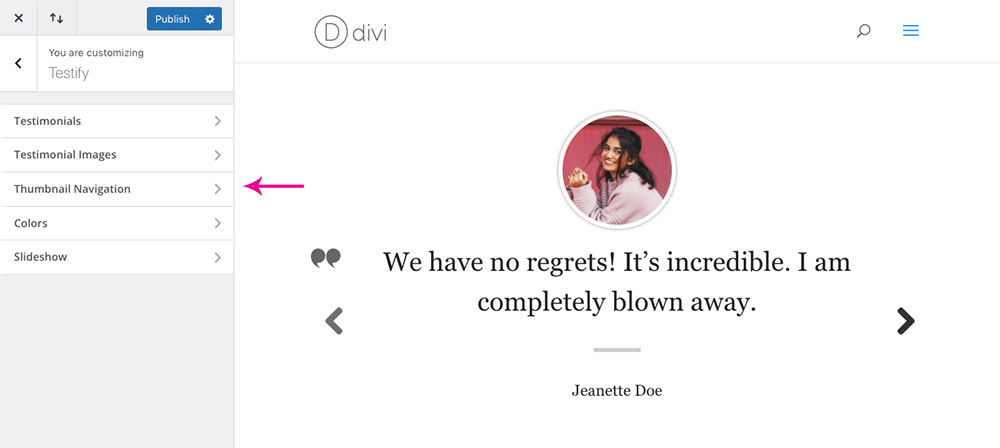
Open the menus to view the plugin setting options
For example, here are the styling options relating to the “Testimonials” tab in the Testify shortcode generator. Styling your testimonial this way is slightly easier as you’ll be able to see graphic changes as soon as they’re implemented and don’t have to generate a shortcode before previewing the changes.
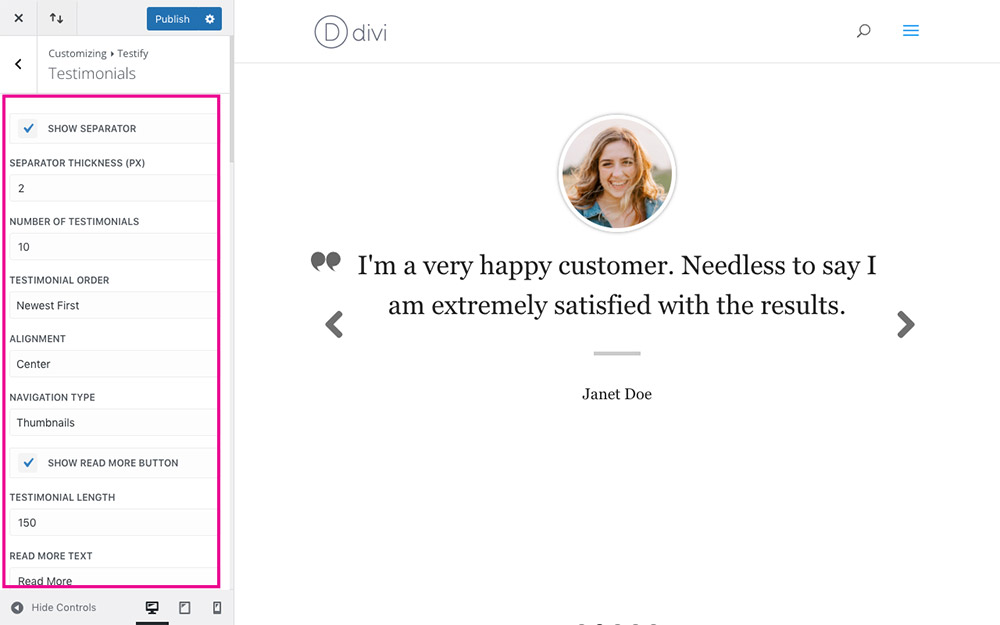
Use the Customizer to set the plugin
You could use the Theme Customizer to set site-wide styling for your testimonials and then the Shortcode Generator to create minor tweaks or design changes to give the testimonials a unique look and feel.
Examples of Testify Sliders
Here are some examples of the Testify testimonial slider in action. All of these layouts can be viewed and tested via the Testify demo page, and they come for free when you purchase the plugin!
Got plenty of positive feedback to share? Create a testimonial slider with multiple slides. The plugin can be set to automatically slide through each testimonial.
Create a testimonial with multiple testimonial slides
Next, here’s an example of a testimonial slider with a beautiful blue-hued background. It showcases only three testimonials, but takes over the entire section, creating a really attention-commanding feel.

Display a testimonial slider as the entire section to make the social proof really stand out
Here’s an example of a 2-column design where the Testify testimonial module is beautifully designed to work with background elements.

Create eye-catching layouts, use your testimonials together with and interesting visuals
Again, here is another great example of how you can play around with the designs of your testimonials. Here, we have the Testify testimonial juxtaposed with visuals and text, creating a really attractive section for a site.

Create a multi-column design and display your testimonial alongside other brand imagery
Finally, this example uses a really interesting shape to steer the eye to the testimonial copy.

Use an interesting shape as the background image to create a striking visual effect
The Testify plugin has so many styling options that you can create really unique testimonials that fit any brand identity or style guide. Every element is customizable, and you’ll end up with some amazing designs to showcase positive customer feedback about your brilliant products and services.
Each of the layouts showcased above are available as free JSON layouts when you purchase the Testify plugin. If you want to skip the design and styling steps, use our layouts to jumpstart your site designs!
Streamline Your Testimonial Submission Process
To help you save time and streamline the testimonial generation process, the Testify plugin includes an incredibly handy front-end submission feature.
With this, you can create a form and place it somewhere on the front-end of your site. As your customer fills out the form, entering details of their name, company name, position, picture and testimonial, the plugin will automatically capture their information and populate the testimonial entry on the back-end. Once the testimonial has been captured, you can review it and assign it to start displaying on the front-end.
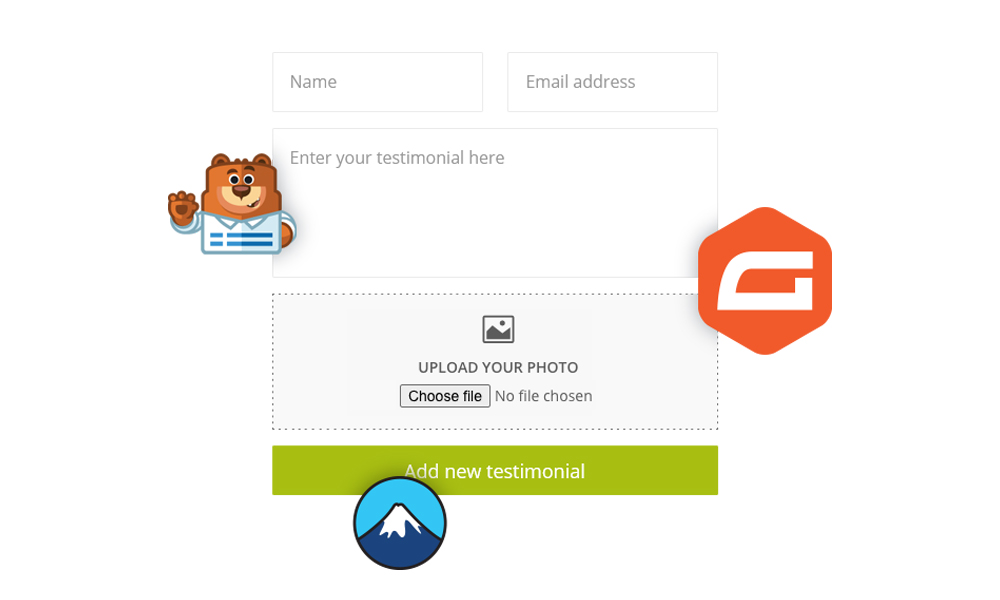
Create an easy-to-use testimonial form for your customers to submit their testimonials through
The URL with the form can be sent directly to your customer for them to fill out. Instead of you sending emails, requesting images, and having to manually enter a testimonial by copying and pasting information from one source to the next, Testify’s front-end submission feature takes all of the stress off your plate by streamlining this entire process for you.
It really couldn’t be easier to collect and display quality testimonials on your Divi site!
Ending Thoughts On Testify, the Testimonials Plugin for WordPress
Testify is an extremely easy plugin to use. There are no complicated setup or configuration steps, you can simply install the plugin and begin sharing testimonials on your website. Whether you prefer using the shortcode generator built into the editor, or if you prefer using the Divi Builder for real-time styling, you have ample options for displaying customer testimonials on websites. If you’re not a Divi theme user, the plugin will work with any WordPress theme.
If you’re looking for a simple way to create, display and showcase positive customer feedback and reviews on your site, Testify is the best Divi testimonial plugin around. You can also create an easy-to-use front-end form submission that’ll make submitting a testimonial a total breeze for your customer.
With two testimonial modules, including a slider testimonial and a carousel testimonial module, you can start building amazing testimonials for your website and showcase powerful reviews and social proof stories that’ll get you booked out and busy. Get Testify, the top testimonial plugin for WordPress. Head over to the Divi Space online store and purchase the Testify plugin!
Prices are $29 for a single site, $69 for unlimited sites, or you could purchase a membership (annual or lifetime) and get the Testify plugin along with countless others.
Need a little inspiration? Have a look at the Testify demo and see the stunning designs our team has made for you. Each example is included as a JSON layout when you purchase the plugin. Add your testimonials, select the layout, customize it to fit your brand colors and in minutes your site will be showcasing powerful testimonials that stop the scroll and bring you business.
Do you display testimonials on your site? Are you a Testify user? If you’ve created testimonials on your WordPress site, share your experience in the comments below! We’d love to hear from you!
Thanks for reading!

Recent Comments