Scheduled Email Reports for WooCommerce is a plugin for WooCommerce that lets you send reports created with either Product Sales Report or Export Order Items, both free and pro editions, to any email address. You have complete control over email customization and scheduling. You can even attach multiple reports to an email.
In this article we’ll walk-through using the Scheduled Email Reports for WooCommerce plugin and get a few ideas for use-cases. I’m using my normal “jump in head first” method so I can see how intuitive the plugin is.
Installing Scheduled Email Reports for WooCommerce

With WooCommerce and either Product Sales Report or Export Order Items installed, upload and activate the plugin.

Activating the plugin will open the settings where you’ll enter your license key. Paste in the key and click Activate.

This will open your welcome screen. From here you can create a new scheduled report or view your existing reports by clicking the links. There are also a couple of tutorials to create cron jobs if you have server issues with scheduling.
Scheduled Email Reports

Clicking on the report links takes you to the list of reports. You can also get here by going to WooCommerce in the dashboard menu and selecting Scheduled Email Reports. You’ll see your list of reports here. Select About & License to see the welcome screen. Click Add New to create a scheduled email report.
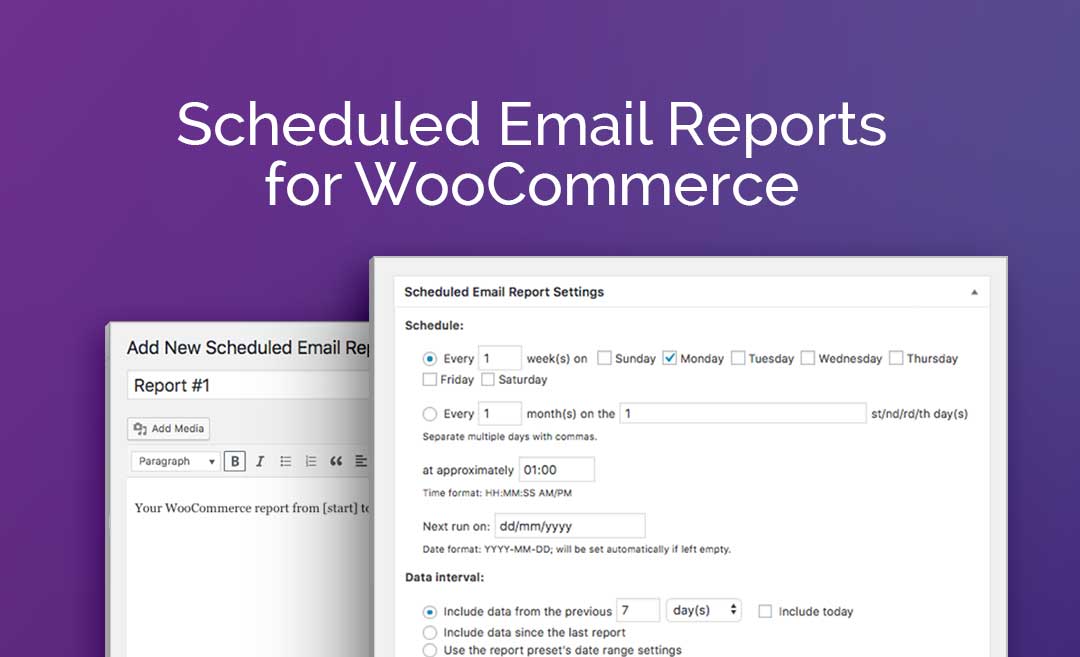
Add New Scheduled Email Report

The title is for your own reference. You can leave the shortcodes in the email body or customize it if you want. The default body shows the start and end dates of the report’s date range. The settings area includes the email address you want to send the reports to, the subject for the report, the heading for the email, the schedule, the interval for the data, and to include the last settings from the accompanying plugin.

Since the body uses the WordPress editor you can include just about anything here you want. I’ve included the two shortcodes for dates and added a message for the recipient of where to send questions. I’ve signed it with my name and a logo from an ET layout.
This is especially helpful if you’re sending the email to other team members and you want to include links, information, a checklist, embedded videos, etc.

Place as many email addresses as you want in the recipient field. Just be sure to separate them by commas. I’ve added three in this example.

You can use the date shortcodes in the subject line. I’ve added start and end shortcodes with a description.

For the heading just use something that makes sense to you.

You can schedule by the week or by the month. For weekly you can choose each day separately. For monthly you can specify as many dates as you want, just separate them by commas. Here I’ve set the schedule to send me an email twice per month on the 1st and the 15th at 8:00 AM.

The data interval lets you choose the amount of data to include in the report. Enter the number you want and choose from days, months, or years.

You have to enable the report to send it. Once it’s enabled it will show you the status of when it was last sent and when it will be sent next.

I’ve created three reports – weekly, quarterly, and yearly. Each one is scheduled to go out at a specific time and include data related to their time-frames. You can send each report to specific team members so they can use it as is appropriate. This is helpful because not everyone will need every report.
Sending a Scheduled Email Reports for WooCommerce Email

I set up a test email that included the body text and image, and a date range that covered from the previous three years. The image above shows the email that I received in my inbox. The email added a header that introduced the message and used WooCommerce branded colors. It also provided a CSV attachment.

The Scheduled Email Reports for WooCommerce plugin sends the reports to your email, but it doesn’t actually build the reports. This is why you need one of the plugins mentioned at the start of this article. This report was built using Export Order Items Pro. It creates a CSV file that provides the product ID, Product Name, Line Item Quantity, Line Item Gross After Discounts, Order Date, Billing Name, and Billing Email.
Scheduled Email Reports for WooCommerce License
You can purchase the plugin $19.99 for use on one website. The license key is valid for one year and includes updates and support. You can use the plugin after the license expires, but if you uninstall it you can’t reactivate it until you purchase a new license.
Ending Thoughts
Scheduled Email Reports for WooCommerce is easy to use. I never ran into problems or needed to look at the documentation. All of the settings are self-explanatory. If you can create a WordPress post then you shouldn’t have any issues using this plugin.
Even though the report is created with either Product Sales Report or Export Order Items and sent as an attachment, you still have the ability to design the body of the email. I also like that you can include anyone you want on the email and schedule the email for any time you want with any frequency you want.
If you’re interested in receiving your WooCommerce reports in email, Scheduled Email Reports for WooCommerce is worth a look.
Have you tried Scheduled Email Reports for WooCommerce? Let us know what you think about it in the comments.

Great tool. I’m in the process of creating a blogging site and this tutorial will be very helpful.