SVGs have grown in popularity, especially with the onset of responsive, mobile-friendly design. Great for small, simple images or graphics that don’t have too many complex elements such as logos, patterns or icons, more and more website creators are using SVG files in their designs.
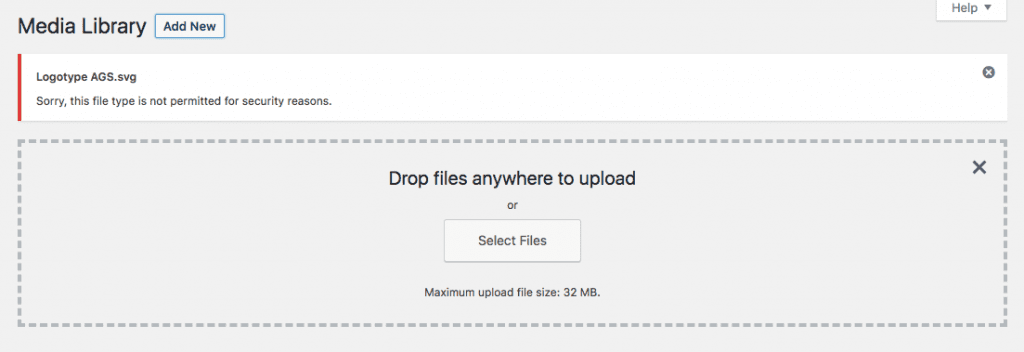
WordPress has a somewhat complicated relationship with SVGs – the CMS does not support the file type natively, for good reason. Even though WordPress does not allow for SVG to be added to the Media Library, there are a number of ways that users can add support for the file format.
In the following post, we discuss SVGs and share why WordPress does not support them. We also offer some methods for adding SVG support for a WordPress website.
What is an SVG?
SVG stands for scalable vector graphic. Unlike raster images (such as JPG or PNG, which are comprised of pixels), SVGs are vector graphics, meaning that they are comprised of easily-manipulatable mathematical constructs as opposed to pixels.
While most people that SVG is an image format similar to JPG, PNG or similar, they’re in fact a markup language (XML) that is used to create two-dimensional graphics.
For example, the code below is the XML used to create a red circle.
<!DOCTYPE html>
<html>
<body>

<h1>My first SVG</h1>

<svg width="100" height="100">
   <circle cx="50" cy="50" r="40" fill="red" />
</svg>

</body>
</html>
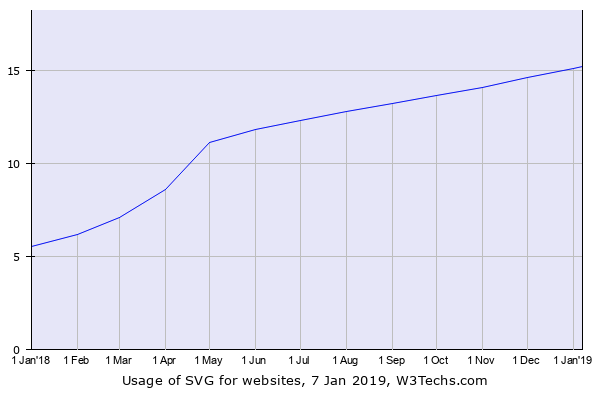
At the time of writing, SVGs are being used by 15.2% of websites. Due to the growing popularity of SVGs in design, this number is expected to climb rapidly over the next few months.
The Benefits of Using SVGs
Unlike other image formats such as PNG, JPG, GIF etc., SVGs have a number of benefits to the web designer:
- Picture quality. As SVGs are vectors, they can be scaled, stretched or shrunk without ever losing or compromising image quality, even on retina display screens. As they preserve their pixel-perfect appearance, SVGs are great for responsive web design. In comparison, raster image formats will look blurry or pixelated if scaled larger than the image size.
- Browser support. Browser support for SVGs is great, with all browsers knowing how to support the format. This means that a high percentage of your site visitors will have no problem viewing an SVG on your website.
- Animation-ready. Due to the format of the SVG file type, SVGs can easily be animated using CSS. If you’ve got a solid understanding of CSS, you can easily create an engaging and memorable animated element for your site.
- Small file size. One of the most vital aspects of web design is page load speed and website performance. SVGs have a far smaller file size as opposed to raster-type images and thus will help a website load faster and will not contribute to a slow website. Of course, SVGs can’t be used to replace all graphics on a website, but saving a few bytes here and there with small-sized graphics adds up in the long run.
If SVGs are so useful, then why are they not allowed by WordPress?
Why Does WordPress Not Support SVG Natively?
Small, compact, pixel-perfect and animation-ready, in theory, the SVG seems to be the best image format to use in a website, however, WordPress doesn’t support the file format by default. This is actually for good reason.
Disallowing the SVG file format is, in fact, a vital security measure as SVGs can be insecure and can put an entire site at risk. Described above, the SVG is not actually an image format as most people think, but is a document format (XML) that reads as code.
With this, SVGs can be scripted to include malicious code and other vulnerabilities or injected with malware. As this can pose a huge threat to a website, WordPress does not support the file type in its native state.
For further reading on the topic of SVGs and the threat to WordPress, read this in-depth article that explains the technicalities behind the SVG format insecurities in detail.
Thankfully, as the world’s leading CMS, WordPress provides a highly flexible solution for its user base. With this, enabling support for SVGs is a relatively quick and easy process, and can be done in a number of ways.
When working with SVGs, it’s important to only ever use original graphics that you’ve made yourself and not use random graphics found around or downloaded from the internet.
How to Create an SVG for Your WordPress Website
Creating an SVG can be a bit of a pain point in itself. Unlike other image types that can be made relatively simply using a phone camera for example, SVGs require a more complex creation approach.
SVGs can be created in one of two ways: either by using a text editor or graphic design software. The former entails a rather technical process, the latter is far simpler.
Graphic design suites generally come with a learning curve and often a price tag. One of the most popular graphic design programs, Adobe Illustrator, is available in the Adobe Creative Cloud suite, while alternate software solutions Inkscape and Vectr are free.
How to Use an SVG as a Logo in WordPress
Once you have created an SVG, you’ll need to enable support for the file format within your WordPress website. There are three ways that this can be done:
- Add code to your functions.php file
- Use the Divi Switch plugin
- Use a plugin from the WordPress repository
1. Add code to your functions.php file
If you are code confident, adding a few lines of script to your functions.php file is a quick and easy solution. The code below is from an article by CSS Tricks.
Simply copy the code below and add it to the functions.php file in your child theme.
function cc_mime_types($mimes) {
  $mimes['svg'] = 'image/svg+xml';
  return $mimes;
}
add_filter('upload_mimes', 'cc_mime_types');
If you don’t have a child theme set up, we suggest reading the following articles:
- Everything you need to know about using a child theme with WordPress and Divi
- What is the difference between a child theme and a premium Divi child theme
- How to use the Divi Space Child Theme Generator
Once you save the newly edited functions.php file, you’ll be able to add an SVG to the Media Library with no problem.
2. Use the Divi Switch plugin
An even easier solution is to use our plugin, Divi Switch.
Developed specifically for use with the Divi theme, Divi Switch is one of the most powerful plugins for Divi that helps you make changes to your Divi website at the flick of a switch.
Along with 50+ switches that can either be enabled or disabled in hundreds of different combinations, the plugin also includes a switch for SVG support. Here, by simply enabling the ‘SVG Uploads’ switch, you’ll be able to support the file type in a matter of seconds.

As well as enabling SVG support, Divi Switch offers countless other switches, each of which will help you build a super-powered Divi website. Other switches include, easily enabling an alternate logo on scroll, adding a custom maintenance mode or 404 error page, easily inserting content before the post content and much, much more.
Find out more about Divi Switch here.
3. Use a plugin from the WordPress Repository
If you’re looking for a simple solution for adding SVGs to a WordPress website and don’t require all of the features offered in the Divi Switch plugin, then have a look at one of the following plugins:
Both of the plugins listed above enable support for SVG files. Simply install and activate the plugin of choice and you’ll be able to start using SVGs with no hassle.
Read our guide for installing a plugin onto a WordPress website.
Despite WordPress not having the best relationship with SVGs, it is relatively easy for the average WordPress user to enable support for the file format.
With SVG support enabled on your WordPress website, you’ll be able to create and use vector images for your logos, patterns and icons, ensuring pixel perfect displays of your brand assets.
We want to hear from you!
Have you used SVGs in your WordPress website? Let us know your experience of SVGs by sharing your feedback in the comments section below.
Thanks for reading!

Thanks for this guide as I was out of options and I really needed SVG logo in my wordpress site. You saved me a ton. Keep up the good work.
Glad it worked well for you.
I love the fact that I can use a code embedded to the functions.php file. Saved me the hassle of using a plugin. Thank you so much.
Really easy and useful to know how to do it with child theme, worked like a charm!!! THANKS!!!
There are a number of articles about how to get WordPress to allow .svg file types (and the security risks associated with doing so) and I would recommend researching to be sure that this is the right approach for your site. Many of these solutions will work well if you re customizing a single theme where you can display the logo image using a CSS background.
I’ve gotten to the point where I can upload an svg no problem and can use them most places on the site. My issue comes in Customize > Site Identity > logo. While the svg logo is there, when I select it, it goes to a crop screen where cropping is the only option. But when you click on Crop, it gives an error that it can’t crop (because obviously you can’t crop an svg). However you don’t have the usual option to skip cropping so I’m stuck. Any ideas?
Your website has a bunch of good blogs, Really liked it.
Keep Sharing
Nice posting, thank you so much for sharing with us!!
I really appreciate you for sharing these that steps really worked great help.
Followed the exact steps worked like a wonder, Thanks Lisa