
Maintaining a website is almost as important as building one, and backing up a website is the most crucial step in the maintenance process. If you’re new to WordPress, the following post will teach you how to manually backup a WordPress site.
Keeping an up-to-date copy of your website is important. Your site could get hacked, it could fall victim to an attack, or you could make an error on the site; for example, something could break while you’re updating an aspect of your site. If you have access to a backup, you’ll be able to restore the backup, returning your website to its normal state.
In the following post, you’ll learn how how to back up a WordPress site manually. You’ll find detailed step-by-step instructions for exporting and saving your website’s site files and MySQL database.
There are other, easier methods for backing up a WordPress site, such as using a plugin for automatic backups, but it’s always good to know how to manually backup WordPress. Executing a fully manually backup once in a while is always a good idea.
Preparing to Backup a WordPress Site Manually
Manually backing up a website will require you to log into the server and export the two core components, the site files and database, from two different locations. The site files will be located within the File Manager console of your server, while your database can be accessed through phpMyAdmin.
For the below guide, we’ll be using cPanel as the server reference. If in the event your server is set up using a different platform, look for the same or similarly worded areas – File Manager and phpMyAdmin – in your user dashboard.
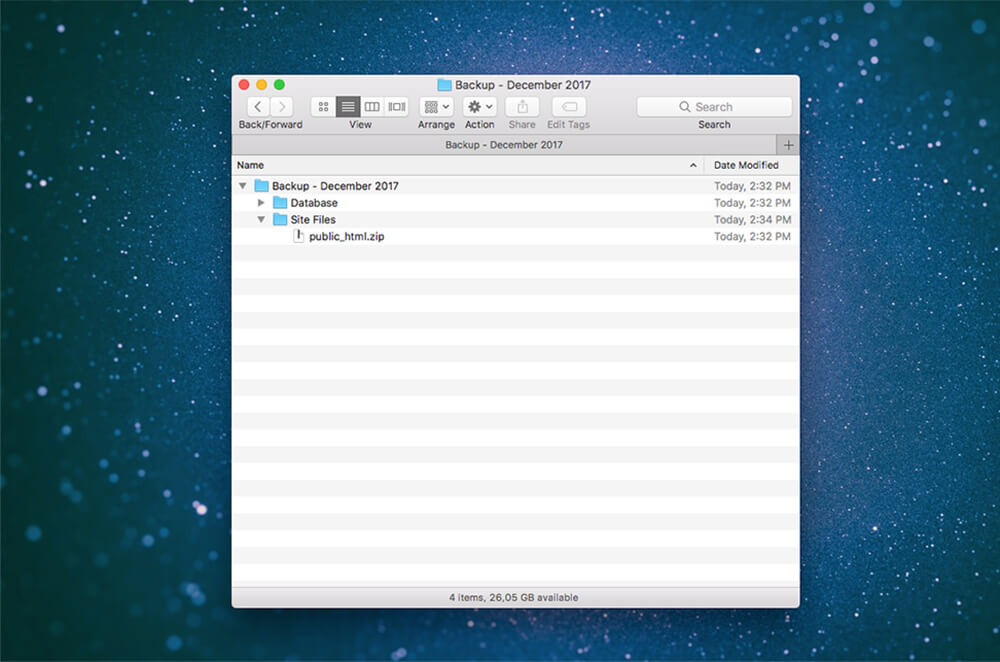
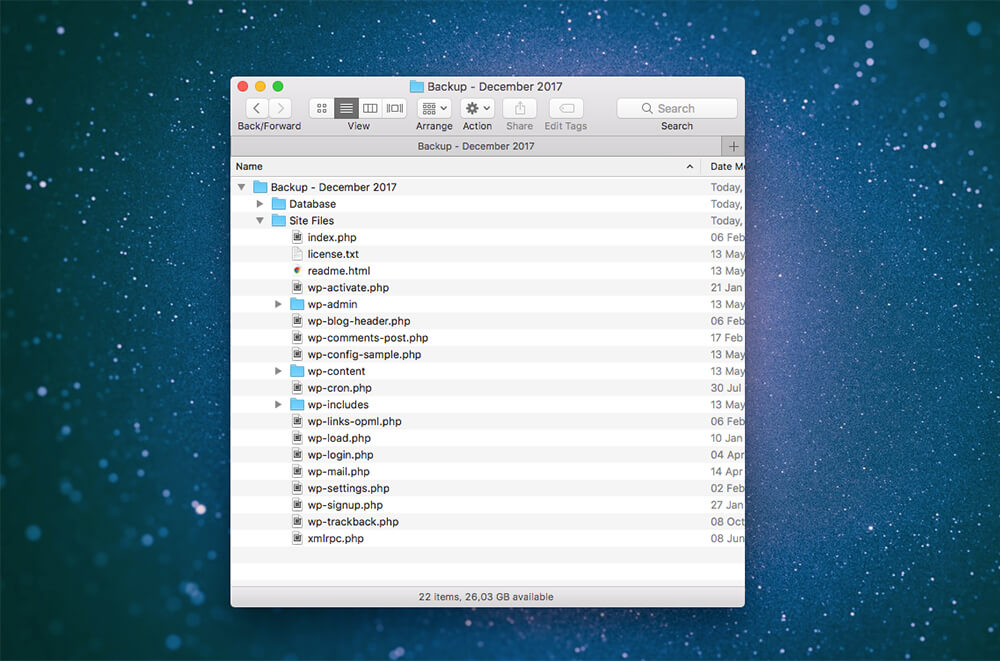
Before you begin, a good practice for this process is to create a folder on your computer and rename it as either your or your client’s business name and follow the name with the date of the backup. Within this folder, create two subfolders called “Site Files” and “Database”.
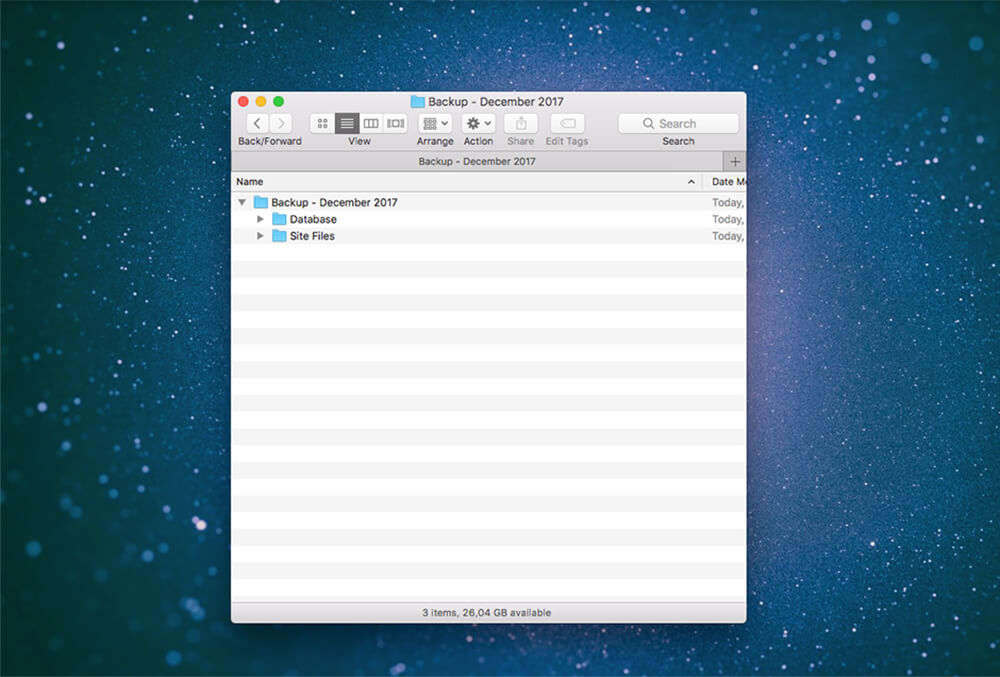
Create a folder on your computer titled ‘Back Up’ and the date
How to Manually Export Your WordPress Website’s Database
To begin, log in to the admin interface of your website’s cPanel using either your chosen login details or those shared with you by your client.
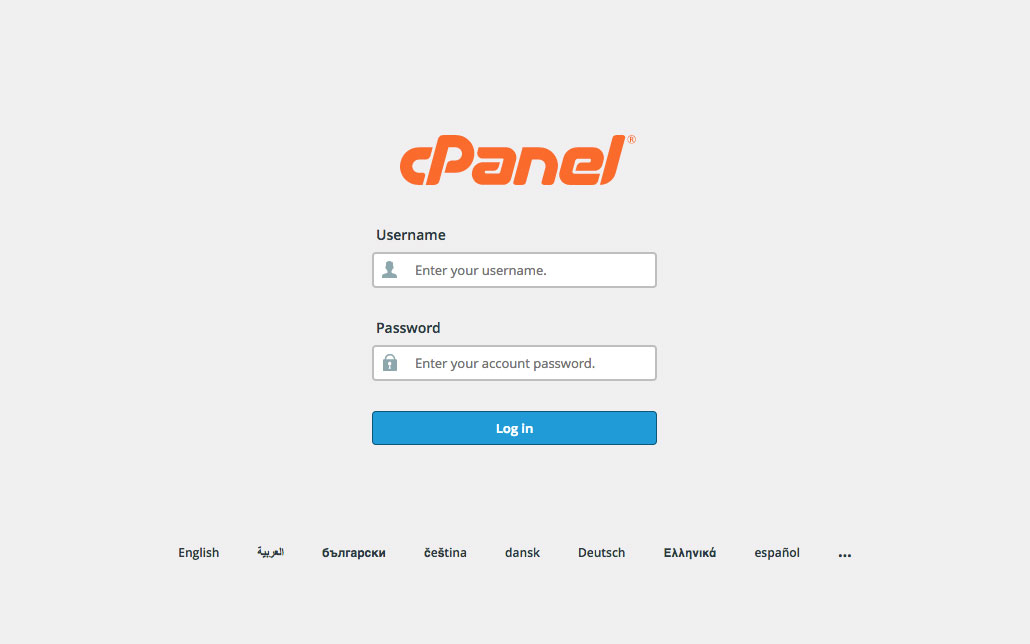
Log into cPanel
WordPress uses a MySQL database system to operate. Web developers can interact with the website’s database through the phpMyAdmin console. The database stores a number of indexes, users, tables and more, each which contain various systems and processes relating to the functioning of the website.
To export the database, click on the Databases dropdown and select phpMyAdmin. Once selected, the phpMyAdmin console will open in a new browser tab.
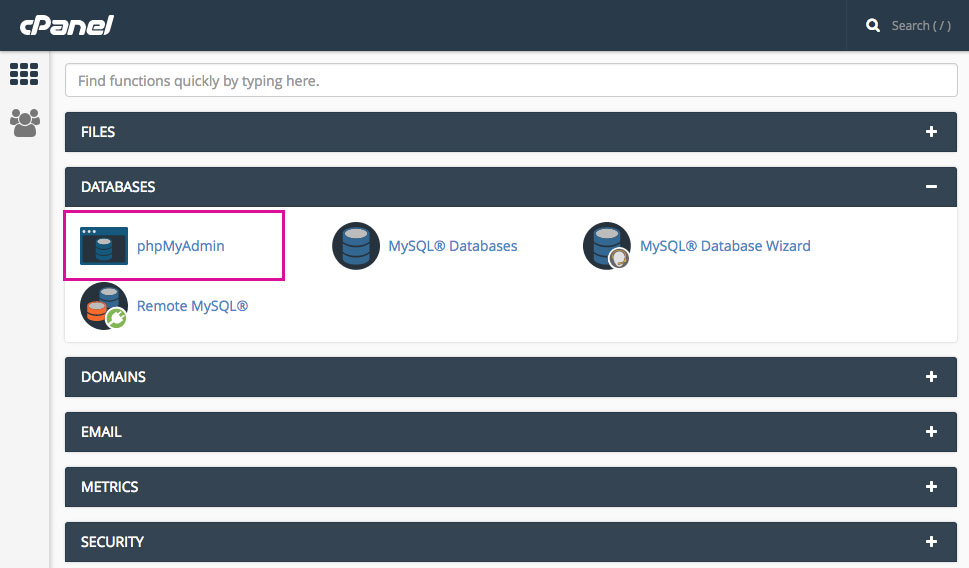
Click the phpMyAdmin tab
Once you’re inside phpMyAdmin, look on the left-hand side panel and select the database of the website. If the server itself is hosting a number of websites, you’ll see a list of available, linked websites. Once you’ve selected the correct database, the right-hand panel will display all of the tables associated with the site.
Now, click on the tab that says “Export”. Note, in other servers it may be required to scroll down to the bottom of the table list and click a checkbox that says ‘Select All’ before clicking on the “Export” tab.
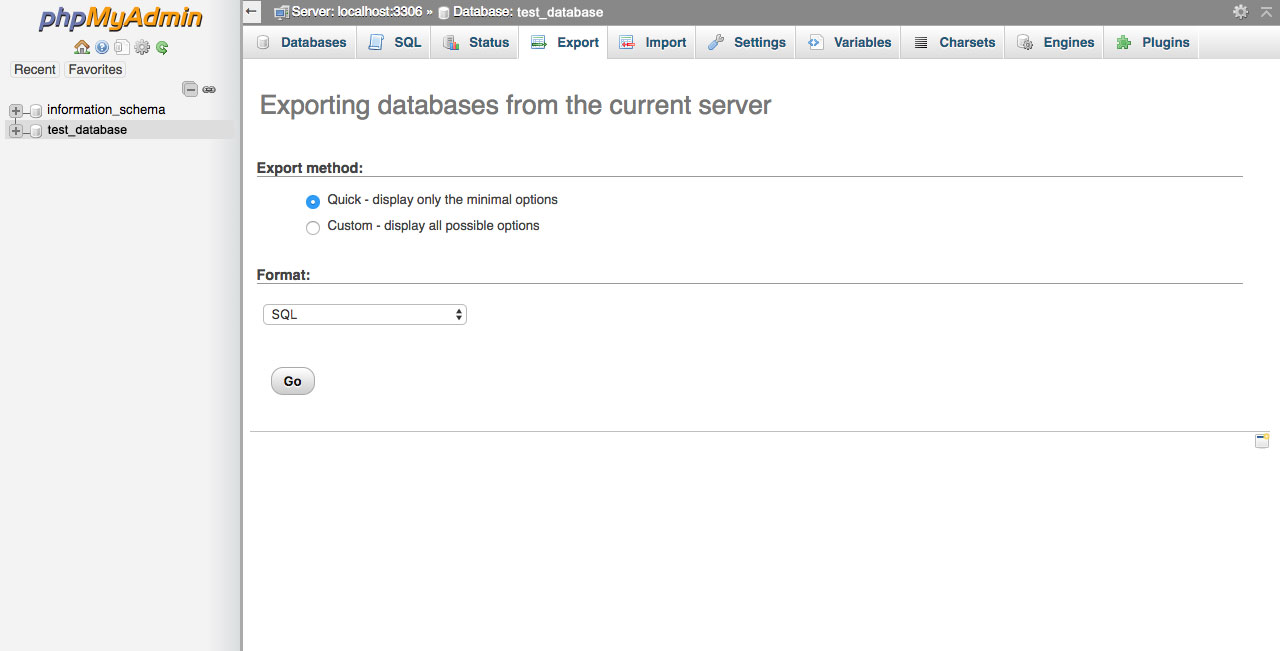
Select ‘Click’ and click Go
Once you’re in the Export console, you’ll be met with a few input options:
- Select Quick as the Export method
- Select SQL as the Format option
- Click Go
A file should automatically start downloading and will save to either your Downloads folder or similar. Once the download has completed you should see a file with the suffix .sql saved on your computer. Move this file to the subfolder named “Database”.

Move the .sql file to the ‘Database’ folder
For whatever reason, should the database not automatically download, it may display directly within your phpMyAdmin console. If this happens, simply copy everything in the display box and paste it into a new IDE file (Sublime, Brackets or your computer’s default TextEdit). Once pasted, save the file as db.sql, companyname.sql or similar, and move it to the relevant folder.
Great!
You’ve successfully exported your website’s database. The next step is to export the site files.
How to Manually Export Your WordPress Website’s Site Files
When exporting your website’s site files, the most common route is simply to use CPanel itself. In some cases, users may need to export the site files by using FTP.
Both of these methods are explained below.
Exporting Your WordPress Website’s Site Files Using CPanel
Once you’ve logged into CPanel, navigate to the dashboard and select the File Manager option.

Click the File Manager tab
In the File Manager, navigate to the right-hand column and select the folder named ‘public_html’. Note, you may have to move around between folders. Once you’ve located public_html, click on the folder name (not double-clicking on it as this will open the folder) and click Compress.
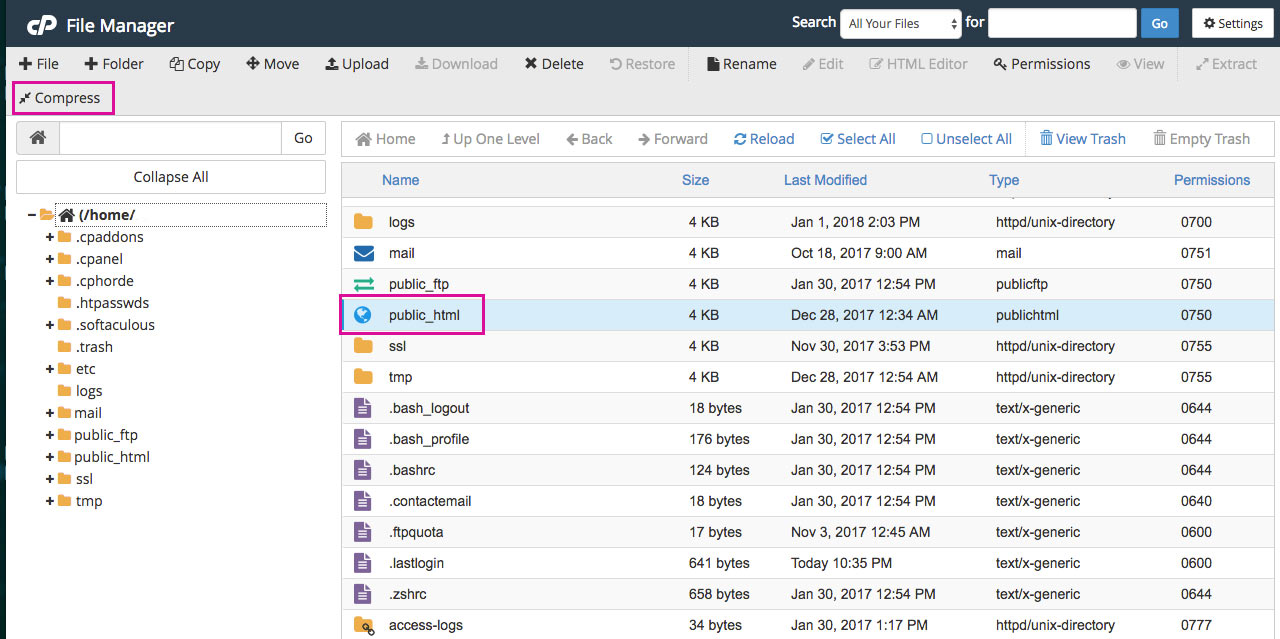
Compress the public_html folder
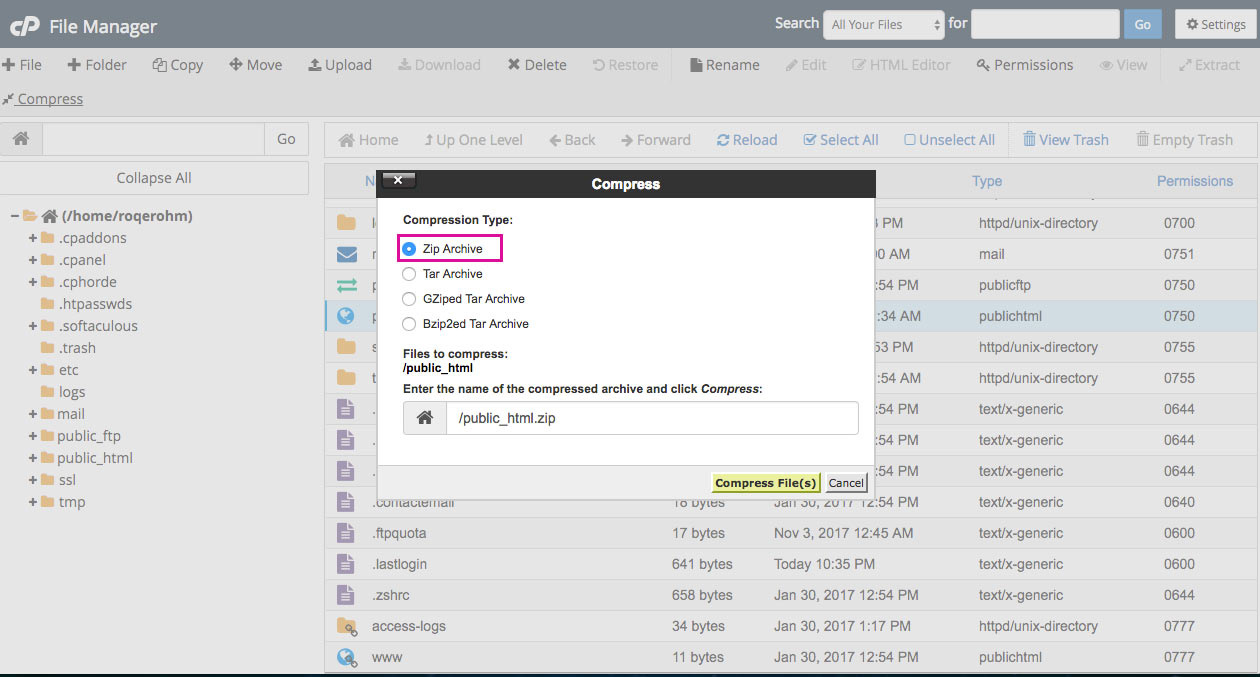
A pop up will appear. Select .zip Archive then click Compress File(s).
Select ‘Zip archive’
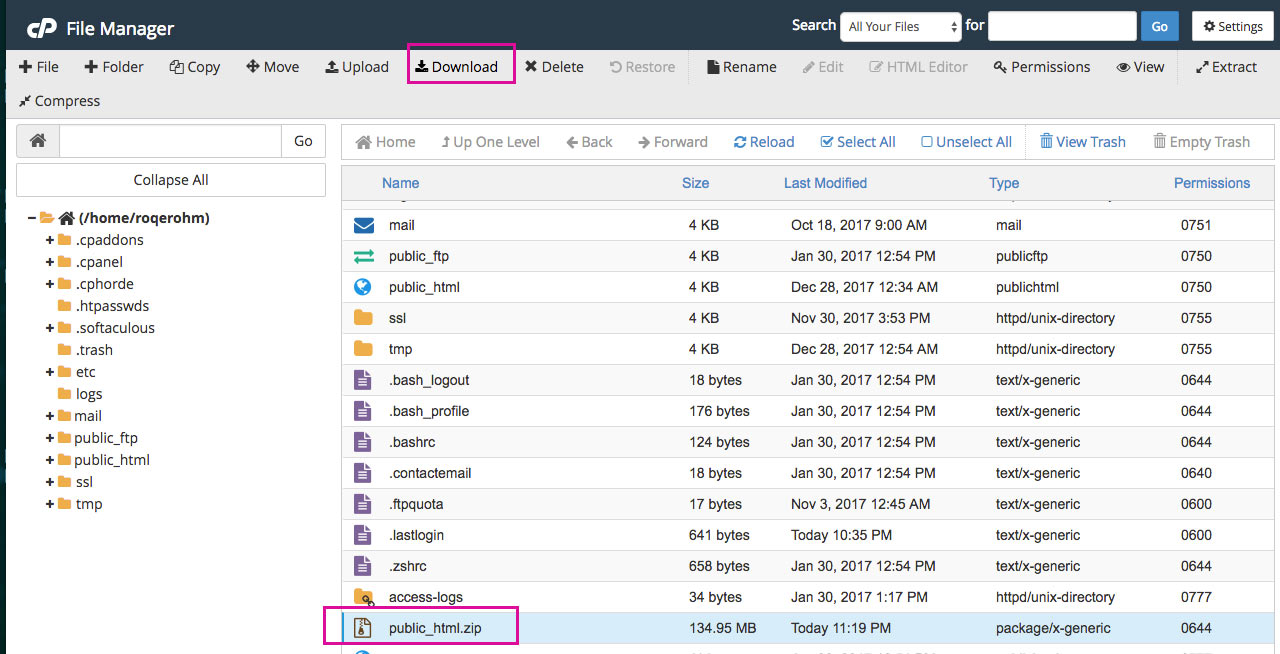
Once the files have been compressed, click on the ‘public_html.zip’ folder and click Download.
Click Download
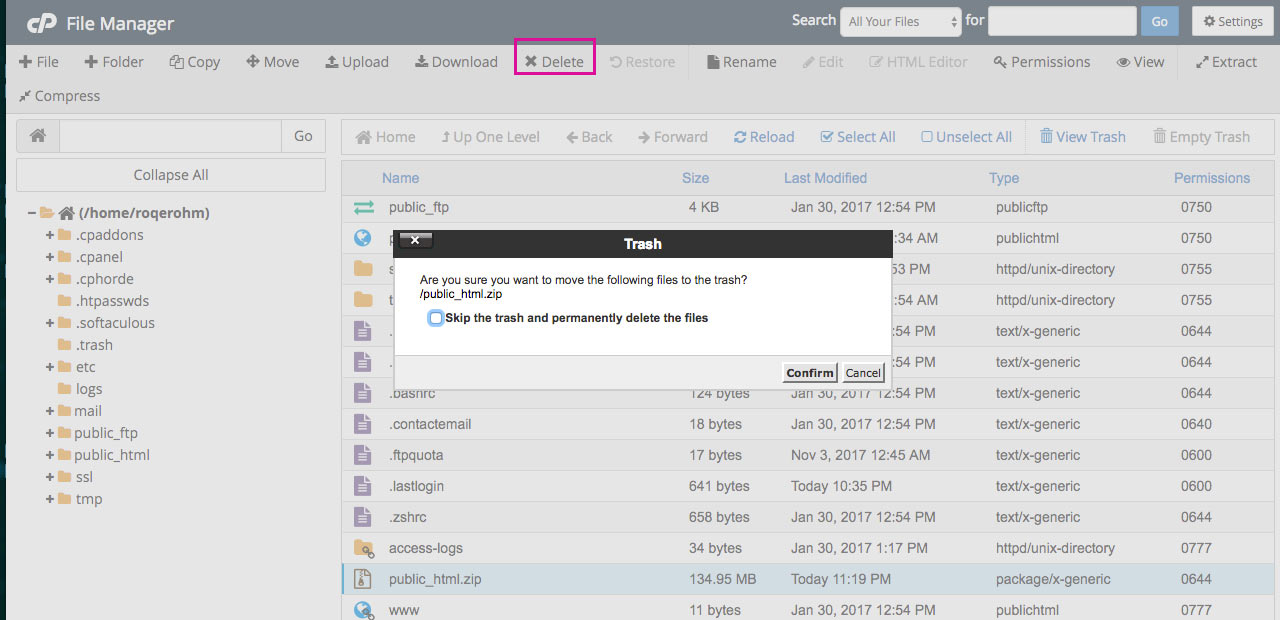
Once the download is complete, remember to delete the .zip file as it’ll take up unnecessary space on your server. To do this, click on the ‘public_html.zip’ folder and click Delete.
Delete the .zip file
At this point, locate the .zip file and move it to the Site Files folder.
Move the public_html.zip file to the Site Files folder
Great! You’ve successfully exported your website’s site files!
If you are unable to export the site files directly from the CPanel, you’ll need to use an FTP client to connect to your website’s server.
What is FTP?
FTP stands for File Transfer Protocol. This useful piece of software allows you to make a connection between a live website’s server and your computer.
With an FTP client, you’re able to access the live server, export and save the site files, and/or move the website’s files onto your desktop, and vice versa. A bit of a confusing interface at first contact, using the FTP client will become second nature with practice.
Two of the leading FTP clients are FileZilla and Cyberduck. Simply visit either of the respective websites, download the latest version of the software and install it on your device.
Once your FTP client has been downloaded and is up and running, you can connect to your website’s server in a few easy steps. For this demonstration, we’ll be using FileZilla.
How To Use FTP To Connect To Your Website’s Server
To connect to your website’s server, you’ll need the FTP login credentials. To locate these details, log into cPanel, navigate to Files and click on FTP Accounts.
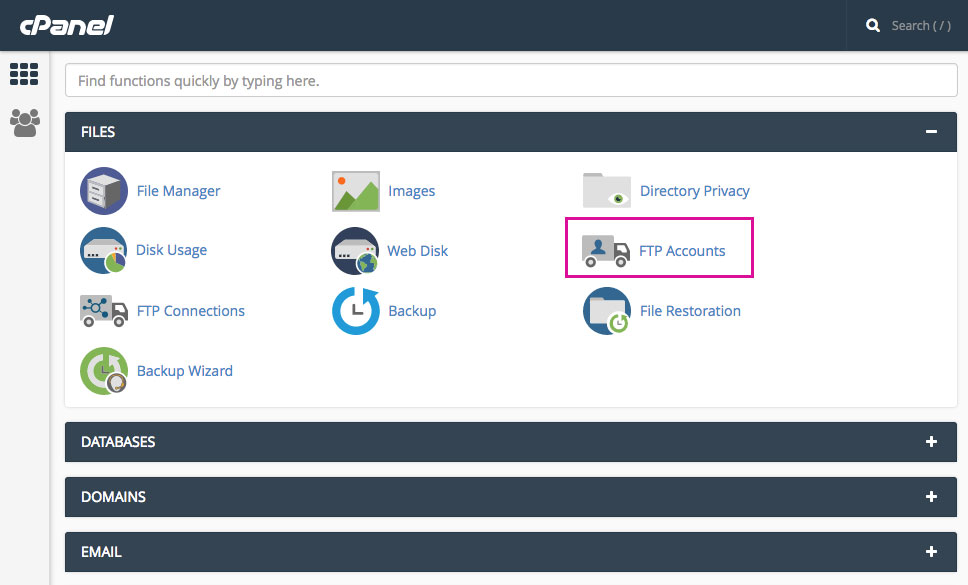
Click on the FTP Accounts tab
If you can’t find the correct login details, contact your hosting service provider.
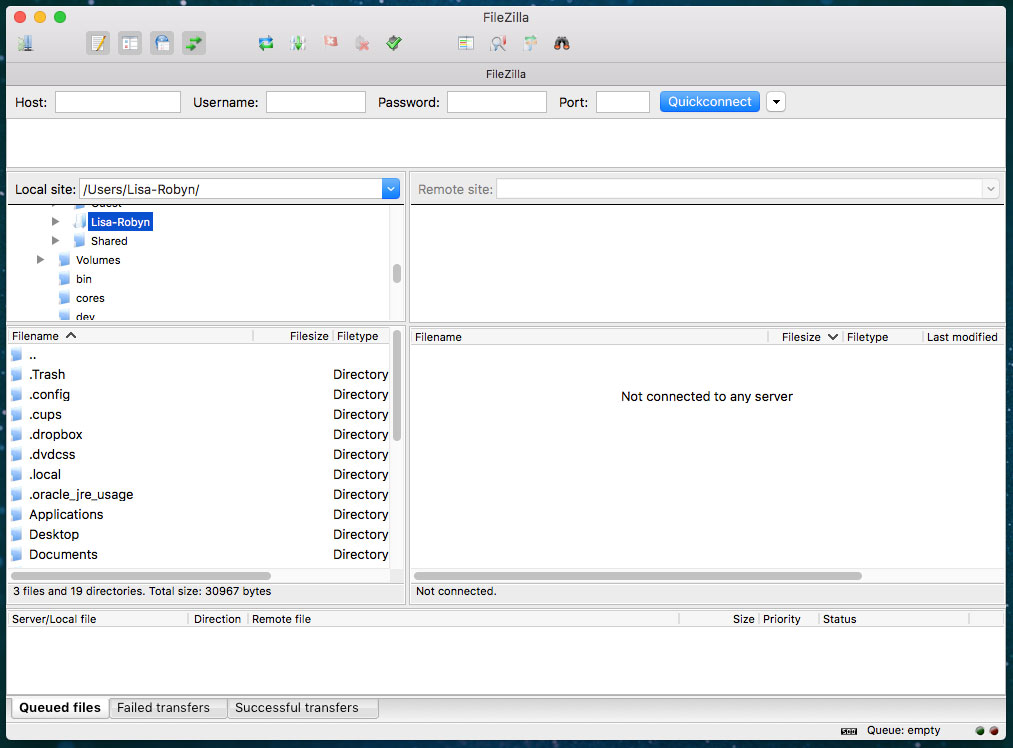
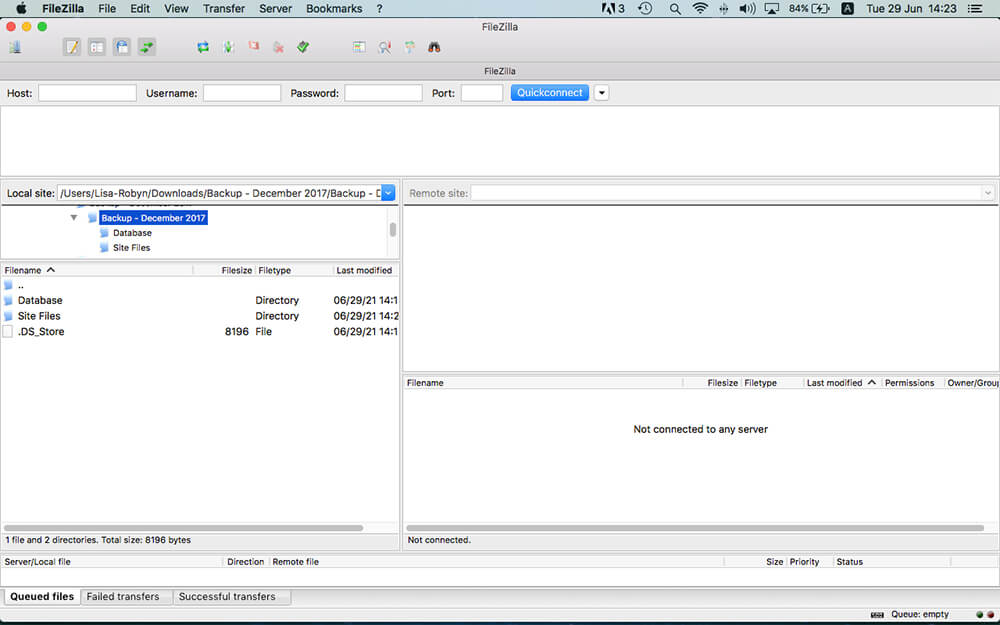
Once you open up FileZilla, you’ll see two panels:
- The left-hand side (the local site) is your computer
- The right-hand side (the remote site) is the server you will be connecting to.
Connect to your server using FileZilla or another FTP client
Now, navigate to File > Site Manager.
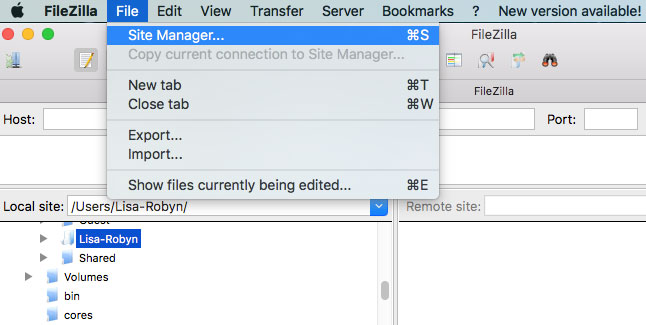
Click Site Manager
Next, a window will pop up. Click on ‘New Site’ and give the website a name.
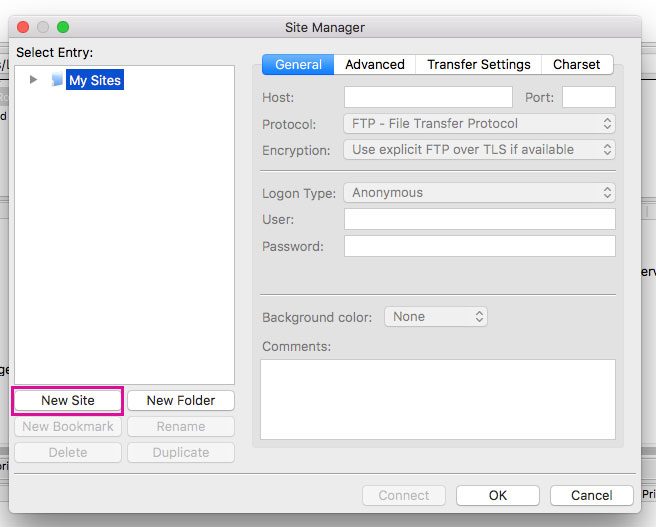
Click New Site
In the right-hand panel, you’ll be asked to specify a number of details:
- Host is usually the domain name of the website in question
- Select Normal as the Logon Type
- Enter the relevant details for the Username and Password

Connect via FTP
When you’ve entered all of the above, click Connect. FileZilla will save all of these settings so you won’t have to re-enter all of the information the next time you connect to the server.
Once you connect to the server, look under the “Remote Site” panel and you’ll see a list of your website’s files and folders. Click on the dropdown arrow and scroll until you see a folder named “public_html”. This folder is also called the root folder and it is the entire collection of your website’s site files.
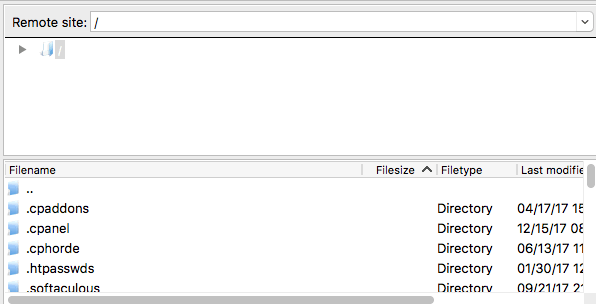
View all of the file in your website
If you’ve previously set up local sites or created a child theme, you’ll see that some of these files and folders look quite familiar.
This folder, the public_html folder, is what we’ll export for the backup.
How to Manually Export Your WordPress Website’s Site Files
Remember the folder on your desktop called “Website Name” with the subfolders “Site Files” and “Database”? Well, we’ll be transferring the contents of the public_html folder into the Site Files folder
In the FTP client, head to the left-hand panel and sort through the Local site (your computer) until you find the backup folder.
Select the Site Files folder
Next, go to the right-hand side panel and locate the public_html folder of the website you’d like to back up.

Select the public_html file
Now, click and hold on the public_html folder on the right-hand panel and drag it across to the Site Files folder in the left-hand panel.
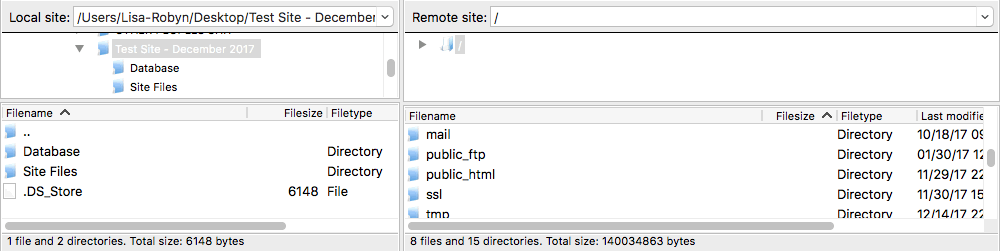
Pull the site files from your server to the backup folder on your computer
Let the transfer/export process run until complete (how long the process takes depends on your internet speed).
Finally, head on over to the “Website Name + Backup Date” folder. You’ll see that the entire public_html folder is there, as well as the SQL database in the Database folder.
Open the folder on your computer and you’ll see the site files have been copied across
Now that you’ve backed up the website’s database and its site files, you can rest easy knowing that you’ve safeguarded yourself and your client’s website.
How to Back Up a WordPress Site Using a Plugin
It’s quite a lengthy and round-about process to manually backup a WordPress website. Thankfully, there are several plugins available to help.
BackupBuddy and UpdraftPlus are two top-notch backup plugins that offer automatic backups to cloud storage. BackupBuddy is exclusively a paid solution, while UpdraftPlus comes in two versions, free with paid add-ons. You can also use a migration plugin such as All-In-One-WP Migration plugin, as this will export both the database and site files of your WordPress website.
It’s good to know how to backup WordPress manually, but going the manual route every time can be time-wasting. Make sure you have a good automatic backup plugin installed on your site.
How Managed WordPress Hosting Assists with Backups
If you’re looking for an even more hands-off backup solution, consider purchasing a managed hosting solution for your website. Managed WordPress hosting is web hosting specifically for WordPress websites. The servers have been specifically engineered to accommodate the WordPress environment, and at a price higher than standard hosting solutions, the service comes with several premium features.
One of which includes automatic backups. Each day, your managed WordPress host will run an automatic backup of your website. These backups will rest within the hosting console itself, so there’s no need to dedicate cloud storage or space on your computer for the backup files.
Our managed WordPress hosting, Divi Space Hosting, offers automatic daily backups of your site. If ever you have a problem with your live site, for example, a plugin update has caused your website to tweak out, you can quickly log into your Divi Space Hosting profile and restore a backup at the click of a button. This usually takes a few minutes, depending on the size of your website. Once the restoration is complete, your site will return to the former version at the time of the backup.
Ending Thoughts
Knowing how to run a full manual backup of your WordPress website is extremely important. Even if you have a backup plugin running in the background or have invested in managed WordPress hosting, you never know when you’ll need to jump into your server and export the site’s files and database.
We hope you’ve enjoyed this tutorial and that it’s helped you back up your WordPress website. If you have any questions or comments, share them below – we love receiving your feedback!
Thanks for reading!

It is true that wp migration in addition to requiring updates, and bugging, it became paying. Thankfully there are tutorials like yours. You are a life saver! And in addition this way of doing is eternal
Ty 🙂
All in One WP Migration is free but a paid extension is required if your site is over a certain size. We have never had any issues with bugs.
best post for backup guide of wordpress websites
If I need to restore my WordPress files (WordPress website) from backup… should I just restore the database file and public_html folder from backup? Will the site work properly or i have to do anything else ?
In theory that should work, however there are other variables to consider that are handled by migration plugins like changing permalinks
Restoring isn’t covered because it’s a WAY different animal than backing up. You would think simply putting the files back, in reverse order of how you backed up, is all there is to it. Not so. There are multiple files that have to be tweaked (wp-config.php, for example) after the restore in order for things to work the way they used to before a restore became necessary. That aside, (the article is about backing up, after all) this is a wonderful, detailed article. Thanks!
Clean Instructions. Thanks a ton!
In case I need to restore my WordPress files from backup… should I just restore the database file and public_html folder from backup? Will the site work or anything else is required?
Many many thanks for this amazing tutorial dude! It helps me a lot for backup my site. I will share this post to my website. Thanks
Hey, successfully done! Can you share how can I use this backup to restore my site incase something happens?
Thanks 😀
Very helpful, thank you Lisa-Robyn.
I am reminded that a backup is only as good as its restore. Now that I’ve backed up my site, how would I restore it… something I hope is never needed! 🙂
Just done it! Didn’t expect it could so easy.
How to upload/migrate the files to a new server?
This was just what I needed, I guide I could understand and follow. Thanks so much!
Thank you! This was a huge help and very simple to understand. Thanks
Hi, Since you have done this recently, did you experience
– a compress process that never ends, but when you close the file manager and reopen, the zip file is there, compressed and ready to download?
– a downloaded zip file that is smaller than the zip file in the file manager, three quarter the size?
Or did I maybe do something wrong…?
Thanks 🙂
Thanks for sharing this info.. Really helpful..
I have never come across any article as detailed as this on this topic. Very easy to follow, thanks alot
Thanks for the useful information. I was struggling with the same issue with my WordPress site. Thanks a lot!!
Anyways can you suggest me some better option to get cheap Linux hosting other than redserverhost.com
Easy, Awesome, Informative post
God Bless Lisa 🙂
Dear Ms. Lisa, I am new to WP and your step-by-step guide is very helpful and easy.
Thank you!
Thanks for the detailed post, Lisa. The importance of website backups can never be mentioned enough.
Bonnie
Fantastic article! I followed the steps one at a time and was able to do it without a hitch (via direct, not FTP). Thank you SO very much for the clear instructions with screenshots!
Thank you! This was a huge help and very simple to understand
Hey, I really found this post quite interesting, very helpful. Following your approach I had managed to move 2 website to another hosting . Keep it up 🙂
Manual process to backup a site is the most secure and 100% trusted method. Thanks for sharing the article, it helped me a lot.
And now, how to manually restore the backup in other server? Do you have another Step-by-Step Guide to to this?
Hello, we do not have a tutorial on this but will add it as a suggestion on our editorial calendar. Thanks!
Step-by-step was exactly what I needed. Thank you for saving me from googling things.
Is there any process to do it automatically done in a weak?
Great post you have here Lisa-Robyn Keown. You really clarified me with the hitches I always encounter with cpanel backup.
Thank you,
Thanks a lot for this detailed blog post! I also use Plugins for automated backups which is working fine. But just to be on the save side it is good to know how to do it manually since there can also go something wrong with the backups made by the plugins!
Happily I never had to use my backups. But it is on my list for testing for when I will need it 😉 Therefore, I also would love an article about “how to restore WP manually” and what pitfalls to avoid.
THX for the great content!
Hi,
Which pulgin you have used? I have to move my hosting server so I need to backup my wordpress.
Thanks,
Gyan
Hello,
Thanks for this. It’s simple when it’s well explained with screenshots!
I keep this page in my favorites.
Do you think you write more….Could you write a second article to explain “how restore a wordpress site with your manually backup (step by step) ?
It would be great!
Thank you very much,
Nathalie
Great post. I find it’s just easier using automated tools to backup websites. I have had clients try doing it manually and they end up screwing up the entire website. Thankfully, the web hosts are often able to help out in minimizing what could have been serious disasters.