
A contact form is one of the most important components of a website and provides a vital line of communication between a business and its customer base. If the contact form is not reliable, a company can miss out on important customer correspondence like presale inquiries, technical support requests and more, ultimately costing them hundreds or even thousands of dollars.
WordPress has dozens of contact form options available in the plugin repository and the Divi theme includes its own native contact form module, so that no 3rd party contact form plugins are required. While Divi’s contact form module may not be as robust as other 3rd party solutions, like Gravity Forms or Ninja Forms, it is still a very well developed and useful tool that should be considered by Divi web designers.
As a moderator of the Divi Theme Users Facebook group consisting of nearly 75,000 members, some of the most frequently asked questions I see are ones like, “The Divi contact form is not working, how do I fix it?” or “my Divi contact form is not sending emails, what is wrong?”. While it is a logical first response to think that something is broken with the Divi contact form module itself, the truth is that in most instances it has nothing to do with that at all, and you will likely experience the same issue regardless of the WordPress contact form solution you are using. In this guide I will walk you through how to troubleshoot and try to figure out why the Divi contact form module is not sending emails and how to fix it.
Let’s get started…
Check to make sure the Divi contact form module settings are correct
While this may seem like a no-brainer, double-checking the contact form module settings is an important step that should be taken before you dive into more extensive troubleshooting steps, so as not to waste your time.
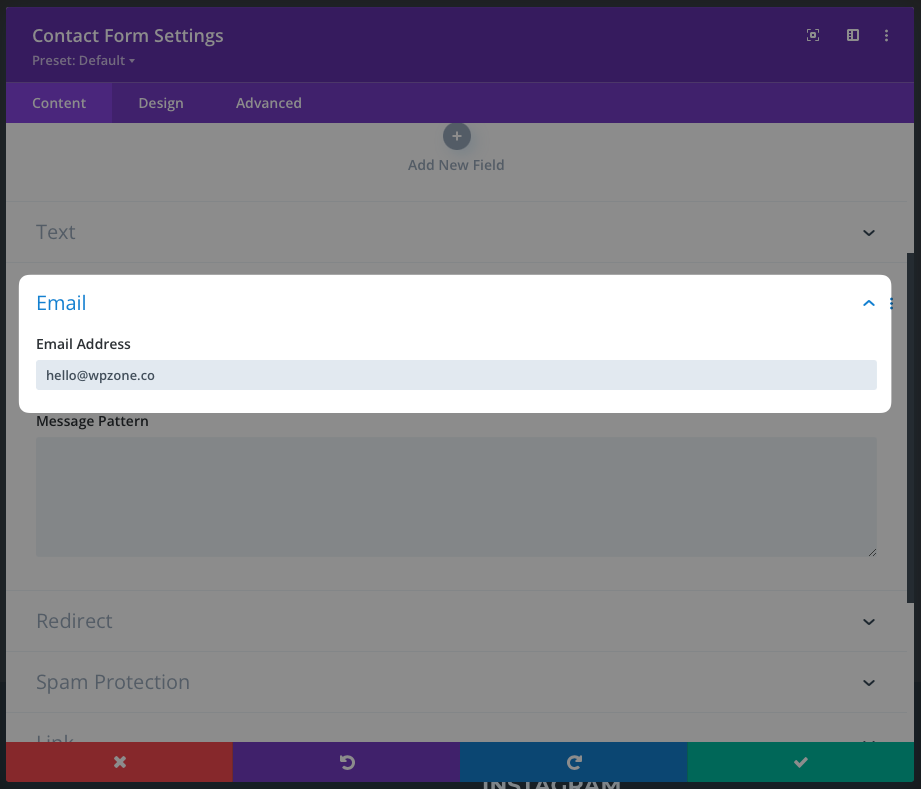
The first thing you should check is that the email(s) in the Divi contact form module settings is correct. Having a typo in the email address field is an easy mistake to make (I have been guilty of it myself) when you are burning the midnight oil trying to meet the deadline of a web design project.
To do this, click open the settings of the contact form module and under Content > Email Address you will find the email address field. Check to make sure that the address is correct and contains no typos.
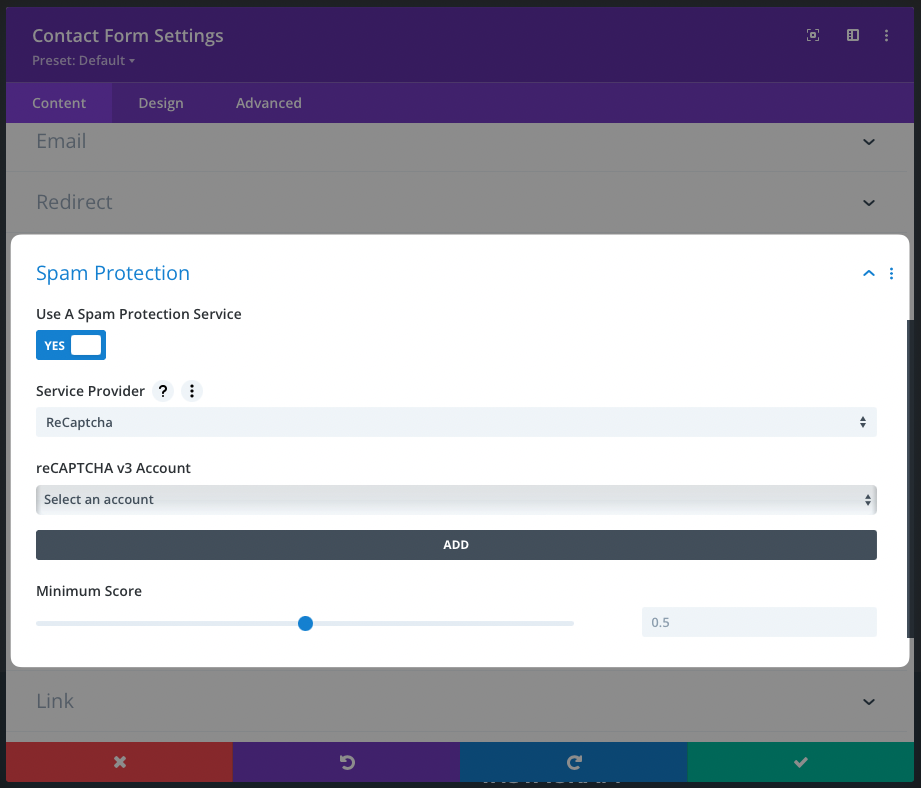
The next thing to check within the Divi contact form module settings is the Spam protection minimum score. If you are using Google ReCaptcha for Spam protection and have the “minimum score” set too high, your contact form may be flagging legitimate Divi theme contact form entries as Spam and not allowing them to be sent. In this case, you can try lowering the Spam protection minimum score setting and testing again or try temporarily disabling it to rule it out as an issue altogether.
Test to see if your WordPress website is capable of sending emails
When emails aren’t being received from the contact form module, users are quick to blame the Divi theme itself, but in most cases the issue has nothing to do with Divi at all. By default, WordPress relies on the wp_mail() function to send emails. Many quality managed hosts have intentionally disabled the wp_mail() function due to its unreliability and the fact that it is prone to abuse and can allow spammers to have a field day with contact forms on your WordPress website. In other words, many hosts are disabling this function to protect you and not to make your life more difficult.
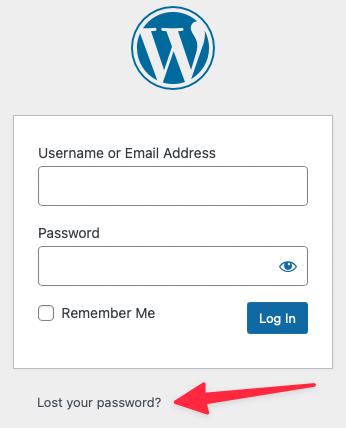
The easiest way to test and see if your WordPress website is sending emails is to request a password reset from the login form. While logged out of your WordPress website, visit yourwebsiteaddress.com/wp-login.php, click the “Lost your password?” link.
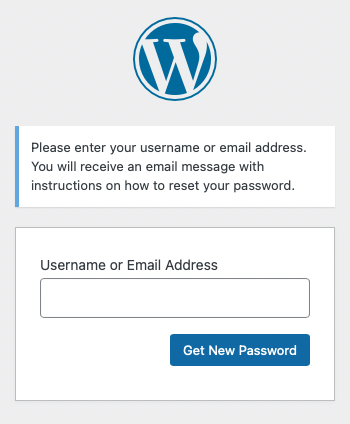
In the following screen, enter the email address associated with your user account on the website and click “Get New Password”
After you have submitted the password reset from the website, check your email inbox to see if you have received the message. In certain cases it may take several minutes for the email to be received. In other cases the email may have been marked as Spam by your email provider, so be sure to check your junk folder as well.
If you do not receive the password reset email or it went to Spam then I highly recommend you move on to the next steps in order to solve the problem.
The solution: Install and configure a SMTP plugin
Even if your Divi WordPress website is sending emails just fine using the native wp_mail() function, I am still a big proponent of utilizing a SMTP plugin. It certainly isn’t going to hurt anything and it will give you peace of mind that the emails being sent from your website and your Divi contact form module are being received and not going to Spam.
In the case of your website not sending emails at all, utilizing an SMTP service will most likely correct the issue with minimal effort on your part so you can move on to other things.
While there are a large number of SMTP WordPress plugins and services to choose from, at WP Zone we use and recommend SendGrid. SendGrid is a service that offers transactional and marketing email options as well as an SMTP server that is free to use up to 100 emails/day. For most users the free version of SendGrid will offer more than enough emails a day and for websites exceeding that amount, the service is very affordable. Here at WP Zone we send an average of 300 emails daily and only pay around $15/month – Well worth it for the peace of mind! Beyond that, SendGrid also offers you advanced statistics like Open Rates, Click Rates, Bounce Rates and more.
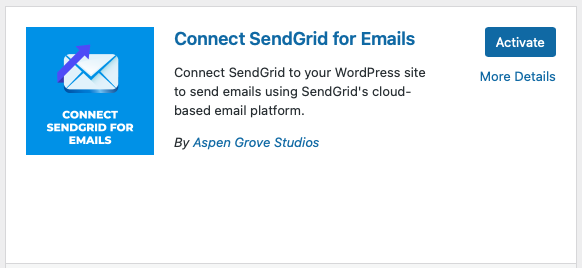
Step 1: Install and activate the Connect SendGrid for Emails plugin
When we first began using SendGrid as an SMTP provider for our website they offered and maintained their own plugin in the WordPress Repository. For whatever reasons, SendGrid decided to deprecate the plugin and no longer maintain it and eventually not offer it at all. In our mind, the plugin was easy to use and worked great, so we decided to fork it and maintain it ourselves. Our version of the plugin is kept up to date so that it is bug free and secure.
To install the Connect SendGrid for Emails plugin while logged into your WordPress Dashboard, visit Plugins > Add New. From there enter “Connect SendGrid for Emails” in the search box and then click “Install Now” once the plugin search has populated.

Once the plugin is installed you will be asked to activate the plugin. Once activated the plugin settings can be found from your WordPress dashboard under Settings > SendGrid. We will return back to the plugin settings in just a bit.
Step 2: Create and configure your SendGrid account
First thing’s first, you need to sign up for SendGrid and create an account. As mentioned, SendGrid is free up to 100 emails/day so you are not required to enter your credit card information.
Once you have completed the signup process you will be asked to create a sender. Please note that since you are using SendGrid as an SMTP service and not using it to send promotional emails, this step is not required so you can hit the “cancel” button during this step. Information such as your “From Email Address” and “Reply To Email Address” will be configured when we return to the plugin settings in a later step.
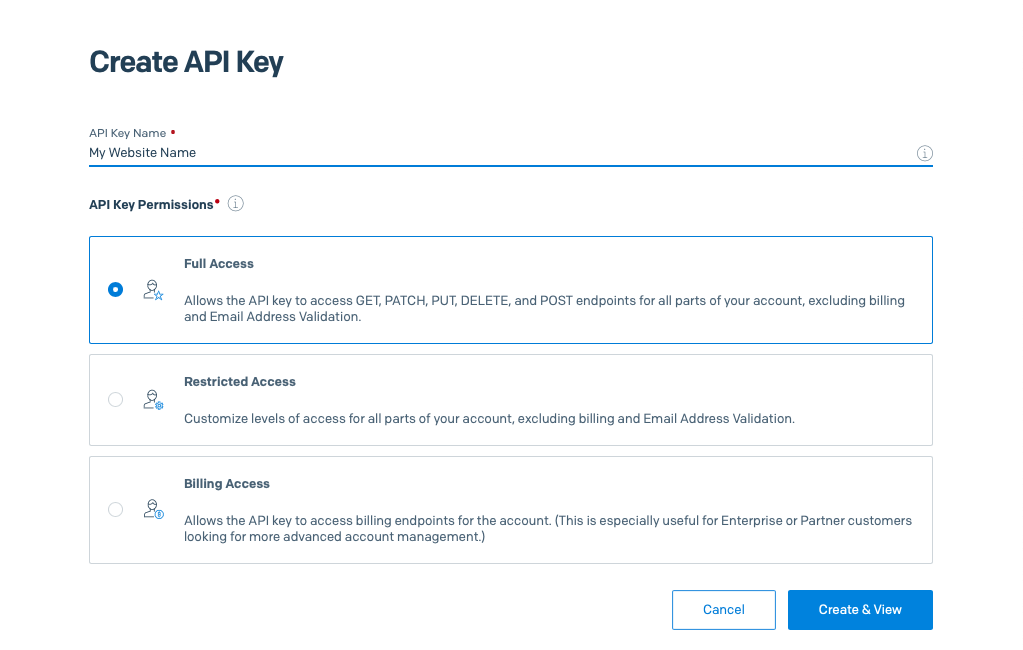
Next you will navigate to Settings > API Keys and then click “Create API Key” in the upper right-hand corner. In the next screen you will be asked to enter the Website Name. Here you will enter a way for the API key to be recognizable by you… I usually just enter the name of the website like “WP Zone” or the URL of the site (minus the “https://”). It really doesn’t matter as long as you will be able to recognize it. Next, select “Full Access” from the options and click the “Create and View” button.
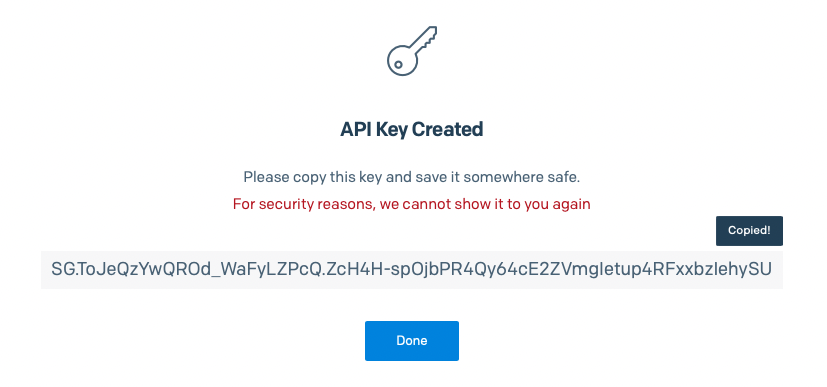
You will now be brought to a page that displays your unique API key for the particular site you are working on… each site requires its own key so you will have to repeat these steps for each new site you configure. Click on the generated API key that is displayed in order to copy it to your clipboard. PLEASE NOTE: The API key will only be displayed once for security purposes, so do not lose track of it. If you do lose track of it you will have to delete that key and generate a new one.
**Please note that this generated API Key has been deleted 😉
Now that the SendGrid account and API key are created we will head back over to your WordPress website and configure the plugin settings.
Step 3: Configure the Connect SendGrid for Emails plugin
From your WordPress dashboard the settings for the Connect SendGrid for Emails plugin can be found under Settings > SendGrid. In the settings screen, you will see several different fields, however only a few are required for setup so we will only be covering the required fields in this tutorial.
Paste your API key that you copied in the previous step into the “API Key” field and ensure that API is selected in the “Send Mail With” dropdown. Then proceed to enter your “From Name” (Name as it will appear in recipient clients), and your “Sending Address” (Email address from which the message will be sent) and “Reply Address” if you would like that to be different from the sending address.
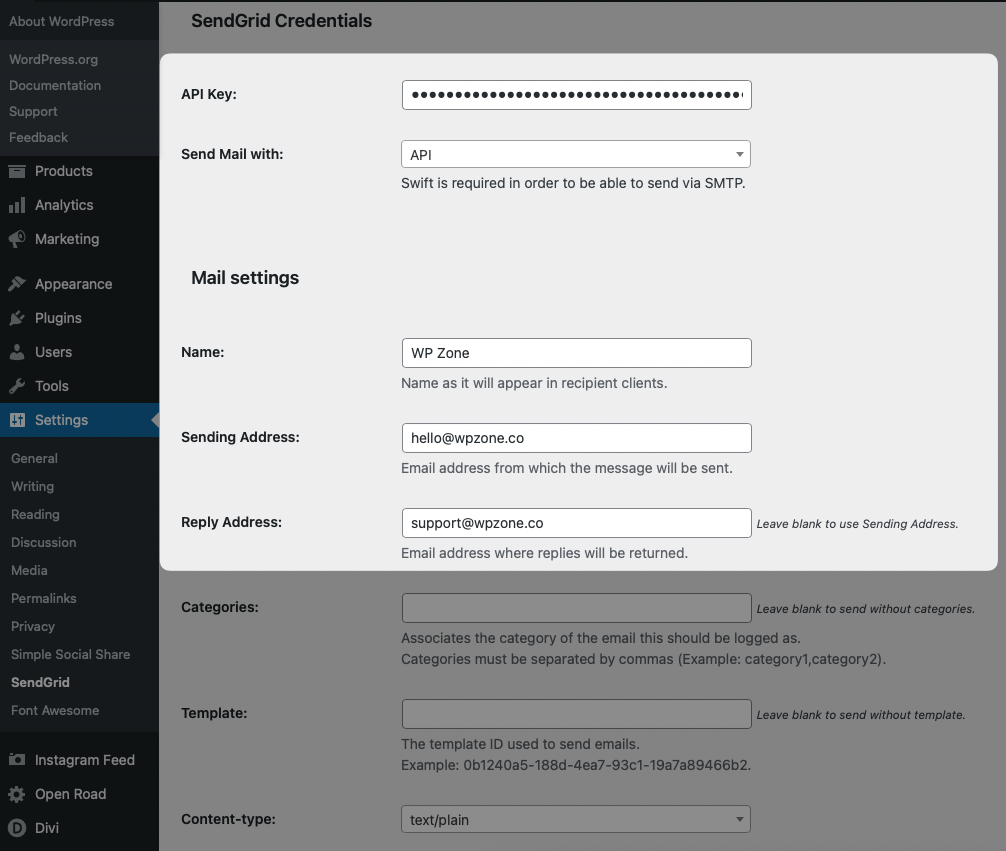
Now that all of the required information has been entered, click the “Update Settings” button to save the configuration.
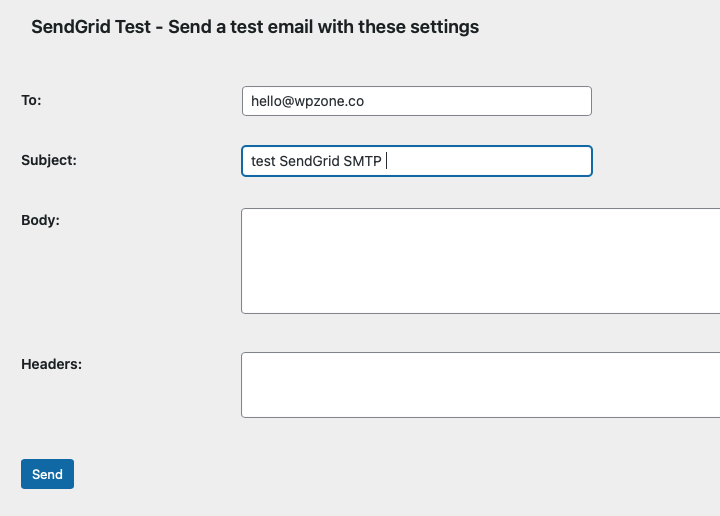
At the bottom of the plugin settings the Connect SendGrid for Emails plugin provides a method to test and make sure that your WordPress website is now sending emails. Here you should only have to enter your email address and the subject line. Hit “Send” and then head over to your email inbox to confirm receipt of the test message.
That’s it!
After SendGrid SMTP is configured and tested, your Divi contact form module should now be sending emails without any issues. If your website is sending emails, but you are still having trouble with Divi’s contact form module, you should open a support ticket with Elegant Themes as further troubleshooting may be required.

Thanks for sharing, can you tell me the plugin to stop fake enquiries.
Hi Cory – It seemed too easy. Followed all your instructions. However, when I try to send a test message, all I Get is “Email wasn’t sent”. Any tips? No apparent errors on the configuration page. The API key is there and I selected Send mail with API.
Hello Cory, thanks for your help, I was not able to send the email, It seems this is because I do not have the swift mailer plugin, but it seems to be no longer available, how can I fix this?
This is really useful! We have a problem that emails from the contact form sometimes come through and don’t at other times! I’ll try the SMTP and see if that helps
Step 3: I get an error here. When I want to paste the API key into Sendgrids settings the page constantly renews (?)
I just keep getting this error at the top of the Sendgrid settings page:
Email wasn’t sent.
Send mail with: API
error: Swift is required in order to be able to send via SMTP.
Hello, you are using Swift SMTP?
Thank you Ilana! Your suggestion worked perfectly. I first tried the “Forgot password” link and received the reset email, so I then knew that the wp_mail() function worked.
I created a forwarding address using the same domain and the contact emails started working. Ironically, they’re going to the same email I was using directly in the form.
Creating an email address mail@yourdomain enables the contact form to send on my hosting server (Xneelo) without an SMTP plugin. You can also use the plugin “Contact Form Helper” by Pee-Aye Creative to help solve that and other styling and tracking issues associated with Divi’s Contact Form.
Having an email address @yourdomain.com really has nothing to do with the issue of the contact form emails not sending. Many hosting servers do not support the wp_mail() Function and it is inherently unstable. SMTP allows you to send emails on servers that don’t support wp_mail() and also helps improve stability/deliverability.
Thank you for your post about the contact form. Do you have any advice on the recaptcha portion of the module? I have a client who continues to have her contact and email optins used for email spoofing. I have done everything I can to tighten security. I have created all of the SPF records between her email provider and host and set up recaptcha. Her site shows the recaptcha logo, but Google says it is not working. I have installed and uninstalled it repeatedly. It first says it is working and then when you go back days later, it is not. She is using a free email provider, but it seems like that would not matter because I have created the SPF records. I have never had this problem with a client or personal website before with or without the recaptcha. Any advice or insight?
Hi Laura, we will consider digging onto ReCaptcha in a later post, perhaps. It is hard to diagnose the problem without really being able to dig into the site. You light try looking into an alternative method like Cleantalk, which we use on our site.
SendInBlue does not require a credit card either and the tech support is fantastic.