** Code Updated on 9-4-2018 **
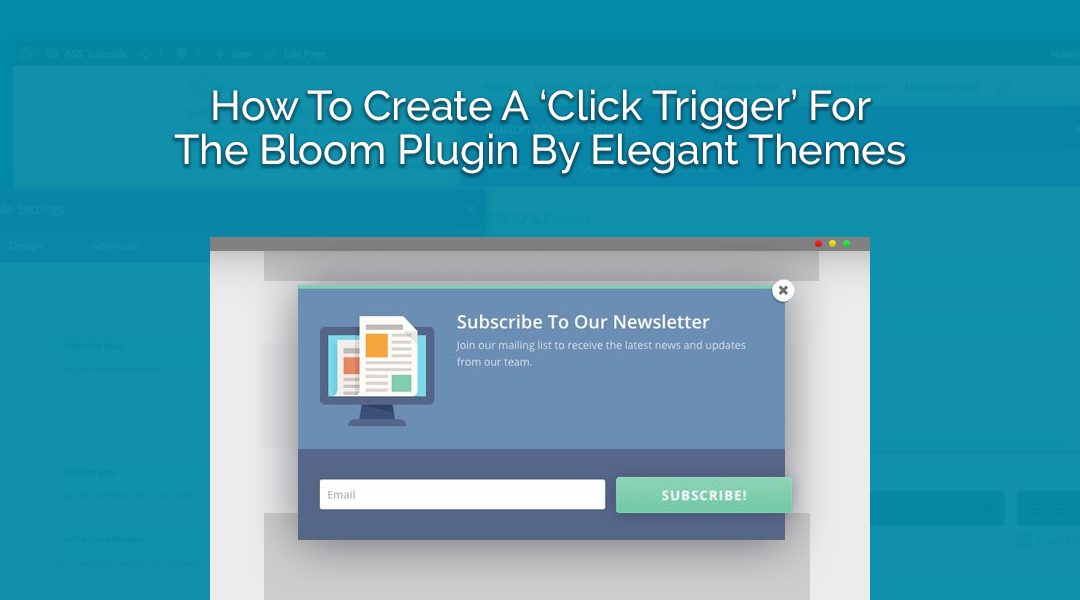
Bloom is a brilliantly designed and well coded email opt-in plugin from the smart folks over at Elegant Themes. Chances are if you are a Divi or Extra Theme user, you have either utilized this plugin, or have at least heard quite a bit about it. So revolutionary and unique is the design in-fact, that the landing page behemoth, LeadPages, took it upon themselves to fork the plugin, causing quite a bit of controversy amongst the WordPress community.
So what does Bloom do exactly?
According to Elegant Themes, “Bloom is the ultimate email opt-in plugin for WordPress. With Bloom, you can easily add opt-in forms to your website and harness complete control over the design and location of each.” So, in a nutshell, Bloom allows you to create custom email opt-in forms on your website, so people can subscribe to your newsletter. The Bloom opt-in form can be implemented into your website using several methods including: Time (in seconds), percentage of scroll down the page, inline (static) and… You guessed it, with a Click Trigger.
What is a Click Trigger?
The Click Trigger method of using Bloom entails creating a button, link or some other form of call to action (CTA). When the CTA is clicked the opt-in form will then appear and the user can enter their email address and other requested information. This helps keep your web page nice and tidy and is generally considered less invasive to people viewing your site.
Step 1. Build The Subscription Section
There are a number of ways to create the section users will click to subscribe to your email. In this tutorial I have opted to use the combination of a Text Module and Button Module. I will not cover every aspect of how I designed the section, as there are many different methods to do so, but instead detail out the necessary steps to enable the Bloom click trigger.

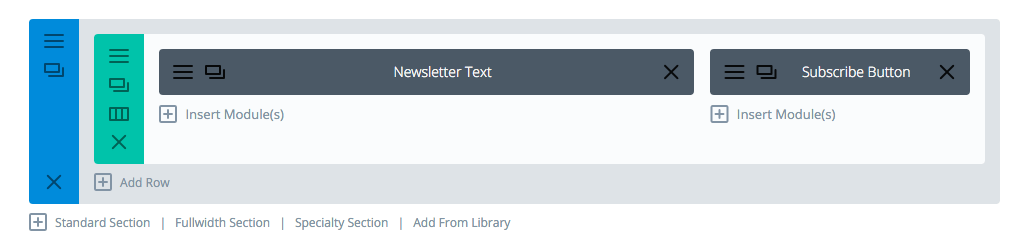
Setup the Button Module
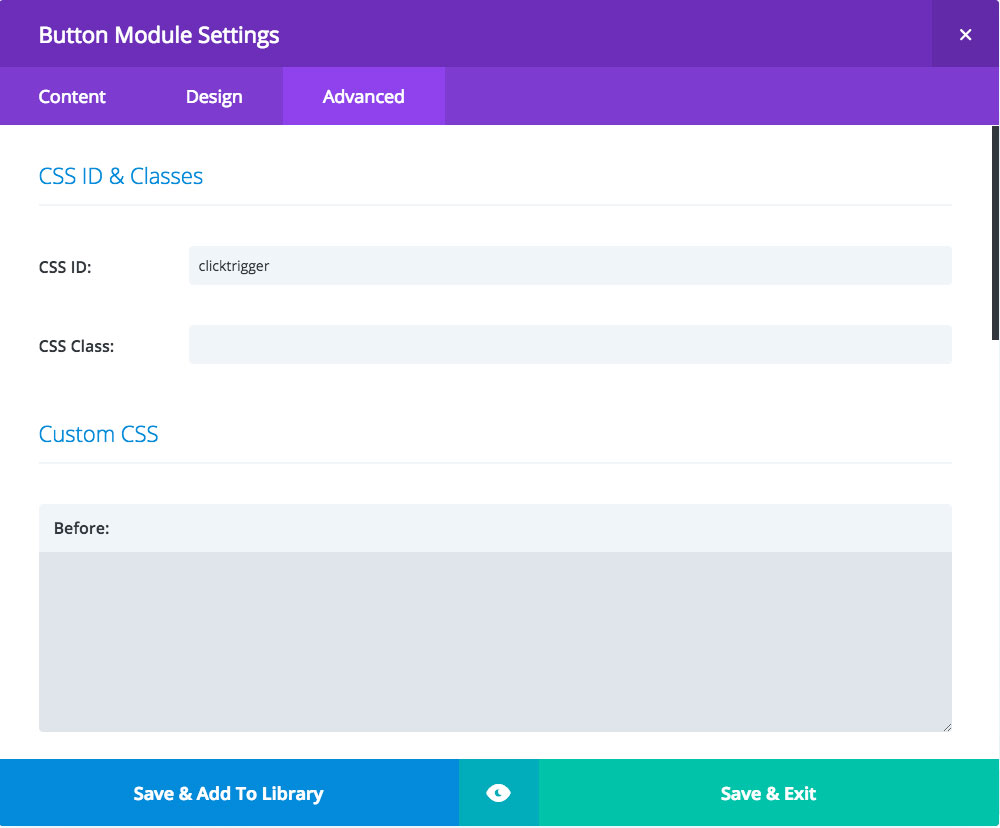
I am not going to dive into the design specifics, but most importantly here is that you give your button a URL/ID as seen below. In this example we have used the URL/ID ‘a‘. We will use this same CSS ID in a few other locations as well. Also give your button some text so it appears… we have added ‘Subscribe Now‘, but use whatever fits your needs.

Within the same Button Module, navigate to the Custom CSS tab. In the field marked CSS ID, add ‘clicktrigger‘ and then Save and Exit.
Step 2. Setup The Bloom Plugin
By this stage I am assuming that you have already installed and styled your Bloom Opt-In plugin to look all nice and pretty. I will now go over the necessary steps for the click trigger…
After you have gone through the initial steps of Setup and Design, you will then end up in the Display Settings. From there you want to make sure you tick the box marked ‘Trigger On Click‘. After that, head down to the the field marked, ‘CSS Selector (string)‘. Here you will add the same CSS ID used in the button module URL and Custom ID field, but make sure you precede it with an ‘a‘, so that it looks like this: a#click-trigger. Make sure that your settings look like the screenshot below and then press Save & Exit.

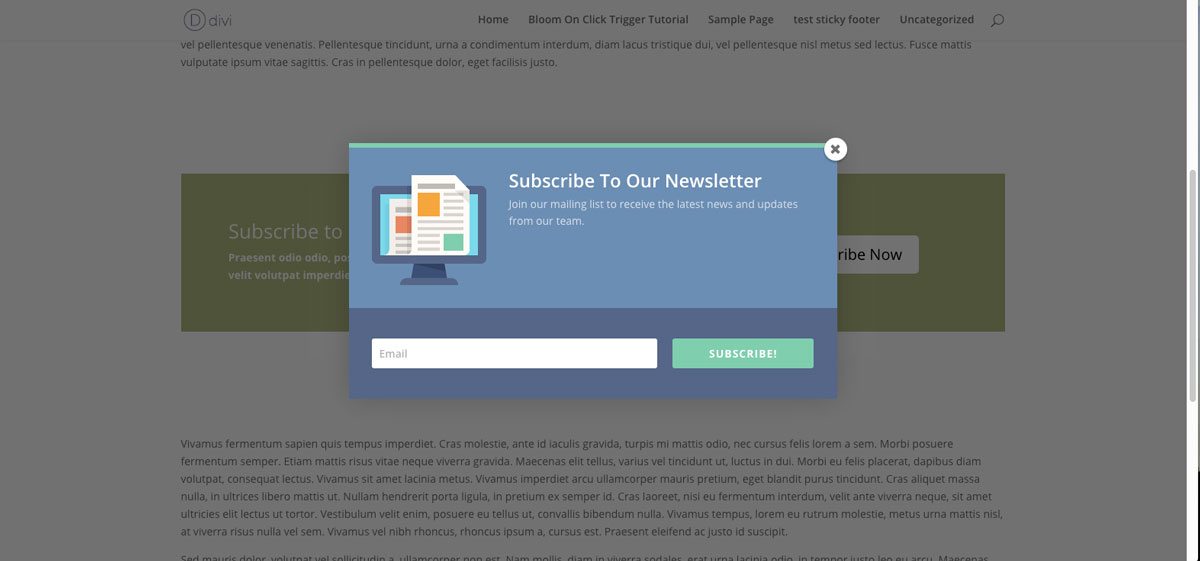
Time to checkout the result
Now that everything has been setup properly, head back to the call-to-action section you created, press ‘subscribe’, and take a look. Pretty cool!

Hello, I have a off-topic question on Bloom Plugin. Despite more asking on the Elegant Theme community, there’s not feature for add a reCaptcha in the optim modul. How to prevent the spam using this plugin? Have you some solutions?
Thanks in advanced.
The best way to prevent spam emails in your list is to enable double opt-in
how would one manage this with a text link instead of a button? text does not have a css id and other module options that i could find.. ty
You would add the ID to the HTML link like: Subscribe Now
Is there a way to use this that instead of a subscribe me the button would download a locked form upon submission?
Your tutorial was very easy to understand and implement. I had the bloom plugin for more than one year, but never understood how to trigger the popup properly. Finally I could used the trigger popup in my website and with that I am considering stoping my ClickFunnels membership. Thank you!! 🙂
Thank you!
Hey Cory! Thanks for the great tutorial!
Here is my question.
I set up a Bloom form to redirect to a URL – my mailchimp URL for sign-up because I want it to actually “integrate” as the name implies, with Mailchimp, sen the captcha, thank you, etc.
Doing this actually gives the success message, though it is turned off, then redirects, requires the email to be re-entered, and then gives an “already subscribed” message.
Any ideas? I’m horrible at CSS and the MailChimp embedded forms are super plain, not to mention, like you said, Bloom offers all the different options for location.
Thanks.
Tina
Hi Tina, that sounds like a more technical issue, I would suggest to contact Elegant Themes support 🙂
Hi! In your video and post, you are using the same DIVI theme. What about the trigger on another theme as this method is not working.
Hi! Same rule – make sure you have button set, and button has id “click-trigger”. You can also use the basic html to make it work:
Thanks for this update Cory.
For some reason when I follow these new directions and test it out, it opens up a new tab in Chrome with this URL: “http://a/#clicktrigger” which then says “This site can’t be reached.”
And I specifically have the button set to open in the “same window.”
Any ideas why that is happening? I’ve double checked everything many times over.
Thanks!
I am having the same issue.
did you ever solve this? mine also does the same thing….opens a new page (adds the “http” to the beginning)
Hi, we updated “Setup the Button Module” section. Make sure the button url is set to “#”.
Also, make sure in your optin display settings you have delay disabled and “display on” set up correctly 🙂
Hi,
I’m having an issue with this… when I click on my pop-up it only partially shows up (doesn’t allow you to scroll to actually enter in your info). When I exit out of the pop-up and click it again, it will allow me to scroll down on the pop-up and actually enter in the info.
When you hit refresh or visit page again, it does this again and will only work correctly if you exit pop-up and click it again. I have tried on both safari and chrome and it does the same thing on both browsers.
Has anyone else had this problem? How can I fix it?
Thanks,
Kadyn
I’m having a similar issue. When I preview in Bloom all is okay, but once loaded on the site it’s not fully loading. Its weird as I have set this up on a few sites now and all is okay.
Gif Screen Shot of issue: https://cl.ly/1J3u1h0n172M
Hi,
Can I ask one thing?
If person subscribe once and I don’t want him to subscribe again, How can I check this? because a lot of same people SUBSCRIBED AGAIN AND AGAIN.
Thanks.. waiting for an answer
J
Excellent tutorial Cory. MailOptin is a great alternative to Bloom. Let me know if you want to try it out and I’ll gladly provide you it.
Thank you Cory. I tried that already and that indeed worked. Thanks a lot!!
Hey Cory,
What if you have different buttons on the same page. which have different opt in forms attached to them. They all pop up now if you click one button. What to do?
Hello, you will have to create a unique ID for the other popups like clicktrigger2 for example
Great post Cory and very easy to follow.
Thanks Collins!
Great tutorial. But it didn’t work for me either. I’ve tried the * vs ‘a’, I’ve made sure ‘everything’ is selected. I don’t see that it’s not already activated and still it doesn’t work. I’d appreciate any help I can get. http://www.lifeonpurpose.academy Thanks so much!
Hi Donna we are super swamped with Black Friday and Cyber Monday but you may want to try the Divi Fcaebook groups to see if someone can help quicker. Thanks for reading the post!
i need help to get this done with a image.
i want to click on a image to get the bloom pop-up opt-in shown. i tried it this way in the picture, but it doesn’t work.
hope someone can help me.
Great HowTo but none of the images are showing..?
Thanks for pointing that out Dave, it has been corrected. We recently did a complete redesign so some things are a little out of whack and we are correcting as we go. Thanks for the help and your patience!
This was the trick for me thanks Rashida
Top Tip! 🙂
Double check this – it was a problem for me. That the opt in was activated. Go in where you see all opt-ins and press the activate check symbol. Then it started to work immediatly. 🙂
this doesnt work for me. I tried putting a * instead of a an a but still doesnt do anything when I click on the button. http://www.vinoforgood.com. Trying to put on request access button
Thank you Cory! Just what I was looking for.
Thanks so much Devin – my heart sank when I clicked and it didn’t work. Ticked “Everything” and it works beautifully.
Love the step by step. I followed it exactly and did get it to work. I am working in an AVADA theme instead of DIVI. Although the setup is pretty similar with each theme having the same exact options available, it simply didn’t work for me.
Thank you! I had the same issue!
I got it to work for me. Instead of an a I used * (got it from another tutorial on this) so – *#click-trigger
IT WORKED!!! Thank you so much 🙂
Excellent, glad you found this helpful 🙂
Hi Cory,
First, thanks for creating this tutorial!
I’ve installed it a couple times before and it worked, but now on my latest project, it isn’t working.
I’ve double-checked all the settings over and over – including selecting for the optin to display “everything” – but it doesn’t do anything upon click.
URL = #clicktrigger
CSS ID = click-trigger
Bloom = Trigger on click, a#click-trigger
Set to view display “everything”
Is there anything else that might stop this from working? Trying to figure it out.
Thanks!
Has anyone got this working in a menu yet?
Thanks – extremely helpful and easy to follow!
Oh man – I went through this exact same sequence! Wish I had read your comment first!
This doesn’t seem to be working for me, I did as I would for a button but called the style in the menu and I get a 404 error.
Awesome! This helped me out a lot for a landing page for my ebook. Thanks for the hookup!
I am using woocommerce and the button does not allow an ID, only a class, is there a way around this so I can still use bloom for my optins? Also, is there a way to redirect bloom afterwards to a URL?
Hi Christopher, this question may best be directed to ET support or a WooCommerce forum. Off the top of my head the best method would be to add a WC template file to your child theme and modify/add the class or ID there.
I really wish I had come to your comment sooner.. I had exactly the same problem and went through the same thought processes as you. Thanks for clarifying and to the author for a great post.
Great job!
It works with mine as well. I’m just running into the issue that it doesn’t want to work with the full-width header. Settings all applied as stated in your post and comments above. Any ideas why it doesn’t work with the full-width header module?
Thank you!! Mine did not work immediately either. I scrolled through the comments and found yours. Checked “everything” and it works!!! Thank you Ben for the troubleshooting comment and Cory for the tutorial. Totally awesome!!!!
Love it! Will totally be using this!
Thank. I just wanted to point out mine didn’t work straight away. I found out that in the ‘Display On’ section on the ‘Display Settings’ page was set to ‘post’. I ticked show on ‘everything’ and it worked.
There’s no mention of this in the article and I spent a while trouble shooting it thinking it was the ‘-‘ being the issue eg in some cases you talk about :
URL/ID ‘#clicktrigger‘. (notice there is no ‘-‘ in this)
CSS ID, ‘click-trigger‘
a#click-trigger. (this seems to be an amalgamation of the above 2)
This confused me and I spent a while trying to figure out whether you had made a mistake before realising the issue was on the bottom of the ‘Display Settings’ page which isn’t in your screen shot.
Just so others don’t have the same issue.
Cheers Ben
Thanks Ben!
I’m grateful for the tutorial, and for your clarification. I spent a week going through many… MANY tutorials on YT until I found this one. I was really frustrated until I read your comment. Thank you much to both!
Cory Thanks a lot for this info. You save buy optimizepress ….hahaha
Hey Cory,
I used this great tutorial on a site and it worked great, now I have added ssl to the site and updated to the new divi, but it is not working anymore…
Do you know what have changed??
Sorry, don’t have much insight into this at the moment but will look into it when I get a chance. I can’t think of a reason SSL would have any effect on this
Hi Cory, this was such good news when I found this tutorial but unfortunately it’s not working for me. I tried it for the Sign Up button here https://holistickitchenacademy.com/ and no go..
Sorry it works now — my bad! Thanks again for this!
Glad to hear it’s working for you!
Hi Cory,
Thank you for this post! It works really well with CTA.
I have one question though, is it possible to create multiple on one page. If so, how would it work?
I want to create 5 CTA boxes on one page with a different pop up optin for each.
Many Thanks
Hi Gemma,
For this you would want to create multiple popups in Bloom, each with unique CSS IDs (#clicktrigger1, #clicktrigger2, #clicktrigger3 for example). Hope this helps and please let us know the result!
Hey Cory,
I knew it would be that but as I am not very clued up on CSS and it wasn’t working I thought I did it wrong. It seems like the CTA module button doesn’t work when you start adding more than one to the page. I have just recreated them all using text boxes and buttons and it looks amazing 🙂
Thank you for your help!
Cory, you ROCK!
JUST what I needed, when I needed it. Starting my very first email list after writing for 12 years.
(Keep the shocked looks to a minimum…)
Happy to help Jaime and best of luck with growing your list!
Hi, how can you trigger a menu item to do this? I can’t find out how to add a css-id to a menu item.
Hello,
You can add a CSS ID to a menu item like this: From the Menu dashboard, click on “Screen Options” in the top-right of the screen and then tick the box “CSS Classes”. Hit “Save Menu” and now when you open up a menu item you will see the option “CSS Classes (optional)”
Hello there.
The bloom widget you have on your top left with the icon on top. Is that custom css you using? I mean how do you get you icon on top like that?
I mean ofc on top right.. sorry
Great tutorial guys, super helpful!
This is a good trick. Thank you
Exactly what I was looking for! Will try to get this working on my site soon. Thanks Cory!
Happy we could be of assistance, and let us know how it goes!
Just implemented it. When I click on the button the form is opened in a pop-up. But after a few seconds it disappears again. Any thoughts how to fix that?
Just used this on a webinar opt-in – thanks, Cory!
Awesome… glad it helped you out!
Can we do this with an image instead of a button?
In theory it should work, but we have not tried it ourselves. We are currently very busy and not sure when we can test this, but if you are successful, please let us know 🙂
Hi there
Did you ever work out how to do this with an image?
i also thought it will work.. but it doesn’t, i need help to get it work 😀
Great post Cory, I was curious as to whether or not you know how to make this work with the buttons in the fullwidth header module?
I would like to know this as well.
Great tutorial. Is there anyway we can do a similar trick with Monarch? I would love to be able to add a simple ‘Share’ Button, that brings in the Share fly-in
Great post thanks, glad it’s so easy to follow but I think they’re missing a trick not including this as standard. Maybe they will one day.
Thanks, Cory. Does this function well on all popular mobile devices?
Hello Hope. Yes this functions well across all devices… if there are any responsive issues they would be native to the plugin itself and not necessarily this click trigger method. I hope it works well for you!
This is great Cory. Thanks. How will this be on mobile?
Hi Sheila, you’re welcome! This works great on mobile… I will try and add a working version to this blog post when I get a chance and will notify you in the comments 🙂