A few weeks ago, we introduced you to the Simple Payment Module for Divi in this blog post about how to process credit card payments on your Divi site. The initial version of the plugin integrated Stripe to facilitate secure collection of customer credit card information and fulfillment of payment requests for a variety of purposes, such as product purchases, donations, and invoice payments. Today, we are excited to announce that the plugin has been updated to also work with PayPal, allowing you to process payments from user’s PayPal accounts, a variety of compatible alternative payment methods, and credit cards, all using the plugin’s Divi builder module. This PayPal integration for Divi is currently in beta and available in the free and Pro versions of the plugin (version 1.1.0 or higher). Using PayPal is optional, and you can choose to enable it on its own, or alongside Stripe to allow your customers to decide which payment processor to use (Pro version only).
Simple Payment Module for Divi is designed to be simple to use and to cut down on the extra complexity of a full-blown ecommerce solution that might not be necessary for sites that are only looking to sell one or a few products, or to provide a payment form or PayPal button to collect donations or invoice payments. For the Divi community, the great news is that all of this functionality is wrapped up in a single Divi builder module that uses the visual builder and module settings interface that is already very familiar to Divi users. If you have a PayPal or Stripe account and have activated this plugin on your site, adding payment functionality to your site is as easy as completing a few plugin configuration steps and dragging and dropping the Payment Module onto a page!
For more detailed general information about this plugin, including a comparison of the Free and Pro versions to help you decide which one you need, check out our earlier blog post here. Here, we’ll get into how to add PayPal support to the payment module if you want to use PayPal buttons for payment processing.
Setting up the Plugin
If this is your first time using Simple Payment Module, start by setting up the General Settings as described in the Configuration section on this page. You can disable the Stripe integration if you plan to only use PayPal for now.
To start using PayPal in your Divi visual builder content, you will first need to configure some additional settings on the plugin settings page, which can be found in the WordPress admin under Payments > Settings. The first two items allow you to enable the PayPal integration and optionally enable test mode if you want to use PayPal’s “sandbox” to test the integration before making it ready to accept actual payments. Enabling the PayPal integration doesn’t automatically add it to any existing modules; you still get to choose which payment processors are enabled on a module-by-module basis.
Next you will need to log in to the PayPal Developer site and register your site as an API App to allow it to communicate with PayPal. After logging in, select Apps & Credentials from the main menu (make sure the Sandbox / Live toggle near the top right of the page is set to Live initially). Click the Create App button, enter a name for your API App (for example, the name of your website), and click Create App at the end of the form.
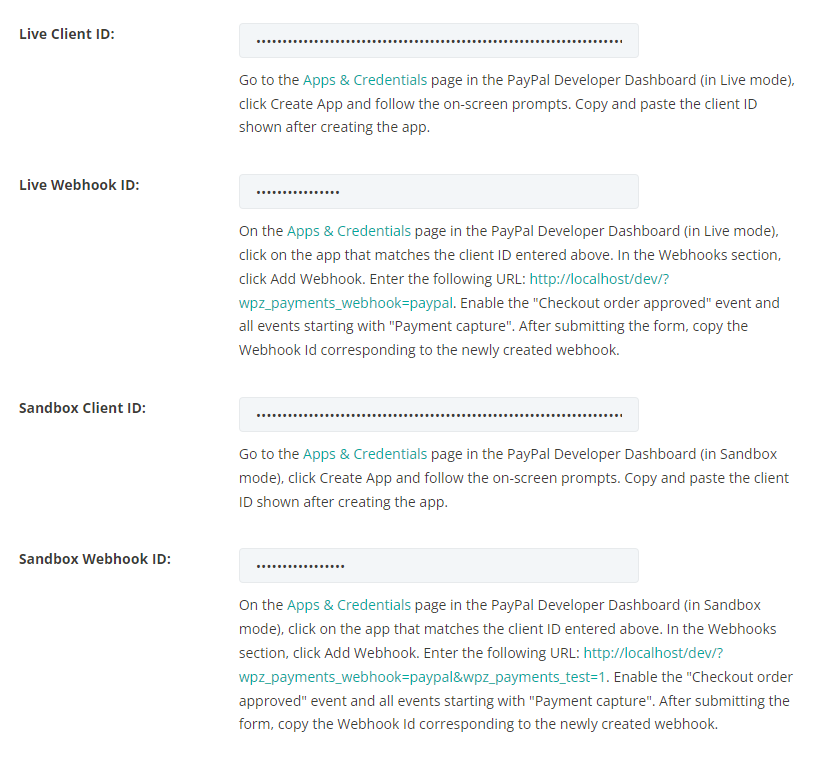
Once your PayPal API App is created, it will appear in the list of apps; click its title to go into the app settings. Near the top of the page is a field called Client ID; paste this value in the Live Client ID settings box in the Simple Payment Module plugin.
Next, click the Add Webhook button near the end of the page. In the URL field, paste the URL that is indicated in the text below the Live Webhook ID field in the Simple Payment Module settings page. Check the checkbox next to the “Checkout order approved” event and all events starting with “Payment capture”. Click the Save button to create the webhook, which will allow PayPal to send notifications of payments and payment changes to your site. Then copy the Webhook Id indicated in the table for your newly created webhook.
If you plan to use the sandbox (test) mode for PayPal, you’ll need to change the Sandbox / Live toggle (at the right side of the top menu bar) to the Sandbox position and repeat the above process to obtain the values to enter in the Sandbox Client ID and Sandbox Webhook ID fields.
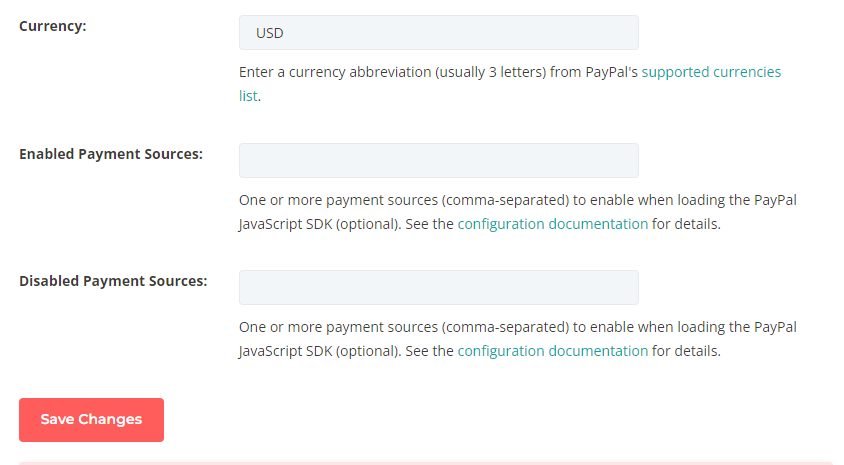
Make sure the currency field reflects the abbreviation of the currency you plan to use, selected from this list. You can leave the Enabled Payment Sources and Disabled Payment Sources fields blank for now unless you want to explicitly enable a payment method or you need to disable specific payment method(s) due to PayPal Terms or for other reasons.
Adding a PayPal button to your Divi page
The next step toward accepting PayPal payments on your Divi site is to insert the Payment Module to a page or post in the Divi visual builder. Click the + (Add New Module) button where you want to add the module, or in the main visual builder menu bar. Choose Payment Module from the list to add it.
To enable the PayPal integration, open the Form Settings toggle. If you are using Simple Payment Module Free, or you have the Pro version but don’t want to enable Stripe payments alongside PayPal, uncheck the Stripe checkbox. Next, check the box next to PayPal under Payment Processor. You should also select the appropiate category for your payments from the PayPal Category dropdown.
Other PayPal-specific options you can set in the Form Settings toggle are:
- PayPal Button Text: Select from several pre-defined text options to display on your PayPal button
- PayPal Buttons Layout: Choose from vertical or horizontal button layout
- Show PayPal Tagline: Decide whether or not to include PayPal’s tagline in horizontal layout mode
Before leaving the Content tab, be sure to set up other settings as described in our earlier blog post; all of these apply to the PayPal integration as well:
- Product section
- Product Name: Shown above the form and in payment records in your WordPress dashboard
- Product Description: Optionally provide more information about the product or payment above the payment form
- Price section
- Price Type: If you want to set a single price, choose “Fixed Price”. Otherwise, choose “Custom Price” to allow your website visitor to set the price.
- Depending on your Price Type selection, you can set additional settings such as the fixed price amount or custom price range.
- Quantity section: You can optionally display a quantity field in the payment form, with minimum and maximum quantities, etc. pro version
- Display Mode section
- Show Payment Form: By default, the payment form is shown directly in your page. Alternatively, you can show the form in the page or in an overlay after the user clicks a button. pro version
- Form Fields section: Optionally show a notes field and/or a “terms and conditions” section with an agreement checkbox
- Payment Settings section
- Statement Descriptor: Set some text to display on your customer’s credit card statement to help them identify their purchase
- Payment Success / Payment Error / Loading Error sections: Customize the messages that display when various events occur, or redirect the user to a different page when their payment succeeds
Switching over to the Design tab, open the PayPal Button toggle to see several PayPal-specific design settings. Here, you can set some dimensions for the PayPal buttons (free and Pro versions) and choose from some predefined styling settings (Pro version only). Since the PayPal buttons are hosted by PayPal in an iframe on your site, with appearance options specified as part of the PayPal API, the full range of design options that are usually available for buttons is not available here.
That’s all!
Now your PayPal button has been inserted into your Divi content and is ready for use once you publish your changes! As payments are made and PayPal notifies your site’s webhook about these payments, they should start appearing in the Payments page of your WordPress admin. For some example payment use cases and suggested configuration, see the “How to configure different payment scenarios” section of our previous blog post.
Q & A
Is it secure?
The PayPal integration of Simple Payment Module uses PayPal to handle all processing of credit card information or other payment credentials – this information is never stored on or even tramsitted to your server. Typically all of this is handled in a separate window after the user clicks one of the PayPal buttons.
Do I need the Pro version of the plugin or will the free version work for me?
First off, if you are already a WP Zone member, you can download Simple Payment Module Pro for no extra charge since it is included in your membership! If you are not yet a member, check out our membership page for more information on the perks of joining. That said, the free version does have a lot of functionality and may be sufficient for your needs; check out the comparison table in the “Getting Started with our Stripe Integration for Divi” section of our other blog post to see some of the differences between free and Pro. Plus, you can always upgrade to Pro later, and any modules that you’ve created with the free version should continue to work seamlessly after the upgrade, with the additional Pro-only options available.


Recent Comments