
Hosting and server configuration is the biggest factor for website performance, stability, and security. It doesn’t matter how good WordPress or your page builder is if your servers are not correctly optimized.
I get a lot of users asking how they can fix speed issues with a plugin, but WordPress plugins are only good for fine-tuning performance or security.
The right server setup is essential for performance, especially if you are using a powerful page builder like Divi.
If you’re a super DIY user or a system admin looking to optimize your server setup for WordPress and Page builders, I’m going to show you how we’ve improved site speed for premium page builders.
I’ll give you a behind-the-scenes look at Divi Space Hosting and the settings that come out of the box. We’ll look at:
- What PHP Version you should use
- How to Enable OPCache
- Tweaking those PHP Variables
- Webserver Operating Systems
- Divi Space Hosting settings
- And caching methods for improving speed
If you don’t want to become a server architect and are just looking for the best Divi Hosting option, our team has you covered. Get started with Divi Space Hosting for as low as $15 per month.
If you’re a server nerd like me, keep reading to learn how to get the most out of WordPress with the best hosting settings for WordPress and Page Builders
PHP Versions
The first thing you need to be aware of is the version of PHP running on your server. Ideally, you would use the latest version. At the time of writing, that is PHP 8, but there are still some plugins that won’t work properly with it enabled and some that will simply break while having version 8 enabled.
For optimum performance and compatibility, your server should have at least version 7.4 installed and enabled.
A good control panel will let you easily switch between PHP versions for testing or quickly upgrading. On Divi Space Hosting, you can simply switch between all the major PHP server versions by clicking on the following button.
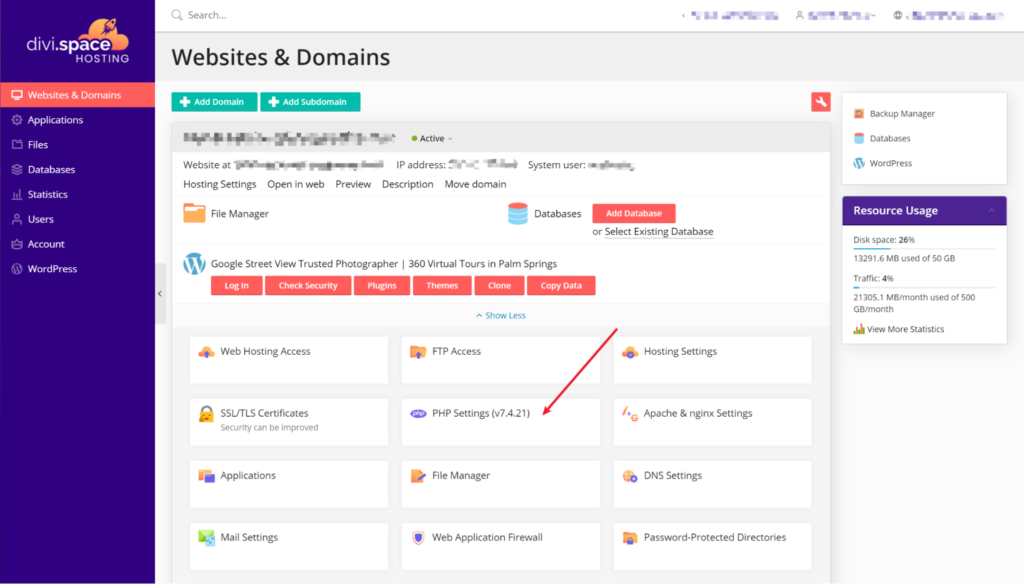
Divi Space Hosting’s PHP versions
We allow versions 7.3.29, 7.4.21, and the newest 8.0.8
Enabling OPCache
Next, we will look at how to improve PHP performance so that Divi loads faster. The first thing we will do is create or increase the OPCache on PHP.
This is the single most important variable for improving performance. OPCache is the embedded cache ability on all versions of PHP that allows opcodes processing saved on RAM for future requests. It will speed up the backend of your builder if properly configured.
To tweak this variable under Linux, you first need to have the php-opcache package installed. This package will vary depending on your Linux installation.
Usually, the configuration of this variable will be saved on the default php.ini file on your server.
For Divi, these are the recommended parameters for optimum OPCache:
opcache.enable=1
opcache.memory_consumption=256
opcache.max_accelerated_files=10000
opcache.revalidate_freq=200
This will assign 256Mb of memory for OPCache. You can check if this is properly enabled by creating a file in the root folder of your domain called:
Phpinfo.php
Add the following code:
<?php phpinfo(); ?>
With this in place, load the file from yourdomain.com/phpinfo.php. This will return all the PHP information and you should see under OPCache your settings properly enabled.
The more memory you have on your server, the better. If you’re over 4GB the idea would be 256 for OPCache but if you have more than 8GB and you’re not using half of it, then it could go up to 512.
The following are suggestions based on actual real usage.
1GB of free memory on the server – 64Mb OPCache
More than 2GB of free memory – 128Mb OPCache
More than 6GB of free memory – up to 256Mb of OPCache
On Divi Space Hosting we enable OPCache by default on all versions of PHP with a value of 256Mb.
Tweaking those PHP Variables
Divi uses a lot of memory to render the backend properly, the most common problem among Divi users is slow rendering or failed rendering of the backend. This can be easily solved by increasing the size of the memory_limit variable. This variable reserves memory space for the proper functioning of PHP execution. Because Divi is resource-intensive in that aspect, this variable is the single most important factor.
If a site has moderate styling (say a homepage with 20 modules) a minimum of 256Mb will be enough, but, for big edits of more than 40 modules at the same time on a page, we recommend at least 384Mb.
Regarding the the variables that are needed for Divi, here are our recommendations:
max_input_time 256
max_input_vars 2000
post_max_size 128M
upload_max_filesize 128M
The variable max_input_time prevents a timeout if PHP execution is taking extra time.
The variable max_input_vars prevents Divi from breaking on the backend due to variables being set outside of the maximum allowed. Usually, the more blocks/module you have on your edit, the more variables it will take, less than 1000 and you’re risking a corrupted save.
If you bump into an issue where trying to save your Divi Template results in a corrupted save, this is the variable you should increase.
Post_max_size and upload_max_filesize usually go hand in hand and will limit the maximum size of an upload into WordPress. They will limit exports, imports, and the media library.
What you should input into your PHP.ini
memory_limit 256M
max_input_time 256
max_input_vars 2000
post_max_size 128M
upload_max_filesize 128M
On Divi Space Hosting we use these values as the default for all accounts.
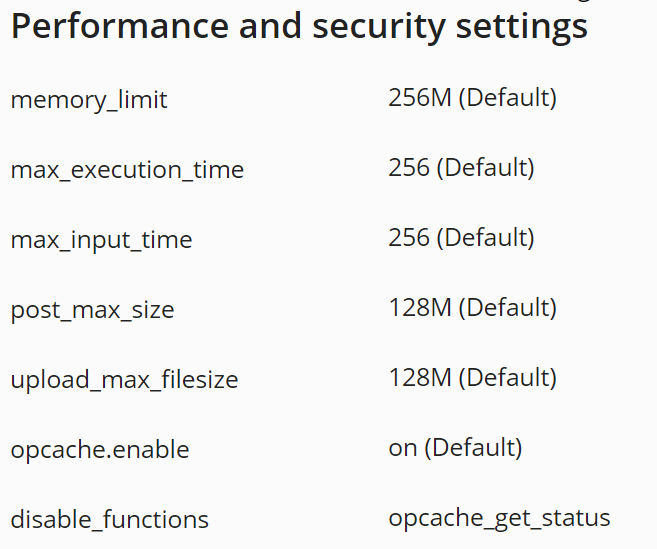
We use the recommended Divi sever settings as the default settings
The Web Server Operating System
The web server is an important part of the equation related to Divi speed. The most well-known is Apache but it’s far from ideal since it’s not as efficient as NGINX or LiteSpeed. If you can replace Apache with NGINX, this will speed up both the backend and frontend rendering of your site.
If you want to speedup Divi even more while running NGINX, create a rule in your conf.d virtual domain configuration and add the following:
location ~* \.(jpg|jpeg|png|gif|ico|css|js)$ {
expires 365d;
}
This will signal the browser to save those assets, bypassing any other method completely. It will result in a faster load of the backend and increase the render speed on the frontend.
On Divi Space Hosting, our customers can choose which web server they want to use for their sites, be it Apache or NGINX.
NGINX Cache
NGINX Caching will improve performance even further without having to utilize a plugin inside WordPress. Usually, this is done through the NGINX configuration for each virtual domain.
There are 2 ways you can implement a cache on NGINX:
- Proxy Mode
- Native Mode
In Proxy Mode, NGINX passes the content to another web server while functioning as an intermediary proxy, aka “proxy_cache”. This mode is ideal if you want to take advantage of Apache compatibility with apps and do not want to mess with NGINX configuration files directly.
In Native Mode, NGINX will be the web server and the cache. It allows for bigger cache sizes and more performance improvements as there is no need to go “outside” of the web server for retrieving content like in the proxy method. One less service running in the background and the increased efficiency make NGINX the ideal choice.
The procedure to properly cache content with NGINX is complicated and usually involves lots of tweaking to the NGINX config files. If you’re interested in doing this for your server, this is a good article on properly setting NGINX caching for most content. It explains how to cache static and dynamic content, improve dynamic content performance with micro-caching, serve stale content while revalidating in the background for better performance, and how to override or set Cache-Control headers for specific situations.
Since NGINX needs configuration files on the backend (it does not have a frontend configuration access file like Apache does with .htaccess), for the cache to work properly, you must edit the web server configuration files for the main cache and the actual virtual domain, making all this a real pain to most people. That said, it is one of the best ways to speed up performance making this a must for any serious server administrator.
How we do it on Divi Space Hosting
On Divi Space Hosting we implemented both modes of operation. When the customer is running Apache, NGINX is automatically set into the Proxy Mode, while going into pure NGINX the option for NGINX cache is automatically enabled.
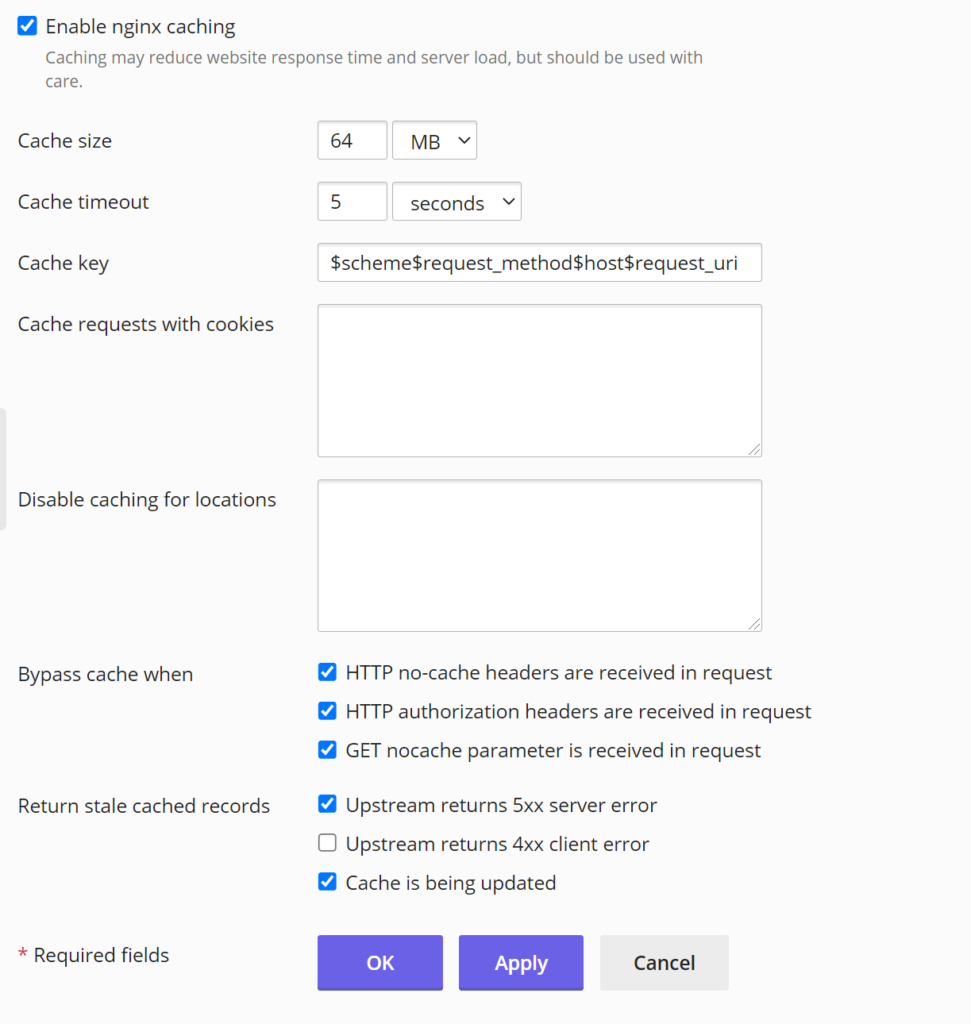
NGINX caching enabled
The way we have this setup by default is what is commonly referred to as NGINX microcache. That means NGINX will cache all content for a very brief period, no longer than 5 seconds. This increases performance when a website is getting hit by similar requests in a short time span and at the same time prevents dynamic content from failing to update properly.
If you were to modify this behavior by implementing a longer cache, dynamic content could be affected.
The Frontend Cache Method
This is an interesting method which most hosting businesses use to speed up content for their customers. It can be either an HTTP cache running as a proxy such as Varnish or an object cache like Memcached which will allow caching of objects such as database calls.
The problem with this method is that sometimes it breaks normal operation for the site, especially with dynamic content that needs a third-party plugin operating on each website where this method applies. Otherwise, it could trigger missing posts or content, this is because this method sits on top of the web server and unless it knows when to clear the cache, it will bypass the web server completely.
This is less than ideal and most of the speed improvements will come with a drawback. I suggest going this way only if you are experienced or really know what you’re doing.
On Divi Space Hosting we came up with a neat trick for increasing our customer’s site speed. It is a method we like to call the Direct Cache Method.
The Direct Cache Method
Our Direct Cache method is a customized set of NGINX rules loaded onto our backend that enables NGINX direct interaction with the static content being cached through WP-Supercache, while at the same time skipping the method completely if folders and files for WP-Supercache are not present on the website.
This prevents it from having an impact on dynamic content, and at the same time, giving the customer the power to control it all from a single well-known and proven caching plugin.
While this feature on Divi Space Hosting is currently in beta, it has proven to show remarkable results for our customers.
Since NGINX is unable to interact with plugins unless specific rules are added, most hosting companies apply a frontend cache on top of the regular web server, as explained earlier. The drawback is it requires another plugin to control the cache that must be installed or a way to disable that cache and losing the performance benefit if a customer deletes the plugin.
We think our method is clever. 🙂 The customer can both use the cache methods included in WP-Supercache and take full advantage of the extra power from NGINX without having to install yet another plugin.
For now, customers are instructed to request this method to be enabled by a support ticket but the results have been remarkable, to say the least. It’s like having your own personal web server at the cost of traditional WordPress Managed Hosting.
The benefits are obvious, customers retain full control over the cache expiration through WP-Supercache while at the same time getting the full speed of NGINX by processing static content directly when it’s needed, bypassing PHP, and not needing any secondary frontend cache or extra plugin in the process.
And with Divi Space Hosting, you can have both methods enabled at the same time, NGINX Cache and the Direct Cache.
Conclusion
Configuring the perfect hosting solution has massive speed, security, and performance benefits. It is especially important for sites using a page builder like Divi.
In this post, we explored advanced server settings you can use to speed up WordPress. If you are looking for fast affordable hosting and don’t want to manage it yourself, check out Divi Space Hosting. Everything we covered in this tutorial comes pre-configured and is backed by our team of experts. Get started now.
I hope you found this information helpful! If you are hosting websites, we would love to hear what tricks you are using to boost performance. Drop your feedback and thoughts in the comments below.

Perfect work thank you. This was different from the last settings I had and now some plugins are working that wouldnt load last time.
Hi, thank you for your DIVI opcache manual. I can on my server edit more values, how can set them right?
opcache.validate_timestamps, opcache.interned_strings_buffer and opcache.fast_shutdown
Preseted values from my hosting:
opcache.validate_timestamps=1
opcache.interned_strings_buffer=8
opcache.fast_shutdown=1
Thank you