Last week, we explored one of the most useful tools in modern day web design: the web browser’s Developer Tools console. This helped us take a closer look at the underlying CSS of a page. We also used the same console to make temporary CSS changes to a webpage. These temporary changes only reflected on the front end of the page, as a preview of sorts, and served as a mini-guide that would let you to experiment with CSS styles before updating your website’s style sheet.
This week we’re introducing you to one more exciting, totally free, tool that’ll help you further your CSS journey: Stylebot.
Note: To use Stylebot, you’ll need to have Google Chrome installed.
What is Stylebot?
Stylebot lets the web designer target a select element on a webpage, and then add additional CSS. In some cases, certain commands will override the current CSS on the page.
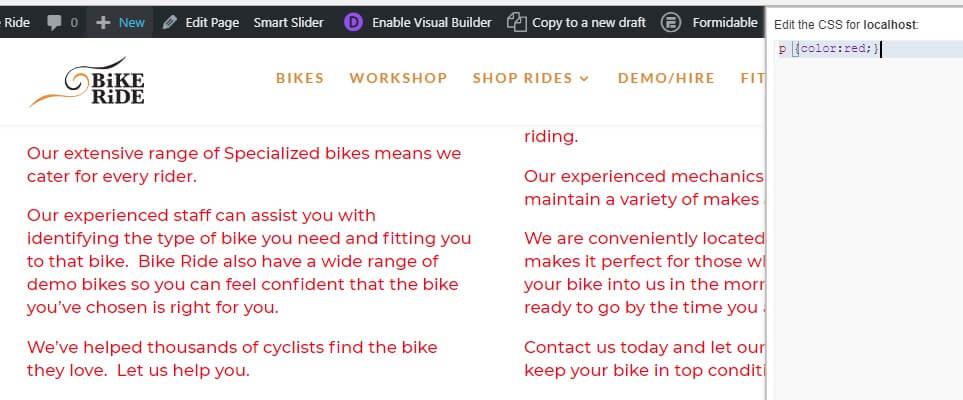
As a quick example, in the image below, we’ve selected the paragraph text (in the <p> tag). Using Stylebot, we have changed the default black color to red by writing p { color:red; } in the Stylebot console.
Once these rapid changes are complete, and we’re happy with the new look and feel of a webpage, we can then implement the changes by adding them into either the style sheet of the website’s child theme or the Custom CSS console found in the Divi Theme Options tab.
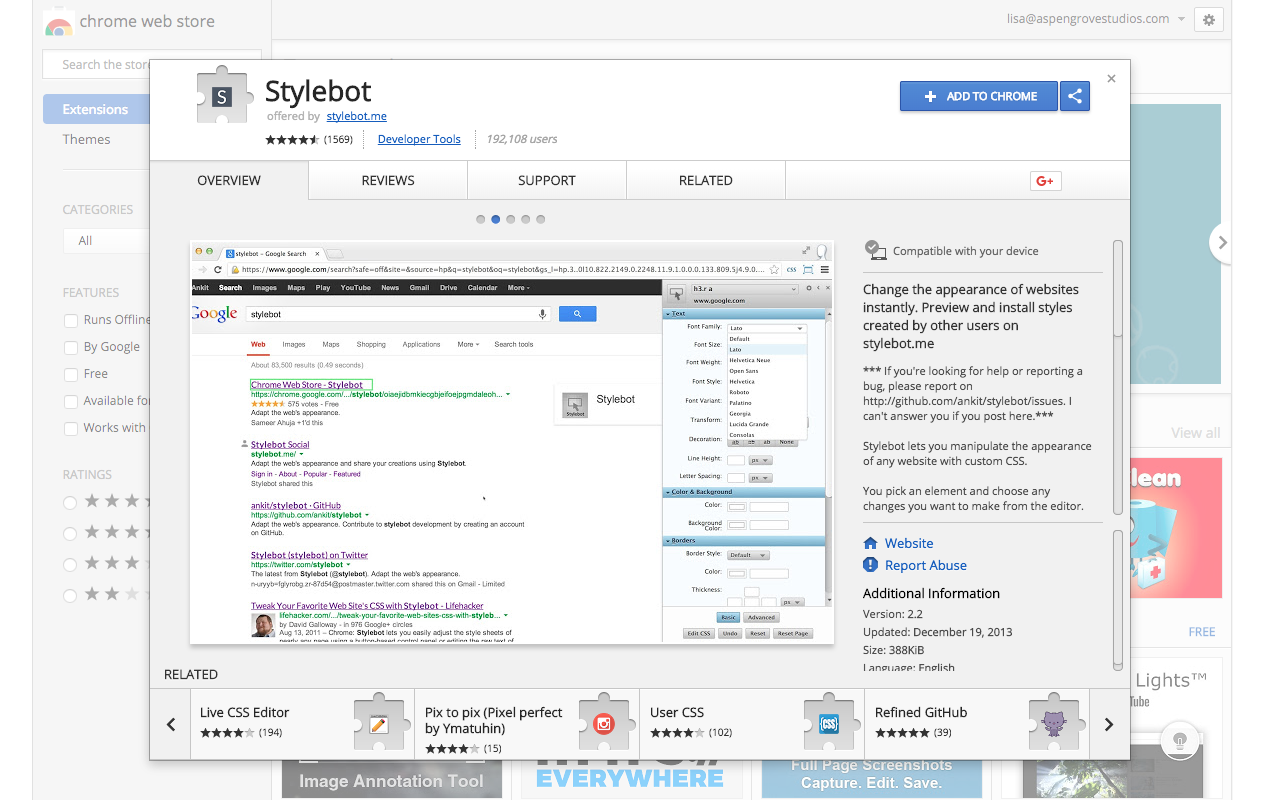
How to Install Stylebot in Google Chrome
First, open up Google Chrome, navigate to the Chrome web store, and click install.

Using Stylebot to Experiment with CSS
Once you’ve reached the webpage, click on the CSS icon your toolbar, select ‘Open Stylebot’. Now you should see a new sidebar console.
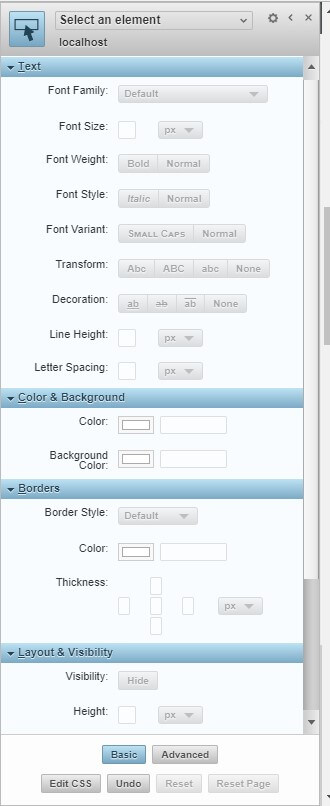
If you don’t see this sidebar when you open Stylebot, use the standard selection options when clicking ‘CSS’ in your toolbar. Here, choose ‘Options’ and then set the Default Editing Mode to ‘Basic’.
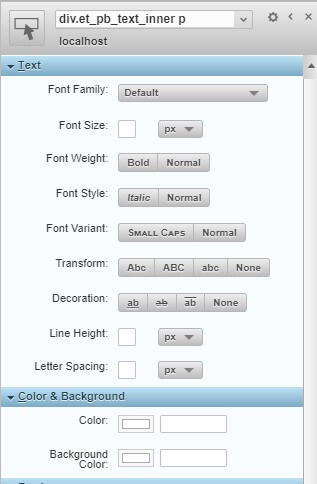
Once you click on an element on your page, whether it’s a single word, a button, or an element that isn’t explicitly visible (such as a Divi section, row or module) the arrow’s background will change from blue to grey. When selected, the CSS name of the HTML element will appear in the Stylebot console.
In our example, we selected a word within the paragraph text. Here, Stylebot signals that we’ve selected a div with the class name of .et_pb_text_inner and the element type of <p>.
There is some really important information displayed right here. I can get rid of the ‘div’ but the other two sections have some meaning. We’ll cover more on this later.
The easiest way to start is by playing around with the various buttons and input fields in the Stylebot console. For the first example, we’ll make the following changes:
- Increase the font size to 20px
- Increase the line height to 20px
- Change the font weight to bold
Try this yourself and watch as these elements change before your eyes.
Continuing this demonstration, we can change the font color to red. When doing so, a color pop-up box will display. Here, select a hue of red that you like and hex code will be reflected.
Once complete, the webpage should look something like this:


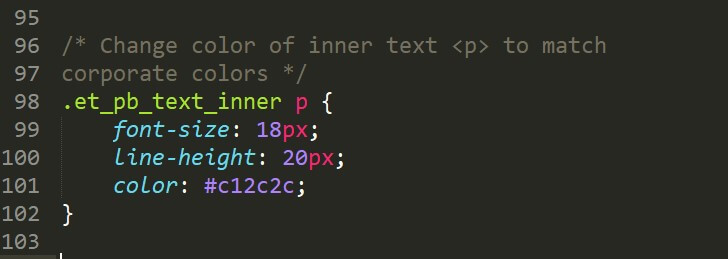
Now you have the basic CSS in front of you, you can make additional changes to the code to match your desired aesthetic. In our example below we have:
- Changed the text color from #e3263f to #c12c2c,
- Decreased the font size from 20px to 18px, and
- Removed the bold effect by deleting the font-weight declaration altogether
Now the Stylebot CSS compiler will look something like this:

This indicates that Stylebot is using a style that you’ve created to change the look of the current page you are viewing.
Note: it is good practice to clear Stylebot after you are finished testing otherwise you might think your changes are working when they are really just local.
How to Add Stylebot Changes to your Website’s Style Sheet
If you are not using a child theme and are simply entering style updates into the Divi Theme Option’s Custom CSS console, simply copy the compiled styles and paste them into the console.
If you are using a child theme for your Divi website, there are two options to update the style sheet.
- Use an FTP agent such as FileZilla or Cyberduck
- Edit the style.css file in the Appearance > Editor console
If you’ve opted for the FTP route, you’ll need to transfer the style.css file from your web server to your desktop. Here you can open the file and enter the new CSS code. Once complete, save the file and transfer the updated file back to the server.
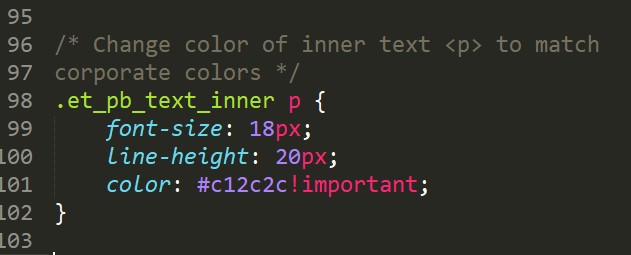
To help you identify your CSS edits easily, you can add a comment above the code that explains what the edit entailed. To add a comment to your style sheet, use /* to begin, enter the relevant text, and close the comment with */ . Comments will not have any effect on the code itself.
The image below is a screenshot of the portion of the style sheet with the new code added. As a note, you can see that we have removed the ‘div’ declaration from the front. This now limits our change to any paragraph <p> tag within a class of .et_pb_text_inner.
Note, the Editor area may be hidden if you have a security plugin activated.
Things to Be Aware of When Making CSS Changes
- Caching. If you have a caching plugin installed, you will most likely need to refresh it in order for the changes to reflect. It is likely that your browser cache will also use a locally stored copy, so remember to clear your browser’s cache as well (<ctrl> F5 for Windows or <command> R for Mac).
- Specificity. In some cases, there will be other lines of code that may override your newly compiled CSS. This situation is due to CSS specificity. In the Divi Space course, Transforming Divi with CSS and JQuery, we explain CSS specificity in detail. If need be, you can add the !important declaration to a line of CSS that is not reflecting. Declarations such as !important (why they exist, when to use them etc.,) will also be covered in the online course.
Note: One of the core philosophies that we’re aiming to teach in the Transforming Divi with CSS and JQuery online course is to give Divi users the ability to understand how to approach a problem when one occurs.
In the course, we’ll cover enough of the fundamentals of CSS so that you’ll be able to identify rather quickly why most CSS updates are not reflecting. For more complicated situations, we’ll equip you with the knowledge of how to go about troubleshooting a problem and researching various fixes.
A Basic Overview of CSS Specificity
In the image below, if we were to simply target the <p> tag, then we’re not being very specific, and instead of simply changing one section of paragraph text, we’ll end up changing the entire website’s <p> style.
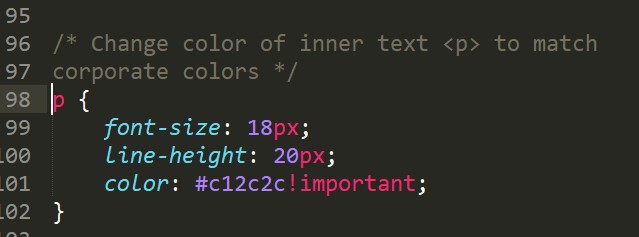
Any style rules set for <p> will be overridden when the <p> paragraph exists within the class of ‘et_pb_text_inner’. This is because the combination of our class with the tag has a higher specificity ranking than just the tag on its own. A higher specificity will win out except where !important is used.
Again, specificity, classes, IDs and much more will be covered in depth in the Transforming Divi with CSS and JQuery online course. Find out more about the online course here.
Conclusion
It goes without saying that with regular practice, you’ll get to where you need to be. To start the journey towards mastering CSS, begin with small changes. Don’t be afraid to play with CSS snippets in a testing or development environment. You can find a number of CSS snippets in the Divi Facebook groups and also in various CSS tutorial-style blog posts.
When making the various changes, you can always use Stylebot to test out how they work first.
For further reading, have a look at the following sources:
- CSS Tricks (a go to- for everything CSS – these guides and articles are first class),
- W3Schools (invaluable as a reference point for CSS),
- Codrops (awesome CSS Reference with great examples).
Have you used Stylebot before? If so, what was your experience with this nifty tool?
If you have any questions or feedback, post a comment below. We love receiving your feedback!
Thanks for reading!

Recent Comments