
An essential plugin to include in a web build is one that assists with SEO. One of the leading SEO plugins for WordPress, Yoast SEO, is free to download, quick to set up and easy to use.
In the following post, we’ll discuss why it’s important to use an SEO plugin as well as offer a step-by-step set up and install tutorial for Yoast SEO.
Why You Should Use an SEO Plugin for a WordPress Website
Installing an SEO plugin in your or your clients WordPress website should become a mandatory practice. An SEO plugin such as Yoast SEO (or All in One SEO Pack or the SEO Framework) will ensure that the pages and posts of a WordPress website will be indexed correctly, helping the content on the site get seen by both site viewers and search engines.
In static websites, where each page would be individually scripted using HTML, the <head> section of each page could be accessed with ease and entering on-page metadata would be a breeze. With a CMS system such as WordPress, accessing the <head> section of each page is not a clear-cut process as the system is served dynamically using PHP and an associated database.
SEO plugins have made it incredibly easy for WordPress users to enter on-page metadata and other SEO elements. By simply installing and activating a plugin, and following its set up instructions, users can ensure that their websites will be indexed correctly by search engines, and that their content will be found by the correct target audience/s.
SEO plugins work in almost the same way and offer a number of the same features. Including, but not limited to:
Metadata
SEO plugins help by adding metadata (meta titles, meta descriptions and focus keywords) for each page or post on a WordPress website. Metadata helps ensure that search engines can understand what each page or post is about, and in turn, they’ll display the page or post accurately in a search result. The SEO plugins will generate a snippet preview that’ll show you exactly how your post or page will look in search results. Some also offer this preview for mobile devices as well as previews for social pages.
Canonical URLs
URL structure is incredibly important when it comes to SEO. If you’re not careful with your pages and posts and the related URLs, you could find yourself with either duplicate content or broken links. SEO plugins will advise on setting canonical URLs, helping you avoid Google penalties.
XML Sitemaps
An XML sitemap basically tells a search engine what your website is comprised of, i.e. x amount of pages, posts, projects, x amount of images and so on. SEO plugins make submitting a Google Search Console incredibly easy.

While SEO plugins function in pretty much the same way, Yoast SEO includes a handy ‘traffic light system’.
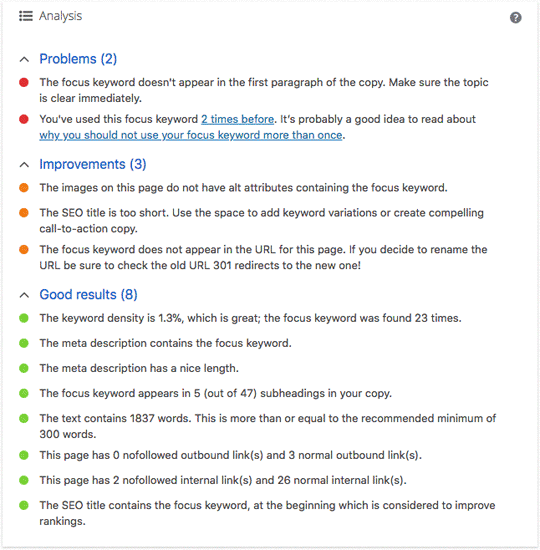
While writing content, the plugin will analyze the users content and offer suggestions to make it better. Using a code of red, amber or green lights, the user can easily identify which areas or aspects of the content can be improved upon. Here, Yoast SEO helps users better their content writing and editing skills to help your articles rank better in search results.
The Yoast SEO traffic light is a great feature, particularly for new WordPress users or users who are new to content publishing, however, at times, it can be a bit overwhelming and distracting. Keep in mind that the aim of the game is writing great content that your readers will love, not impressing search engines at any cost, especially if it costs you your craft or interest therein. The traffic light system is merely a guide.
Yoast SEO is available in two versions:
- A free version available for download from the WordPress repository, and
- A premium version available for purchase from the Yoast SEO website.
The premium version includes a number of additional features, such as:
- The ability to add multiple focus keywords
- A nifty Insights Tool that’ll help you see what the focus of your article is in relation to the keywords
- Automatic suggestions for internal links
- A redirect manager that assists with deleted pages and changed URLs
- A social media preview that’ll show how each page or post will display on social networks such as Facebook, Twitter etc.,
For the tutorial, we’ll be demonstrating the free version of the plugin. For most users, especially those starting out with blogging and content marketing, the free version is more than sufficient.
If you are a multifaceted brand that publishes high volumes of content in an array of categories, then the premium version of Yoast SEO may be better suited, however, for most websites, we recommend trying it out and monitoring results before considering the premium version.
How to Set Up Yoast SEO
First things first, you’ll need to install the Yoast SEO plugin on your WordPress website. There are two ways to install the plugin. You can either:
- Upload the plugin directly from within your WordPress website (navigate to Plugins > Add New, search for Yoast SEO and click Install), or
- Download it from the WordPress Repository, install it on your WordPress website by navigating to Plugins > Add New and uploading the downloaded .zip file.
If you’re brand new to the WordPress interface, we recommend reading our blog post How to Install a WordPress Plugin (Step by Step Guide for Beginners) which not only gives a plugin installation tutorial, but also explains what a plugin is, how it can function and what that difference is between free and paid plugins.
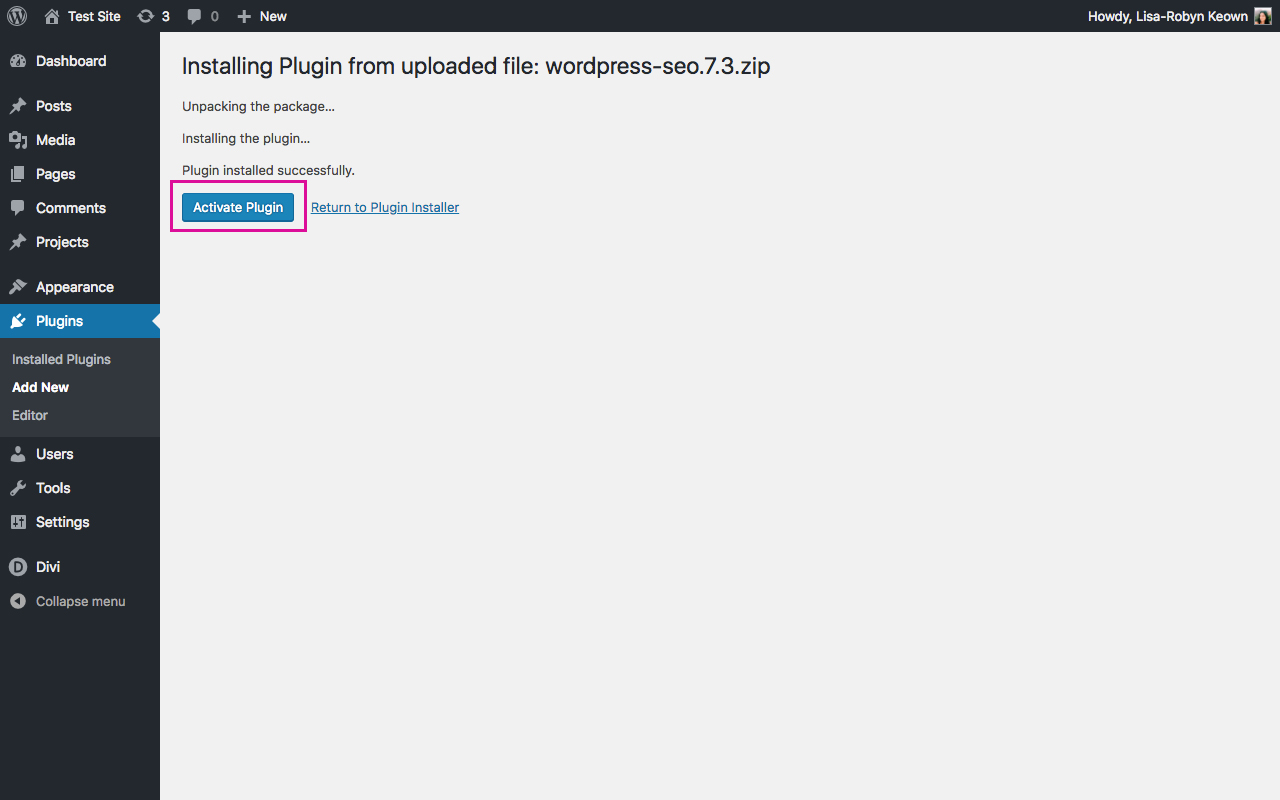
Once you have installed Yoast SEO, make sure that you click Activate or else the plugin will not work.
After Yoast SEO is installed and activated, you’ll see a new menu item called SEO as well as a Yoast SEO icon in the WordPress admin bar.
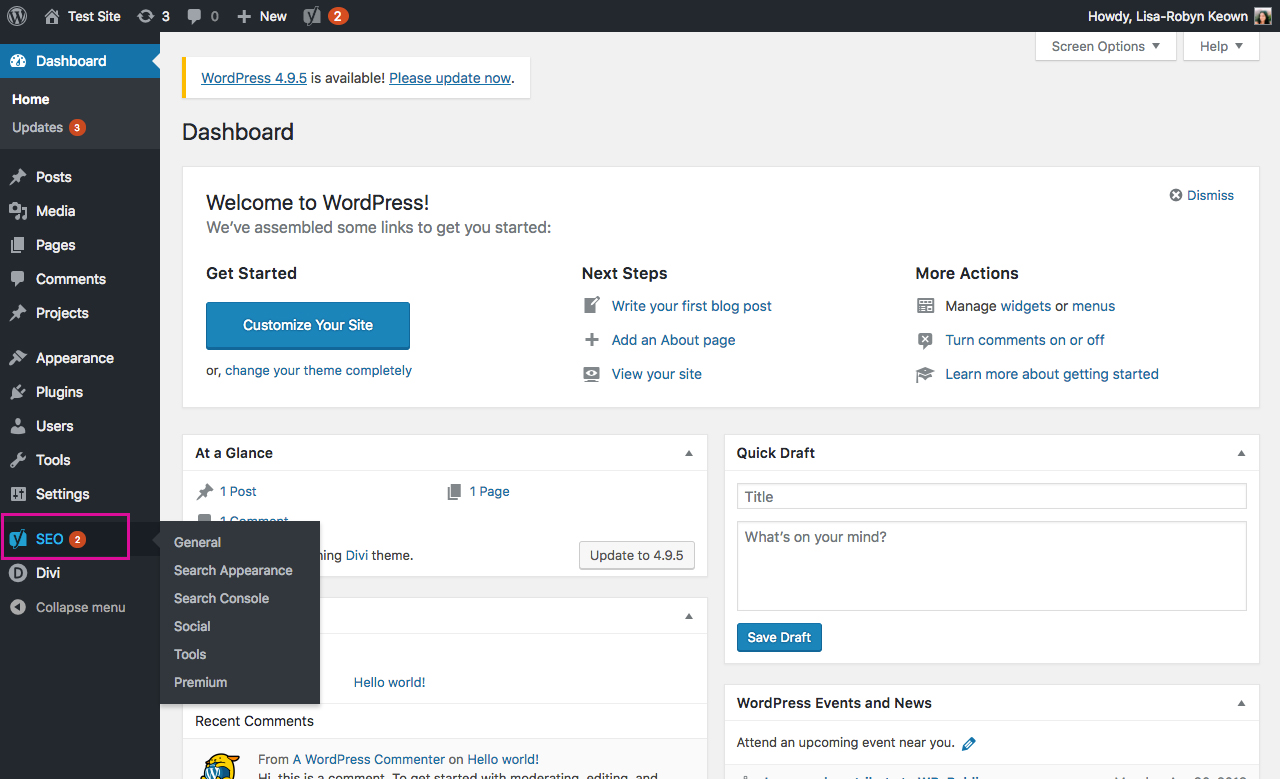
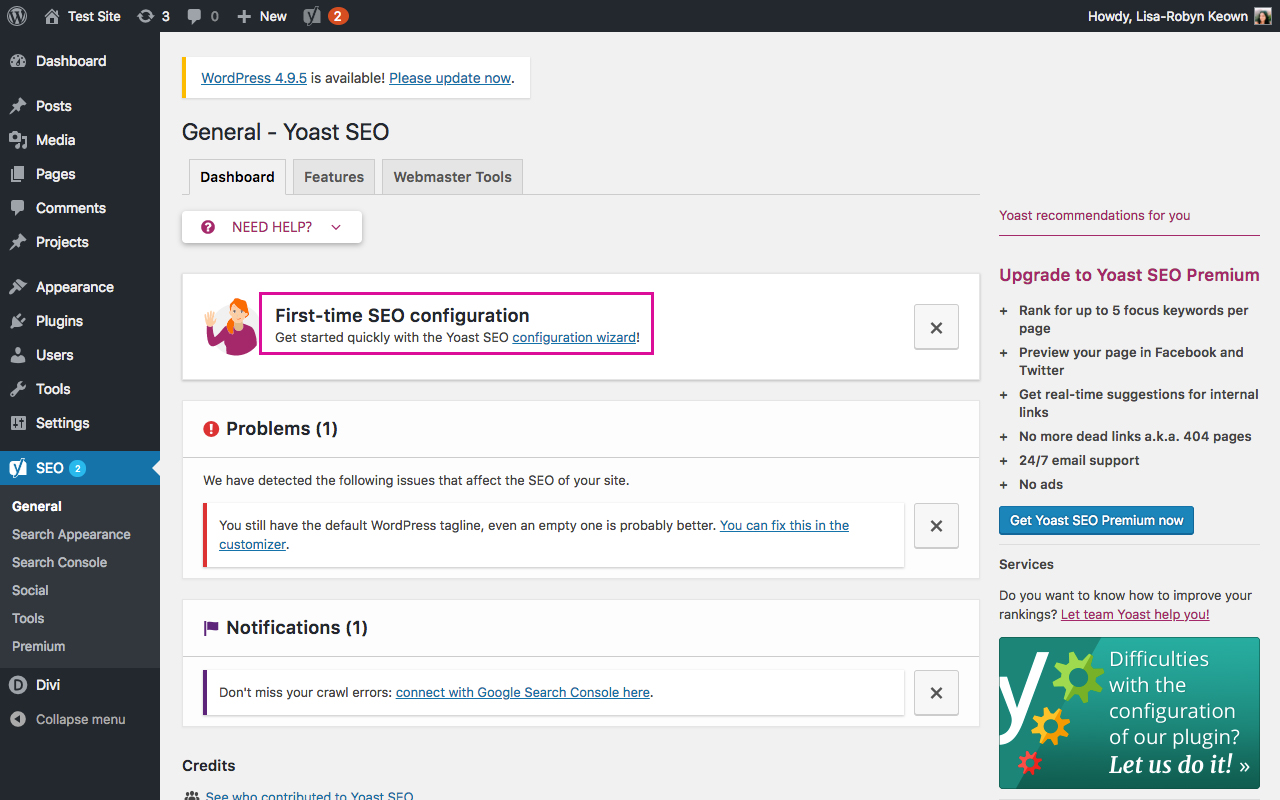
By clicking on either the admin icon or navigating toSEO > General, you’ll be taken to the Yoast SEO Dashboard where you’ll get updates about the plugin, information about your website’s search performance, problems that the plugin may be experiencing in trying to improve your SEO and so on.
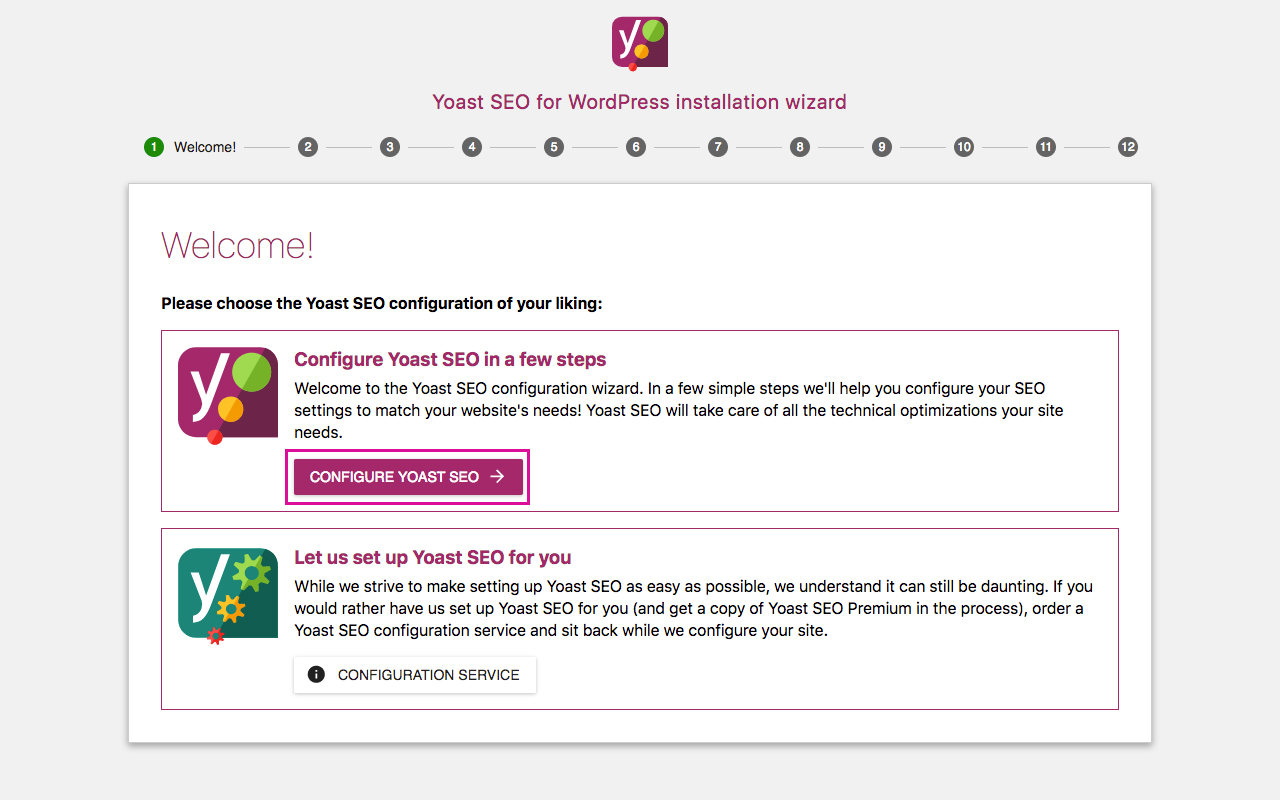
First time Yoast SEO users who may not know how to setup the plugin are advised to use the configuration wizard.
As you begin the configuration wizard, the plugin asks if you’d like to configure the settings yourself or pay a fee for the Yoast SEO team to do this for you. Select the Configure Yoast SEO option and click Next.
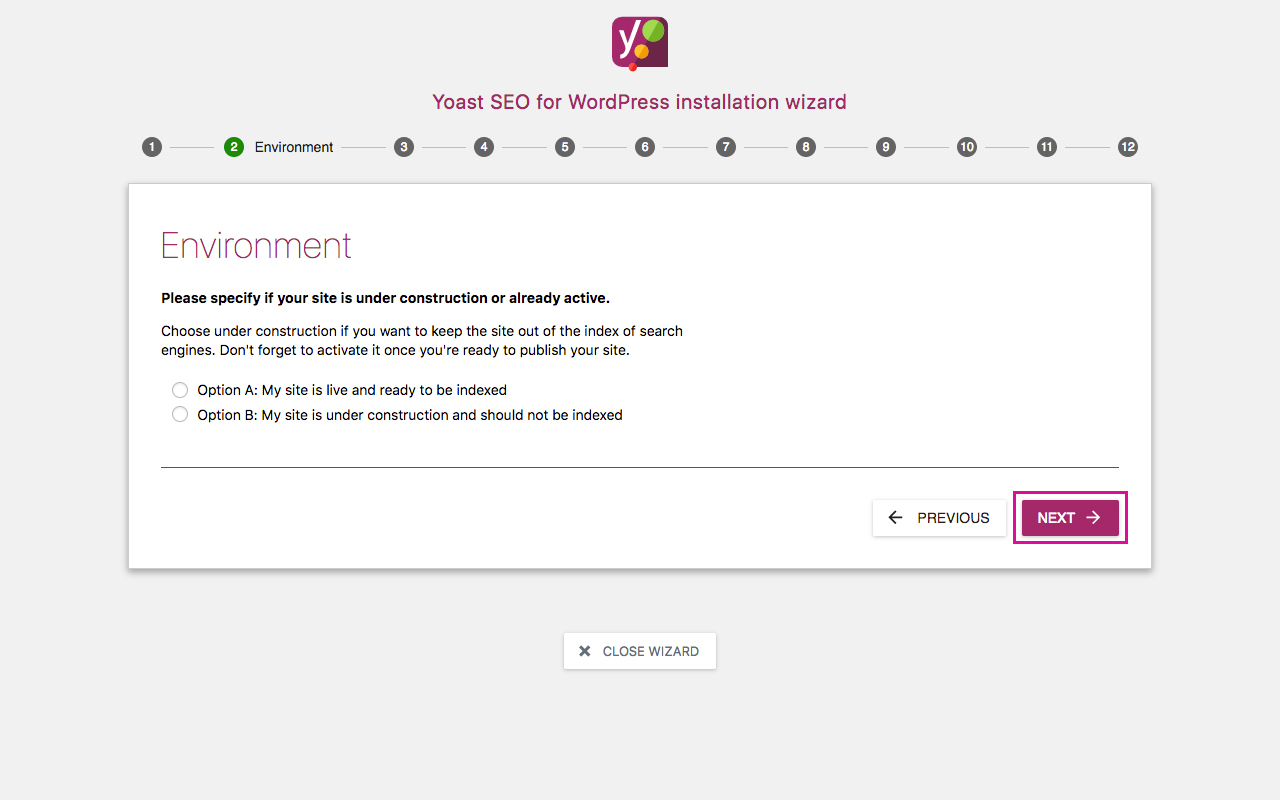
Next, you’ll be asked to specify which environment your site is currently in – live or in development. If you select Option A, Yoast SEO will begin the process of indexing your site. If your site is still under construction, select Option B. You can easily change this once you’ve deployed your site. Select the applicable environment and click Next.
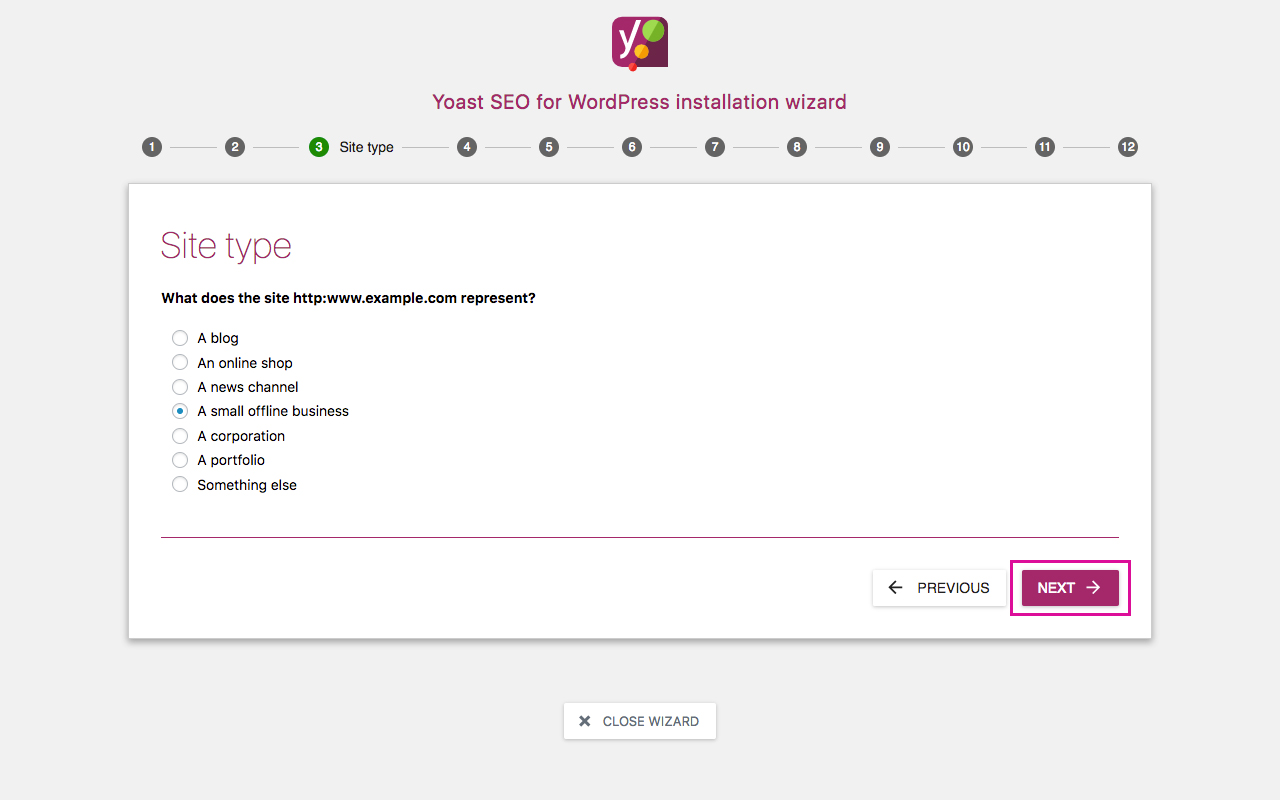
At this point, the plugin asks you to specify what type of website you’re creating (a blog, an online store, a portfolio site etc.). Select whichever option best suits your website and click Next.
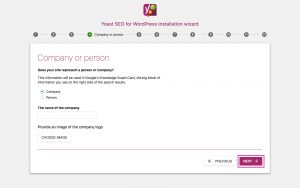
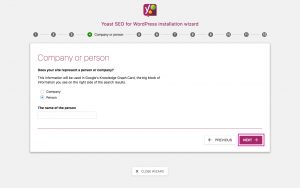
You’re asked to state whether your website is for a company or a person. Each option asks for different inputs – the company name and logo or the name of the person, With this information, Yoast can submit better information to Google’s Knowledge Graph. Select the correct option and click Next.
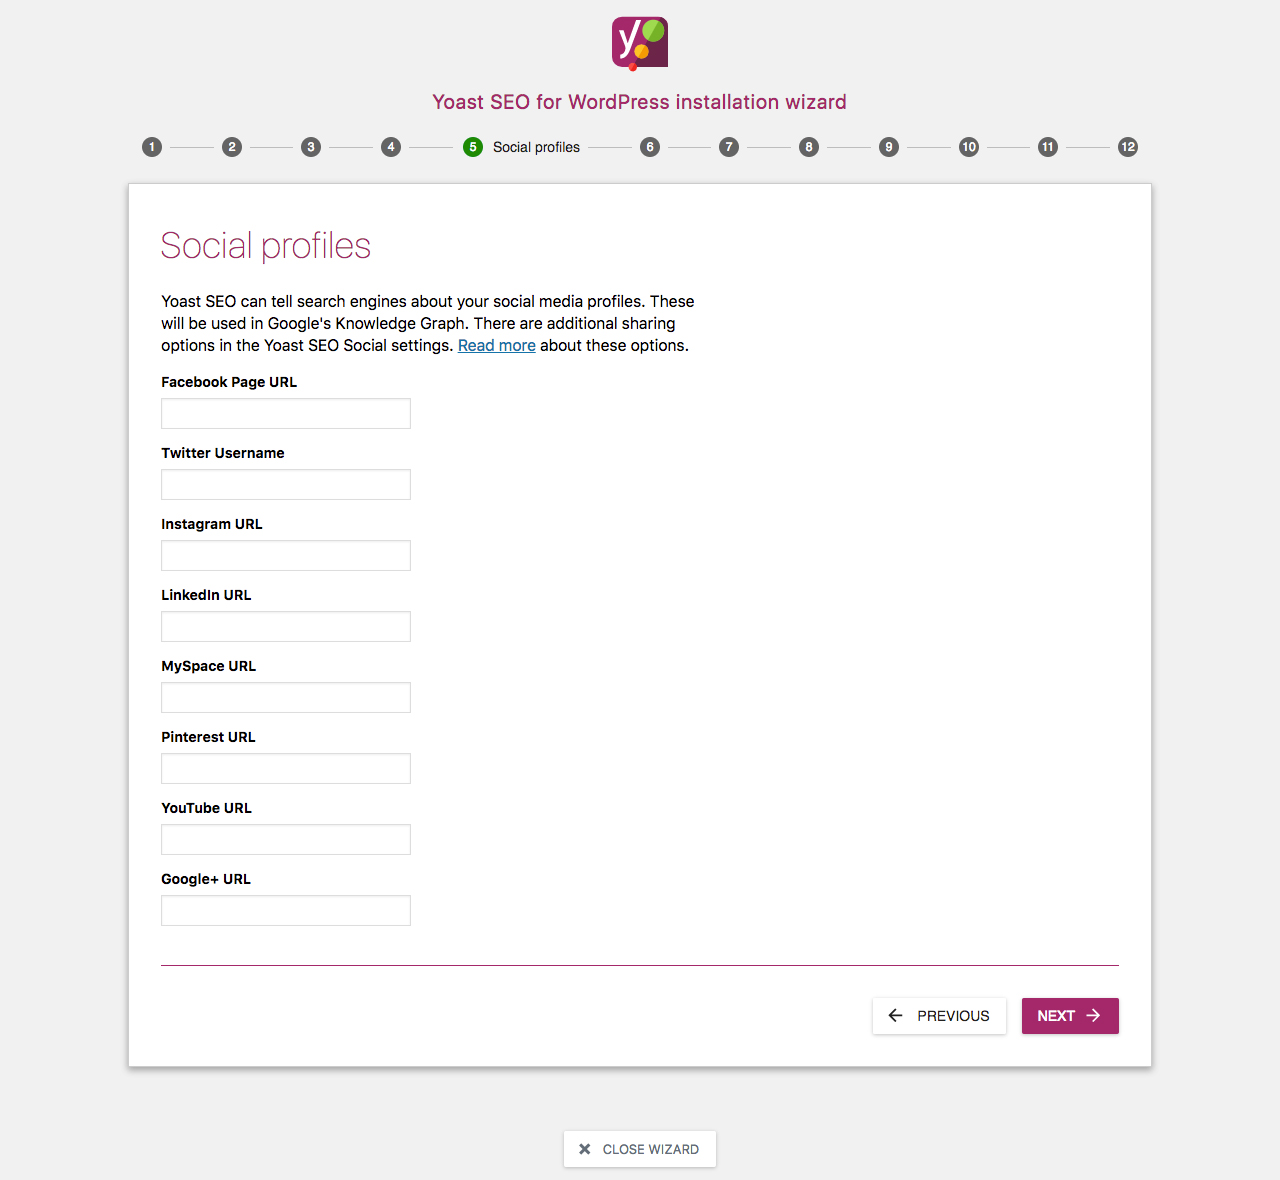
The following step is to add your available social media profile, again, for more accurate information for Google’s Knowledge Graph. Enter the correct URLs and click Next.
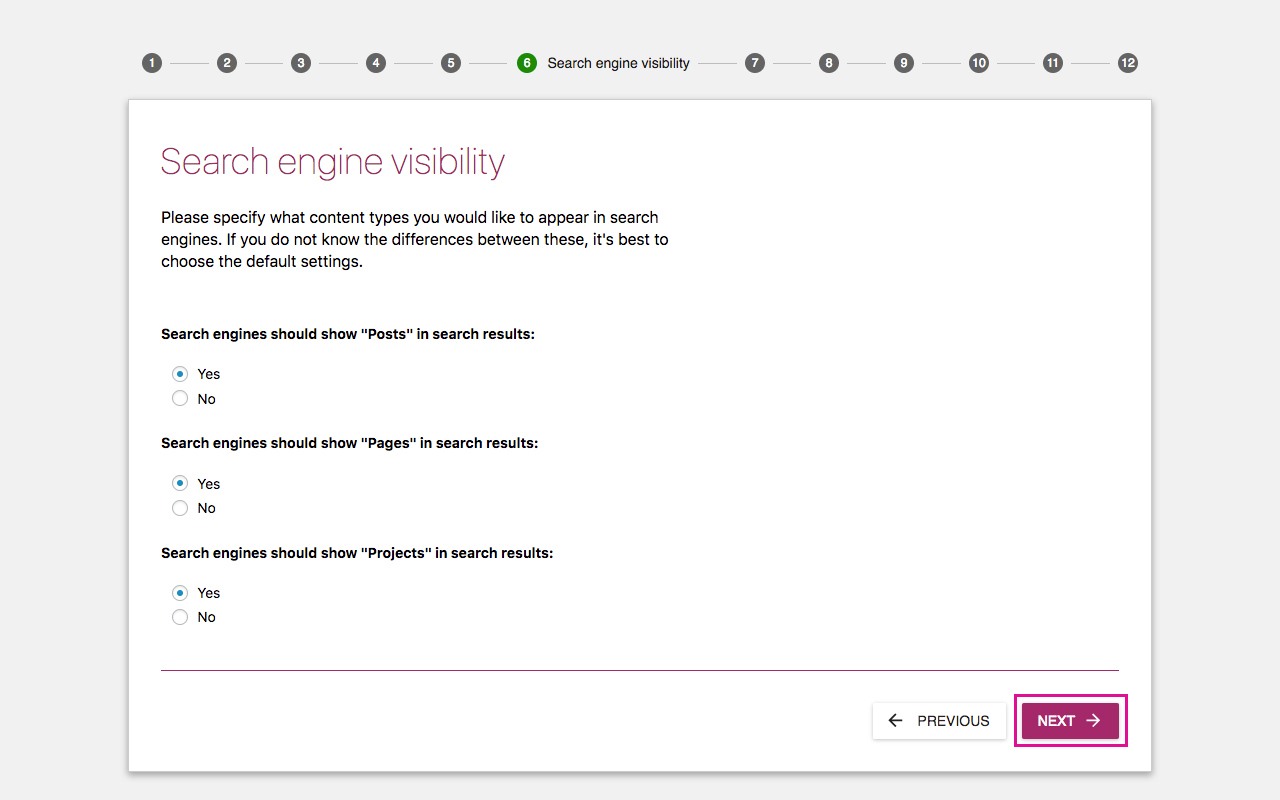
In step 6, you are given the option to set whether your pages, posts or projects will display in search engines. Pretty self-explanatory, unless for any specific reason you do not want a post type to be indexed and display in search results, select Yes for all options and click Next.
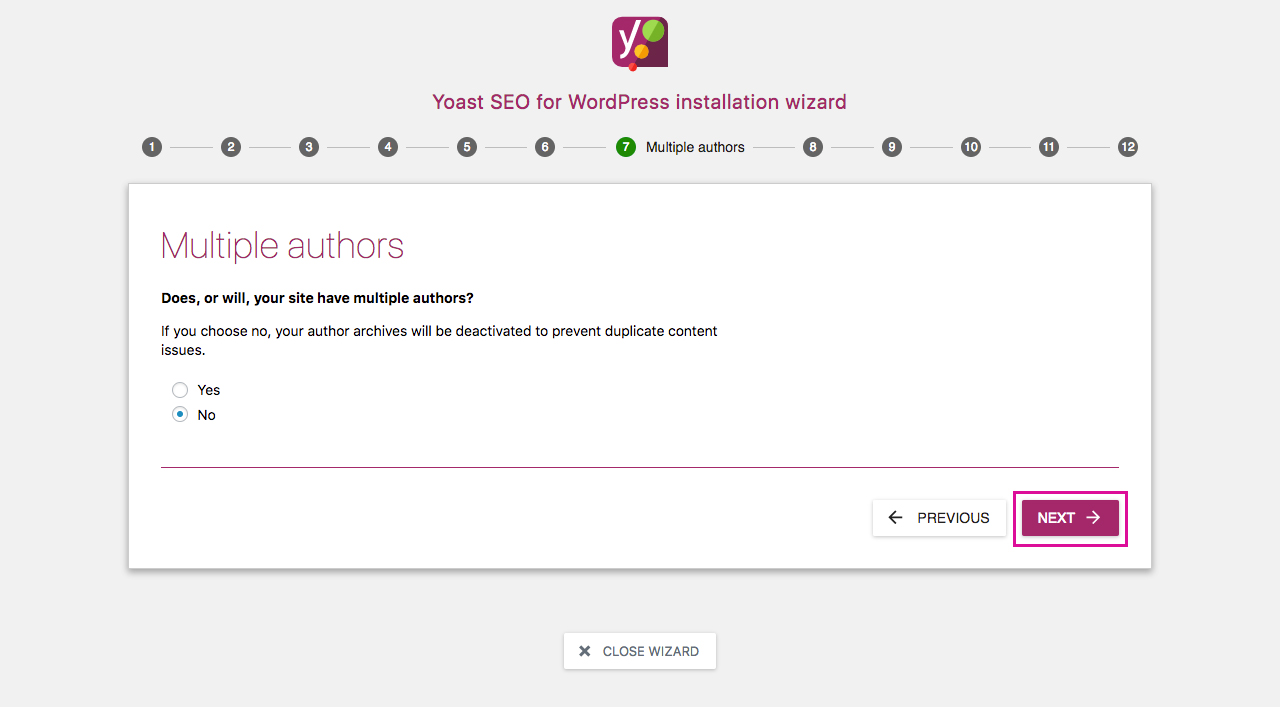
Next, you’re asked to specify whether your website will have multiple authors. To prevent WordPress from creating duplicate content in replicating the archive author pages for a single author, specify whether you’ll have more than one author and then click Next.
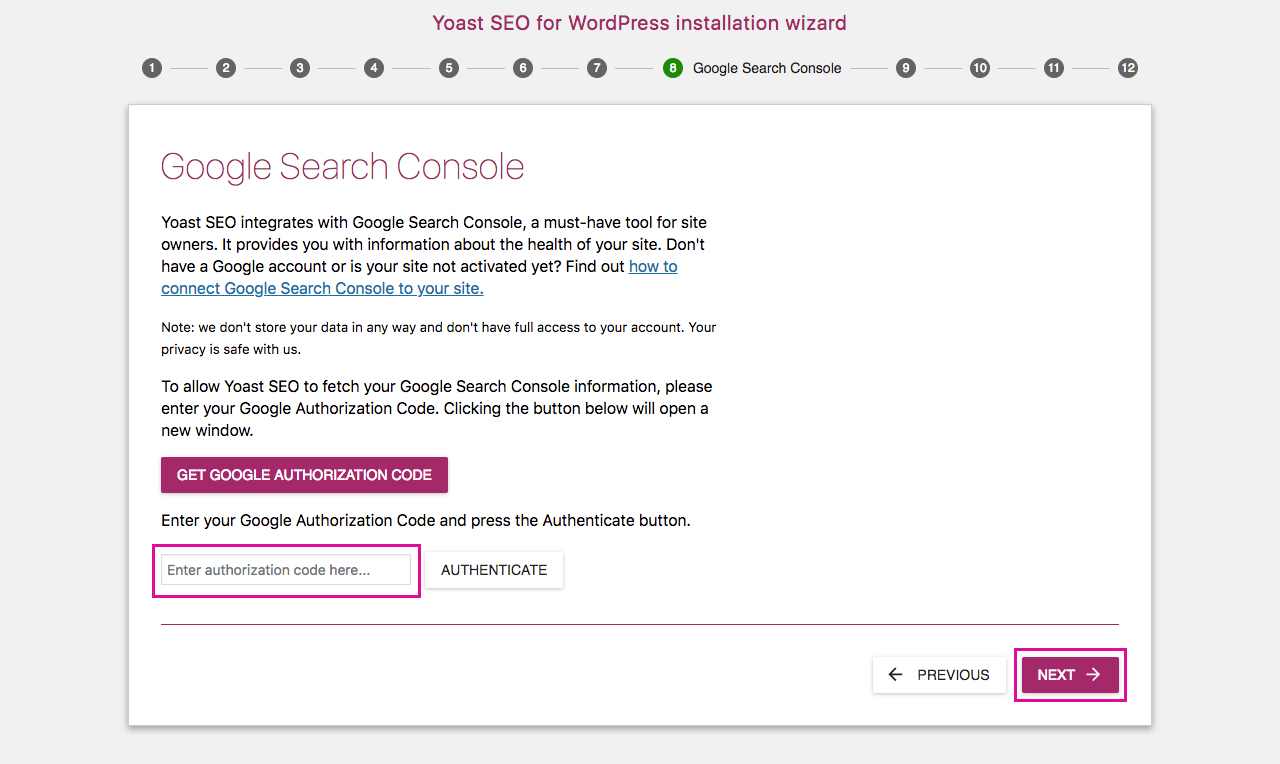
Step 8 asks you to connect your website with Google Search Console.
If you have already set up Search Console, simply click the Get Google Authorization Code button and log into the associated Google account. Here, you’ll receive an authorization code that can simply be copied and pasted into the space shown below. Once pasted, click Authenticate, followed by Next.
If you have not already set up Google Search Console, you’ll have a few more things to do before this step. At this point, you can skip step 8 and return to it at a later stage, but keep in mind, listing your setting your website up with Google Search Console is incredibly important if you’d like your site to perform well in search results.
We’ll cover the Google Search Console setup steps in brief further down in this article, for the meantime, if you can’t connect with Google Search Console here, rather bypass this step for now.
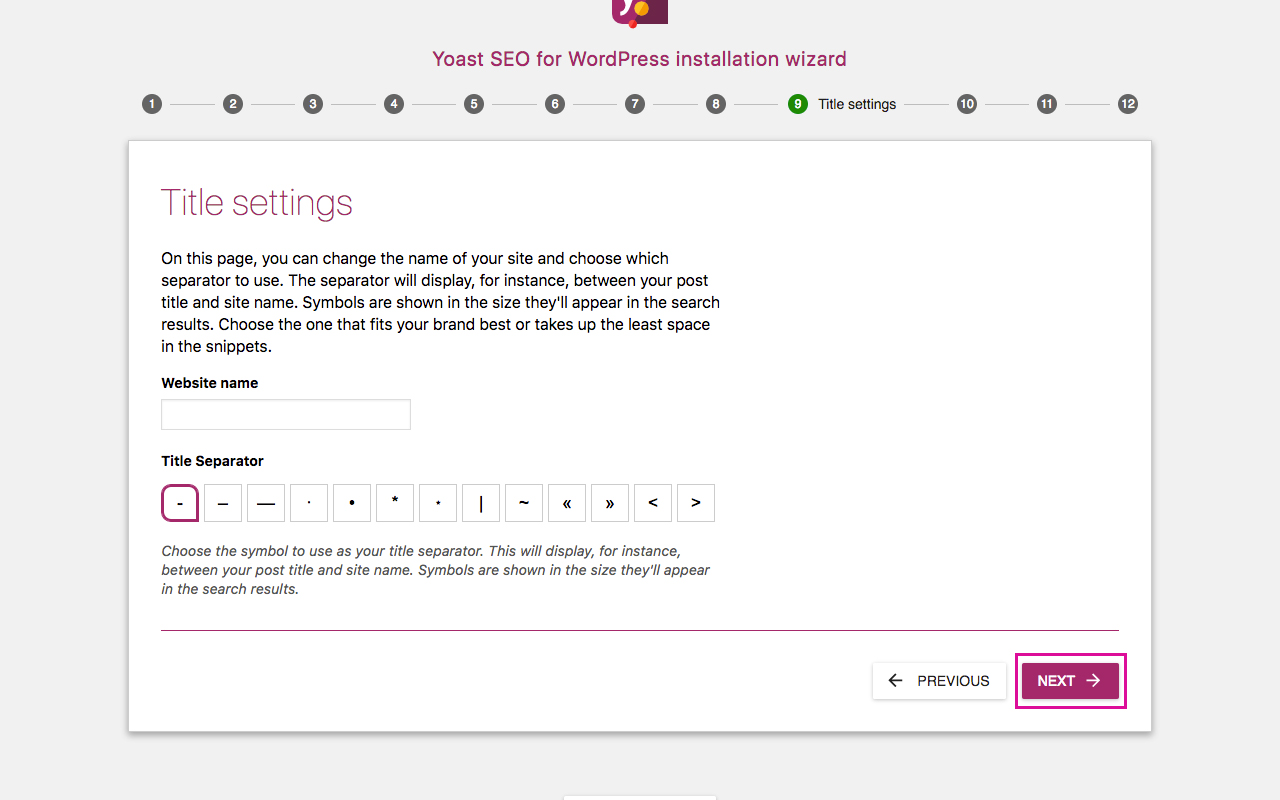
At this point, you’ll be asked to select the title settings. These separators (as punctuations marks) will be used between the page and post titles and site titles, for example:
- How to Setup Yoast SEO for Your WordPress Website | Divi Space
- How to Setup Yoast SEO for Your WordPress Website – Divi Space
- How to Setup Yoast SEO for Your WordPress Website > Divi Space
Select whichever separator you prefer and click Next.
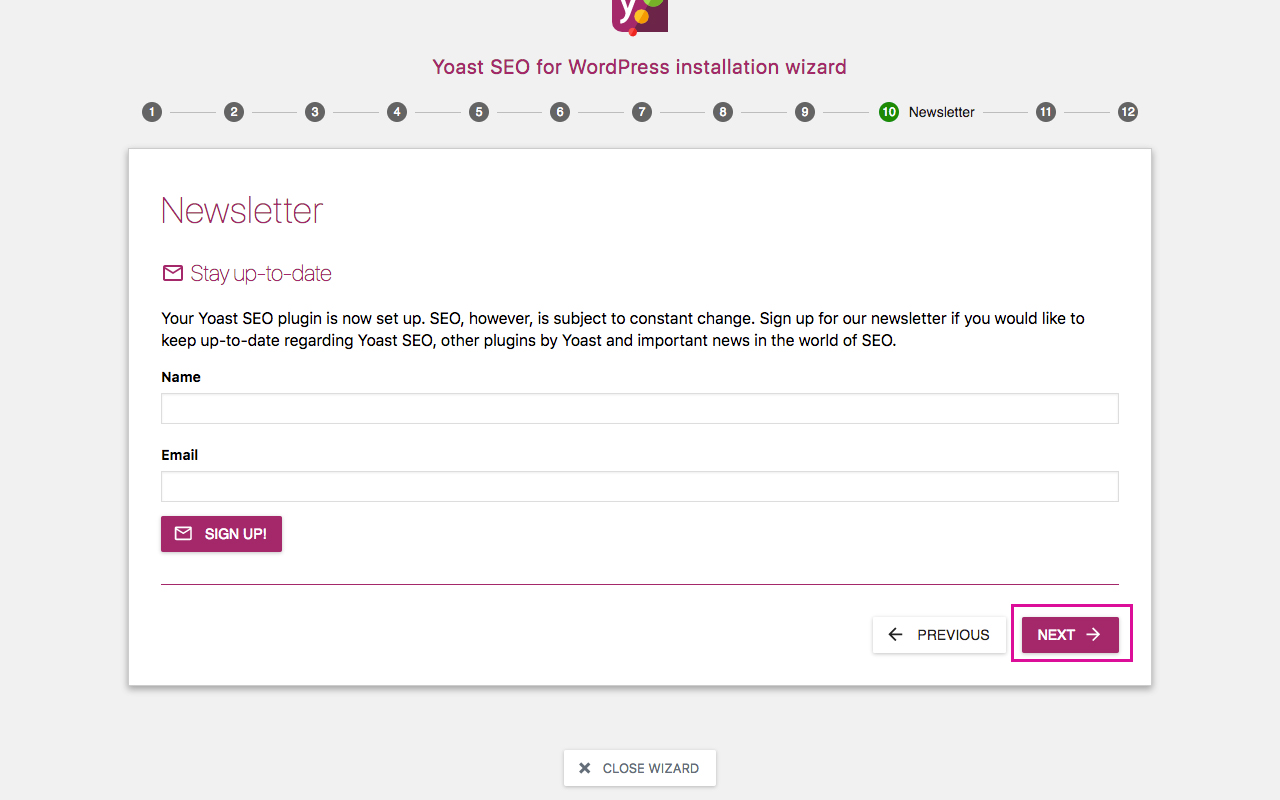
Step 10 is just the plugin asking you to sign up for the Yoast SEO newsletter. Yoast is well known for releasing really valuable content so if you’re brand new to WordPress, content marketing or SEO, then consider signing up.
Finally, you’ve reached the end of the setup and configuration process. When ready, click Close.
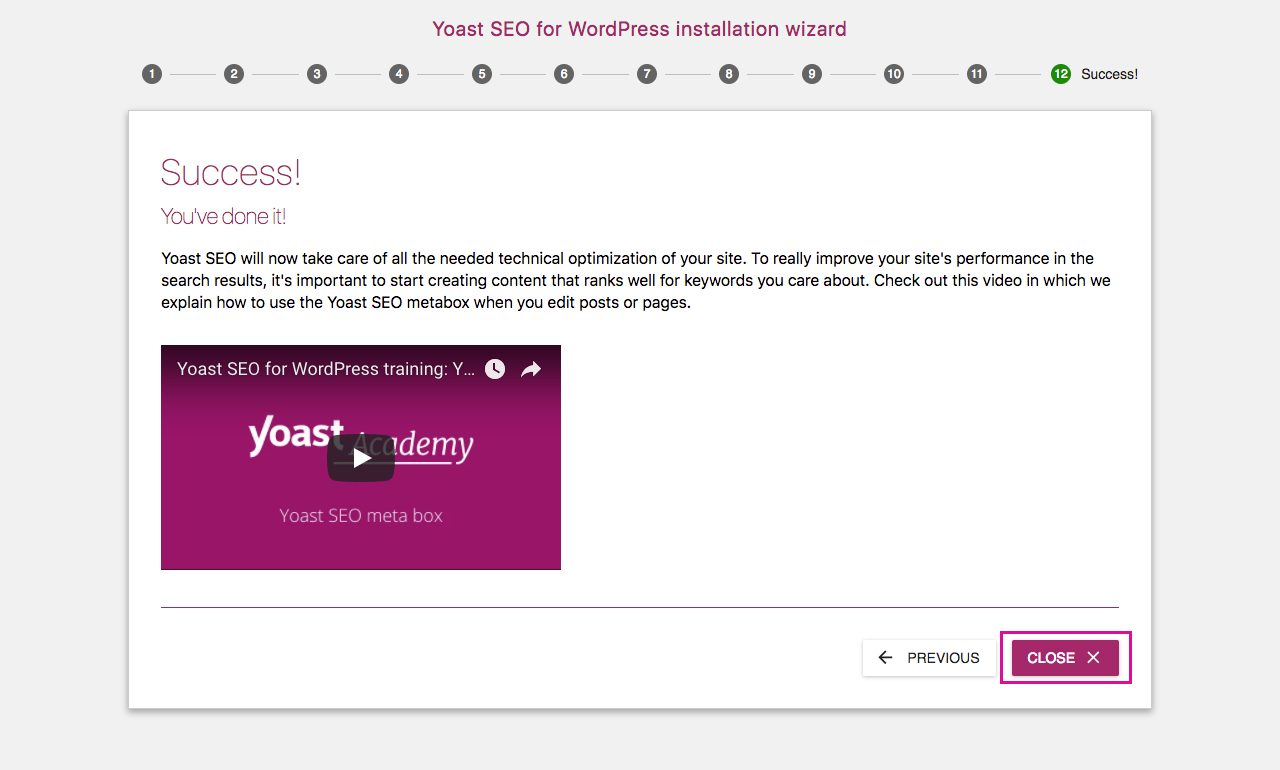
Once the setup process is complete, the plugin will be ready to go. As soon as you create a new post, you’ll see an additional section in your page or post editor – the Yoast SEO plugin – including the metadata entry section and the ‘traffic light’ that’ll guide your content.
Getting Started with Yoast SEO and Google Search Console (A Very Brief Overview)
One of the steps in the Yoast SEO setup process requires the webmaster to connect the plugin with their Google Search Console. Google Search Console helps webmasters gain a deeper understanding of the browsing behavior of their site visitors, and too, offers deep insight into the search performance of the site itself.
It really is worth investing the time in setting up your website with Google Search Console as well as Google Analytics. Here is a very quick step by step overview of the setup processes for both:
- Create a Google Analytics account.
- Go through all of the relevant Google Analytics setup steps until you are presented with the asynchronous tracking code.
- Copy this code, including the opening and closing <script> tags, paste it into the section of the Divi Theme Options Integrations Tab titled “Add code to the <body> (good for tracking codes such as google analytics)” and click Save Changes.
- Return to Google Analytics. Pretty soon after setting up Analytics, you’ll be prompted to connect your website with Google Search Console. Follow the prompts.
- As you arrive on the Dashboard, you’ll be asked to Add a Property. Here, add both the www.domain.com and domain.com versions of your site (both with and without the www).
- You’ll need to verify that you are in fact the owner of the website provided. There are a few methods to verify site ownership, the easiest of which is to verify using Google Analytics.
- Select this option and click Verify. Search Console will check to see that the asynchronous tracking code is present, and, once complete, you’ll see a success message.
- At this point, head back to your WordPress website and navigate to the Yoast SEO plugin on your WordPress dashboard.
- Click on the Webmaster Tools tab.
- At Google Verification Code, click the Get your Google verification code in Google Search Console option.
- You’ll be asked to enter the email and password of the Google Account associated with the Google Search Console in question.
- After following the prompts you should see a success message.
- For a more in-depth guide to setting up Google Search Console, read the following post, “How to Set Up Google Search Console for Your WordPress Website.”
Conclusion
Yoast SEO is just one of the SEO plugins for WordPress. It does a great job at doing a lot of SEO heavy lifting, and too, helps writers refine their craft to become more visible with search engines.
There are alternate SEO plugins such as All in One SEO Pack and SEO Framework. These plugins do not have the ‘traffic light’ feature of Yoast, so will not guide new users in their writing, however, other users may lean more towards either of these options as a more streamlined and minimalistic interface may be less of a distraction.
We want to hear from you!
Are you familiar with Yoast SEO? Have you used it before on a site build, or do you have experience with another SEO plugin? We hope you enjoyed reading this article and that you’ve been encouraged to invest the time in an SEO plugin. Please feel free to share your comments or questions below, we love receiving your feedback!
Thanks for reading!

Great article. Here is my concern. Apart from all the YOAST settings, there is a section in DIVI theme options about SEO, In that section you can see switches and fields for meta descriptions, keywords and son on. Whay should we do with that settings?
Its a real shame that Divi and Yoast cannot function together as it did when used with the classic editor. I wish they would do something soon. Its so hard to work with currently
Well, how do I use Yoast SEO with Divi. If the Divi page builder is active then I can’t see yoast option in the bottom. Am I missing something
You will need to use the wireframe builder by clicking “edit page” and not the visual builder
Further to other comments how do you solve the issue that Yoast SEO and Divi Editor does not working with the ‘Readability’ elements of Yoast?
Which is the same for all theme editors I think.
I have different issues using Yoast SEO with the Divi theme. It says there are more than one h1 tags but checking through and looking at the page source there is only one set. Also I do not get a green light with the keyword in the first paragraph when again looking at the page source it clearly is. Has anyone else had this issue with Divi and Yoast.
He usado Divi y Yoast Seo, te aseguro que si funciona. Tal vez deberías de chechar bien las etiquetas de texto que estas usando.
Yep, we’re seeing the same issues with our client sites. We did discover that inserting the page title dynamically with Divi’s dynamic content options solves the h1 error, but the other error you mentioned we haven’t found any good documentation on how to rectify.
Opps, this is the link I meant to include https://github.com/Yoast/YoastSEO.js/blob/master/README.md
As someone using Divi and the Yoast plugin on over 100 sites, at a ratio of about 90/10 free vs. paid, I can categorically state that there are glaring incompatibilities with the #1 WordPress SEO plugin. Those compatibility issues must be manually overcome, and it does make things less efficient.
For example, we recently applied a nice Divi layout to a 1500+ page site one page at a time, and inc=stantly lost all of autogenerated description tags, which had to be individually edited. Stuff like that is irritating to say the least.
There are steps that Elegant Themes and other site builders can take, which will offer better compatibility and Yoast has outlined those here https://kb.yoast.com/kb/can-i-add-data-to-the-page-analysis/
Sadly, none of the major theme builders have yet seen the potential value of being 100% compatible with the Yoast SEO plugin, and it would be great to see Divi become the first.
Hi Lisa,
How does yoast analyse the textual content on the pages. Seems like Yoast is only showing and analysing the meta data.
Best, Chris
hi, anyone ever had this issue: i have divi theme (child) and seo yoast, and if i check the website with some check tools, they find 2 title tags per page, instead of only one, there is any option i should disable in divi them in order not to contrast with Seoyoast title tags page by page?
We’ve found that if we insert the page title as dynamic text it solves this h1 issue. We are still looking for a solution on how to fix the incorrect error stating that the keyword doesn’t appear in subheadings or the entry paragraph (which it does), however..
Hi there,
I’d be interested to know if you tried the Yoast SEO Video Plugin, with posts / pages using the Divi Builder.
Personally this plugin of Yoast SEO is not working on my Divi website, so i was wondering if you or a friend of yours found out how to make it work. As when using the Divi Builder, Yoast Video plugin have a hard time to analyze the embedded information to find the videos on the page.
As you underlined in your article obviously SEO plugins are essential for website overall our inspiration regards the kids’training including the teachers and so these plugins with its tutorials will enable us to acquire more English learning.
More once thanks for everything you to do for us.