Have you looked around a website and then gone to Facebook to see ads from the website you just left? Maybe you’ve looked at course and then Facebook shows you that course. Coincidence? No. This is a Facebook pixel. Facebook pixel is one of the most popular marketing tools available to website owners. If you’ve ever visited Facebook, chances are high that you’ve encountered Facebook pixel.
What is Facebook Pixel?
A pixel is a digital dot, right? A picture element? Well, normally that’s what we would be referring to if we talked about pixels, but in the case of a Facebook pixel we’re referring to Facebook’s advertising cookies. A pixel is a cookie that allows you to track your visitors so you can advertise to them on another platform.
Facebook pixels target your audience. They track conversions of your ads, help you optimize for conversions, and allow you to remarket to your site visitors. This is known as retargeting.
To use Facebook pixel the code needs to be integrated into your WordPress website. The method of adding the code will vary, depending on the type of WordPress theme you have. There are two ways to add it to Divi: manually or with a plugin. Let’s look at both methods. First, let’s see how to create a Facebook pixel.
How to Create a Facebook Pixel
![]()
In your Facebook account, select the down arrow in the far right of the menu. From here select Create Ads or Ads Manager. Alternately, you can go to the Pixels page in the Facebook Events Manager.
![]()
This opens the Ads Manager. Click the hamburger menu (conveniently labeled Ads Manager) in the upper left corner.
![]()
Select Pixels under the section labeled Events Manager.
![]()
Within the Data Sources tab click the green button labeled Set Up Pixel.
![]()
You have a few options of how to install the code. We’re going to live on the wild side and install the code manually. Select Manually Install the Code Yourself.
This opens a modal that provides the code and instructions on installing it within your header. We’re going to install it a different way than it’s showing here, so you can ignore the instructions it gives you.
Note – you can install the code in the header if you want to, but only install it in the header if you’re using a child theme. If you install it directly into your Divi header without a child theme your code will be overwritten the next time you update Divi.
It’s up to you if you want to use Advanced Matching. This adds visitor information such as phone numbers and email addressing to better match your visitors to people on Facebook.
![]()
For the manual install, click on the code to copy it to your clipboard. This is the code you will paste into Divi. Don’t close this page yet. We’ll come back here to add an event. For the plugin install, go ahead and close the modal.
Add Facebook Pixel to Divi Manually
![]()
In order to operate properly your Facebook pixel must be installed on every page of your website. Fortunately you don’t have to physically install it to every page. You can install it to your header once and it will appear on every page that uses the header.
Divi makes this easy. Instead of digging into the PHP of Divi you can simply paste the code into your Divi Theme Options. This will not be overwritten when Divi updates.
In your dashboard menu go to Divi > Theme Options. Select the Integration tab. Scroll to the field labeled Add code to the < head > of your blog. Paste your Facebook pixel code here. Make sure the button at the top, Enable header code, is enabled.
Click Save Changes at the top of bottom of the screen.
Adding an Event
An event is something that can be tracked, such as a button click or a purchase. Adding events is optional but it’s a good idea because it allows Facebook to show ads based on specific actions the visitor has taken.
For example, if the visitor placed an item in their cart but didn’t complete the purchase, you could show them a reminder to complete their shopping on your website. Another example could be if someone clicked on a specific page, such as viewing your services or information about an event, Facebook could show them ads based on that page or event.
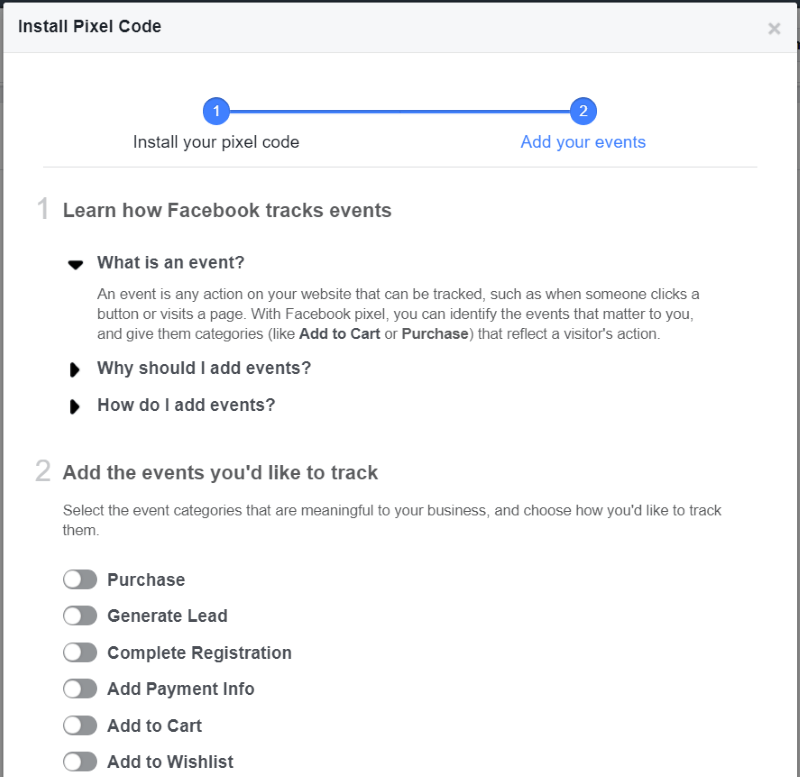
Facebook pixel has 9 events built in and you can create your own custom events. To get the script for the event go back to the modal where you got the first script. At the top of the modal select the option on the right labeled 2 – Add your events.
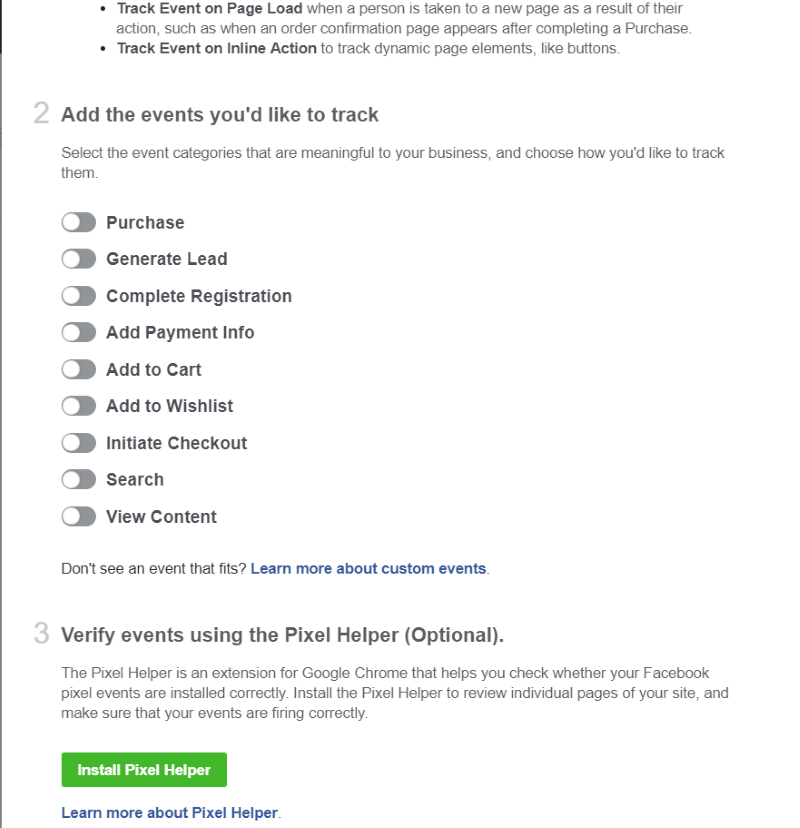
Scroll down and select the event you want to track. You can track either on page load or on an inline action. Page load is when they’re taken to a new page because of an action. An inline action are when they interact with page elements such as buttons.
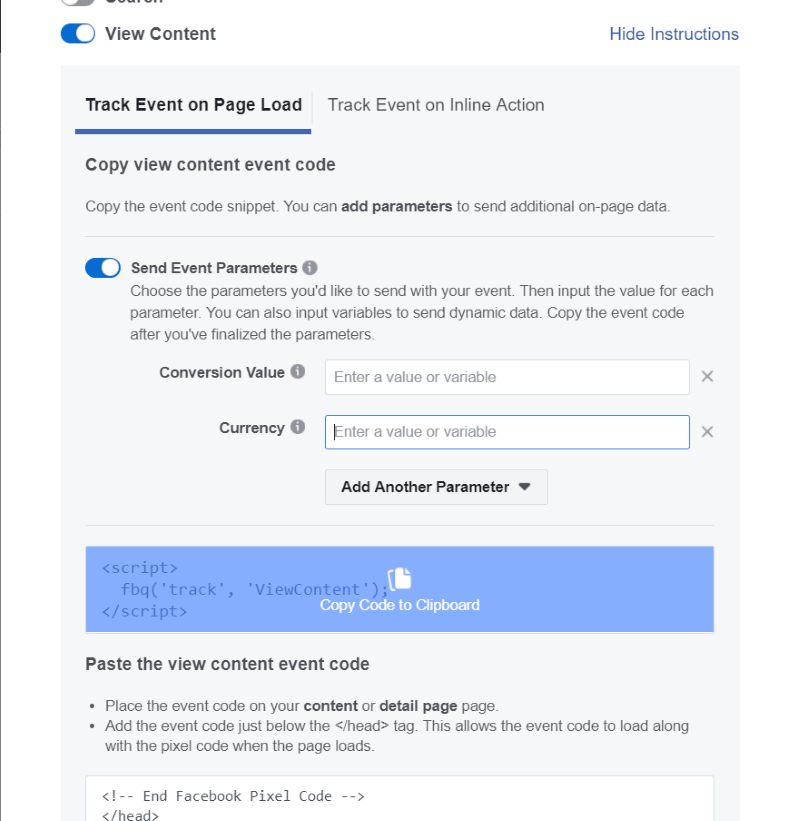
Add parameters if you wish. Select the code to copy it to your clipboard.
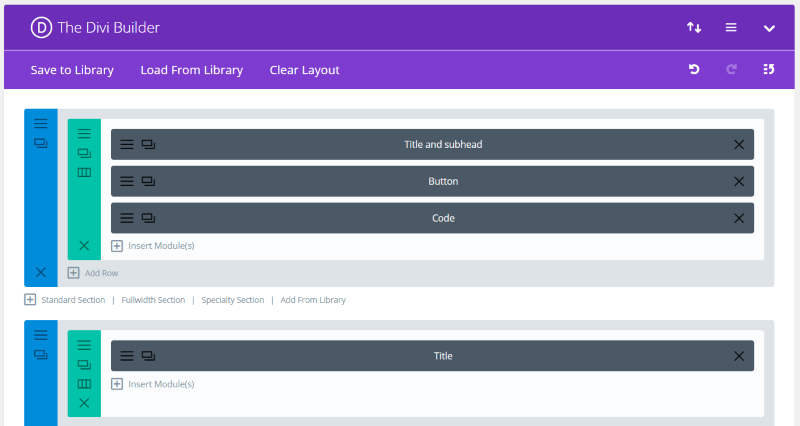
The code needs to be placed on a specific page. Place a code module within your Divi layout.
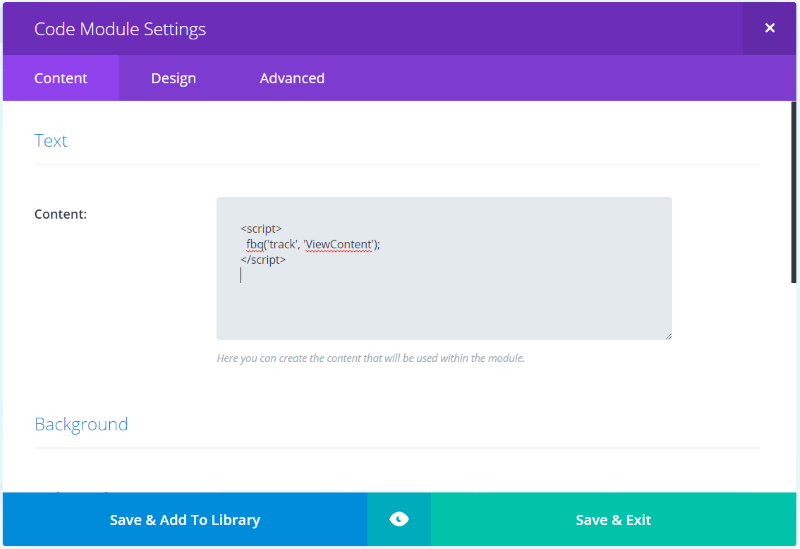
Paste the code into the code module. Add as many events as you want. Each event will be its own script. You can now track this page specifically.
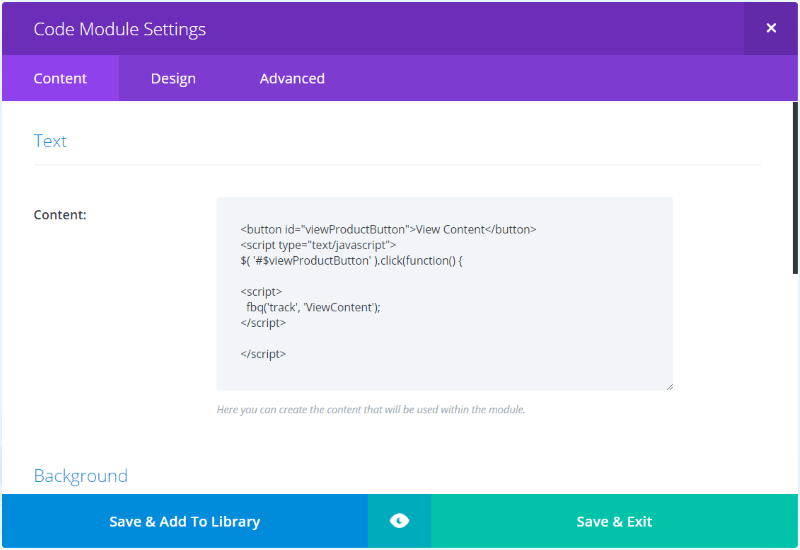
If you want to track a page events, such as a button click, you’ll select Track event as inline action when you create the code. It also provides the inline script that you’ll use with the code. This example creates an HTML button. Since this code is placed within a module you can perform a/b testing to help improve your call to actions.
For more information see the section Track In-Page Events in the documentation. Facebook also has a Pixel Code Reference for those who want to create custom events.
Add Facebook Pixel to Divi with PixelYourSite Pro
![]()
An even easier way to add Facebook pixel to your Divi site is with a plugin called PixelYourSite Pro. This plugin adds your Facebook pixel to your WordPress website without you having to handle code, editing scripts, or adding actions to events.
![]()
All you need is your Facebook pixel ID. You’ll find this on your Events Manager screen.
![]()
Paste your Pixel ID into PixelYourSite’s settings and click the button labeled Save Settings. That’s it. Done.
![]()
Events are enabled by default. This includes the general events for posts, pages, and taxonomies. It also includes custom post types such as buttons, links, video, AdSense, and search. Traffic sources are added to your events automatically as well as advanced matching.
Adding an Event with PixelYourSite Pro
![]()
Even though events are enable automatically, you can add your own events to any page from the dashboard. Simply name the event, choose between page load or key action, enter the URL of the page or pages you want it to apply to, and choose the event type from the drop down box, and enter your desired parameters for the event. You can enable or disable the event any time you want.
Verifying Your Installation
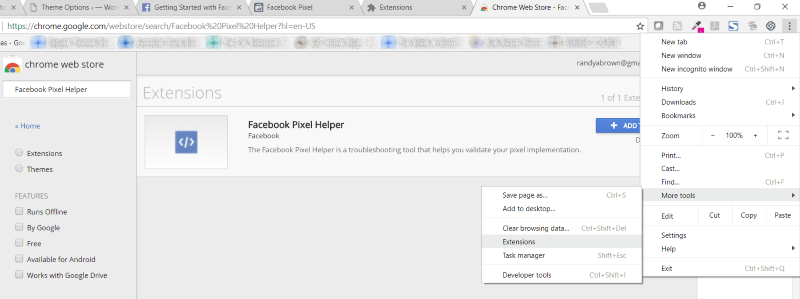
You can test your installation by using a Google Chrome extension called Facebook Pixel Helper. In Chrome, select the settings (the three dots in the upper right corner), hover over More tools, and click Extensions. Scroll to the bottom of the page and select Get more extensions. Search for Facebook Pixel Helper and click Add to Chrome.
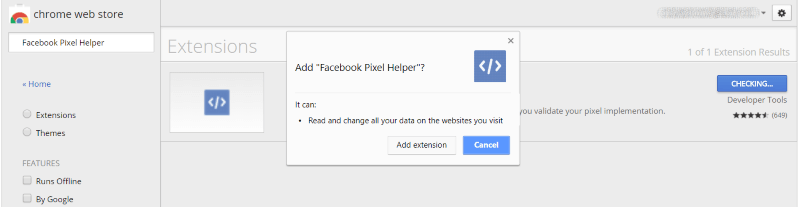
Click Add extension in the popup. Let it complete the installation and you’re ready to test.
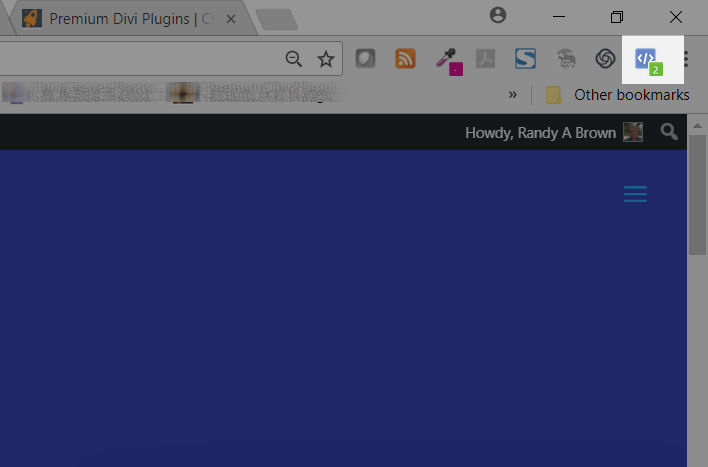
Go to your homepage or the page where you’ve added the custom code to test your installation (I recommend testing both). It shows a green number in the upper right corner if Facebook Pixel is installed correctly. This means Facebook is able to track visitors to your website. The number is the number of scripts it detects on that page.
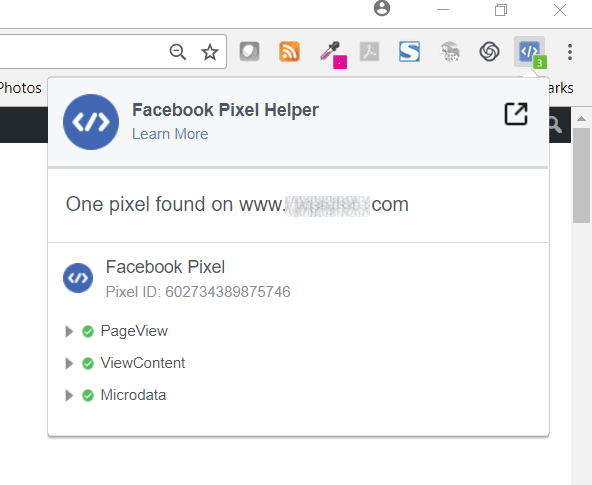
You can click on the green number if you want more information about your pixel. Here it’s showing me the pixel and the event script.
Using Your Facebook Pixel: Creating Your Audience
Once you’ve created your Facebook pixel you can create ads that target your audience. Facebook ads allow you to create custom audiences and target them with different ad campaigns. You could target those who looked at a certain page, added something to the shopping cart but didn’t complete the purchase, purchased one item but not a similar item, etc.
![]()
Go to the pixels Events Manager. Click Create Custom Audience.
![]()
You’ll see a modal where you can create the custom audience. If you have more than one pixel, select the pixel you want to use from the Facebook Pixel dropdown box. Another dropdown has all of your custom audience choices.
All website visitors is the default option. You can also choose people that have visitor specific pages or target them by the amount of time they’ve spent on your website. You can choose from your custom events. You can add more audiences by clicking Include More. You can also exclude specific audiences if you want.
Select the number of days to include (up to 180 days). Give the audience a name (something that identifies them) and give them a description. When you’re ready, click Create Audience.
![]()
Now you can create an ad that targets this specific audience using your Facebook pixel from your Divi website. You can also use this custom audience to find people that are similar to your current users. This audience will likely be interested in your products or services. To perform any of these actions click on the next step you want to take, or click Done if you’re finished. Your custom audience is now ready to use.
![]()
The Events Manager also includes reports where you can track your pixels and events. Click View Analytics to see more reports in greater detail.
Ending Thoughts
Facebook pixel is a powerful marketing tool, giving you the ability to retarget your visitors based on the actions they’ve taken on your website. These ‘hot’ leads could easily turn into conversions with the right persuasion. That Facebook ad might be all they need to become your next customer. Thanks to the theme options and code modules in Divi, it’s easy to add Facebook pixel to your Divi website. For an even easier method with more features, give PixelYourSite Pro a try.
We want to hear from you! Have you used Facebook pixel with Divi? Let us know about your experience in the comments below!d

What if I have a bilingual page and I need to have several pixels because I am using it as a funnel too. How do I add the pixel on an individual page?