Most hosts allow you to connect to your server with a File Manager, but this tool can only upload or download one file at a time. This is handy if you only need to handle a file or two, but it’s not a good option if you need to handle a lot of files. There are also times when you want to provide someone access to files but you don’t want to share your cPanel credentials. The best option is to connect to your server with FTP (File Transfer Protocol).
With FTP, you can upload or download many files at once. You can create FTP accounts and restrict access to certain directories, edit the account, or delete the account. It’s even possible to back up or restore your website with FTP. In this article, we’ll see how to set up FTP access to your site using cPanel.
Log In to cPanel
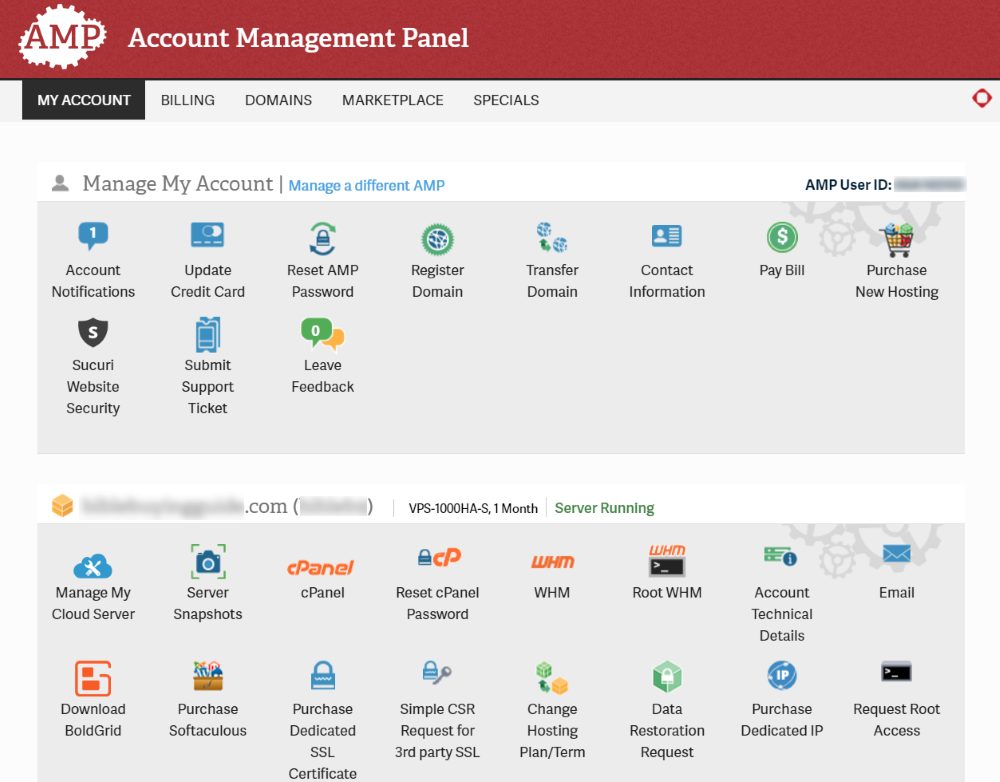
For my example, I’m using InMotion hosting, but the steps are the same for any host with cPanel. Your host may have an Account Management panel where you can manage every aspect of your hosting account. This panel has a link to the cPanel in the server section. Click the cPanel icon to log in.
Select FTP Accounts

In your cPanel, scroll to the Files section and click FTP Accounts. You can also search for this in the search bar of your cPanel.
Add FTP Account
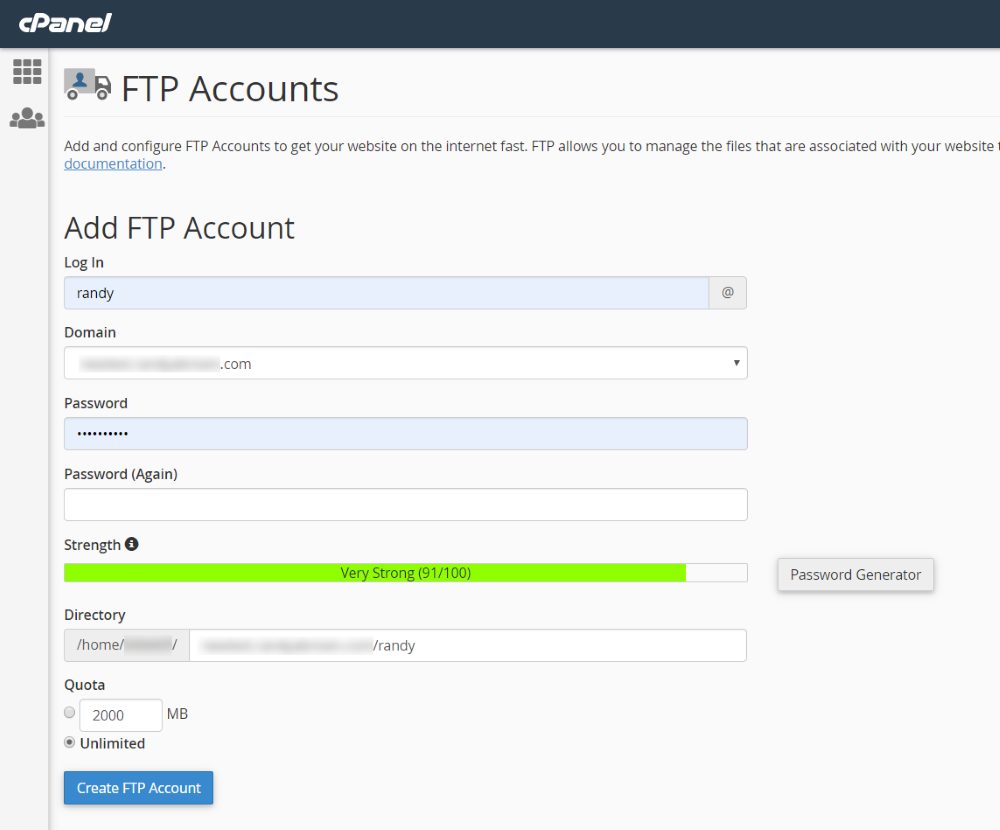
Enter the information for the FTP account. The username will be the name you enter plus @domain, like an email address. The name is added to the domain that you choose in the next field, which is the domain you’re creating the FTP account for.
For example, entering ‘username’ for the domain ‘example.com’ creates the FTP login name ‘[email protected]’.
The Directory specifies the exact directories this account has access to. You can limit it by entering a folder name or give full access by entering a backslash. This is helpful if you want to restrict access to a temporary developer or an employee.
For Quota, enter an amount if you want to limit the amount of space the account can use. Select Unlimited if you don’t want to limit the space for the account. This is useful if they’re uploading images or other large files.
Click Create FTP Account.
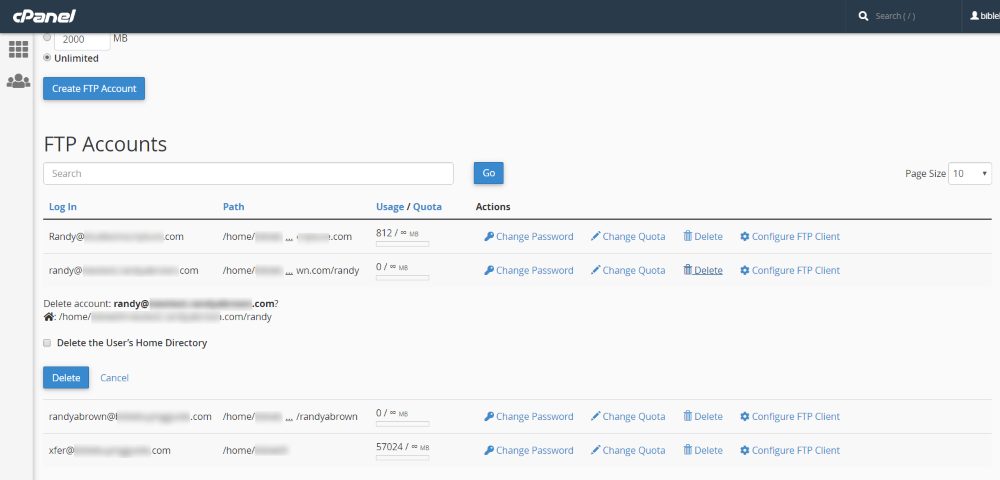
The account will be created and will appear in the FTP Accounts list. The account now has FTP access to the directory you specified. The location of this list might be different depending on your host. In my example, it appears at the bottom of the FTP Accounts page.
In the InMotion example, you can see the login, path, and usage / quota. You can also perform actions on the account such as changing the password, changing the quota, configuring the client, or deleting the account. For InMotion, clicking Configuring FTP Client provides a configuration file for the popular FTP apps or detailed instructions to configure it manually.
Configuring FTP Client
In order to access the FTP account, you’ll need to configure an FTP client. Configuring the FTP client will be different from one app to the next, but the basics are the same. Some hosts provide configuration files that you can then import into your FTP client. You can also configure them manually. I’ll show how to configure one of the most popular FTP client apps: FileZilla. You can import a configuration file or set it up manually. Let’s look at both methods.
Importing the Configuration File

Your host might provide an FTP Configuration File that you can download and then import it into your FTP client. This is an XML file that includes the host, username, and port information. You’ll only need to input your password. This host provides configuration files for FileZilla, CoreFTP, and Cyberduck. I’ve downloaded the FileZilla configuration file.
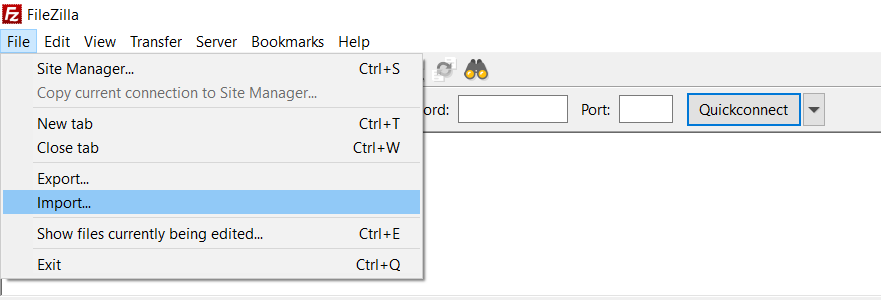
Open FileZilla. To import the file, go to File > Import and select your file.
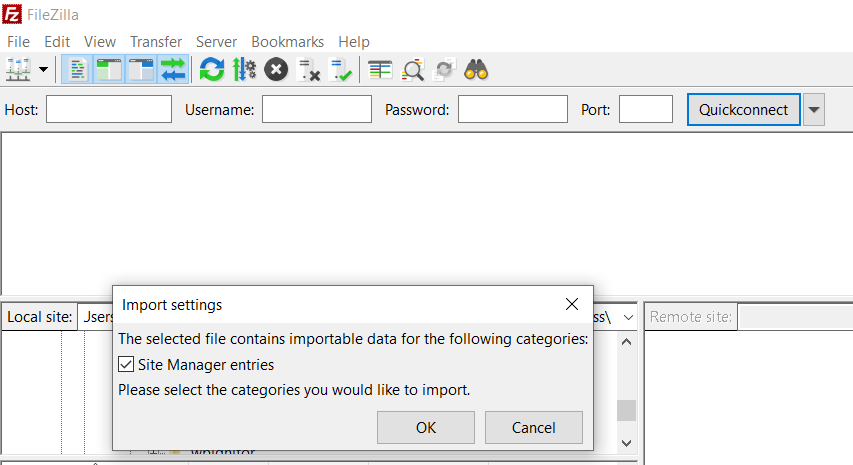
Choose the categories you’d like to import and select OK. In this case, I only have one option, Site Manager entries. This is the hostname, username, and port. Make sure it’s checked and click OK.
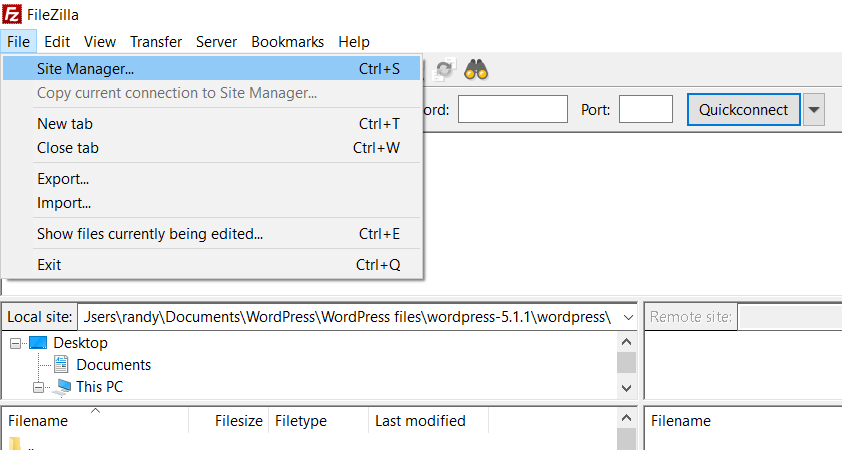
Go back to File and select Site Manager.
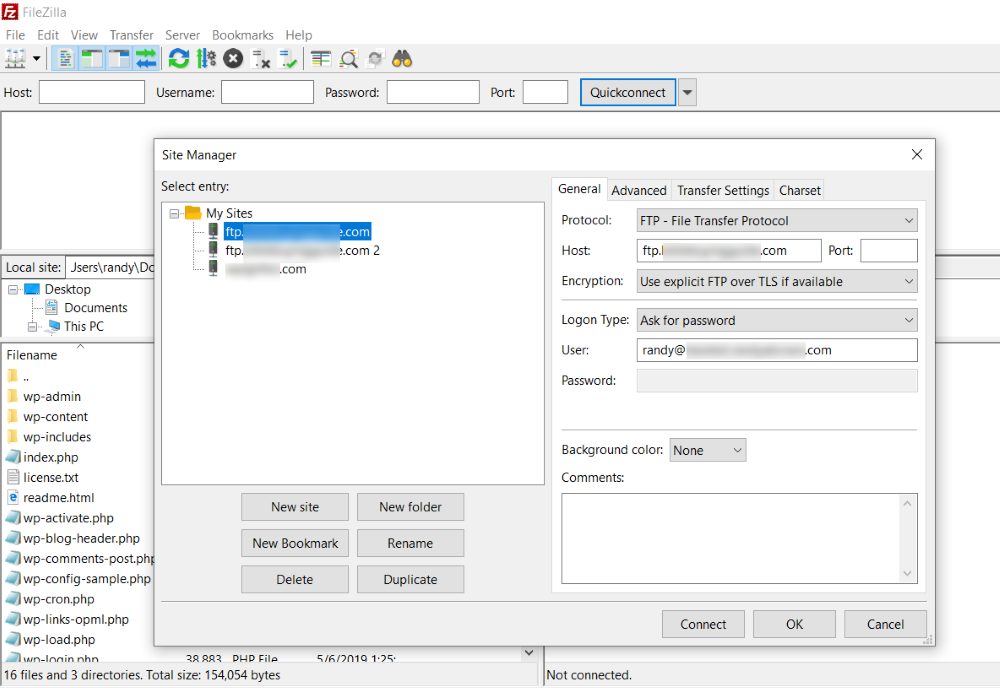
This will open the modal where you’ll be able to choose your website from the Select Entry list. The information is populated for you automatically. Click Connect.
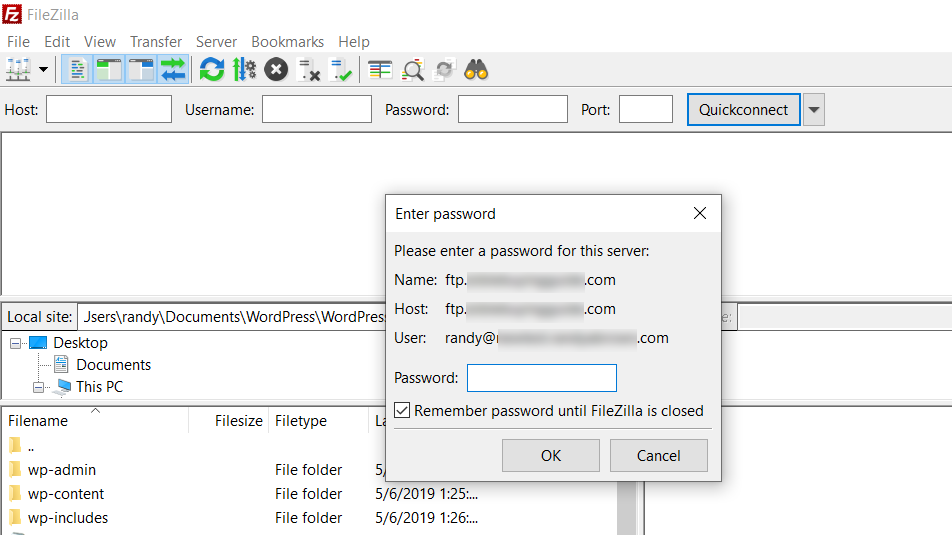
Enter the password for the FTP account and click OK.
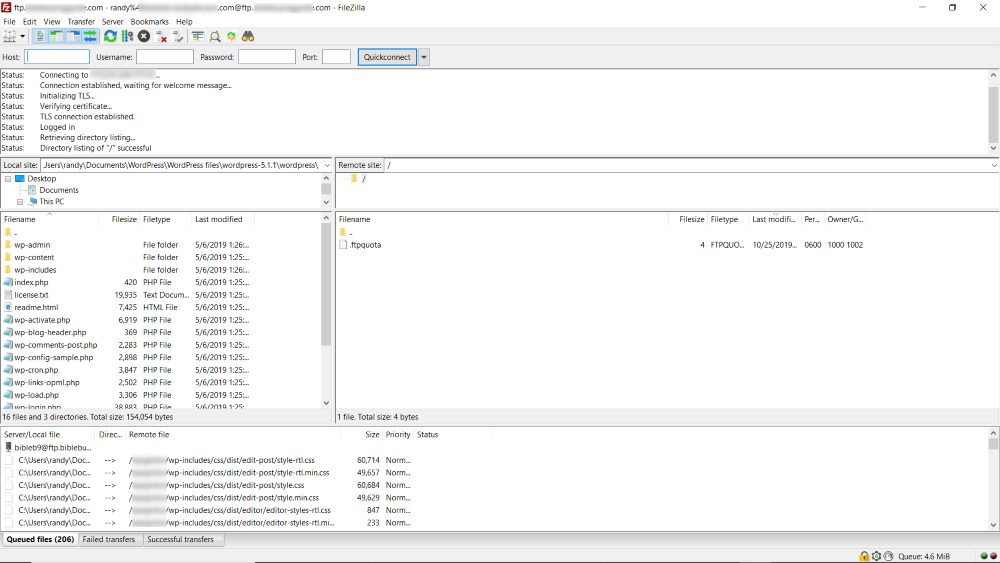
FileZilla is now connected to the website’s server via the FTP client and you have access to the files that were specified in the Directory settings.
Manual Settings

For manual setup, you’ll need to enter the settings yourself. You’ll find the information you need for the manual settings under the list of FTP Accounts. It includes the username, server, and port.
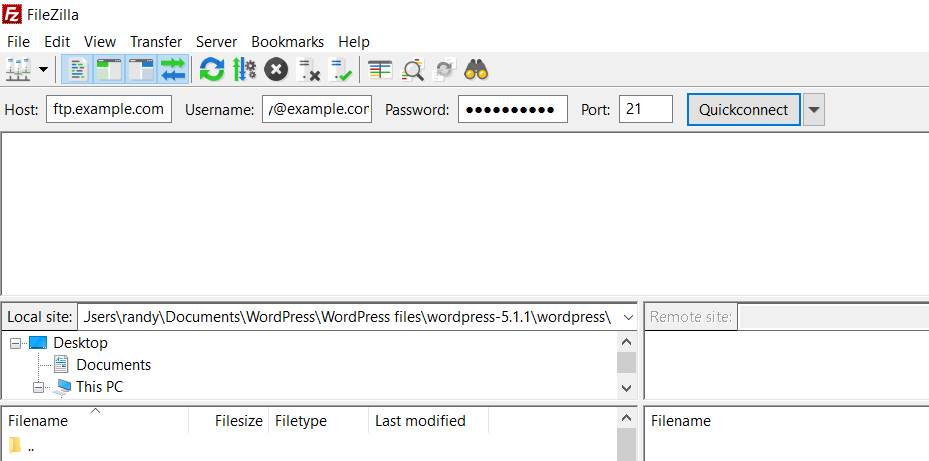
In FileZilla, enter the host, username, password, and port into the fields at the top of the screen. Click Quickconnect.
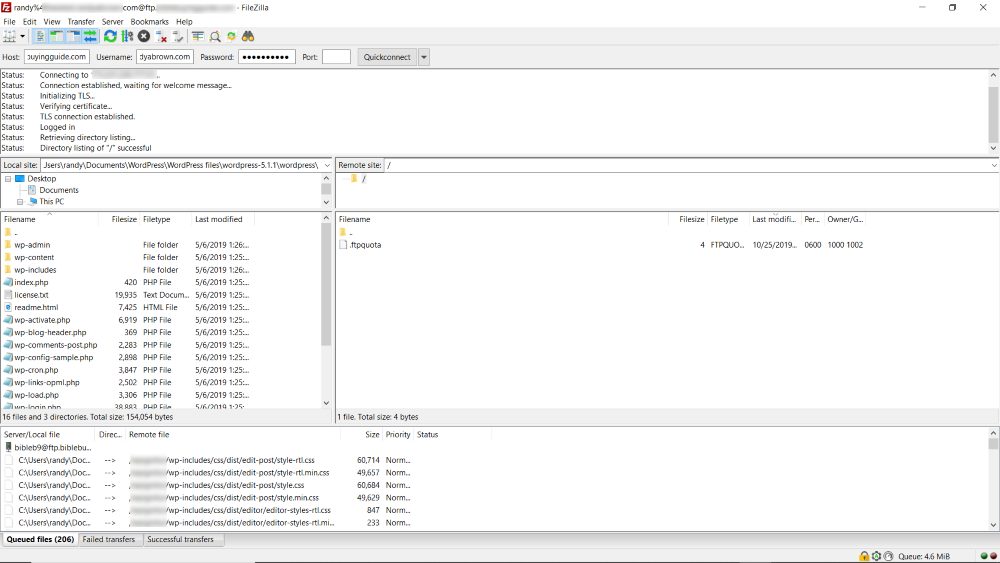
The user is now logged in to the FTP account on the server and can now access the files and folders you specified in the Directory settings when you set up the FTP account.
FTP Clients and Tools
There are lots of FTP clients and tools to choose from. Here are a few that can connect to your FTP connection. Which is your favorite?
The Divi and WordPress Hosting Group
If you are looking for information about choosing the right hosting for your website and configuring it for Divi and WordPress, be sure to join our Facebook group. This group is dedicated specifically to WordPress and Divi hosting.
Join the group here: The Divi and WordPress Hosting Group.
The Best Hosting Service for Divi and WordPress
With plenty of choices available for WordPress website hosting, it can sometimes be hard to sort through all of the noise and figure out which host is right for you.
Read our guide How To Choose The Best Hosting Service for Divi and WordPress
Ending Thoughts
That’s our quick look at how to set up FTP access to your site using cPanel. FTP is a great way to connect to your server and access your files and setting up the FTP account using cPanel is easy to do. FTP access is a great way to transfer a lot of files at once, back up or restore your website, or limit access to certain users.
Most hosts have cPanel and there are lots of FTP Clients to choose from. Even though hosts and apps may have different names for things and different settings, they all work about the same. The examples in this article should work for just about anyone.
We want to hear from you. Have you set up an FTP account in cPanel? Let us know about your experience in the comments.

Recent Comments