In this post I’ll cover the following topics, broken down into the following sections:
- The benefits of using Google Search Console,
- A detailed step-by-step guide of how to set up Google Search Console and verify your WordPress website,
- How to submit an XML Sitemap to Google through Search Console,
- How to link Google Search Console with Google Analytics, and
- A brief overview of the features on the Google Analytics dashboard.
WHAT IS GOOGLE SEARCH CONSOLE?
WHY YOU SHOULD USE GOOGLE SEARCH CONSOLE
Firstly, like Google Analytics, Google Search Console is free to use. Through Google Search Console, you’re able to learn a great deal of information about your site’s visitors, including how your visitors are finding your site, which pages they find most popular and their device usage.
On the surface, Google Search Console may appear to be seemingly similar to Google Analytics, however it offers a blend of powerful functions that allow you to make sure that your website is indexed correctly for search engines – a pretty vital aspect of website health in the day and age of search engine optimisation and high competition for Google’s highly sought after first-page rankings.
Through Search Console, you’re able to you’re able to submit a sitemap to Google, assess whether your website is being indexed correctly, fix errors and further optimise the visibility of your website, among other points of action to help you make sure your website is perforating optimally in the face of Google Search Results.
As content marketing and blogging is a formidable force within the modern-day digital marketing mix, ensuring that your content is being crawled correctly by the world’s leading search engine is really important. If you’ve taken the time to craft high-value and engaging web copy and content pieces for your user’s and have paid attention to healthy SEO practices within your efforts, potential improvements to your website’s functionality and indexability should not go unnoticed.
A STEP-BY-STEP GUIDE TO SETTING UP
AND INTEGRATING GOOGLE SEARCH CONSOLE
First, you’ll need to create a Google Search Console account using your Google Account. If you don’t have a Google Account you’ll need to create one. It is recommended to use the same mailing address for both Google Analytics and Search Console as it makes connecting accounts easier.
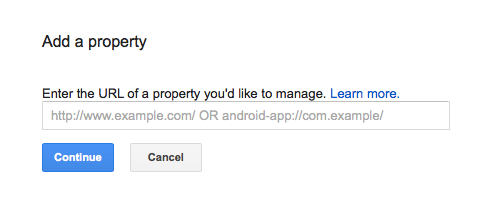
Once you’ve signed into Google Search Console, you’ll be requested to add a property. Google views a website as a physical piece of property and not an intangible element, so enter the web address of your website and click Add Property.
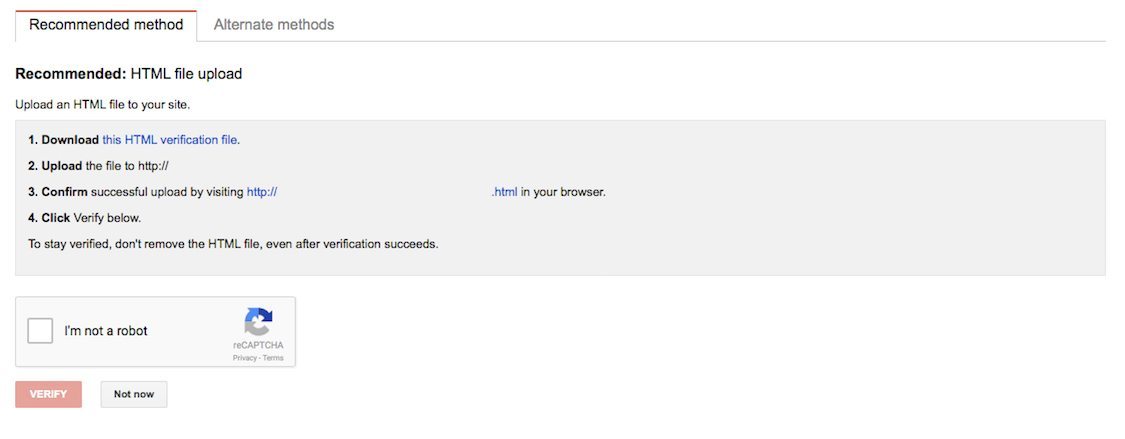
Next, you’ll be requested to verify site ownership. Here, you need to prove that you are in fact the owner of the website in question and are not, for example, a competitor looking to gain insights into the web working’s of another player in the marketplace. Navigate to Manage Property and select Verify this Property from the drop down menu.
You’ll be presented with a number of different verification methods (if the Recommended Method is confusing, click Alternate Methods for more options).
There are a number of methods to verify your website; including using Google Tag Manager or uploading an HTML file. Choose whichever feels most comfortable to you, and if you require a more in-depth walkthrough, visit Google Search Console Help.
Of the several methods offered for site verification, three of the easiest to maneuver have been detailed below.
1. VERIFY SITE OWNERSHIP USING THE HTML META TAG
In selecting this method, Search Console will present you with a meta tag that will need to be inserted into the <head> section of your website. For experienced web developers who are using a child theme, editing the .php files of your WordPress theme can be achieved by accessing Appearance > Editor, and locating the header.php file. Here, insert the meta tag before the closing </head> tag and Save Changes. Following this, return to Google Search Console and click Verify.
2. VERIFY SITE OWNERSHIP USING THE HTML META TAG & PLUGIN
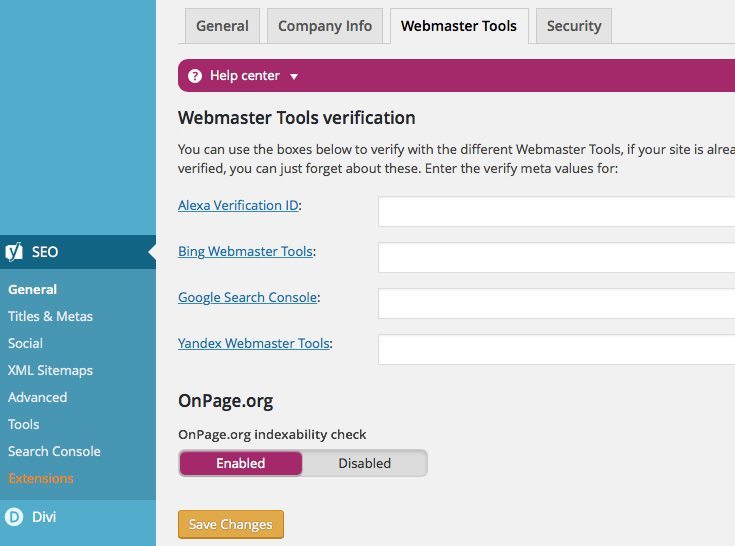
The HTML meta tag insert-method can also be used in conjunction with a plugin. Yoast SEO offers makes this process super easy, and also offers a wide range of additional features that both aid your SEO efforts and tie in well with the functionality of Google Search Console (such as submitting an XML sitemap – more on that later).
To install Yoast SEO, either visit the WordPress.org Plugins Directory, search for Yoast SEO, and download the latest version or navigate to Plugins > Add New on your WordPress dashboard and search for Yoast SEO.
Once installed you’ve installed the plugin, navigate to Yoast SEO > General and select the Webmaster Tools tab. Locate the Google Search Console option, enter the HTML meta tag in the text area and Save Changes. Return to Google Search Console and click Verify.
3. VERIFY SITE OWNERSHIP USING GOOGLE ANALYTICS
If your website already uses Google Analytics to monitor its traffic, this may be the easiest method for you to verify ownership. For this, you’ll need to make sure that your Google Analytics tracking code (asynchronous code) is resting in the <head> section of your website and not the <body> section.
(Note: Although the Divi Theme Options Integration page states that the <body> tag is best for inserting the Google Analytics tracking code, either text area (<head> or <body>) will suffice and will track data correctly due to the nature of Divi’s configuration).
HOW TO GENERATE AND SUBMIT AN XML SITEMAP
A sitemap is simply a file which lists all of the pages within your website and indicates the structure and organization of your web content types to search engines. Submitting an XML Sitemap to Search Console will assist Google’s web crawlers during a search and have a positive effect on your search rankings. As generating and submitting a sitemap to Search Console is quick and easy, it’s definitely worth doing so don’t miss out on this step.
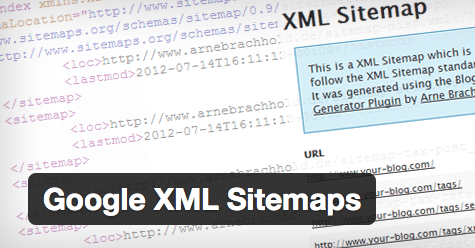
The easiest way to submit an XML Sitemap is through the use of a plugin. Two of the most popular XML Sitemap generators are Yoast SEO and Google XML Sitemaps.
Once installed, navigate through the respective plugin and generate the XML SiteMap.
Return to your Google Search Console panel, select Crawl > Sitemaps and click ADD/TEST SITEMAPS. Enter the details of the Sitemap within the relevant text box and click Submit, and then Refresh. You will need to repeat the process (Submit and Refresh) until all of the sitemaps associated with your site have been logged. Once complete, allow up to 24 hours for your sitemaps to reflect.
LINKING YOUR GOOGLE SEARCH CONSOLE WITH GOOGLE ANALYTICS
To link your accounts, simply navigate to the gear icon in the upper right-hand corner of the Google Search Console dashboard. From the drop-down menu, select ‘Google Analytics Property’, and select the correlating Google Analytics account from the list. All done!
EXPLORING YOUR GOOGLE SEARCH CONSOLE DASHBOARD
When you arrive at the Search Console Home page, you’re met with a list of your properties (websites). Click on the name of your website to access your data and statistics.
NOTE: If you get stuck, have a read through of the vast array of Google’s support documentation and video content.
A BRIEF SUMMARY OF THE GOOGLE SEARCH CONSOLE FEATURES
Dashboard: Your Dashboard merely highlights key data of your site’s functions including; Crawl Errors, Search Analytics and Sitemaps (if submitted)
Messages: Over time, you will receive mail notifications regarding your properties (websites). When you first set up a property, you’ll receive a message offering suggestions of ways in which you can improve the visibility of your website. In the event that there is unusual activity on your site (such as hacking or problems experienced with indexability or search) Google will notify you and steer you in the right direction towards rectifying them.
Search Appearance: Here, you are able to view how your website appears in search results. The information button opens a popup window that explains each element if ever you get confused or forget. The Structured Data tool depicts markup errors with specific URLs and suggests improvements. All errors relating to meta descriptions, titles, and duplicate content will be reflected in the HTML Improvements tool. The Sitelinks tool allows you to remove any automatically generated links that appear underneath your website’s search result if desired. To remove a Sitelink, simply enter its URL and click Demote.
Search Traffic: Through the Search Traffic tools, you’ll be able to figure out interesting aspects of your website’s visitors. Search Analytics (previously known as Search Queries) offers insight into the scores of traffic generated from Organic Search results. Reviewing Links to Your Site (external links; including linking domains and most-linked pages), and Internal Links (incoming links from other internal pages) can aid in increasing your site’s overall relevance and help a page rank higher in searches. The Manual Actions report will alert you to any site errors and possible penalties (for example, spam or unnatural links) on your site. Finally, the Mobile Usability will assess your website’s level of responsiveness across devices and offer suggestions for improvements.
Google Index: Within Google Index, the Index Status report displays the number of pages that are indexed and can be crawled by Google bots, Blocked Resources are pages that are not crawled as they are blocked by a robots.txt file, and Remove URLs allows you to remove certain URLs from already indexed pages. Finally, the Content Keywords report highlights the most important and frequently used keywords on your website.
Crawl: Its imperative that your website is structured correctly as to allow Google’s robots to crawl or scan your website through its links. As mentioned above, submitting an XML Sitemap to Google Search Console will assist the robots in their crawling journey. Crawl Stats reports the number of pages that have been crawled in the last 90 days, as well as the download time and download size. Any problems associated with the crawling process will be alerted in the Crawl Errors report. Here, you’re able to mark crawl errors as fixed once they’re rectified. The Robots.txt Tester tool is used to test new robots.txt markup and check for errors with all of the Google-crawlers (including Googlebot, News, Images, Video, Mobile, Mediapartners and Adbot).


Very efficiently written article.
Thank You Lisa!
I think this is the best guide I have seen so far. Thanks for posting this information. It has really helped me.
Wow! your article is so nice, thanks for sharing this wonderful information step-by-step process for us. I have got a lot of information on this article, really it will help me a lot. keep on updating for latest trend topics on digital marketing.
I have been having problems with google web console but this post has really opened my eyes, thanks for the information
Furthermore, you can view the Search Console performance reports on your WordPress dashboard using a plugin as Search Engine Insights (https://wordpress.org/plugins/search-engine-insights/).
I think this is the best guide I have seen so far. Thanks for posting this information. It has really helped me.
I am suddenly getting many google search console mobile usability issues with my sites that are using Divi theme. Specifically, these three issues are showing up across all the Divi sites I have with clients…
Text too small to read – /wp-content/themes/Divi/core/admin/fonts/
Text too small to read – /wp-content/themes/Divi/core/
Clickable elements too close together – /wp-content/themes/Divi/core/admin/fonts/
Clickable elements too close together – /wp-content/themes/Divi/core/
Viewport not set – /wp-content/themes/Divi/core/admin/fonts/
Viewport not set – /wp-content/themes/Divi/core/
What is going on with this?
its my first time with wordpress. How can I verify both my www. and non-www domains?
Hello, you will need to add a “Property” for both versions of the site
Google search console for my wordpress website is a good pillar for the website existence thank to the following components which are: verifying my wordpress website, recognizing more and more users were harnessing the internet, learning a great deal of information about site’s visitors ,
creating a google search console account.
In addition all these important devices give the importance of Google search console for my wordpress how viable for my wordpress website.
Thank you!