Browser Developer Tools
How to use your browser’s developer tools
In this part, we’ll be showing you how simple CSS changes can be tested and reviewed using the extremely handy developer tools built into all modern-day web browsers.
Testing Simple CSS Updates with Developer Tools
Now, we’ll take a behind-the-scenes look at the Divi theme to see how CSS can be used to change the look of certain elements.
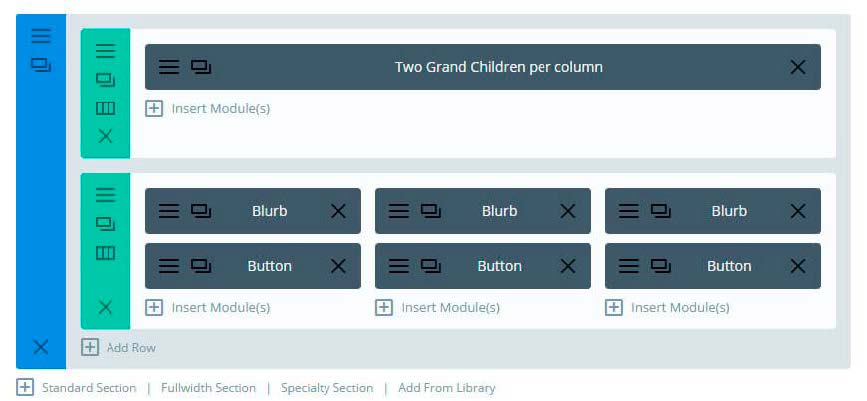
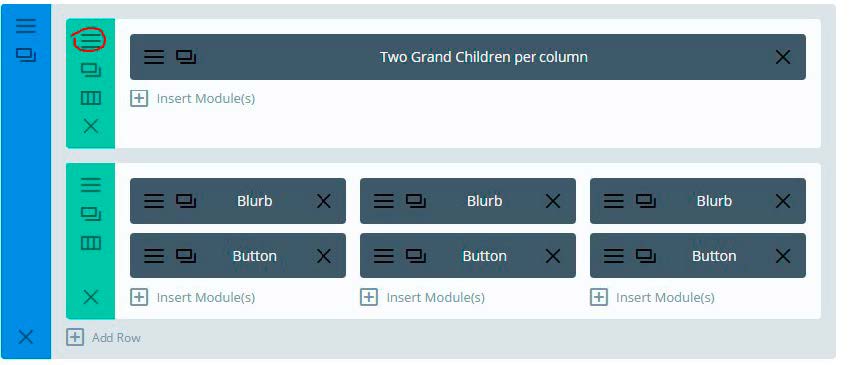
For this demonstration, we’ve created a standard section comprised of two rows: a single column with a text module followed by three columns of blurbs and buttons.
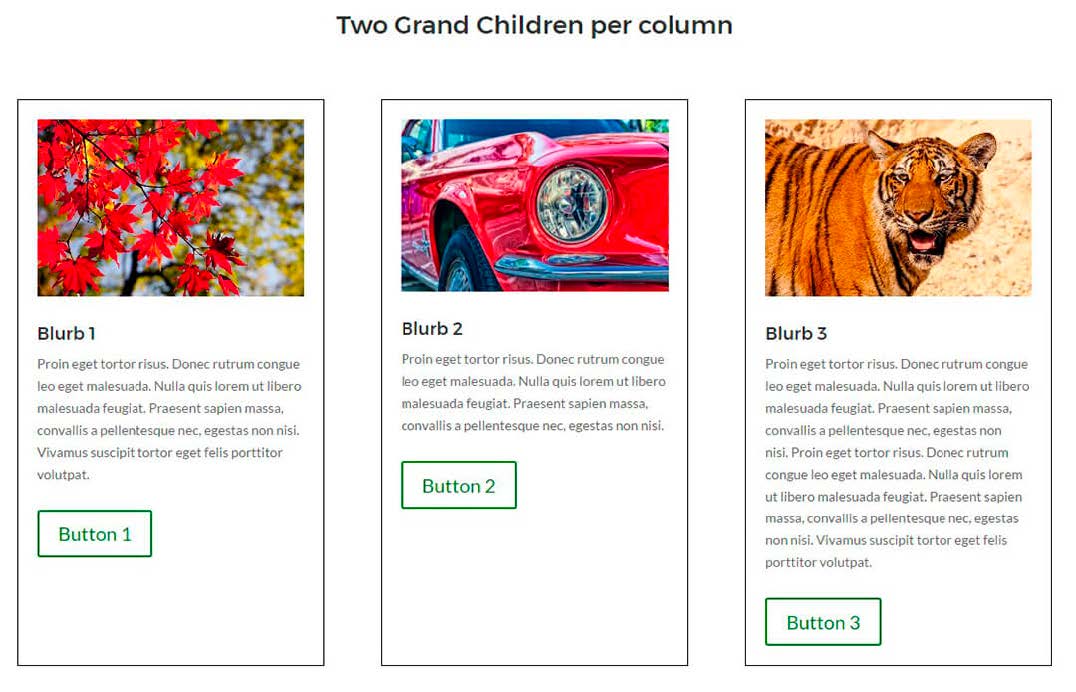
After adding a number of headings, some dummy text and a few images, the front-end of the section looks like this:
Now, we’re going to assess these front-end elements a bit deeper to figure out the HTML make up.
For this, we’ll be using the web browser’s built-in developer tool. With most modern browsers, you should be able to right-click on a certain web element and select “Inspect” or “Inspect Element” or similar.
- If you are using Google Chrome, navigate to File > View> Developer > Developer Tools.
- If you are using Safari you will need to activate the Develop Menu by selecting the checkbox in Safari’s Advanced preferences, then navigate to Develop > Show Web Inspector.
- If you are using Mozilla Firefox navigate to Tools > Web Developer and select Inspector from the list.
By default, this should appear at the bottom of the page and look something like this.
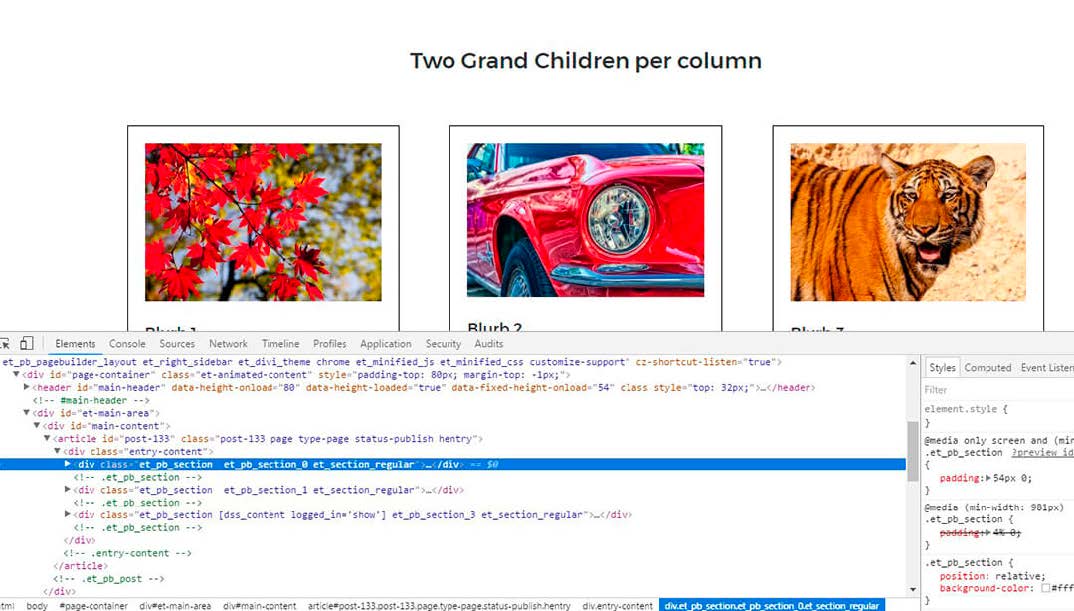
While inspecting the web page or a certain element therein, the website/host compiles all of the information together and presents the page as HTML. The main window displays all of the HTML, while the right-hand side window shows the CSS applied to the specific element currently selected.
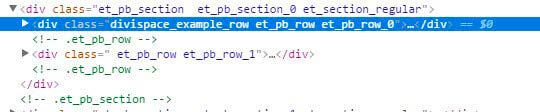
This entire Section created with the Divi Builder in the back end…

… is represented in a single highlighted section as:

Arrows are used to show and hide groups of elements. Clicking on the arrow on the left-hand side will expand to show two green rows. You can see them clearly labeled with CSS Class names.
i.e < div class=“ et_pb_row “et_pb_row_0 ” >
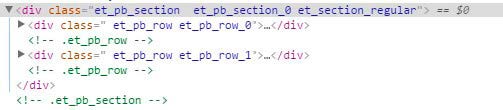
This means that the HTML element, a div, has been assigned the classes of “et_pb_row” and “et_pb_row_0”. Following this element, a second element has been assigned the classes of “et_pb_row” and “et_pb_row_1”.
Now, we can use CSS either to target both rows using the class name of “et_pb_row” or we can target either one of the elements by using the second class name of either “et_pb_row_0” or “et_pb_row_1”.
Targeting Elements with CSS
If you only want your changes to apply to the rows on this page and not the rows on the rest of your site you will need to be more specific. One way to do this would be to assign your own CSS class name to the row that you want to target with CSS.
To do so, return to the back end of the page, select the Row in question and click on the hamburger menu on the top left-hand side of the green row.
Once selected, click the Advanced tab and enter a unique CSS Class name.

Save the changes to the module and page, click Preview and assess the front end. Nothing should change in the page itself. Instead, return to the Inspect Element console and view the same element as before.
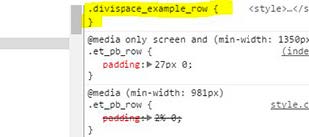
Now you will see an additional Class name divispace_example_row has been added to the first row.
Navigate to the right-hand side Inspect Element window and you’ll be able to see the new CSS Class name (highlighted here in yellow).
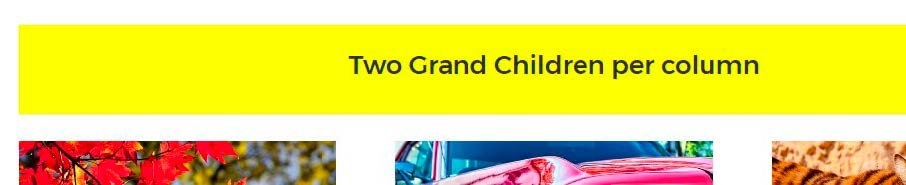
Before going straight to the stylesheet, you can test your CSS changes right in the Inspect Element console to see what effect it will have on your page. Now, let’s change the background color to yellow.
To do so, use the CSS section of the Inspect Element tool on the right-hand side, click between the open and close curly brackets “{ }” in the CSS section, type the following code and then hit enter.
background-color:yellow;
Instantly you’ll see your original web page transform from this:

… to this.
If you are happy with the change you’ve made to the element, you can copy the entire section of syntax:
divispace_example_row { background-color: yellow; }
And paste it into either the style.css file of your Divi website’s child theme or into the Custom CSS box in the Divi Theme Options console. Read Part Three of this guide for a refresher on the various ways you can Add CSS to Divi.
If you wanted to add the same style change to another row or module element in your website, you would need to add the same unique class name to the next element.
Using the browser’s developer tools to inspect the HTML elements is a great way to test different CSS properties and play around with different styling until you create an effect that suits your style.
These changes are temporary, and as soon as the page is refreshed, the changes will disappear. Nevertheless, becoming familiar with the browser’s Developer Tools is a great way to explore how a website is constructed and how it can be enhanced aesthetically.
As well as experimenting with the CSS on a page of your website by adding, removing or changing a setting, you can also use this handy tool to inspect other website’s elements. Rest assured no one else in the world will see it.
Breaking Down CSS Commands
In the example above, we changed an element’s background color. The CSS is broken down into two parts: the property, in this case “background-color” and the value, “yellow”.
This is but one of the myriad of CSS commands available to web designers to use. For an extensive list of the properties, visit W3 Schools.
CSS is constantly under development, seeing new additions being made all the time. If you’re starting out with CSS, we recommend playing around by testing the effect of various properties and values applied to the Divi Builder modules, and using your browser’s developer tools to assess changes.
We highly recommend playing around on a development or testing site. To set up a development site to play around in, we recommend setting up a local, offline site using Desktop Server.